Set up a sample application
Getting Started with Adaptive Access for Native Applications
Introduction
This guide will walk through how to make use of Adaptive Access in a native NodeJS application using the Adaptive Browser SDK and Adaptive Proxy SDK packages.
The Adaptive Browser SDK is used to serve up client-side JavaScript which enables data collection in the browser. The Adaptive Proxy SDK provides classes which manage authentication transactions that are dependent on policies that include Adaptive Access risk determinations.
For a deeper understanding on the different entities involved in Adaptive Access, see Adaptive SDK.
Pre-requisites
You must already have a custom application definition created for your application and on-boarded for Adaptive Sign-On. See On-board your application.
You must have NodeJS installed on the machine where you will create and run the sample application described in this guide. NodeJS is available for many platforms including Windows, MacOS, and Linux. Download and install NodeJS here.
Set up your environment
You will now set up your development environment by creating a new Node project and installing some initial dependencies.
Create a new Node project
In an empty directory, create a new Node project using the following bash command:
npm init -y
This will create a package.json file, which will keep track of all your project's dependencies, making your development process easier.
Install dependencies
The following dependencies are required for this sample application:
Use npm to install these dependencies:
npm install adaptive-browser-sdk adaptive-proxy-sdk express body-parser express-session
Create an index.js file
The index.js file will be the starting point of your project. This is the script that will run first when you run your project.
touch index.js
Setup your Express server
Edit the index.js file with a text editor or IDE. Import dependencies and set up your Express server by adding the following code to your index.js file.
const express = require('express');
const app = express();

// Add JSON middleware, since we'll be handling JSON requests
app.use(express.json());

// add session awareness
const session = require('express-session')
app.use(session({
  secret: 'keyboard cat',
  resave: false,
  saveUninitialized: true,
}));

// Define a static route into the Adaptive Browser SDK npm module
// so that the client-side code can be loaded at /static/adaptive-v1.js
app.use('/static/adaptive-v1.js', express.static(__dirname
         + '/node_modules/adaptive-browser-sdk/dist/adaptive-v1.min.js'));
Adding a Login Page
After an application is on-boarded , a web snippet is provisioned. This snippet loads the Adaptive Browser SDK using the static link you added to your NodeJS application in the previous section. You will now create a login page for the sample application and embed the web snippet.
Create a login.html file
Create login.html file in your root project directory. This page will prompt the user for their login credentials while performing collection.
touch login.html
Embed web snippet in the login page
The login.html page must include the web snippet created for the application in the <head> of the page to load and initialize the Browser SDK. The Browser SDK will then perform the client-side data collection that is required by Adaptive Access.
Add the following code to the login.html page:
<html>

<head>
  <!--
    Paste the script snippet that was provided when you
    on-boarded your application.
  -->

</head>

<body>
  <h1>Login</h1>
  <form name='login' action='/login' method='POST'>

    <label for='username'>Username:</label><br>
    <input type='text' id='username' name='username'><br>

    <label for='password'>Password:</label><br>
    <input type='password' id='password' name='password'><br>

    <input type='submit' value='Submit'>
  </form>
</body>

</html>
Paste the web snippet provided during on-boarding into the login.html page - replacing the <!-- ... --> block that shows where to put it.
Only invoke the browser SDK on login and re-collection pages
The Browser SDK should not be invoked on pages which are not the login page or re-collection page. Running collection on other pages may cause unexpected behavior.
Ensuring collection completes
With the web snippet in place, the Browser SDK will start running in the background as soon as the login page is loaded. This lets it run while the user enters their login details.
Its important that once the user enters the login details, the form submission is augmented. There are two reasons for this:
- It is necessary to capture the
sessionIDgenerated by the Browser SDK. ThissessionIDis used in the API calls to IBM Verify to correlate them with the data gathered in the browser. - To ensure that the Browser SDK completes execution before the user leaves the page.
The Browser SDK provides a function, getSessionId(), which returns a promise. The resolution of this promise will include the session ID. This method should be invoked, and the returned promise should be chained into the form submission, so that the following sequence is enforced:
- User submits form
- Browser SDK resolves the Session ID promise
- Login form is augmented to include session ID
- Form submits
Therefore, in your login page, you should augment the submission of the form with the following change:
window.addEventListener('load', function (e) {
  var form = document.getElementsByName('login')[0];
  form.addEventListener('submit', function (event) {
    event.preventDefault();
    getSessionId().then(sessionID => {
      const sessionIDField = document.createElement('input');
      sessionIDField.type = 'hidden';
      sessionIDField.name = 'sessionId';
      sessionIDField.value = sessionID;
      form.appendChild(sessionIDField);
      form.submit();
    });
  });
});
Your login page should now look like this:
<html>

<head>
  <script src="/static/adaptive-v1.js"></script>
  <script>startAdaptiveV1("xxxxxx.cloudfront.net", 123456);</script>

  <script>
    window.addEventListener('load', function (e) {
      var form = document.getElementsByName('login')[0];
      form.addEventListener('submit', function (event) {
        event.preventDefault();
        getSessionId().then(sessionID => {
          const sessionIDField = document.createElement('input');
          sessionIDField.type = 'hidden';
          sessionIDField.name = 'sessionId';
          sessionIDField.value = sessionID;
          form.appendChild(sessionIDField);
          form.submit();
        });
      });
    });
  </script>

</head>

<body>
  <h1>Login</h1>
  <form name='login' action='/login' method='POST'>

    <label for='username'>Username:</label><br>
    <input type='text' id='username' name='username'><br>

    <label for='password'>Password:</label><br>
    <input type='password' id='password' name='password'><br>

    <input type='submit' value='Submit'>
  </form>
</body>

</html>
Alternatively the augmentation can be included as part of a promise chain, if validation and submission is already being handled in JavaScript. For example:
function formSubmit() {
  validateFormFields().then(formData => {
    return getSessionId().then(sessionID => {
      formData['sessionId'] = sessionID;
      return formData;
    })
  }).then(formData => postForm(formData));
}
For API documentation for the Browser SDK, view the GitHub README.
Serving the login page
To expose your new login.html page, you need to add it as a resource to the NodeJS application. To make life easier, you will also add a root page which re-directs to this login page if the session is not authenticated.
Add the following to the index.js file created above:
// Create a home page that redirects to /login if authentication not complete.
// Returns session token object if authenticated.
app.get('/', (req, res) => {
  if (!req.session.token) {
    res.redirect('/login');
  } else {
    res.send(req.session.token);
  }
});

// Expose the '/login.html' file for GET /login.
app.get('/login', (_, res) => {
  res.sendFile(__dirname + '/login.html');
});

// Start the server on port 3000.
const port = 3000;
app.listen(port, console.log(`Listening on port ${port}...`));
Domain matters
In order for the collection process to work properly, the server must be accessed using an allowed domain specified during application on-boarding.
If you're not yet ready to run the application on your public server, a temporary workaround is to add
127.0.0.1 www.<YOUR.ALLOWED.DOMAIN>to the /etc/hosts file on your local development machine.
Start your application. You can do this using this command:
node index.js
With the server running, navigate to the application in a browser:
http://www.<YOUR.ALLOWED.DOMAIN>:3000/
If all is well, you should see the following upon loading your login page (in this case with developer tools showing the JavaScript console):
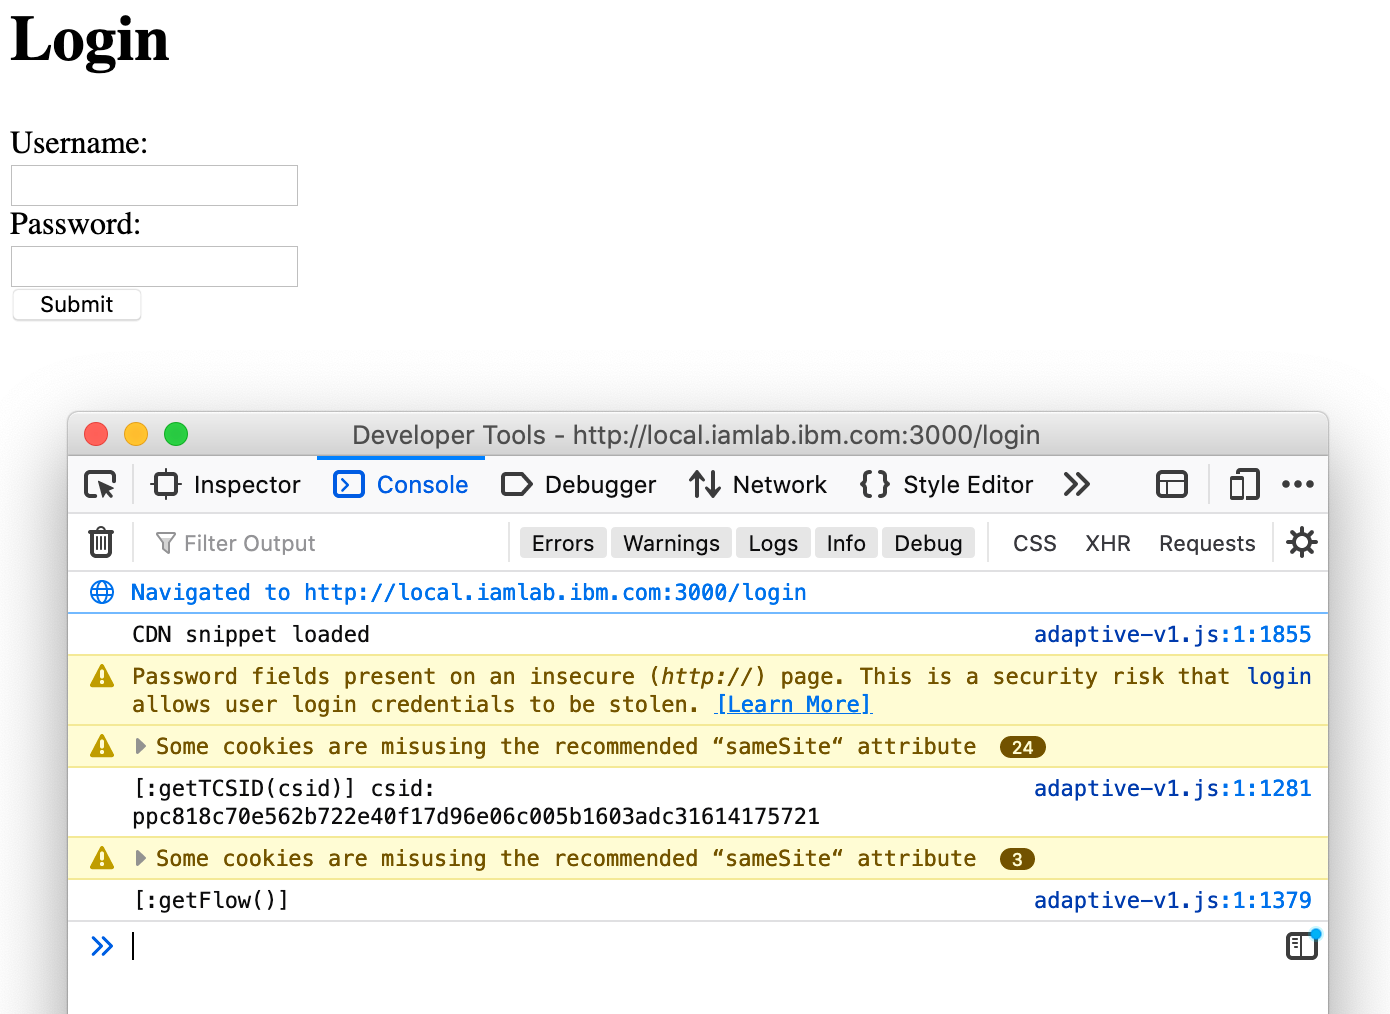
Adaptive Browser SDK collection console
The browser window shows that the login page was successfully displayed. The console trace shows that the Adaptive Browser SDK was successfully called and the service returned a session ID.
This application logic to handle the submitted login page will be added later.
Stop the application by pressing Ctrl-C in the terminal where your Node process is running.
Hosting a Well-Known Static Resource
As part of adding the Browser SDK, a static resource must also be added to the application. It's recommended that a 1x1 pixel transparent PNG be used.
This static resource must be available at the path /icons/blank.gif and conform to the following requirements:
- There must be no automatic redirect from this URL to another web page.
- You must add a full exception to any content security policy (CSP).
- The image size can be up to 500 bytes.
- The image type must be
image/gif,image/png,image/jpeg, orimage/jpg. - The static resource should include a content type header, for example,
Content-Type:image/pngto avoid prompting the user to download the resource.
The Browser SDK includes a static resource which can be exposed, in a similar way to how the Browser SDK itself is exposed.
Add the following code to the end of your index.js file:
// Define a static route into the Adaptive Browser SDK npm module
// so that the blank gif is available at /icons/blank.gif
app.use('/icons/blank.gif', express.static(__dirname
                 + '/node_modules/adaptive-browser-sdk/blank.gif'));
Add the proxy SDK to the application
The Proxy SDK makes it easy for an application server to make use of the /token API in native flows.
It is loosely coupled to the Browser SDK, and does not impose any specific deployment requirements on the application. This lets the developer control how the login form interacts with the backend application.
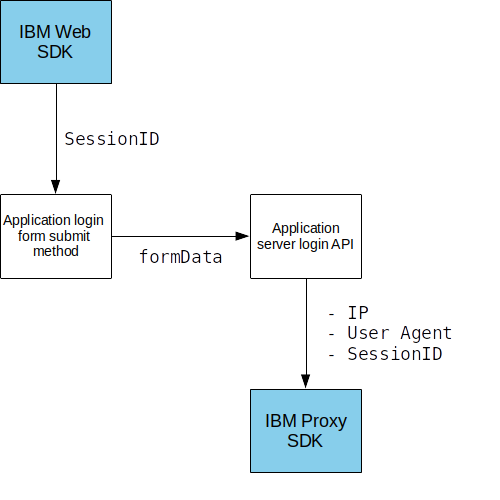
Browser and proxy SDKs interacting
Initialize the SDK
In order to use the Proxy SDK it must be required and then initialized. Initialization requires three inputs:
- tenantUrl - The URL of your IBM Verify tenant.
- clientId - The client ID of your custom application.
- clientSecret - The client secret of your custom application.
For steps on getting the clientId and clientSecret see On-boarding a native application.
Application credentials
The
client_idandclient_secretbeing used by the adaptive SDK are application credentials, not API client credentials.
Add these lines to the end of your index.js file (replacing the values for those for you tenant and application):
// Initialize Adaptive Proxy SDK
const Adaptive = require('adaptive-proxy-sdk');
const adaptiveConfig = {
  tenantUrl: 'https://cloudidlab.ice.ibmcloud.com', // Your Verify tenant URL
  clientId: '6d7393c8-53c3-4d0b-844b-886e28cb9af5', // Your Verify client ID
  clientSecret: '2coMYUTIzg', // Your Verify client secret.
};
const adaptive = new Adaptive(adaptiveConfig);
Protect your secrets
In production usage the
clientSecretwould usually be retrieved from a secure store managed by the application's deployment.
Now with the SDK initialized, we can authenticate a user.
Using the Proxy SDK to Authenticate a User
The Proxy SDK creates and manages an authentication "transaction" which includes initial (first-factor) authentication and optional multi-factor authentication(MFA), managing state across requests.
SDK Inputs
There are three things which the Application Server must provide when calling Adaptive Proxy SDK functions:
- Session ID - This is received in the POST data from the login page.
- IP Address - Either retrieved directly from the request, or consumed from a header provided by the endpoint which received the request (i.e.
X-forwarded-for). - User-Agent - a standard header included in HTTP requests (i.e.
User-Agent).
These values are passed into the Proxy SDK as context. This context is included in the API call to /token.
SDK Response
When integrating with the Proxy SDK, there are three types of responses which may need to be handled:
- Allow - Authentication complete. Identity and Access Tokens are included with this response.
- Deny - User is denied access. No further action is possible.
- Require - Additional authentication required. Information on allowed methods provided.
The SDK functions can also throw errors. This may happen when, for example, the supplied username and password are incorrect.
Build login workflow
These three responses allow for building a workflow such as:
- User initiates login
- First-factor assessment performed
- User may be denied access at this time.
- e.g. Access being attempted from a banned country
- User may be required to use specific first-factor methods
- User may be denied access at this time.
- User prompted for appropriate first-factor login
- User performs login successfully
- Adaptive risk assessment performed
- User may be allowed to access immediately due to low evaluated risk score
- User may need to provide further authentication factors
- User may be denied access due to high evaluated risk score
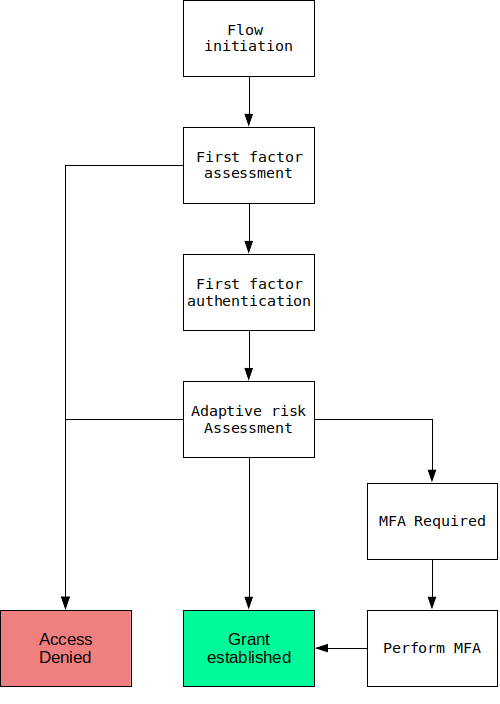
Flow state diagram
Depending on the user experience required in the application, there are two approaches which can be taken:
-
When using password authentication for first-factor, you can present the login page to the user immediately and then initialize the Adaptive authentication transaction only after the user has provided a username and password.
-
When using other first-factor methods, or where pre authentication rules may change which first-factor methods are offered, the Adaptive authentication transaction must be initialized before presenting the login page. In this case the session ID used in the initial call to the SDK must be an empty string (since collection by the Browser SDK has not yet been run).
This sample application only supports password authentication as the first factor and so it uses the first approach because it is simpler to implement.
Add the following lines to the end of your login.js file:
// add body parsing
const bodyParser = require('body-parser');

// Add url form-encoded middleware to process login form
app.use(bodyParser.urlencoded({
  extended: true
}));

var identitySourceId;

// Manage login form POST to /login
app.post("/login", async (req, res) => {
  // Extract parameters from request.
  const username = req.body.username;
  const password = req.body.password;
  const sessionId = req.body.sessionId;

  // Set up context required for call to Adaptive SDK
  var context = {
    sessionId: sessionId,
    userAgent: req.headers['user-agent'],
    ipAddress: req.ip
  };

  // Perform a risk assessment.
  let assessResult = await adaptive.assessPolicy(context);

  if (assessResult.status == "deny") {
    res.status(403).send({
      error: "Denied"
    });
    return
  }

  // Store Adaptive sessionId to session
  req.session.sessionId = sessionId;

  if (assessResult.allowedFactors.filter((entry) =>
                        { return entry.type == "password" }).length > 0) {
    try {

      // Look up identity source ID
      if (!identitySourceId) {
        let identitySources = await adaptive.lookupIdentitySources(
                        context, assessResult.transactionId, "Cloud Directory")
        identitySourceId = identitySources[0].id;
      }

      // Check password - returns risk evaluation
      let result = await adaptive.evaluatePassword(context,
                          assessResult.transactionId, identitySourceId,
                          username, password);

      handleEvaluateResult(req, res, context, result);

    } catch (error) {
      console.log(error);
      if (error.response.data.messageDescription) {
        res.status(403).send({error: error.response.data.messageDescription});
      } else {
        res.status(403).send({error: "Password check failed"});
      }
    }
  } else {
      res.status(403).send({error: "Password login not allowed"});
  }
});

async function handleEvaluateResult(req, res, context, result) {

  // If denied, return 403 forbidden.
  if (result.status == "deny") {
    console.log(result);
    res.status(403).send({error: "Denied"});
    return
  }

  // If allowed, store token and redirect to homepage
  if (result.status == "allow") {
    req.session.token = result.token;
    res.redirect("/");
    return
  }

  // MFA Case to be handled here

}
Note: The adaptive object was initialized using the proxy SDK in an earlier section.
Identity Source ID
In the code above, the identity source ID for the Cloud Directory is being obtained dynamically based on its name. If you prefer, you could hard-code the identity source ID. You can find the ID for an identity source by looking at its properties in your tenant Admin UI (under Configuration->Identity Sources)
Performing MFA
The code in the previous section only handles deny and allow responses after completing first-factor authentication. In this section you will add code to handle the case where an additional multi-factor authentication is required.
An MFA challenge is detected by checking for a status which has the value requires. A requires status indicates that some further authentication must be performed by the end user. There is potential for a requires status to be returned whenever /token is invoked, whether it be for establishing a grant, or using a refresh token.
Controlling policy evaluation
You can control when MFA is required by adding or adjusting the rules using the Policy Editor. For more information on policy see Native App Access policy .
You will now add code to handle a requires response, process the returned enrollments, and initiate email OTP if it is available.
Insert the following code where you see // MFA Case to be handled here in your index.js file:
if (result.status == "requires") {

    // Extract type from each available factor.
    var availableFactors = result.enrolledFactors.map(f => f.type);

    // Save transactionId to session
    req.session.transactionId = result.transactionId;

    // In this instance we're only supporting email OTP
    var emailIdx = availableFactors.indexOf("emailotp");
    if (emailIdx != -1) {
      req.session.currentFactor = "emailotp";

      try {
        // Initiate the email OTP
        await adaptive.generateEmailOTP(context, result.transactionId,
                                        result.enrolledFactors[emailIdx].id);
        // Return /otp challenge page;
        res.sendFile(__dirname + '/otp.html');;

      } catch (error) {
        res.status(500).send({error: "OTP generate fail: " + error.message});
      }
    } else {
      res.status(500).send({ error: "Email OTP factor not available."
                             + JSON.stringify(result)});
    }
  }
Create a file named otp.html and populate with this simple content to present an OTP challenge:
<html>

<head>
</head>

<body>
  <h1>Submit OTP</h1>
    <p>If the received code's format is 1234-567890
       only enter the group of digits after the '-',
       i.e. 567890</p>
  <form name="otpform" action="/otp" method="POST">

    <label for="otp">OTP:</label><br>
    <input type="text" id="otp" name="otp"><br>

    <input type="submit" value="Submit">
  </form>
</body>

</html>
Add the following to the end of your index.js file to expose this OTP page and handle the POST that it returns when the user submits the OTP:
// Handle OTP challenge page POST to /otp
app.post("/otp", async (req, res) => {
  const otp = req.body.otp;

  // Get adaptive transaction from session
  var transactionId = req.session.transactionId;

  // Set up context required for call to Adaptive SDK
  var context = {
    sessionId: req.session.sessionId,
    userAgent: req.headers['user-agent'],
    ipAddress: req.ip
  };

  // Verify the email OTP - risk evaluation returned
  try {
    let result = await adaptive.evaluateEmailOTP(context, transactionId, otp);

    // If denied, return 403 forbidden
    if (result.status == "deny") {
      res.status(403).send({error: "Denied"});
      return
    }

    // If allowed, save token and redirect to homepage
    if (result.status == "allow") {
      req.session.token = result.token;
      res.redirect("/");
      return
    }

  } catch (error) {
    console.log(error);
    if (error.response.data.messageDescription) {
      res.status(403).send({error: error.response.data.messageDescription});
    } else {
      res.status(403).send({error: error.message});
    }
  }
});
The OTP supplied by the user is checked by calling the evaluateEmailOTP function.
If the OTP is incorrect, the function will throw an error.
It would be unusual to receive a deny status at this point but it is possible and should be handled.
If the OTP is correct the response will have a status of allow. In this case an identity token (JWT) and access token for the authenticated user will also be returned. It's up to the application developer to store these tokens in the session and flag the session as authenticated.
Here is an example of the result object returned:
{
  "status": "allow",
  "token": {
    "access_token": "gJduCYHPK0jG7RBiMSiQ3WtGQvxUzpp4GtqTZi8s",
    "scope": "openid",
    "grant_id": "24c6fa4e-dca5-4876-bd24-6b897920d74b",
    "id_token": "eyJhbGciOiJSUzI1NiIsInR5cCI6IkpXVCIsImtpZCI6InNlcnZlciJ9.eyJhY3IiOi...HAiOiAxNTk5MTAxMzY3fQ.HZ9LE3Hb3GkXD..7sQJFlXoXGP3w",
    "token_type": "Bearer",
    "expires_in": 7199
  }
}
In this example application, you are redirected to / after authentication completes. The presence of the token causes a simple You are authenticated message to be displayed.
Congratulations! You have successfully set up a native application for Adaptive Access.
Validation
Having successfully deployed your web application and incorporated the IBM Verify Adaptive Browser SDK and IBM Verify Proxy SDK an end to end validation can be completed.
Validation scenario
We can use a simple validation scenario to ensure the configuration of the Native Web application and Adaptive access is correct.
If the scenario is not successful you should:
- use the detail in Events and Reports to determine the Event and Report result (success, missing event, unavailable, unexpected)
- follow the troubleshooting steps for that result type, as described in Troubleshoot Adaptive Access.
-
The recommended simple validation scenario includes:
- Create a new user
- Authenticate to the Web application
- Complete the MFA challenge
- Gain access to the application
-
The scenario validates:
- IBM Verify Adaptive Browser SDK integration
- Client browser collection and detection
- IBM Verify Proxy SDK invocation
- Adaptive access policy invocation and assessment
-
The user experience should be:
- Launch the Native Web application
- First-factor (password) challenge
- MFA (e-mail OTP) challenge
- Allowed access
Login page loaded
Using the browser's Developer Tools, check that the Browser SDK starts Adaptive access collection and detection.
These requests should be visible in Network tab and include a request to the cloudfront URL that was provided during application on-boarding.
For example:
https://d1anfu45urknyg.cloudfront.net/511843/aloads.js?dt=login&r=0.3289762412868322
You should see additional JavaScript loaders requested, which may include
- bits.js
- main.js
- tags.js
These loaders should return a 200 response code with a non-empty response body.
Additionally, you should see multiple other requests to the same cloudfront URL with different URI paths as the collection continues.
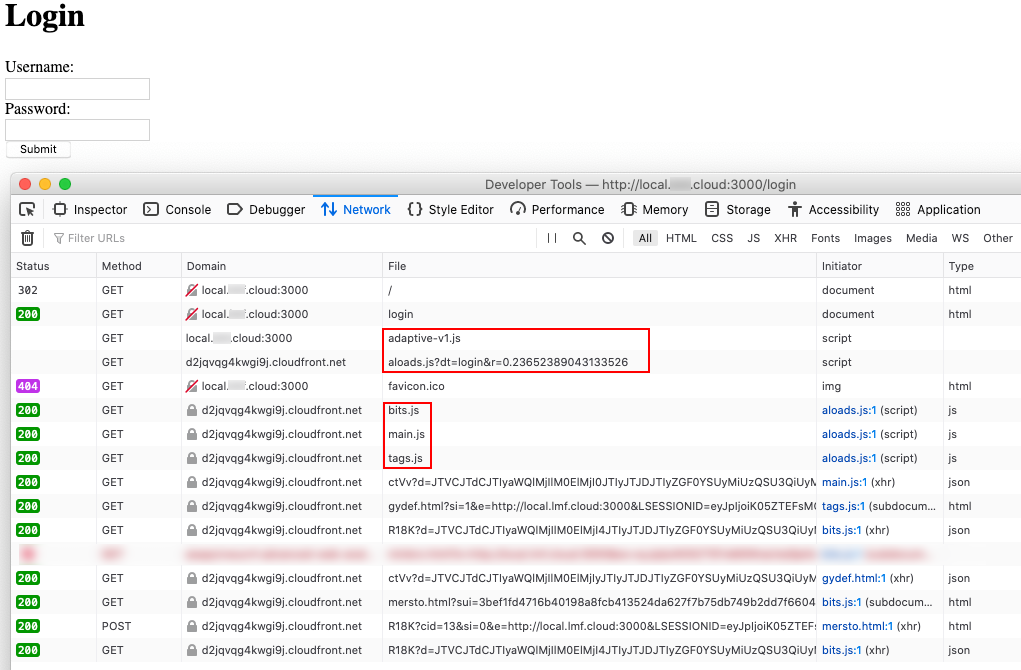
Native Web application login. collection, detection and Session ID generation
Session ID generated
During the invocation of getSessionId() from the Browser SDK, the Console of the browser Developer Tools will display the Session ID that can be used to perform Session ID correlation with the Adaptive access report or Events service API.
For example
CDN snippet loaded
[:getTCSID(csid)] csid: pp24c528943651cbe63c91dd0590b24323a80a0b401600954689
[:getFlow()]
If the trace output has been cleared or Developer Tools was not open during the collection and the Session ID is not visible, you can invoke the Browser SDK to output the Session ID without triggering recollection.
await getSessionId()
which will return the current Session ID
pp24c528943651cbe63c91dd0590b24323a80a0b401600954689
Access policy evaluated
After initial authentication, the Adaptive access policy for Native applications is evaluated. When using the recommended action of MFA per session for Medium Risk level in the Post authentication rules, new users will be challenged for MFA during the session establishment.
After completing the MFA, the user session will be reduced to Low Risk level and the user allowed access to the application - unless the same user attempts to log in from a new device.
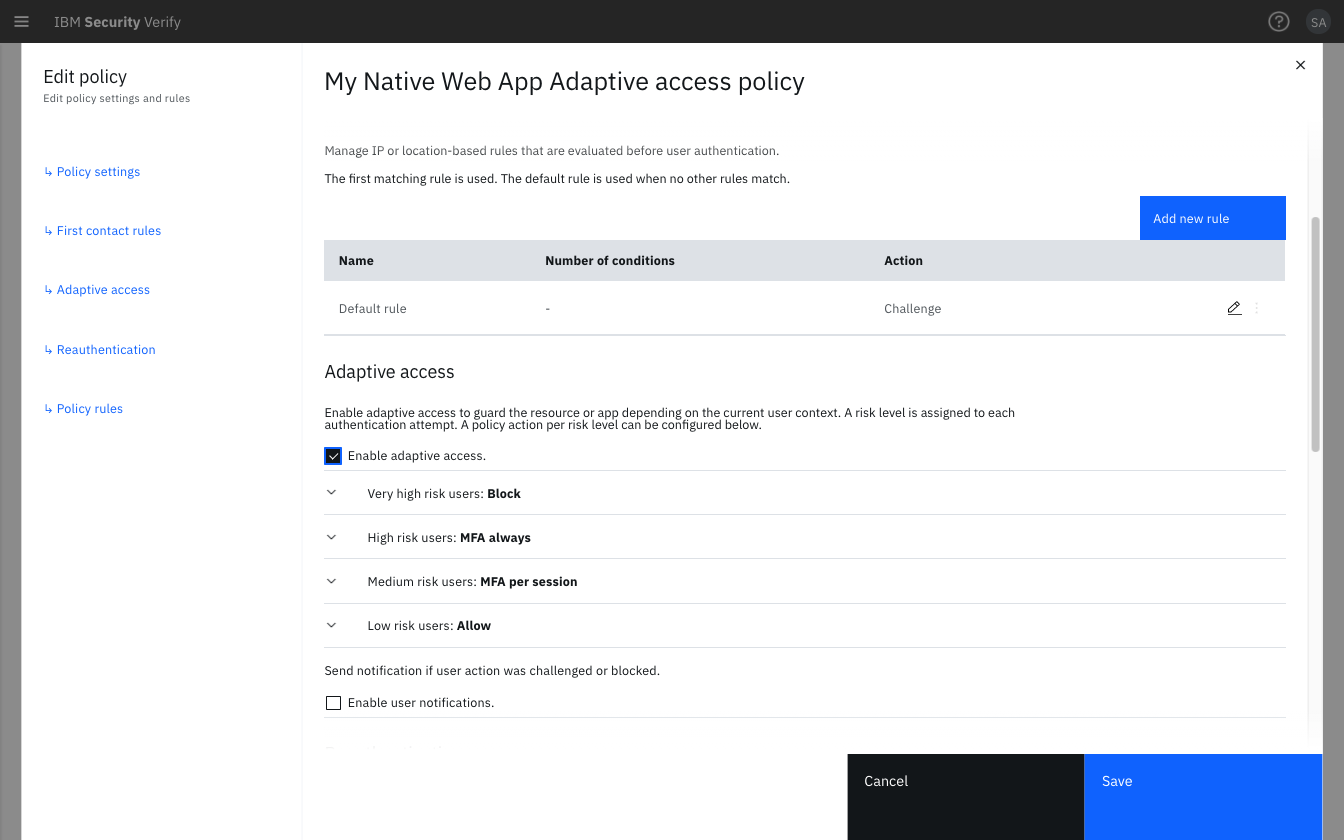
Native Web application Adaptive access policy
Adaptive access report
When using the recommended Adaptive access policy the new user will be evaluated as Medium Risk level and challenged for MFA (per session). After completing the MFA challenge the Adaptive access policy is re-evaluated and the user should now be assessed as Low Risk level and allowed access.
Risk levels
If the collection and detection indicates specific Risk indications, the user may be assessed at a higher Risk level.
Risk level examples are described in Trust score risk levels.
In the following Adaptive access report example
- the bottom row indicates
Risk Service Unavailableas a result of performing the validation scenario before the on-boarding was complete.
The Policy action for theMediumRisk level is applied. - the middle row shows the new user assessment as
MediumRisk level, as this is the first time this user has been assessed on this device. - the top row shows the policy re-evaluation after successful MFA.
Now the user is verified using this browser for this application and assessed asLowRisk level.
Key details for the evaluation are displayed when selecting an event row.
The Session ID should correspond to the one generated by the Web SDK in the login page.
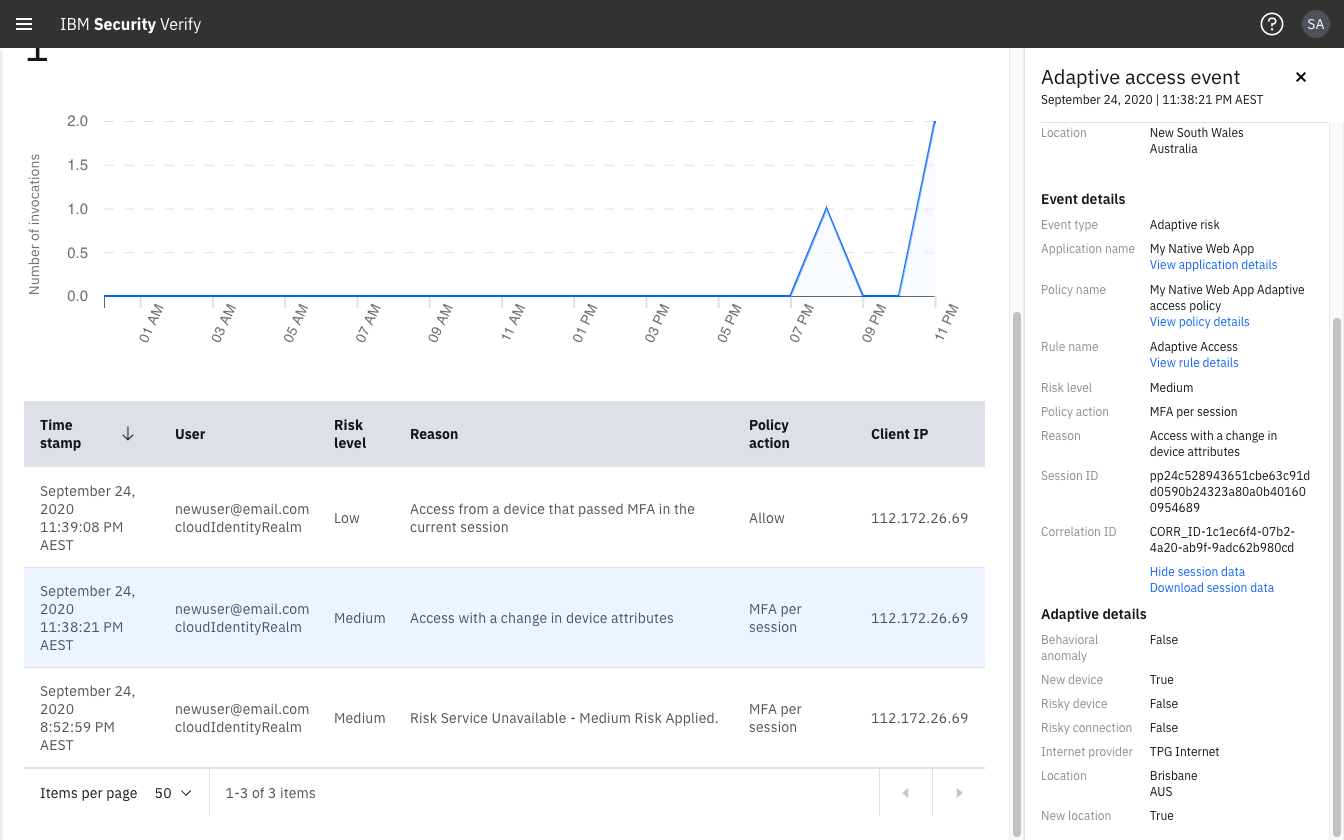
During subsequent authentications (logins) or token refresh, the user should continue to be assessed as Low Risk level unless an Adaptive details indicator is triggered which will alter the user's Risk level, for example, one or more of:
- Behavioral anomaly
- New device
- Risky device
- Risky connection
- New location
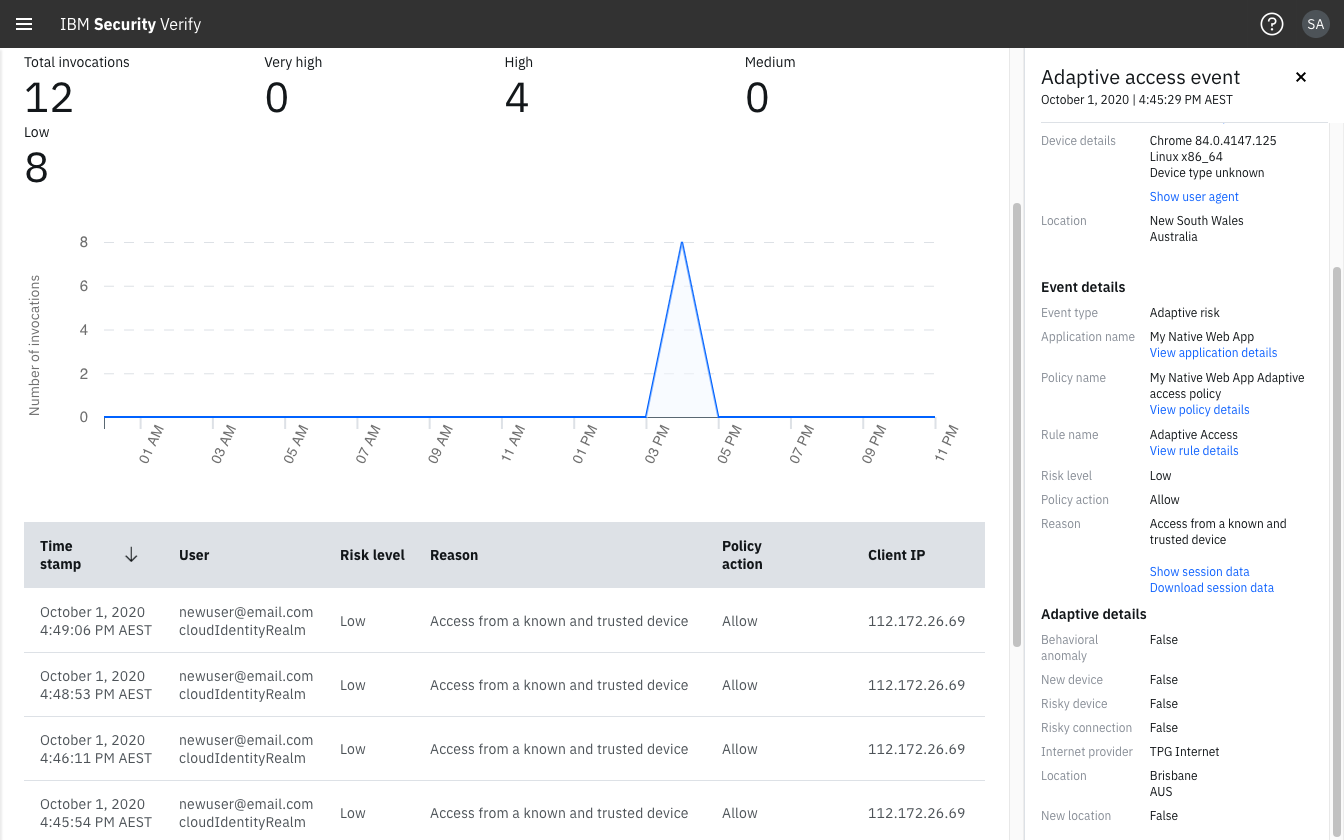
Adaptive access report detail for new user reauthentication and refresh
If adaptive access validation does not execute correctly, troubleshooting can commence by following the data gathering described in Events and Reports.
- Perform session Id correlation between the Web SDK generated Id and the events service API or Adaptive access report.
- Initially when an expired or unmatched SessionID is presented, no event or report will be created in the Adaptive access report. Instead, an error is returned from the policy evaluation indicating that collection was incomplete. This should be used to trigger recollection in an attempt to recover.
- If no session ID is provided or after multiple failed attempts to use a session Id, a Risk Service Unavailable response is returned to the Adaptive access policy which will return the policy action of the
MediumRisk level. - If the user was not prompted for MFA, or continues to be assessed higher than
LowRisk level, review Unexpected evaluation decision.
Updated 7 months ago
