Azure AD Join
Introduction
This document provides instructions on how configure Azure AD join using IBM® Verify as the Identity Provider.
You need following Prerequisites:
- Azure AD with administrator access
- Windows device with Powershell and Microsoft Online Services Module installed.
- IBM Verify domain with administrator access.
Complete the following tasks:
- Azure Active Directory
- Enable device joining
- Configure a federated Azure AD Domain
- Provision user to Azure AD with Powershell commands
- IBM Verify
- Configure Microsoft 365 application (WS-Federation)
Enabling device joining and configuring a federated Azure AD domain
Enabling device joining
- Login to the Azure portal https://aad.portal.azure.com/.
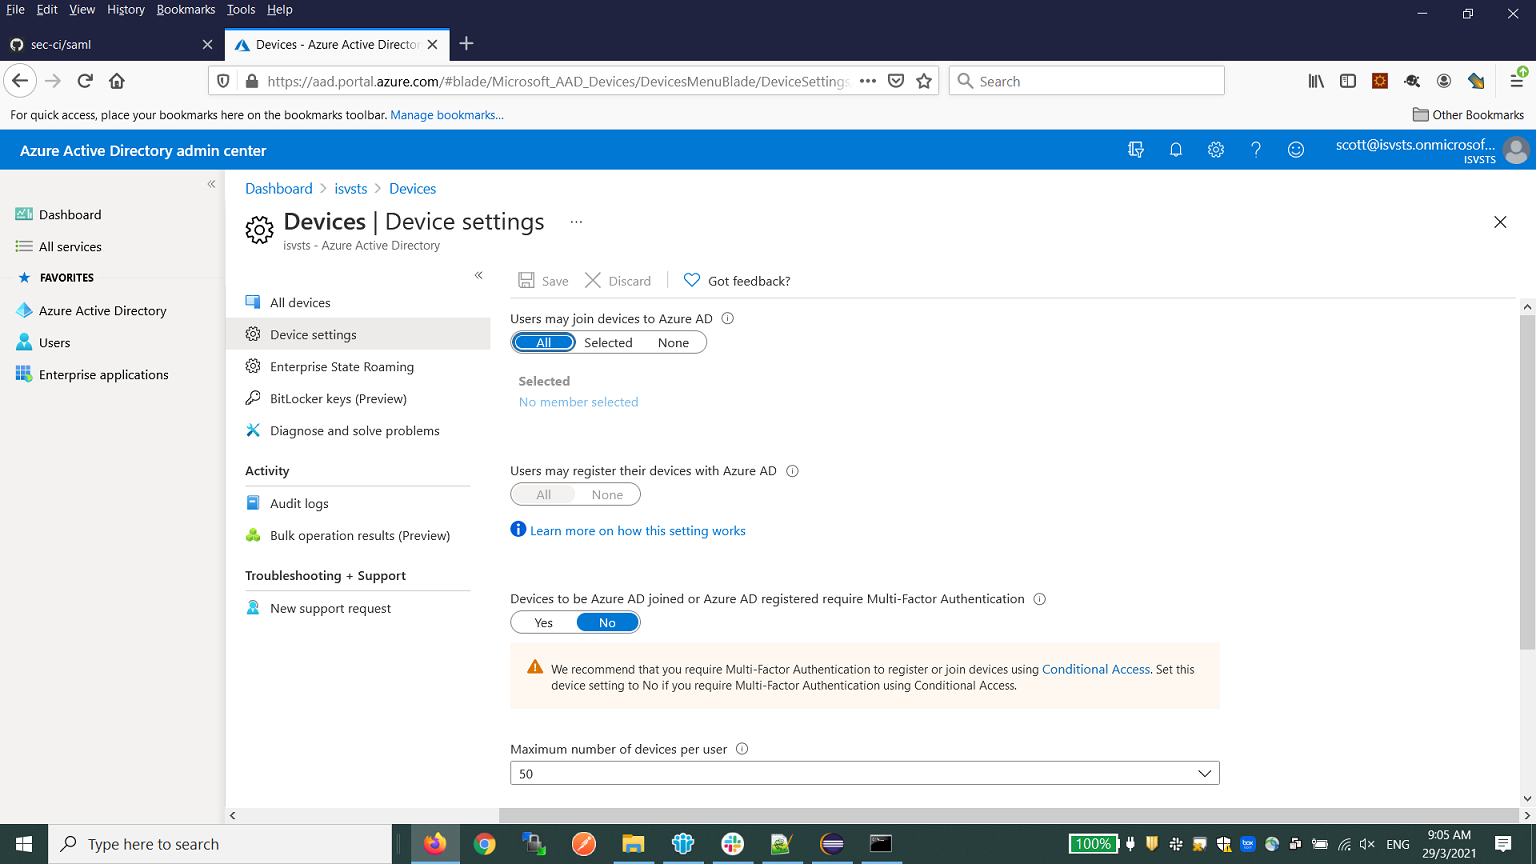
- Configure the device settings as shown below to allow user to join device to Azure AD, disable the MFA settings at Azure AD side to avoid double MFA.
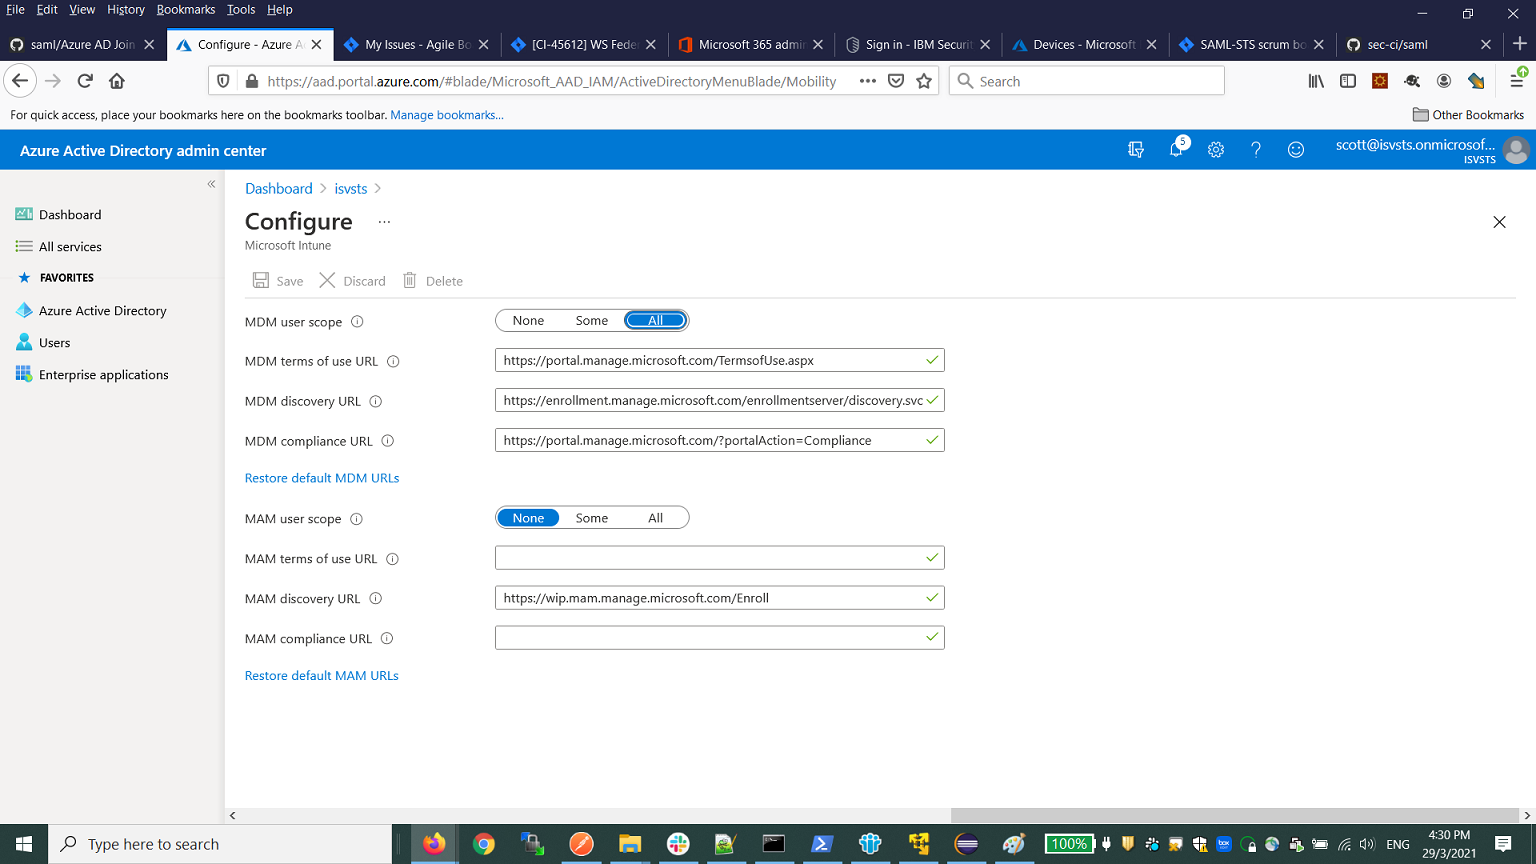
- [Optional] Enable automatic Intune enrollment. During Azure AD join, the computer is automatically enrolled to Intune with the following configurations.
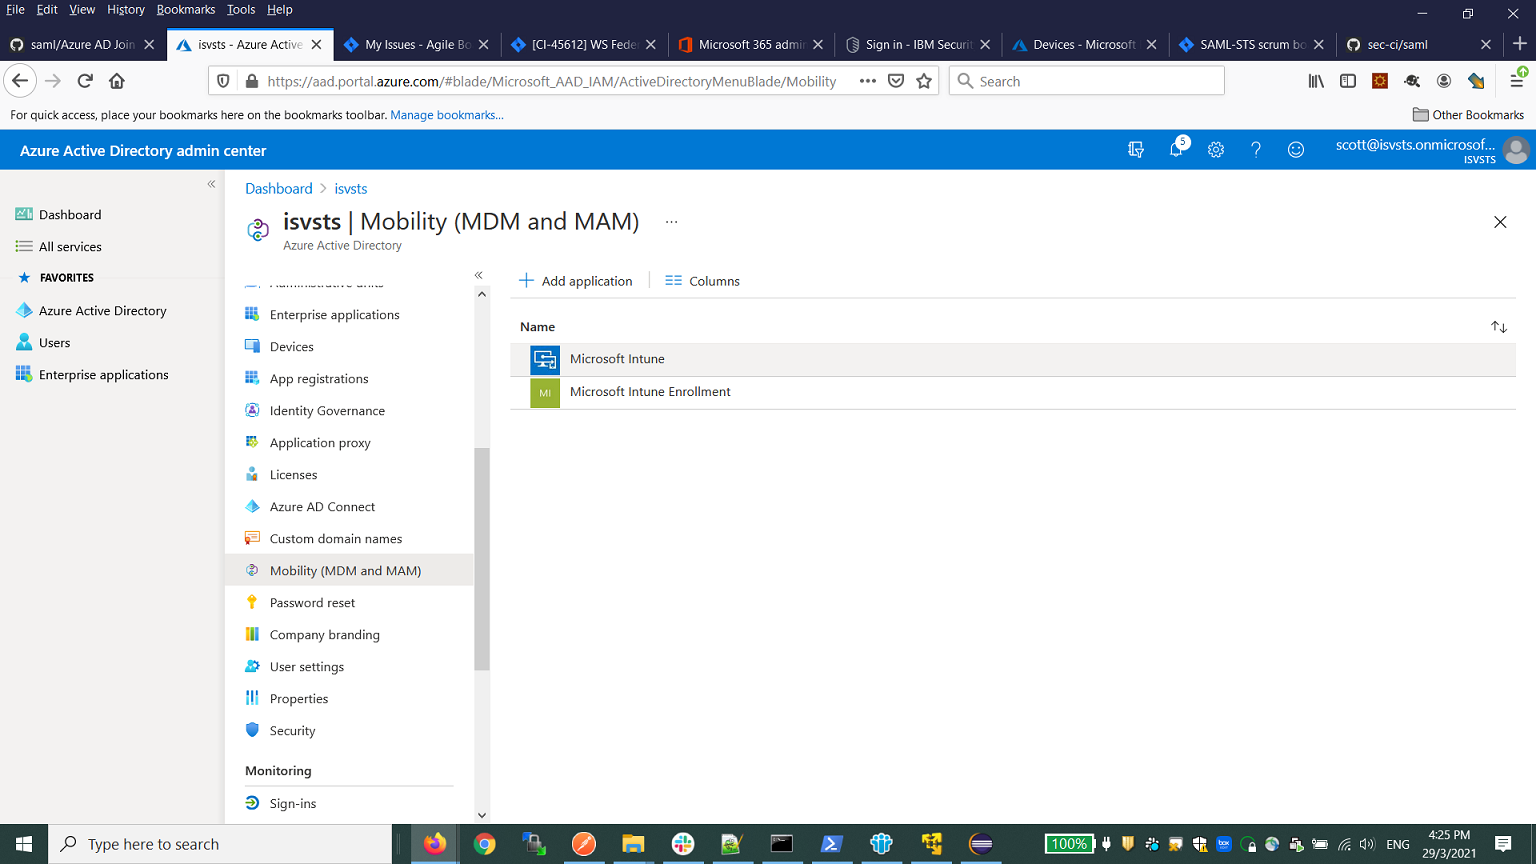
- From the Azure portal, click Mobility (MDM and MAM) > Microsoft Intune
- Set All for MDM user scope and save the settings.
Configuring a federated Azure AD domain
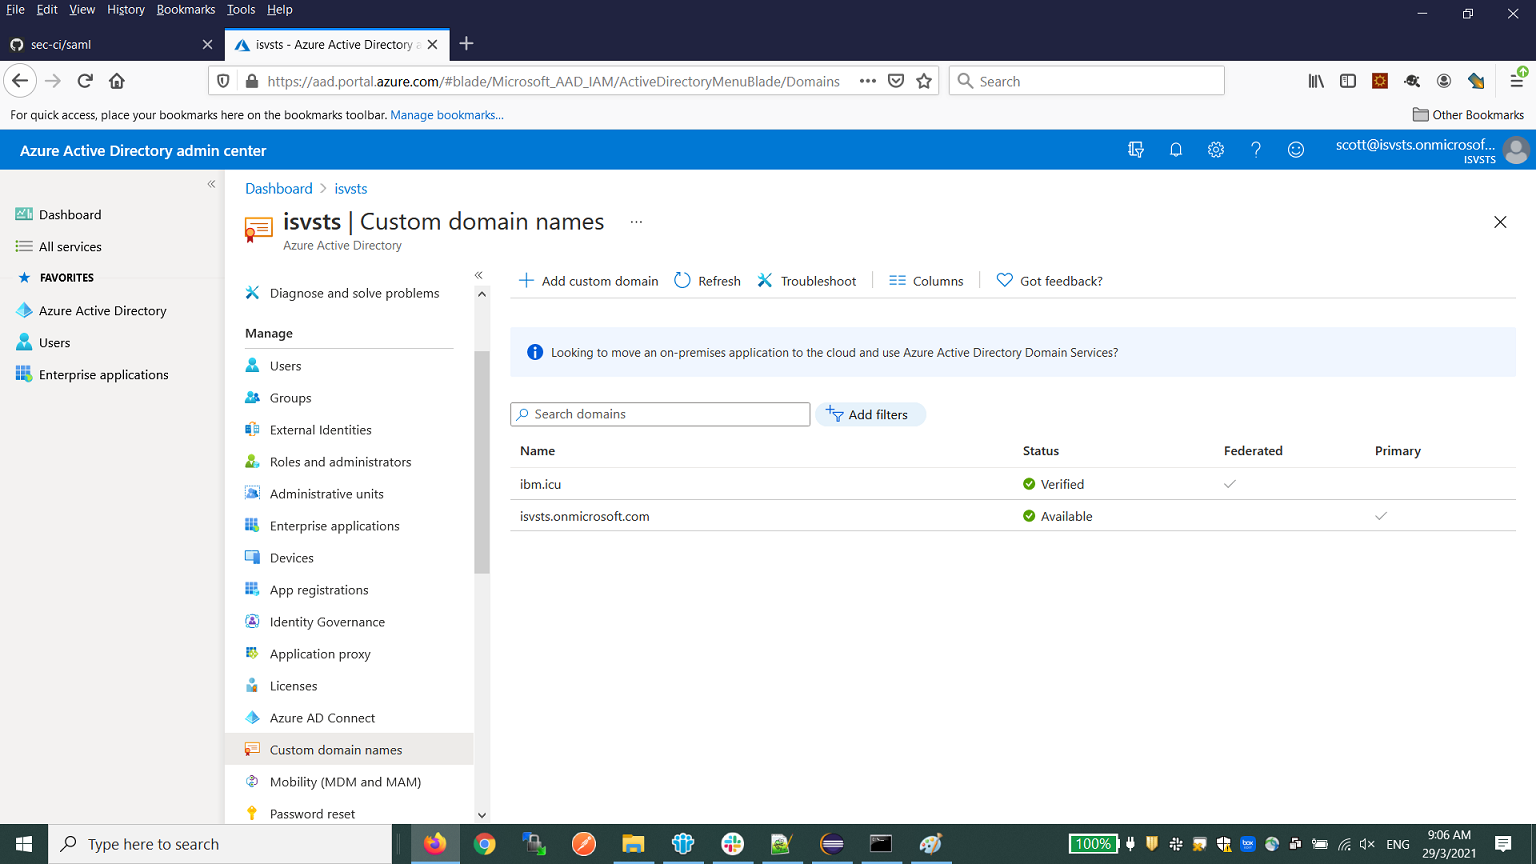
- In the Azure portal, create a custom domain. For example,
ibm.icu. Ensure that it is verified. The custom domain is required to set up a federated Azure domain with a third party federation service. The main domain withonmicrosoft.comsuffix does not support federated domain configuration.
-
Install Windows Powershell and Microsoft Online Services Module on the Windows machine.
-
Execute the following command in the Powershell command console:
Connect-MsolService
It prompts a login.
- Specify the Azure admin user credential. This is the admin user upn with the
onmicrosoft.comsuffix. - After a successful login, execute the following command in the Powershell command console to create a federated domain with the IBM Verify tenant:
(Please update the tenant hostname to your tenanthost accordingly, -DomainName ibm.icu is the custom domain created in step 1; -SigningCertificate is the public cert of the default cert of your tenant:
Set-MsolDomainAuthentication -Authentication federated -DomainName ibm.icu -FederationBrandName IbmSecurityVerify -IssuerUri https://dune.verify.ibm.com/wsf/sps/wsfedip/wsf -PassiveLogOnUri https://dune.verify.ibm.com/wsf/sps/wsfedip/wsf -ActiveLogOnUri https://dune.verify.ibm.com/wst/SecurityTokenService13 -MetadataExchangeUri https://dune.verify.ibm.com/wsf/sps/mex -LogOffUri https://dune.verify.ibm.com/idaas/mtfim/sps/idaas/logout -SigningCertificate MIIDYDCCAkigAwIBAgIEJDZp0DANBgkqhkiG9w0BAQsFADByMQkwBwYDVQQGEwAxCTAHBgNVBAgTADEJMAcGA1UEBxMAMQkwBwYDVQQKEwAxCTAHBgNVBAsTADE5MDcGA1UEAxMwc2FtbC1kZXYzLWNoZW55bS5kZXYudmVyaWZ5LmlibWNsb3Vkc2VjdXJpdHkuY29tMB4XDTIxMDMwODA1NTg0M1oXDTMxMDMwNjA1NTg0M1owcjEJMAcGA1UEBhMAMQkwBwYDVQQIEwAxCTAHBgNVBAcTADEJMAcGA1UEChMAMQkwBwYDVQQLEwAxOTA3BgNVBAMTMHNhbWwtZGV2My1jaGVueW0uZGV2LnZlcmlmeS5pYm1jbG91ZHNlY3VyaXR5LmNvbTCCASIwDQYJKoZIhvcNAQEBBQADggEPADCCAQoCggEBAIR0RqRWk9ii2hhfHQ1mSo83HowKdwlfsSjTEuctyfgvij/hHgTLjh6ZgqOxREycmtmdvABv2W7F+6Dzp+i/KvEMDgp5yNXzf0e5LY0x9pr8Vn0WKCROnq+w047CES2v5hsZ+6zJnHK5ZZA88NJmE2F0Q3/rRS6AUzrEhVknXryUm17HViTYT6tThXmAIBbbes3pNAP2XDKPNt0fQJuUTVMzUG82rtx2KR13Am0UwjmWcs85kBM9upUc4Y8jGFVp71ljsM59rHhQlrBkQIAmHGzm/KXdpa3th6GFP/k6g+qPfoaD4fsND7pNA0DBQP0r4S6Pc5+KqXTcRQznEoNBJ+cCAwEAATANBgkqhkiG9w0BAQsFAAOCAQEAWyDFxjm3dzLye2DbF09/S+97iLBYumsmrsl5cAHzdYqcUBURGhplyEseBog0NHdD3ygd2e0WAmIu1jhz+JuUleDgmaxbECnrO8KcGgM9g+/6cc9v/W3VkdOmweajQn/AuC9DxqGnoiKA5PzO9Fz+3ooTj3PkO1UbYXUwWk+zO4+w0Z0sMKuUpKVL/dOXT/phUp4vFWikc2C5KPG9FKNq4rUj2PHnhBKiXgjRgt3hDJKMcaEC12N4eUlmbwxIeNkda1m4yzhisPOwKFwy0aw/pECwUfdlZsxu523o0GX4MpaWS6DgpRpfysUuVODzPdGm7AZXXqoWhIgBLTMJ6AUEDQ==
- After successfully executing the command, type
Get-MsolDomainFederationSettings -DomainName ibm.icu
PS C:\Users\Scott> Get-MsolDomainFederationSettings -DomainName ibm.icu
ActiveLogOnUri                         : https://dune.verify.ibm.com/wst/SecurityTokenService13
DefaultInteractiveAuthenticationMethod :
FederationBrandName                    : IbmSecurityVerify
IssuerUri                              : https://dune.verify.ibm.com/wsf/sps/wsfedip/wsf
LogOffUri                              : https://dune.verify.ibm.com/idaas/mtfim/sps/idaas/logout
MetadataExchangeUri                    : https://dune.verify.ibm.com/wsf/sps/mex
NextSigningCertificate                 :
OpenIdConnectDiscoveryEndpoint         :
PassiveLogOnUri                        : https://dune.verify.ibm.com/wsf/sps/wsfedip/wsf
SigningCertificate                     : MIIDYDCCAkigAwIBAgIEJDZp0DANBgkqhkiG9w0BAQsFADByMQkwBwYDVQQGEwAxCTAHBgNVBAgTAD
                                         EJMAcGA1UEBxMAMQkwBwYDVQQKEwAxCTAHBgNVBAsTADE5MDcGA1UEAxMwc2FtbC1kZXYzLWNoZW55
                                         bS5kZXYudmVyaWZ5LmlibWNsb3Vkc2VjdXJpdHkuY29tMB4XDTIxMDMwODA1NTg0M1oXDTMxMDMwNj
                                         A1NTg0M1owcjEJMAcGA1UEBhMAMQkwBwYDVQQIEwAxCTAHBgNVBAcTADEJMAcGA1UEChMAMQkwBwYD
                                         VQQLEwAxOTA3BgNVBAMTMHNhbWwtZGV2My1jaGVueW0uZGV2LnZlcmlmeS5pYm1jbG91ZHNlY3VyaX
                                         R5LmNvbTCCASIwDQYJKoZIhvcNAQEBBQADggEPADCCAQoCggEBAIR0RqRWk9ii2hhfHQ1mSo83HowK
                                         dwlfsSjTEuctyfgvij/hHgTLjh6ZgqOxREycmtmdvABv2W7F+6Dzp+i/KvEMDgp5yNXzf0e5LY0x9p
                                         r8Vn0WKCROnq+w047CES2v5hsZ+6zJnHK5ZZA88NJmE2F0Q3/rRS6AUzrEhVknXryUm17HViTYT6tT
                                         hXmAIBbbes3pNAP2XDKPNt0fQJuUTVMzUG82rtx2KR13Am0UwjmWcs85kBM9upUc4Y8jGFVp71ljsM
                                         59rHhQlrBkQIAmHGzm/KXdpa3th6GFP/k6g+qPfoaD4fsND7pNA0DBQP0r4S6Pc5+KqXTcRQznEoNB
                                         J+cCAwEAATANBgkqhkiG9w0BAQsFAAOCAQEAWyDFxjm3dzLye2DbF09/S+97iLBYumsmrsl5cAHzdY
                                         qcUBURGhplyEseBog0NHdD3ygd2e0WAmIu1jhz+JuUleDgmaxbECnrO8KcGgM9g+/6cc9v/W3VkdOm
                                         weajQn/AuC9DxqGnoiKA5PzO9Fz+3ooTj3PkO1UbYXUwWk+zO4+w0Z0sMKuUpKVL/dOXT/phUp4vFW
                                         ikc2C5KPG9FKNq4rUj2PHnhBKiXgjRgt3hDJKMcaEC12N4eUlmbwxIeNkda1m4yzhisPOwKFwy0aw/
                                         pECwUfdlZsxu523o0GX4MpaWS6DgpRpfysUuVODzPdGm7AZXXqoWhIgBLTMJ6AUEDQ==
SupportsMfa                            :
It shows the federated domain settings.
- Verify all fields are correct.
Provisioning user to Azure AD with Powershell commands
-
Provision the user in Azure AD. Decide which user attribute from the IBM Verify user will be used as the
immutabeidandupnin the Azure AD. -
Execute the following command in the Powershell command console:
New-MsolUser -userprincipalname [email protected] -immutableID testuserimmutableid -lastname test -firstname user -Displayname "test user" -LicenseAssignment "isvsts:DEVELOPERPACK_E5" -usageLocation SG
This provisions a user with upn: [email protected] and immutableID: testuserimmutableid.
- Run following command to verify that the
immutableidwas created correctly.
Get-MsolUser -UserPrincipalName "[email protected]" | Select ImmutableID
Configuring Microsoft 365 application (WS-Federation)
From IBM Verify tenant Administrative Console
- Create Microsoft 365 application.
- Select Applications > Applications.
- Click Add application.
- In the Select Application Type pop-up, add the Microsoft365 application.
- In the Sign-on tab, select WS-Federation as the Sign-on method. Use the default settings except for SAML subject Name identifier.
- Select an attribute source for UPN and ImmutableID. The UPN and ImmutableID value must match the UPN and ImmutableID in the Azure AD user registry.
- Save the application.
- In the Applications page, select the Microsoft365 application and click Settings.
Click on the 'Entitlements' tab, select an Access type and select the Approvers check-box accordingly.
Run the flow
- Join the Windows 10 computer to Azure AD.
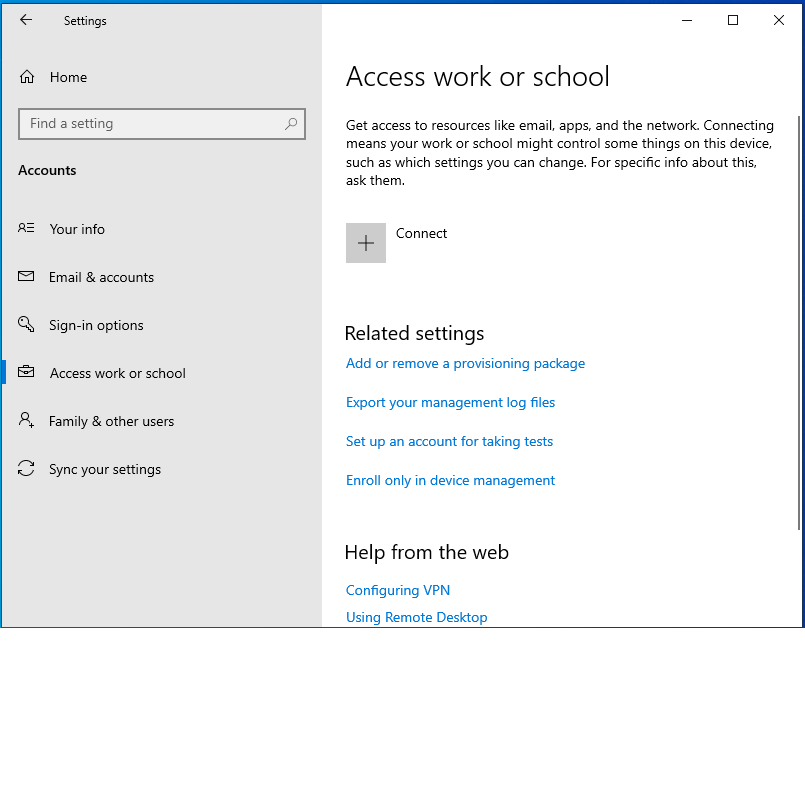
- From Settings > Accounts > Access work or school.
- Click Connect.
- Click Join this device to Azure Active Directory.
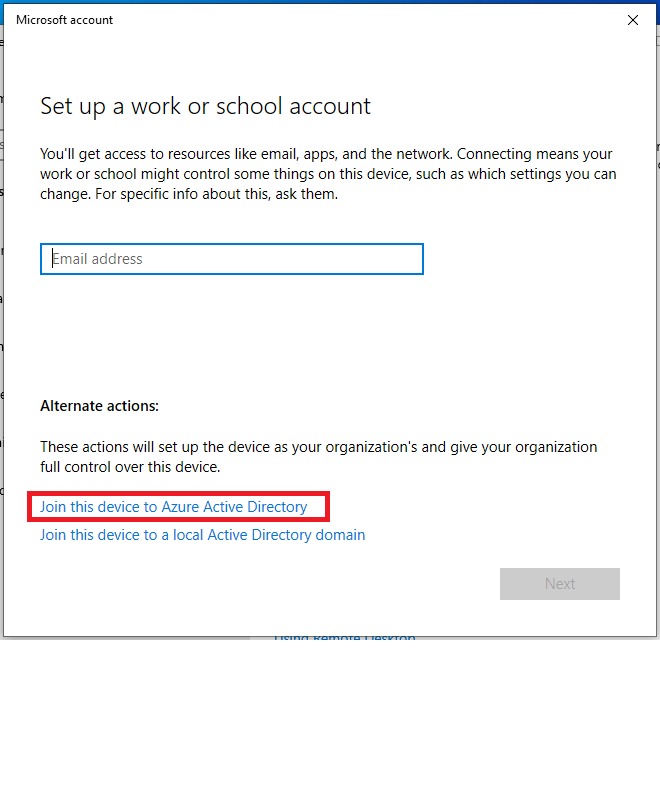
- Specify the upn with the custom domain. For example,
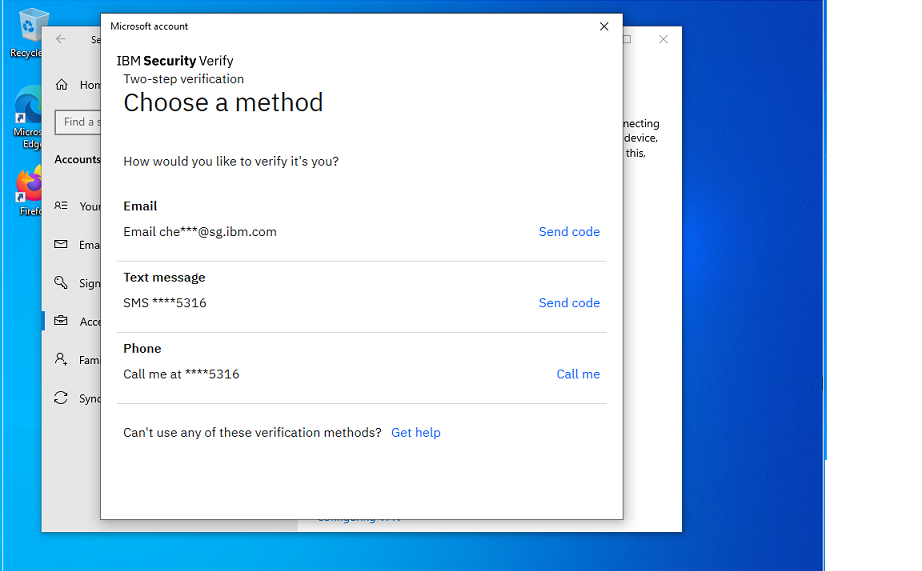
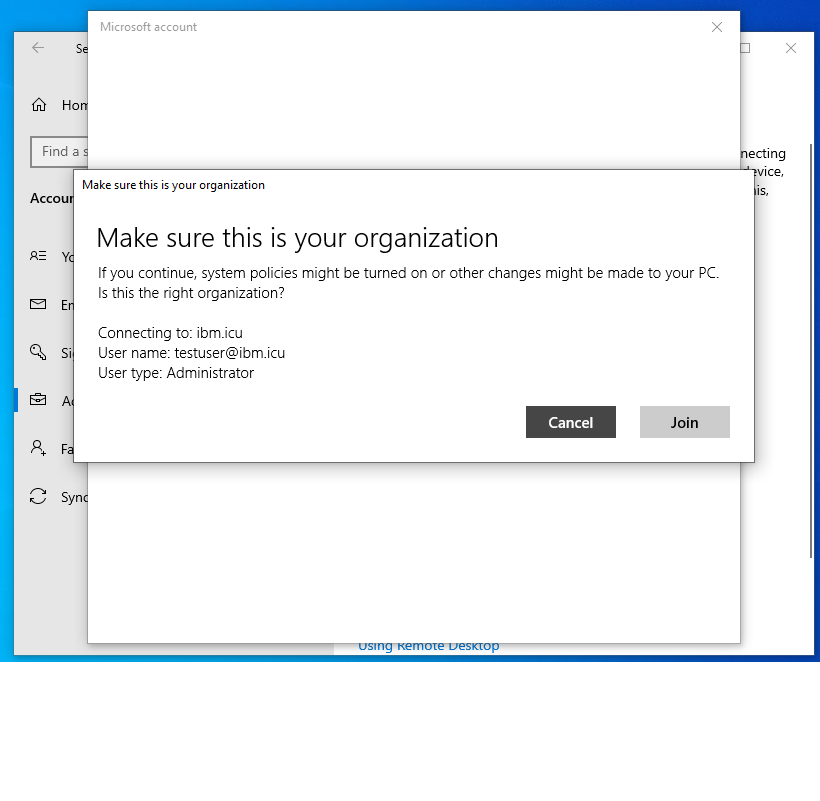
[email protected]. - Click Connect. It redirects to IBM Verify to authenticate. After successful authentication, the following prompt is shown. Click Join to proceed.
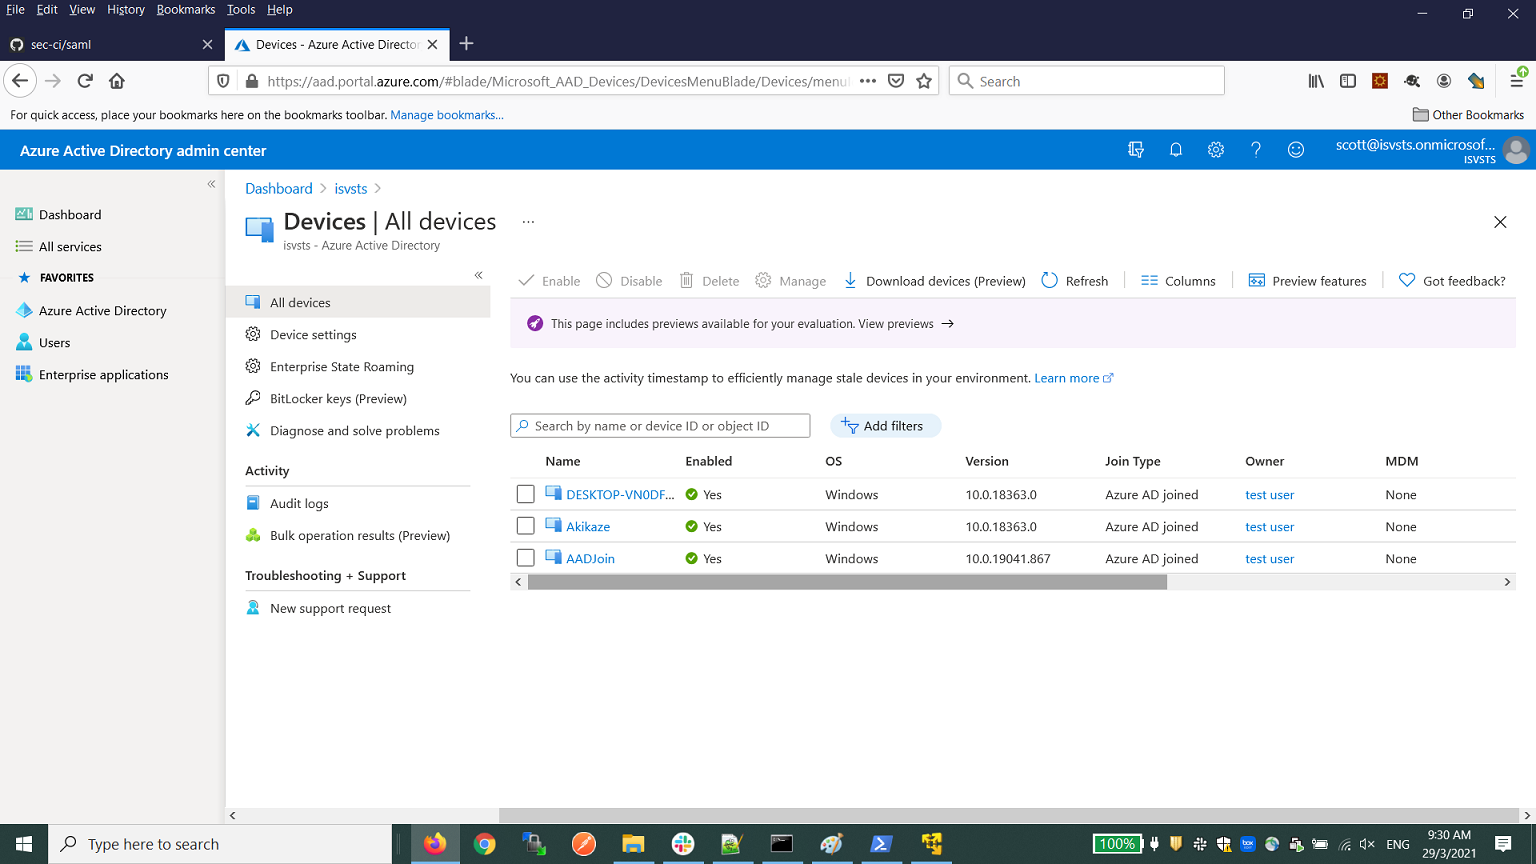
- From the Azure portal devices, verify that the device is Azure AD joined.
-
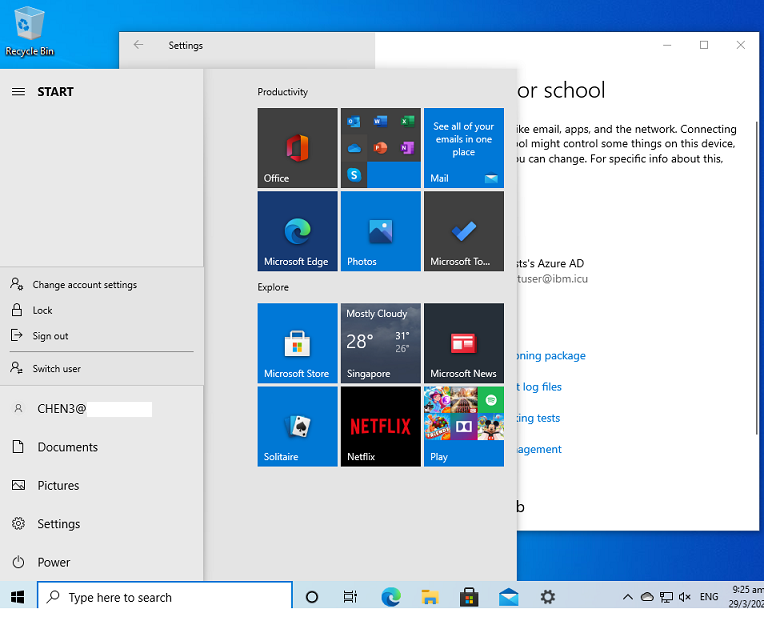
Login to the Azure AD joined computer with the IBM Verify user account.7.
-
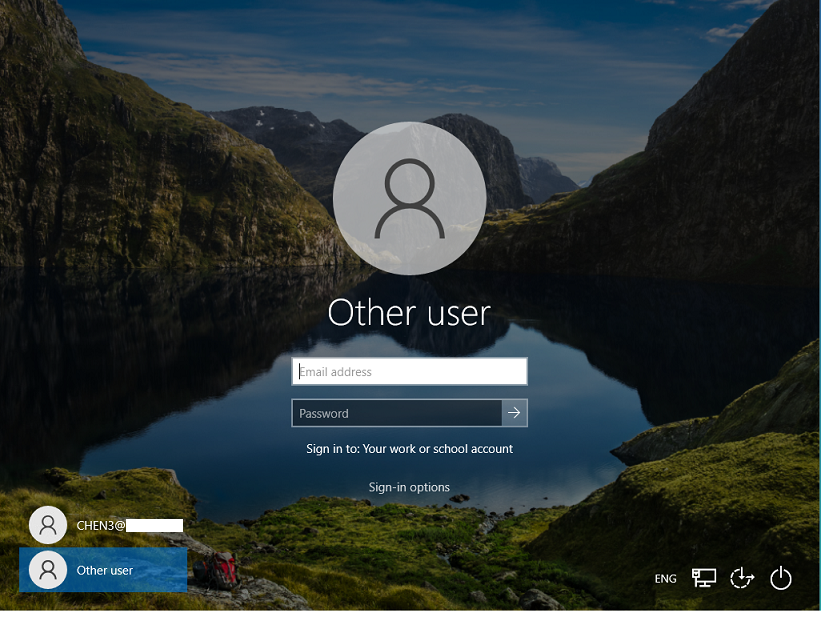
Switch to login with Work or School account
- Specify the username and password of the IBM Verify user to log in.
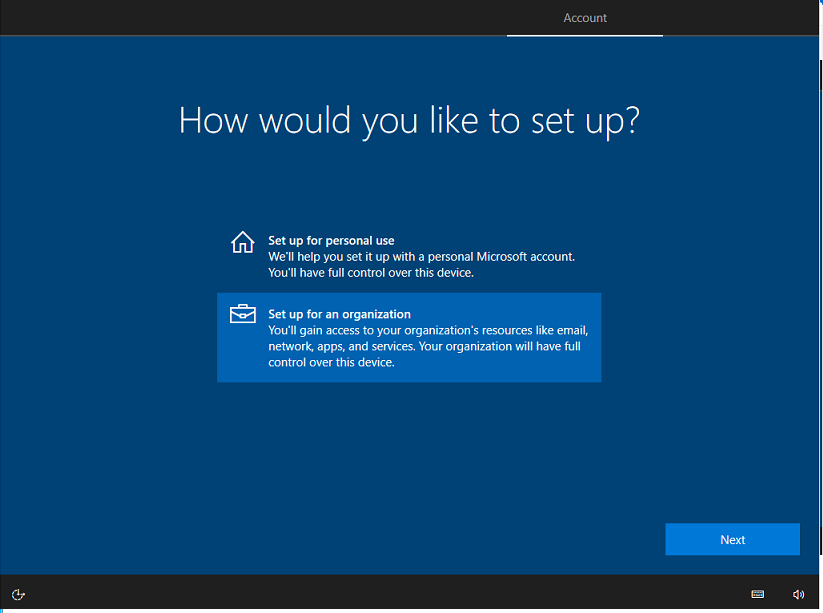
OOBE (Azure AD join for fresh Windows installation)
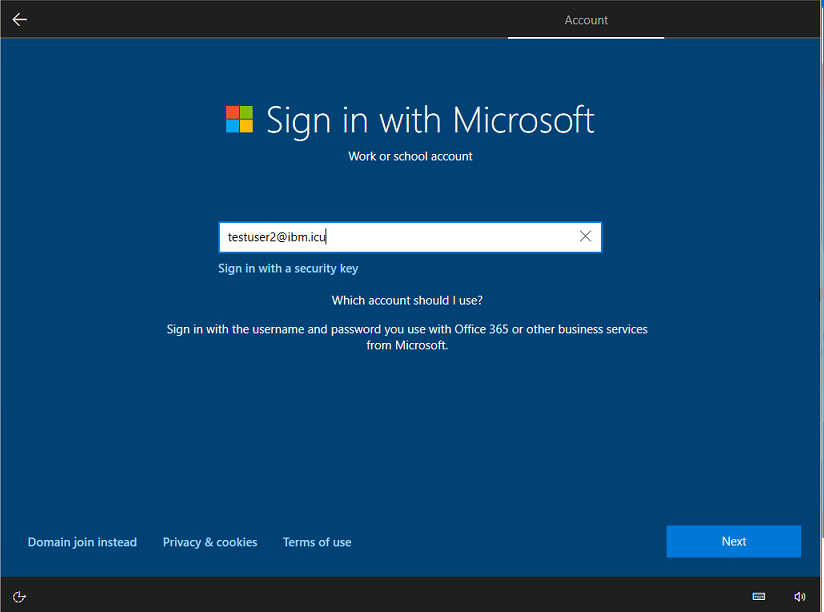
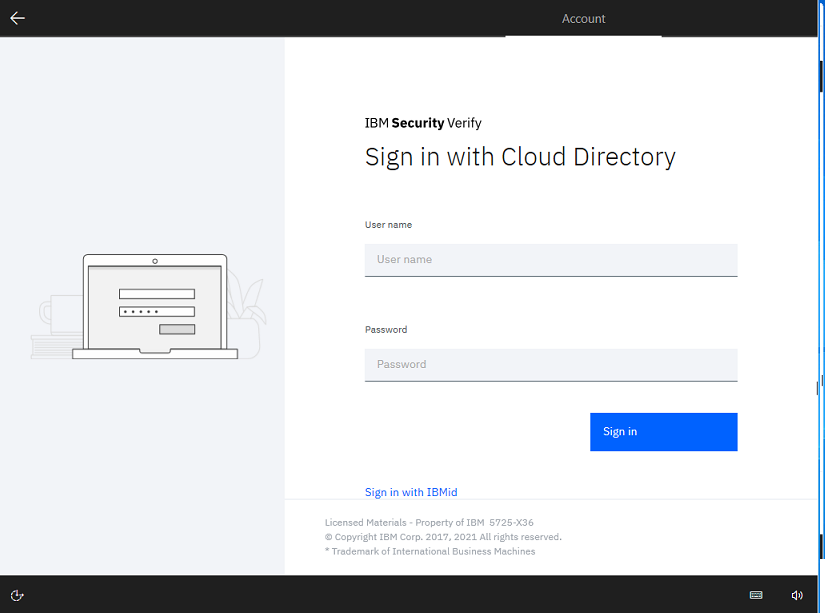
User can also join Windows 10 to Azure AD during the Windows installation process. Follow the screen prompts.
Updated 7 months ago
