ROPC sample
Introduction
If you are building a non-web application that will use username and password for first-factor authentication, a simple way to obtain an access token or id token from IBM Verify is to use the OAuth 2.0 Resource Owner Password Credentials (ROPC) grant type.
To help you with this, we have provided a sample command-line application to demonstrate.
In this guide you'll learn how to set up the sample application.
Prerequisites
You need to have registered an application using the Developer Portal in your IBM Verify tenant. See Using the Developer Portal for details. During registration, pick Resource owner password credentials (ROPC) as the grant type.
You need to have node.js installed on the system where you will run the sample application. Download node.js.
Download the sample application
-
Access the Developer Portal of your IBM Verify tenant. Usually you will find this as a tile in the end user launchpad.
-
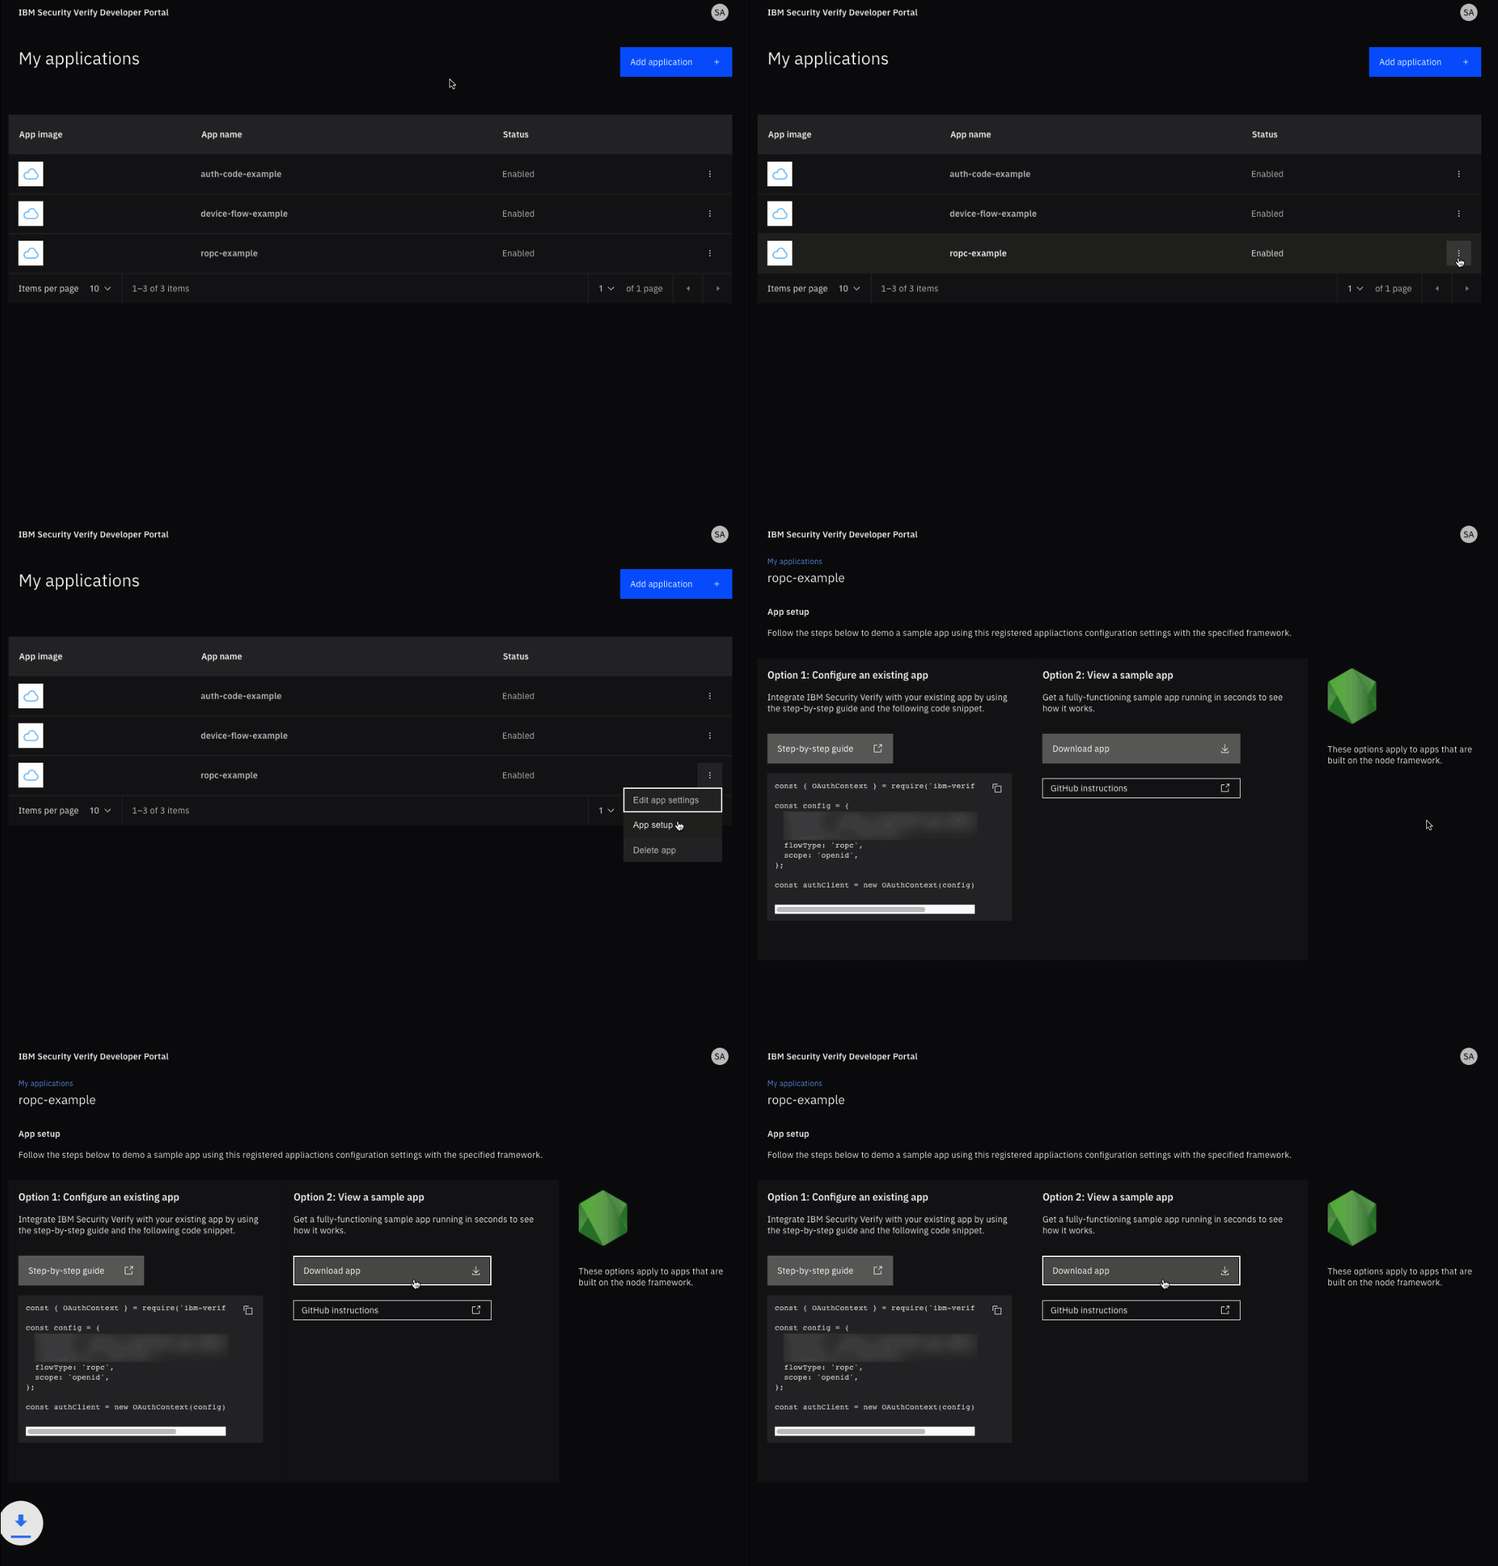
From the My applications page, select your application and then click the App setup link that appears at the top of the details sidebar.
-
Select the node.js tile.
-
Select the Download app button. This will download a ZIP file containing the sample application.

Download sample application
- Extract the ZIP file to the location where you will run the sample application.
- Copy the generated snippet from the developer portal UI.
- Create a .env file in the root of your project, paste the snippet provided and click save.
Install modules
In the directory that was created when you extracted the ZIP file, run the following command to install the node modules required by the sample application:
npm install
added 9 packages, and audited 10 packages in 2s

found 0 vulnerabilities
Run the sample application and test
In the directory that was created when you extracted the ZIP file, run the following command to start the sample application:
npm start
> [email protected] start
> node server.js

=========================================
Dev portal sample app for Resource Owner
Password Credentials (ROPC) grant type.

Tenant: https://...verify.ibm.com
client ID: 29bc0bd2-e260-4e94-8f3d-f352ba3bf5ae

username:
You can see that the application is running and has prompted for authentication.
Enter username and password
Enter the username and password of a user that exists in your IBM Verify tenant:
username: alice
password: **********
The user is authenticated against your IBM Verify tenant. If authentication fails, you will see the following message:
Authenticating...
Error occured while authenticating { error_description: 'CSIAQ0264E The user name or password is invalid.',
  error: 'invalid_grant' }
If authentication is successful, you will see information about the authenticated user. This information is being retrieved by calling the OIDC UserInfo endpoint using the access token retrieved using the ROPC grant type flow:
Authenticating...

Successfully retrieved user information

┌────────────────────┬────────────────────────┐
│      (index)       │         Values         │
├────────────────────┼────────────────────────┤
│        sub         │      '50488EHGGY'      │
│     realmName      │  'cloudIdentityRealm'  │
│    displayName     │     'Alice Developer'  │
│ uniqueSecurityName │      '50488EHGGY'      │
│        name        │     'Alice Developer'  │
│ preferred_username │        'alice'         │
│      userType      │       'regular'        │
└────────────────────┴────────────────────────┘


=========================================
Available attributes
The attributes that are shared from your IBM Verify tenant to the application are controlled by the requested OpenID Connect scopes and by the configuration of the Developer Portal (which is set by your tenant administrator).
If you want to receive additional information, try adding additional scopes to the .env file of the sample application:
SCOPE=openid profile email phone
Updated 7 months ago
