User registration with identity proofing
Multi-step user registration with identity proofing
IBM Verify enables users to self-register, as typically seen in Consumer Identity and Access Management (CIAM) and Business-to-Business-to-Consumer (B2B2C) use cases.
Self-registration can be done by taking the user through a series of data collection and validation steps. There is a specific validation step where the user will need to validate their identity.
The action of validating an identity is known as "identity proofing". The information that is provided by the user in this flow is validated with an external vendor.
This blog helps you understand how to self-register by "identity proofing".
Overview of the flow
The flow for "identity proofing" goes as follows:
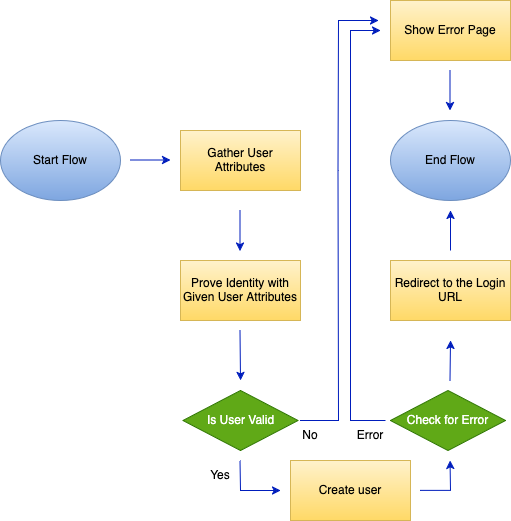
- Gather attributes from the user. These include Email, Account Password, Given Name (First Name), Family Name (Last Name), and Mobile Number.
- Redirect the user to an external identity proofing vendor and have them prove their identity. The attributes collected in the first step will be used.
- If the user is not valid, divert the flow to an error page.
- If the user is valid, register them and create a user profile.
- Show a confirmation page that they are registered.
- If the user creation fails, divert the flow to an error page.
Prerequisites
- Review and understand the hello world example, including how to obtain flow and page asset resources for configuring the example flows. See the parent page for details on the hello world example.
- Connect with the IBM Verify support team and get the user registration features enabled in your tenant:
- CI-98615: Workflow User Registration.
- VDEV-33143: Identity Proofing Task to the Flow Designer
- Create a set of user data collection forms that you can use to present relevant data and gather other data from the users.
- Create an identity proofing flow. Please reference documentation on how to configure a stand-alone identity proofing flow.
Installation and configuration
Custom branding theme
This flow presents custom pages, therefore a theme needs to be created to prevent affecting the flows that use the default theme. There are two customized files:
- custom_page4.html: This template is used to show an error in case the flow fails.
- custom_page5.html: This template is used to show a confirmation to the user post-registration.
Log in to the IBM Verify administration console and follow these steps:
-
In the left side menu, select User experience and click Branding.
-
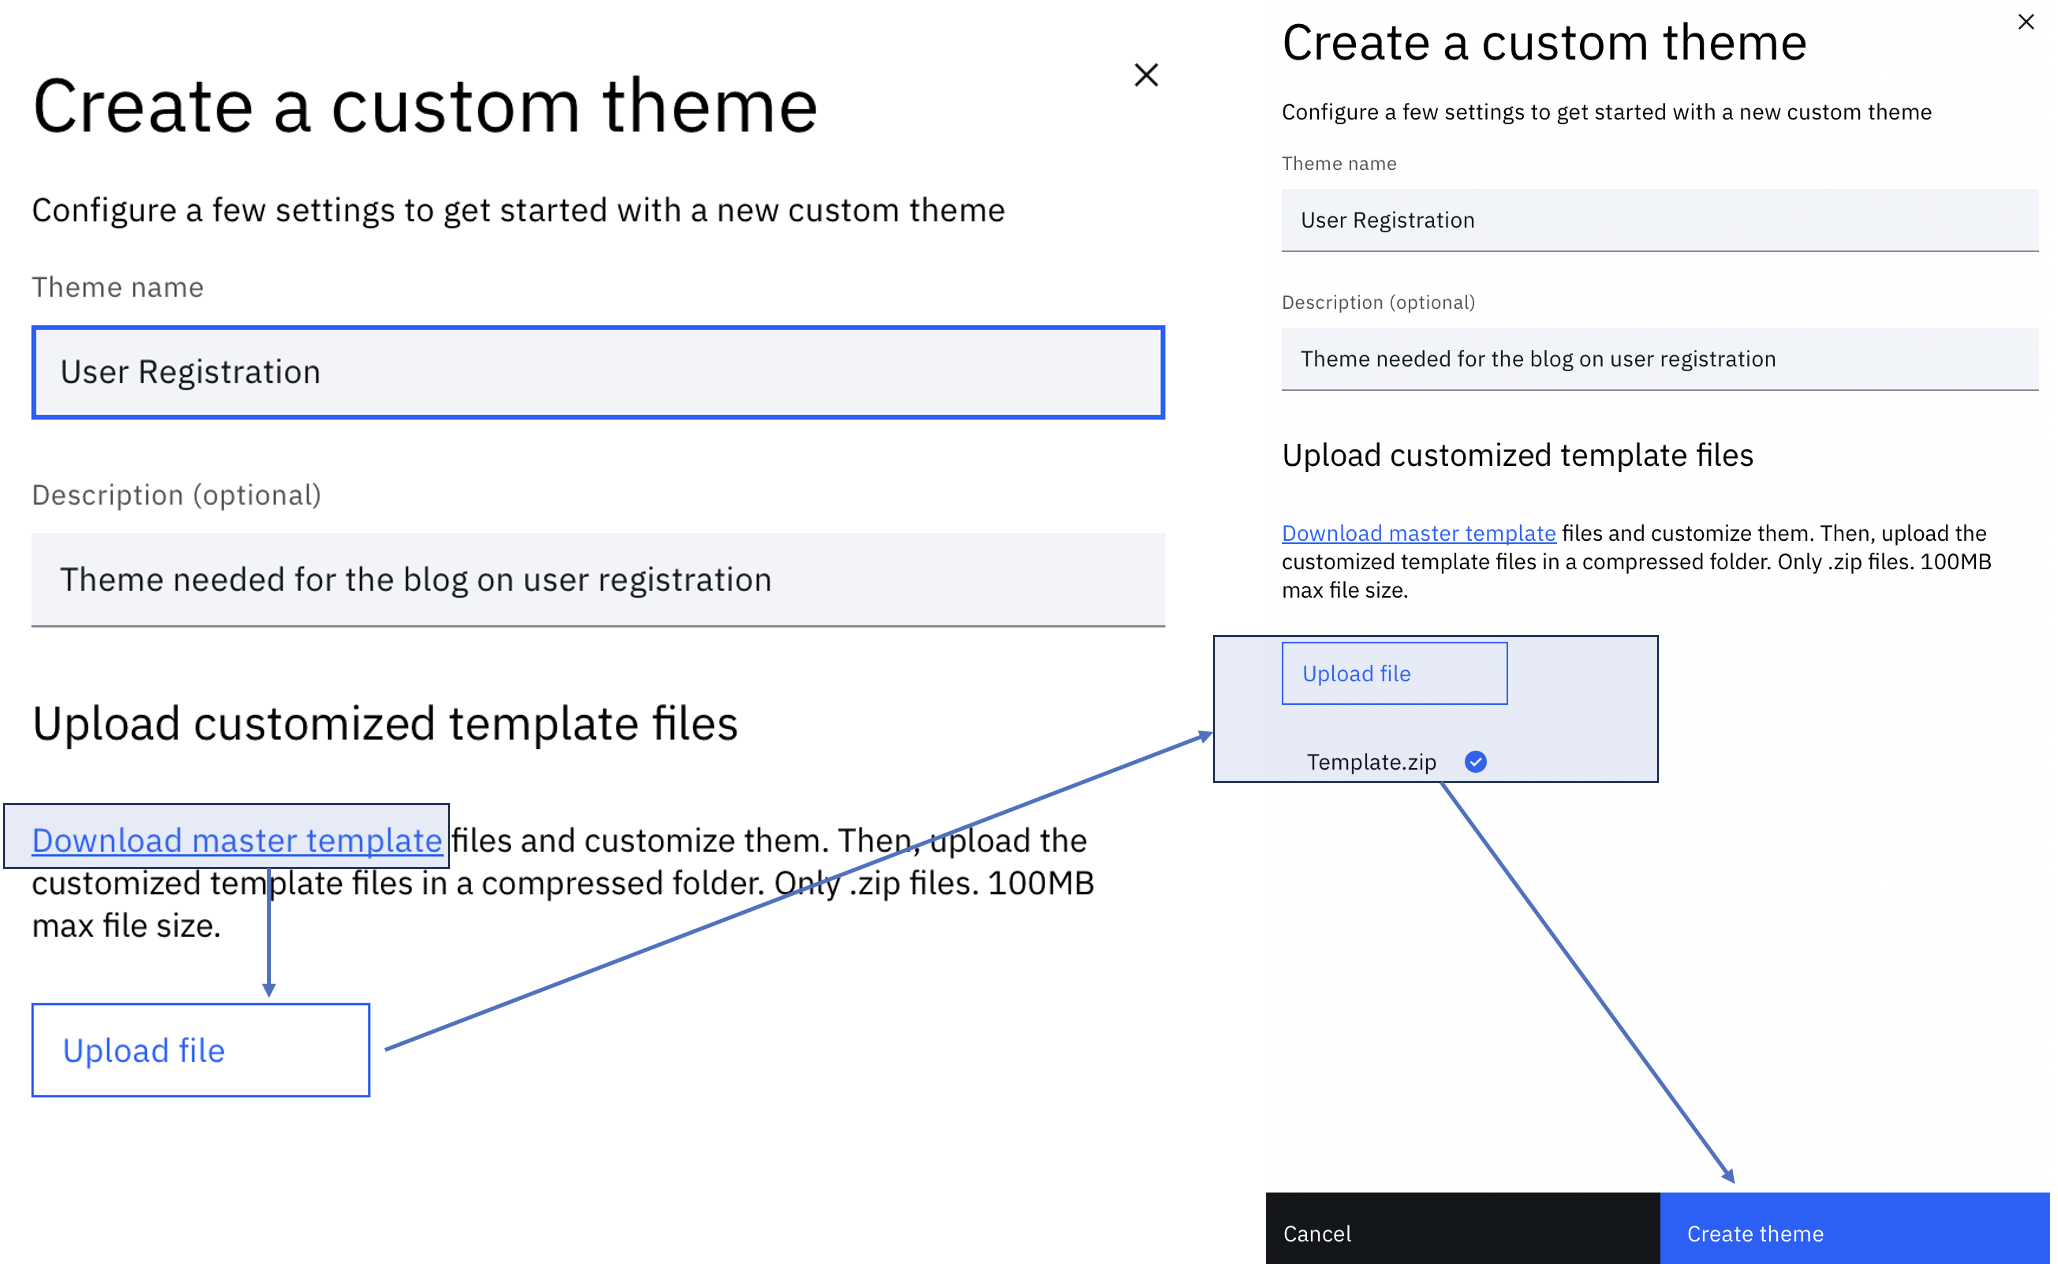
Follow the steps mentioned here to create a theme for this flow. Name the theme appropriately. In context of this article, naming the theme User Registration.
-
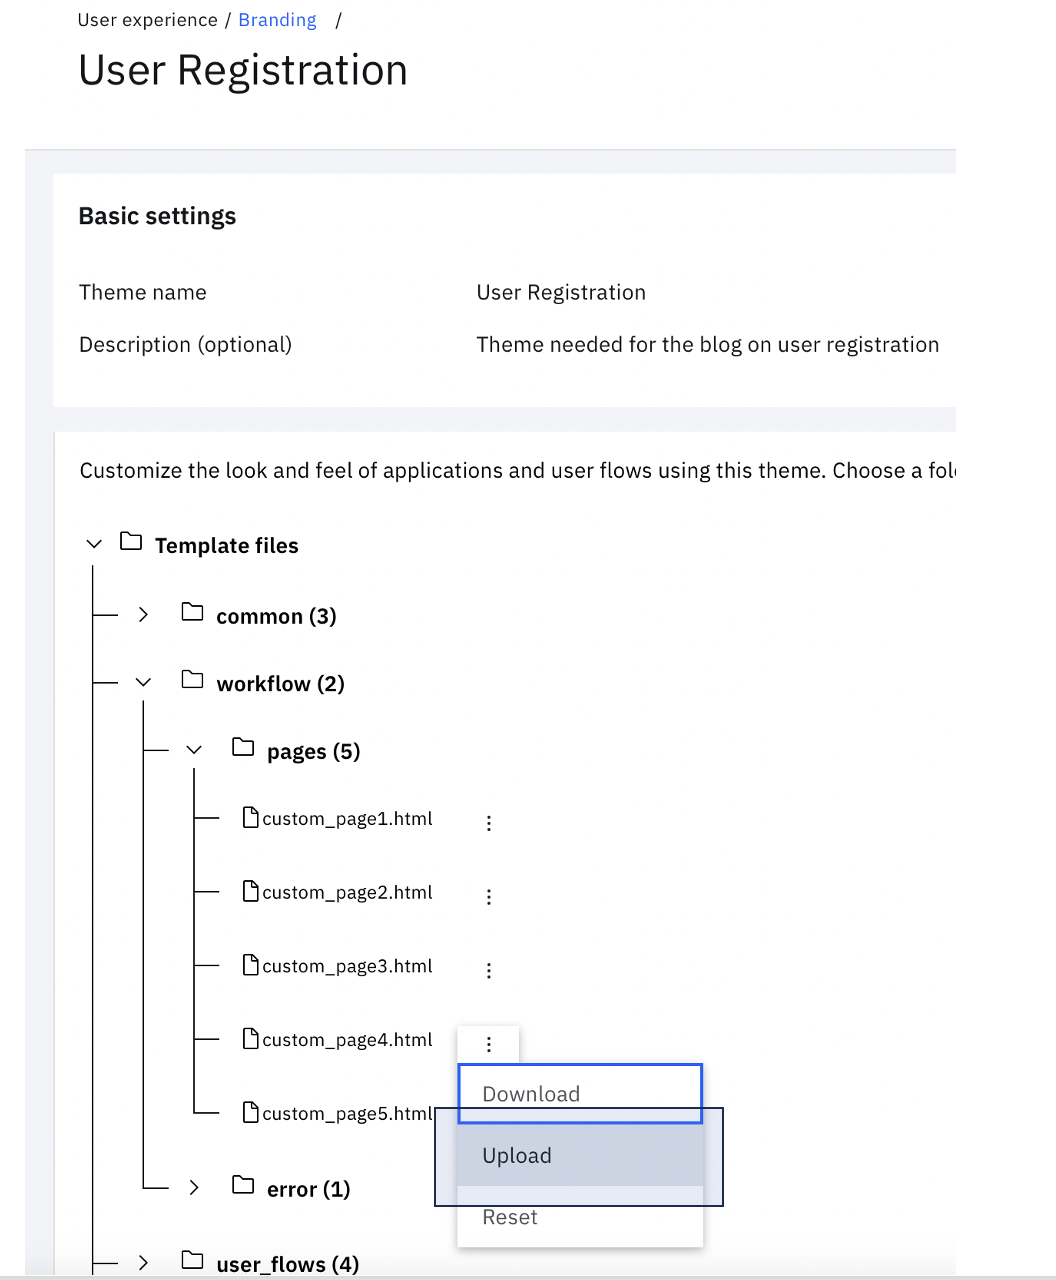
Click the theme tile to view the file tree.
-
Expand workflow > pages and click the three vertical dots next to custom_page4.html. Click Upload.
-
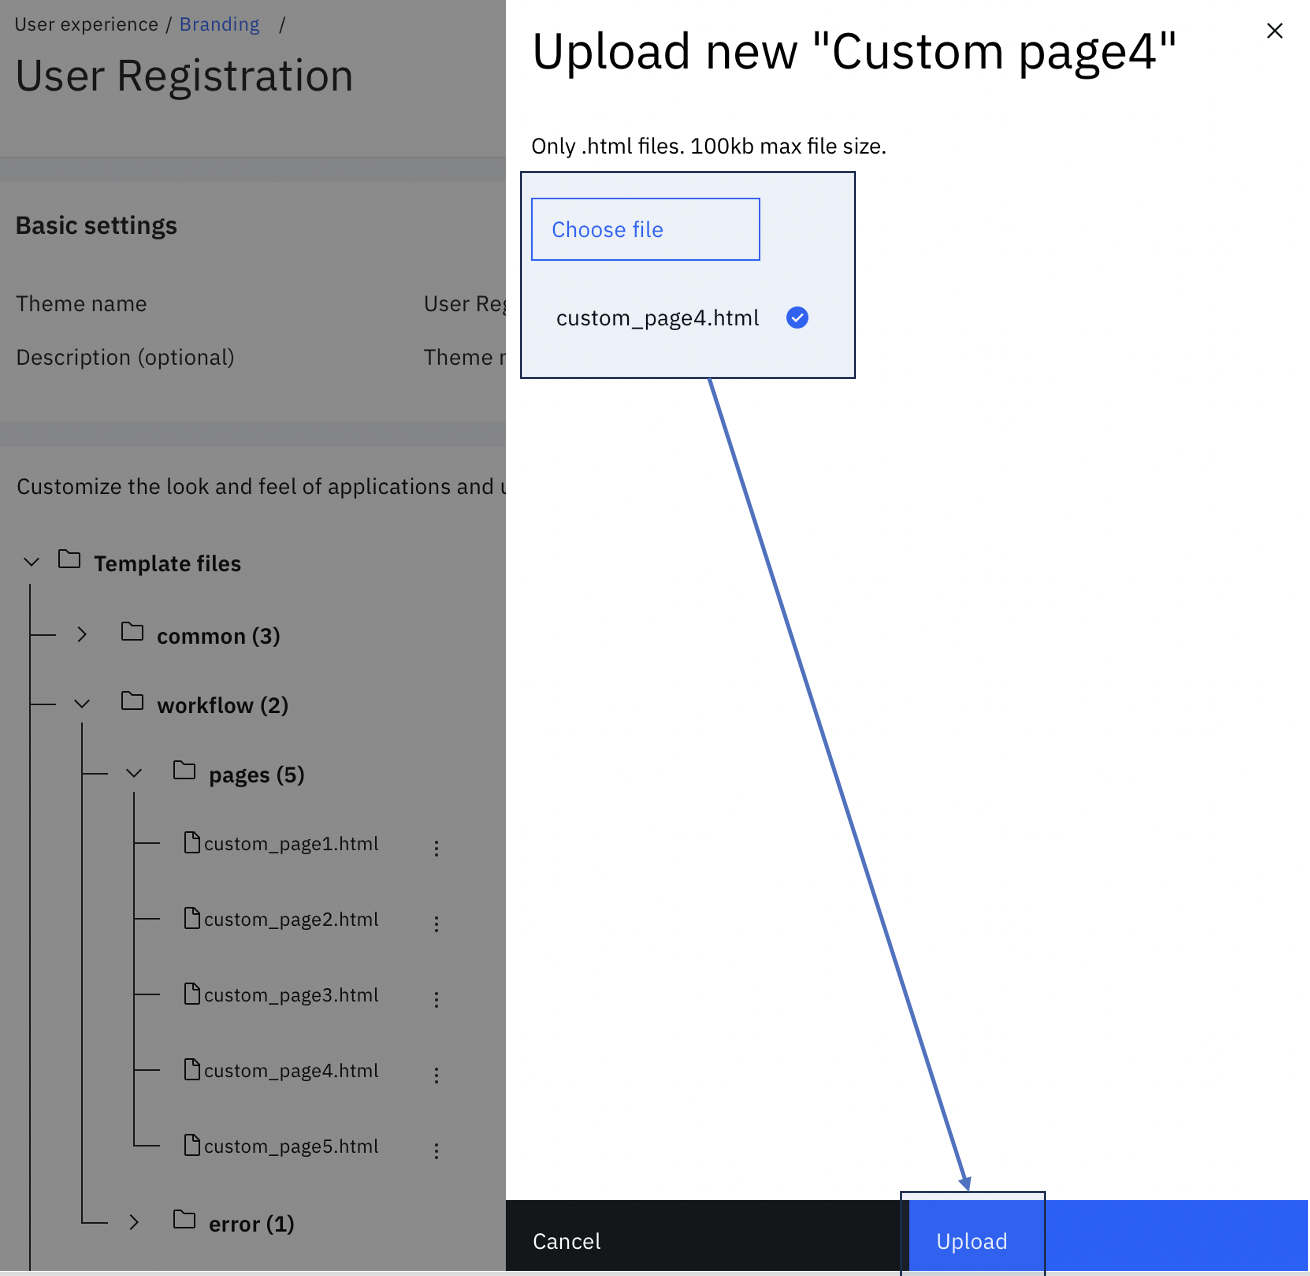
Choose $GIT_REPO/flows/user_registration_with_identity_proofing/pages/templates/workflow/default/custom_page4.html from the local folder. Then click Upload.
-
Similar to the earlier step, under workflow > pages, click the three vertical dots next to custom_page5.html. Click Upload.
-
Choose $GIT_REPO/flows/user_registration_with_identity_proofing/pages/templates/workflow/default/custom_page5.html from the local folder. Then click Upload.
Configuring the user forms
Note
The current article provides the steps to create a single user form with specific fields to demonstrate the basic registration flow. The flow can be expanded to include more attributes and forms, based on the individual needs of registration.
-
When logged in as administrator in the IBM Verify Admin UI, navigate to "User experience".
-
Under "User experience", select "User forms" and "Create form".
-
Enter a form name, for example, idp-attribute-collection-form. Optionally other settings can be customized, such as Primary language, Session management, Theme, and Human Verification:
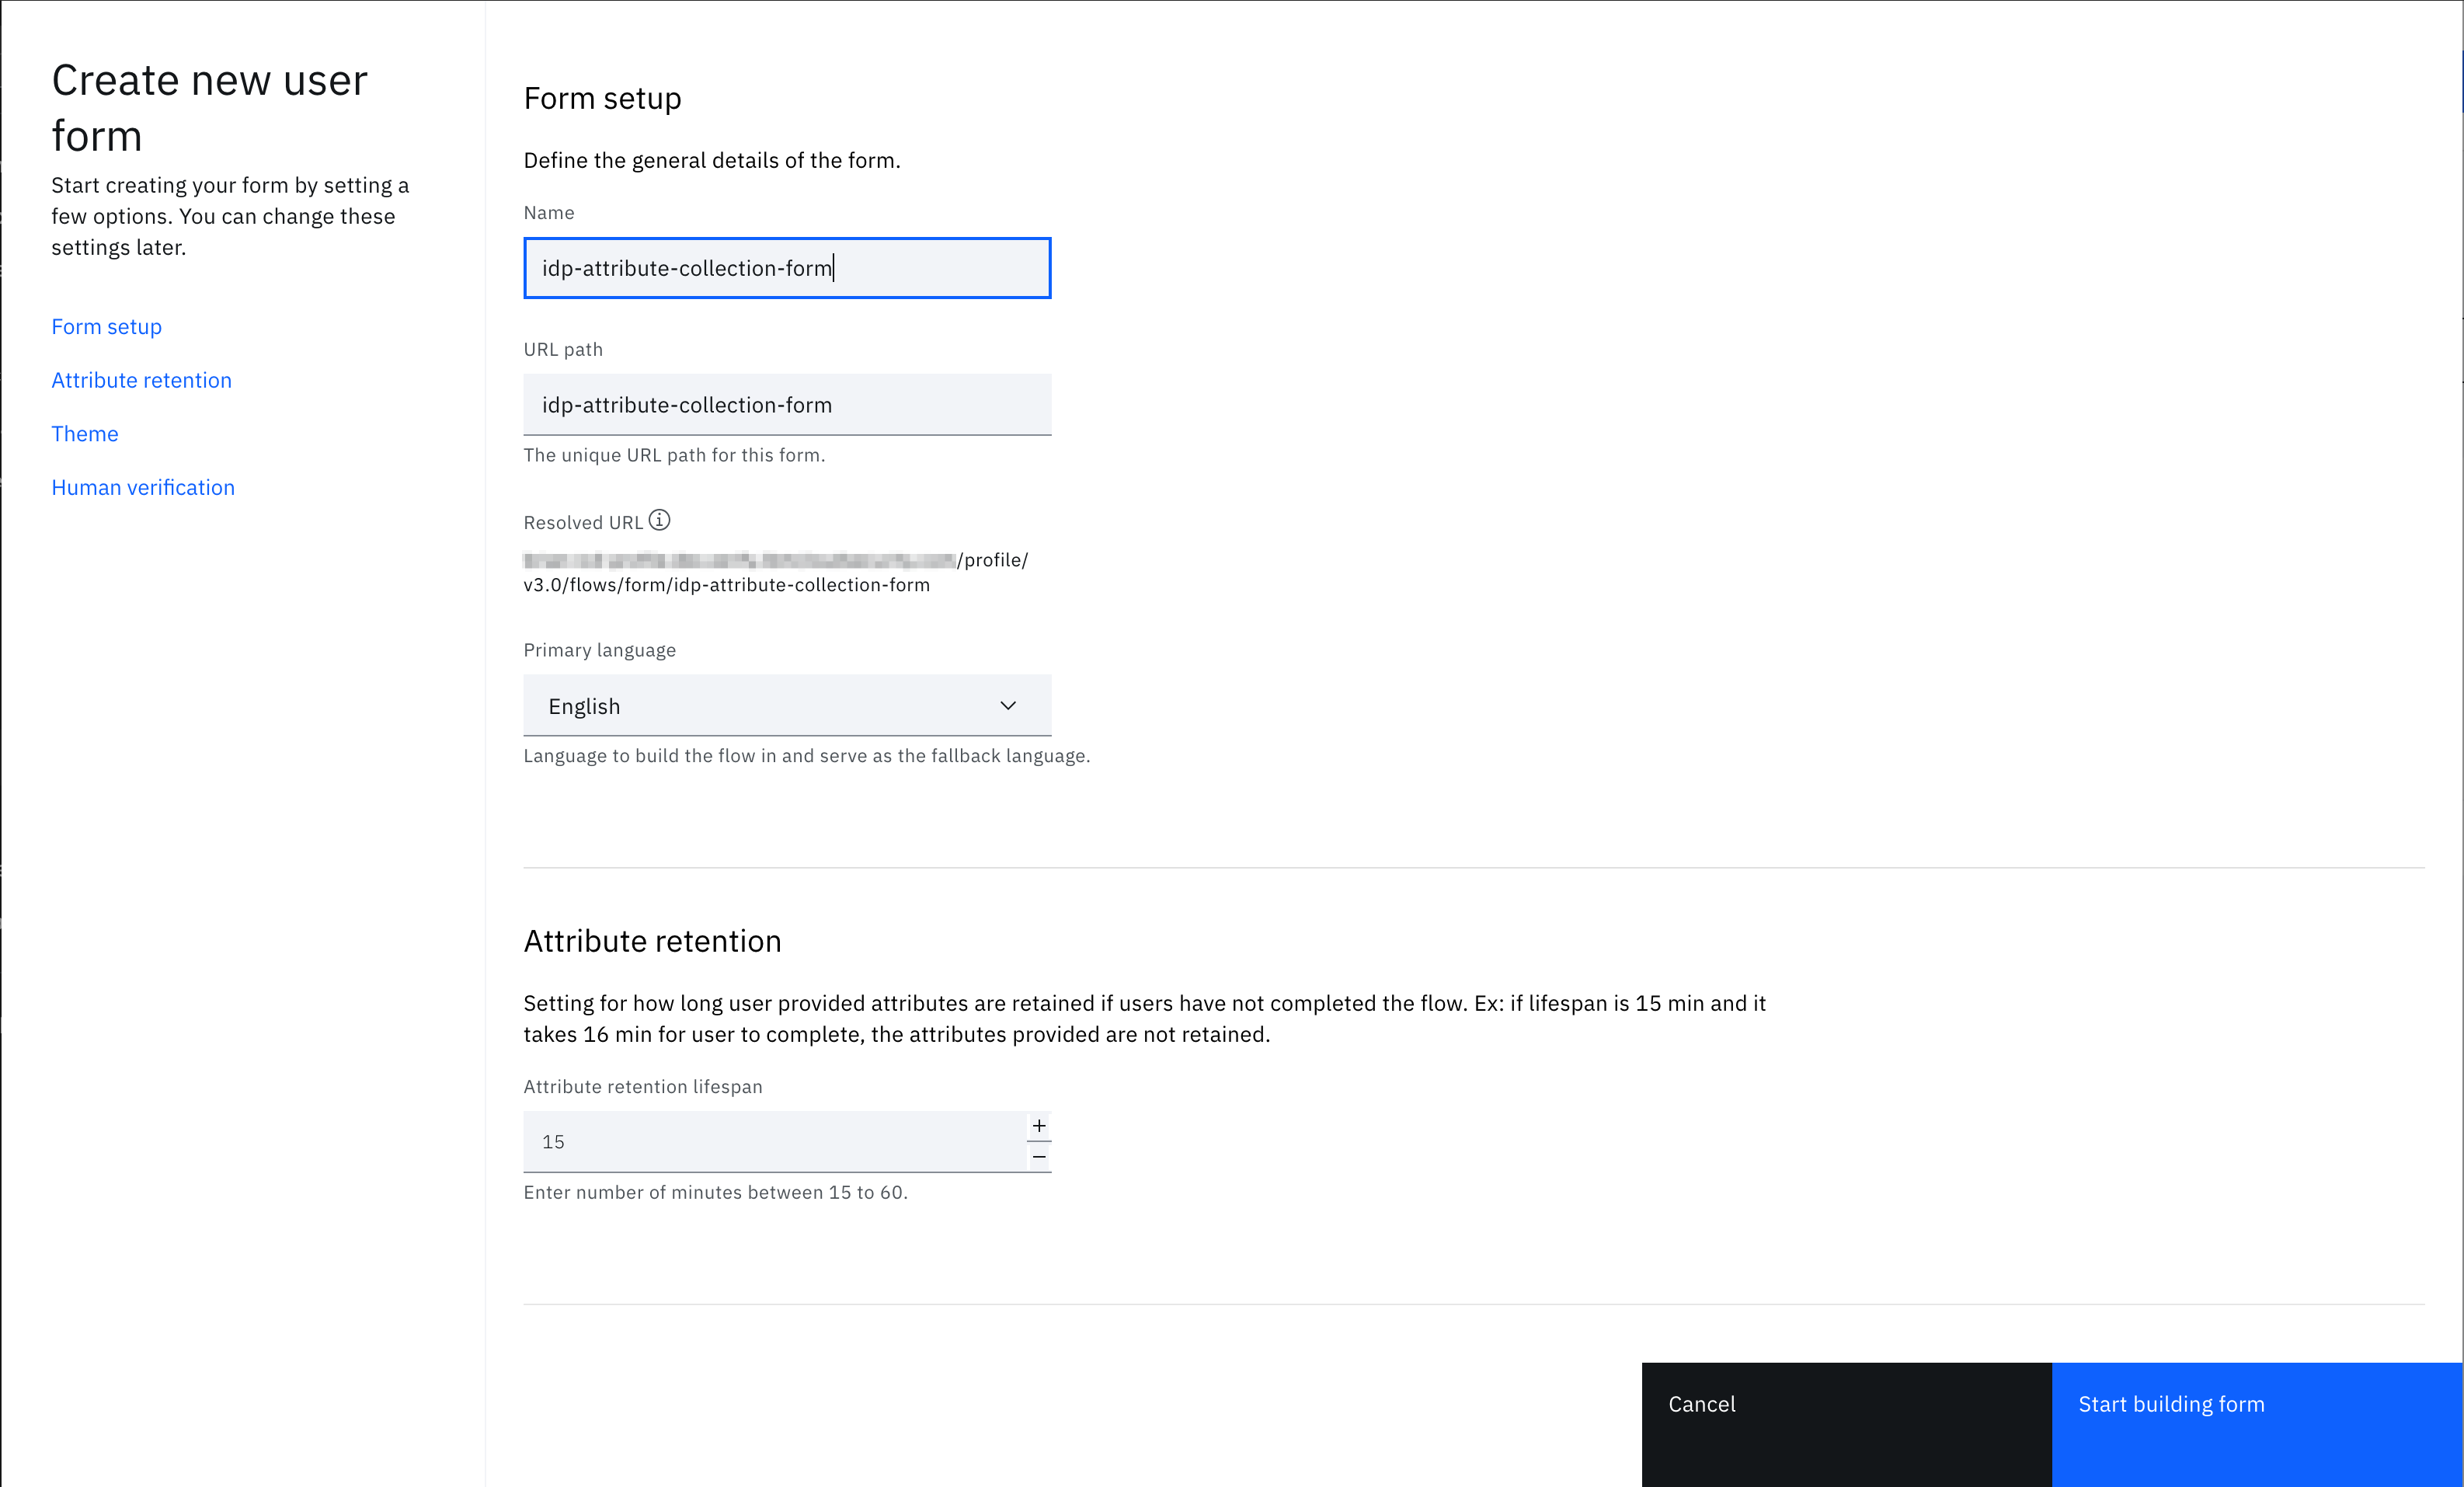
-
Click "Start building form".
-
Click on the Email address element and toggle the "Account username" option.
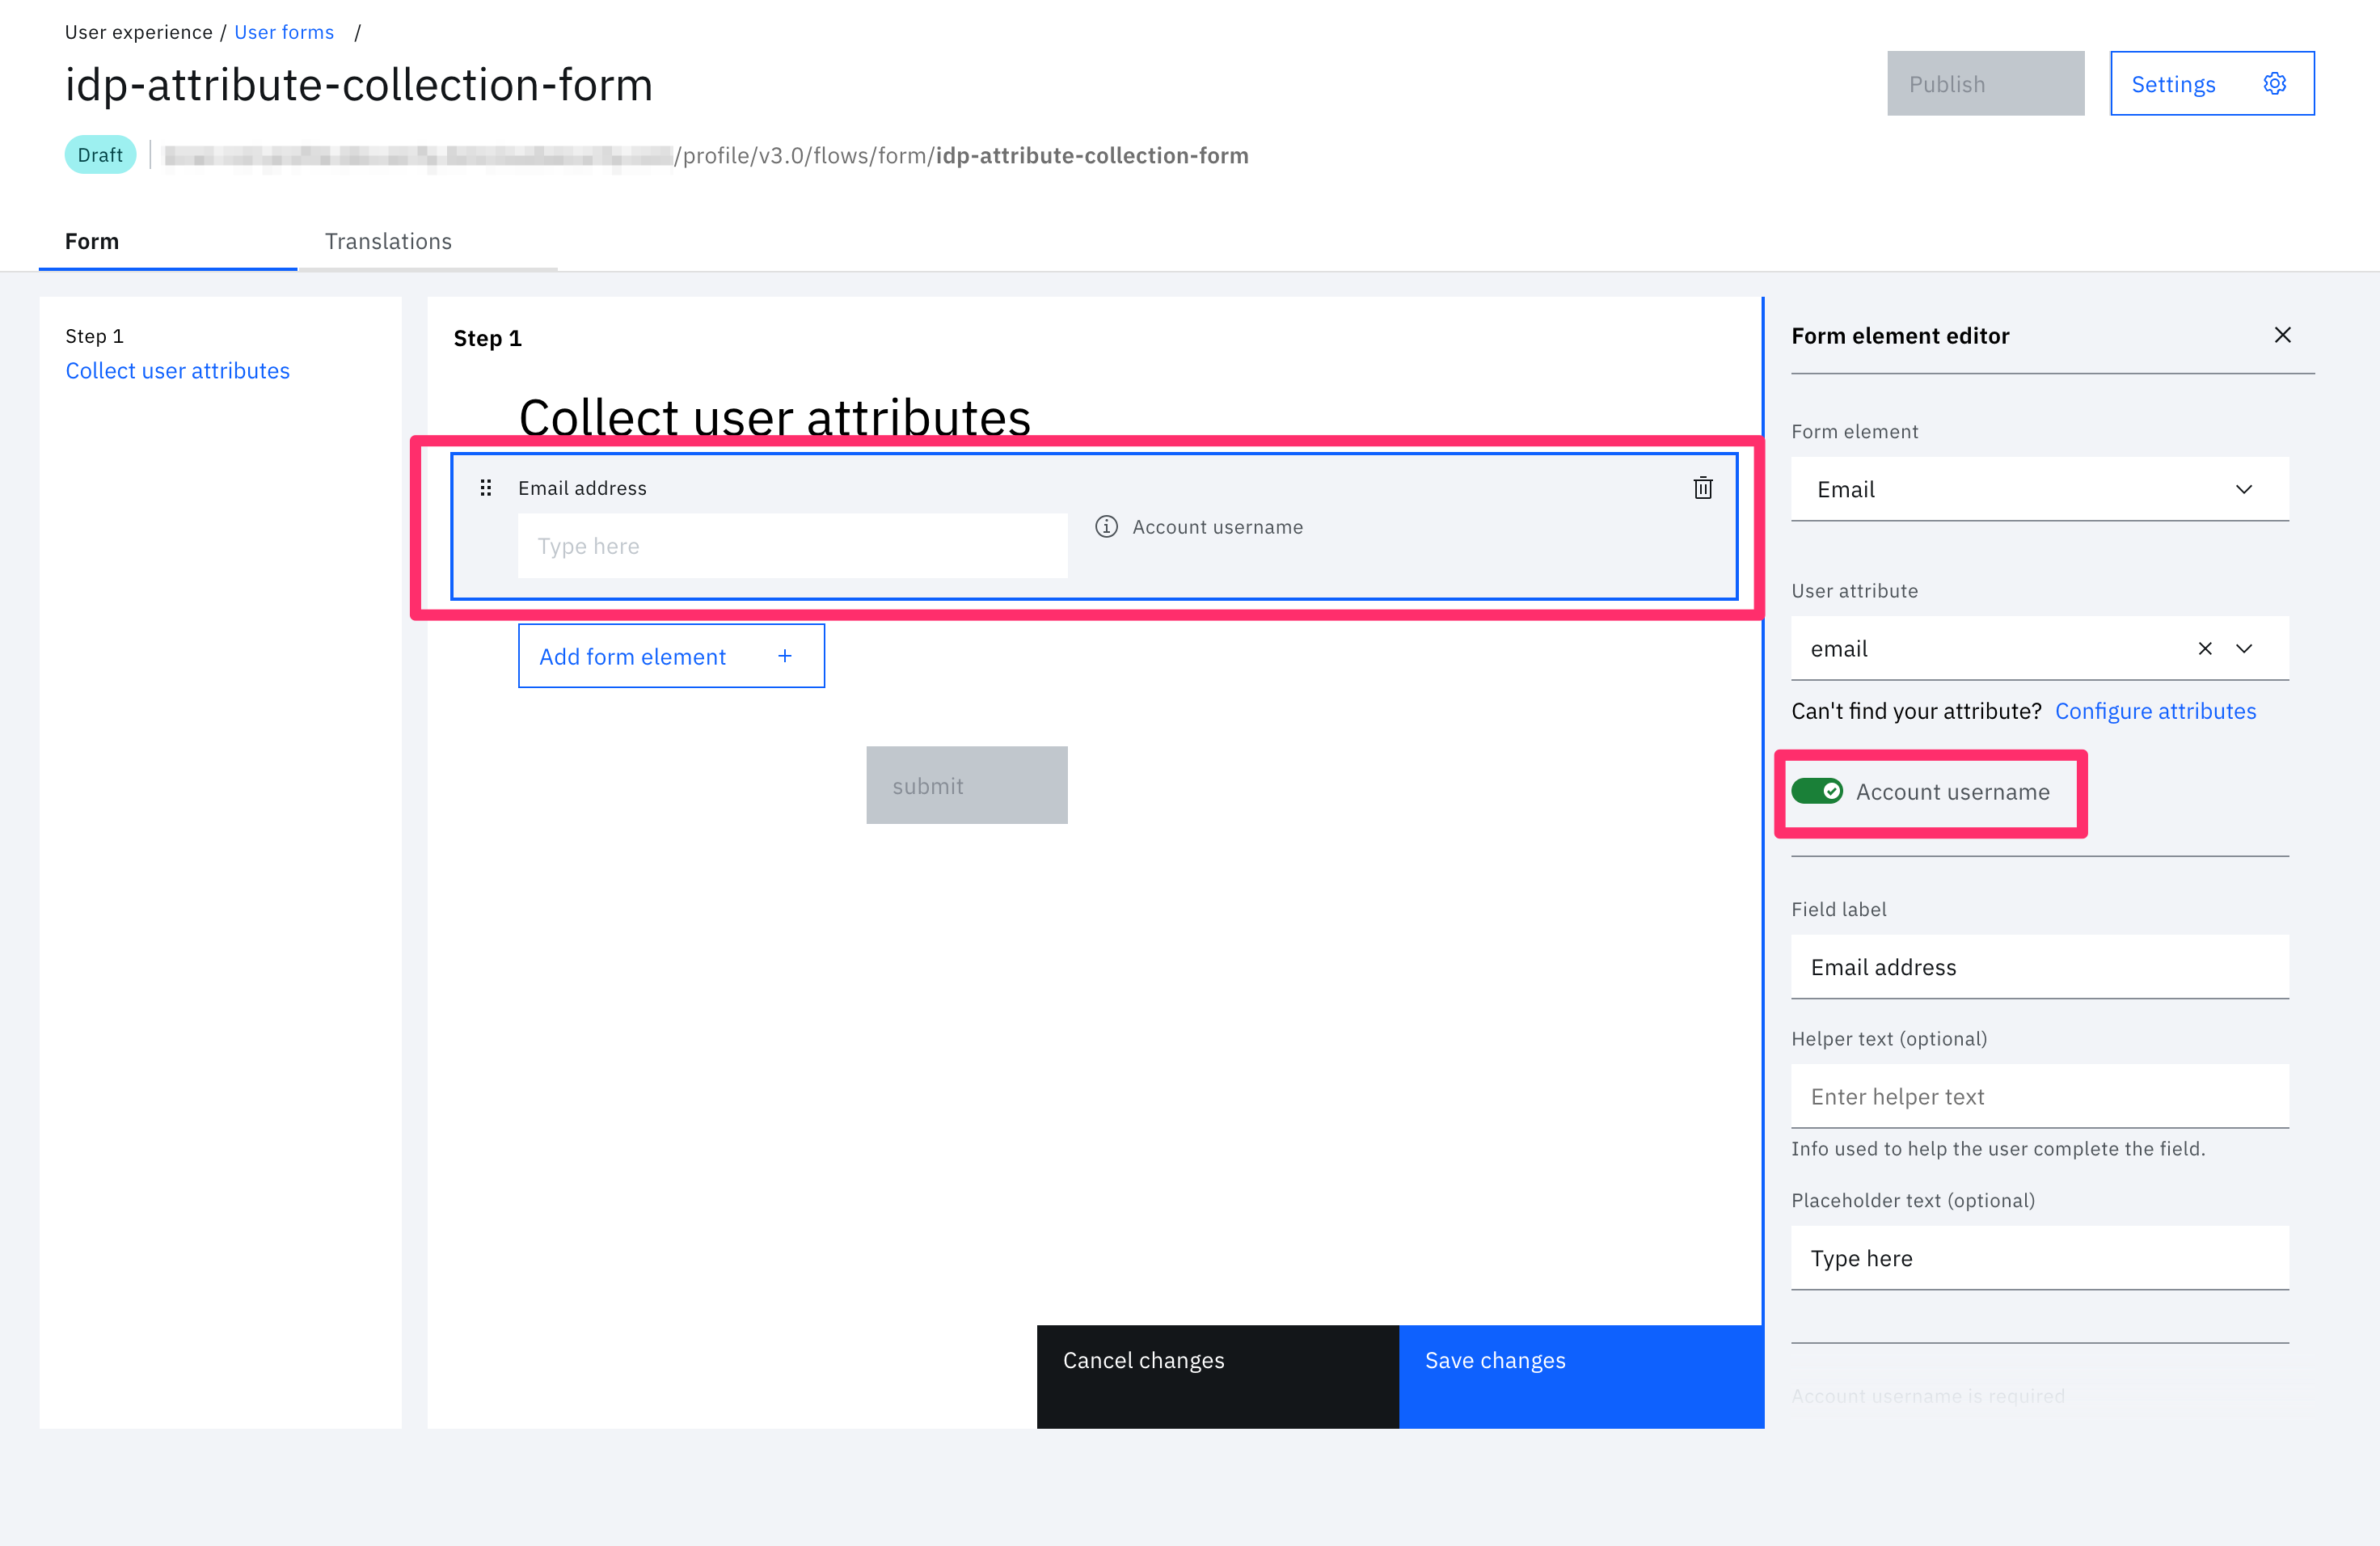
-
Click "Add form element":
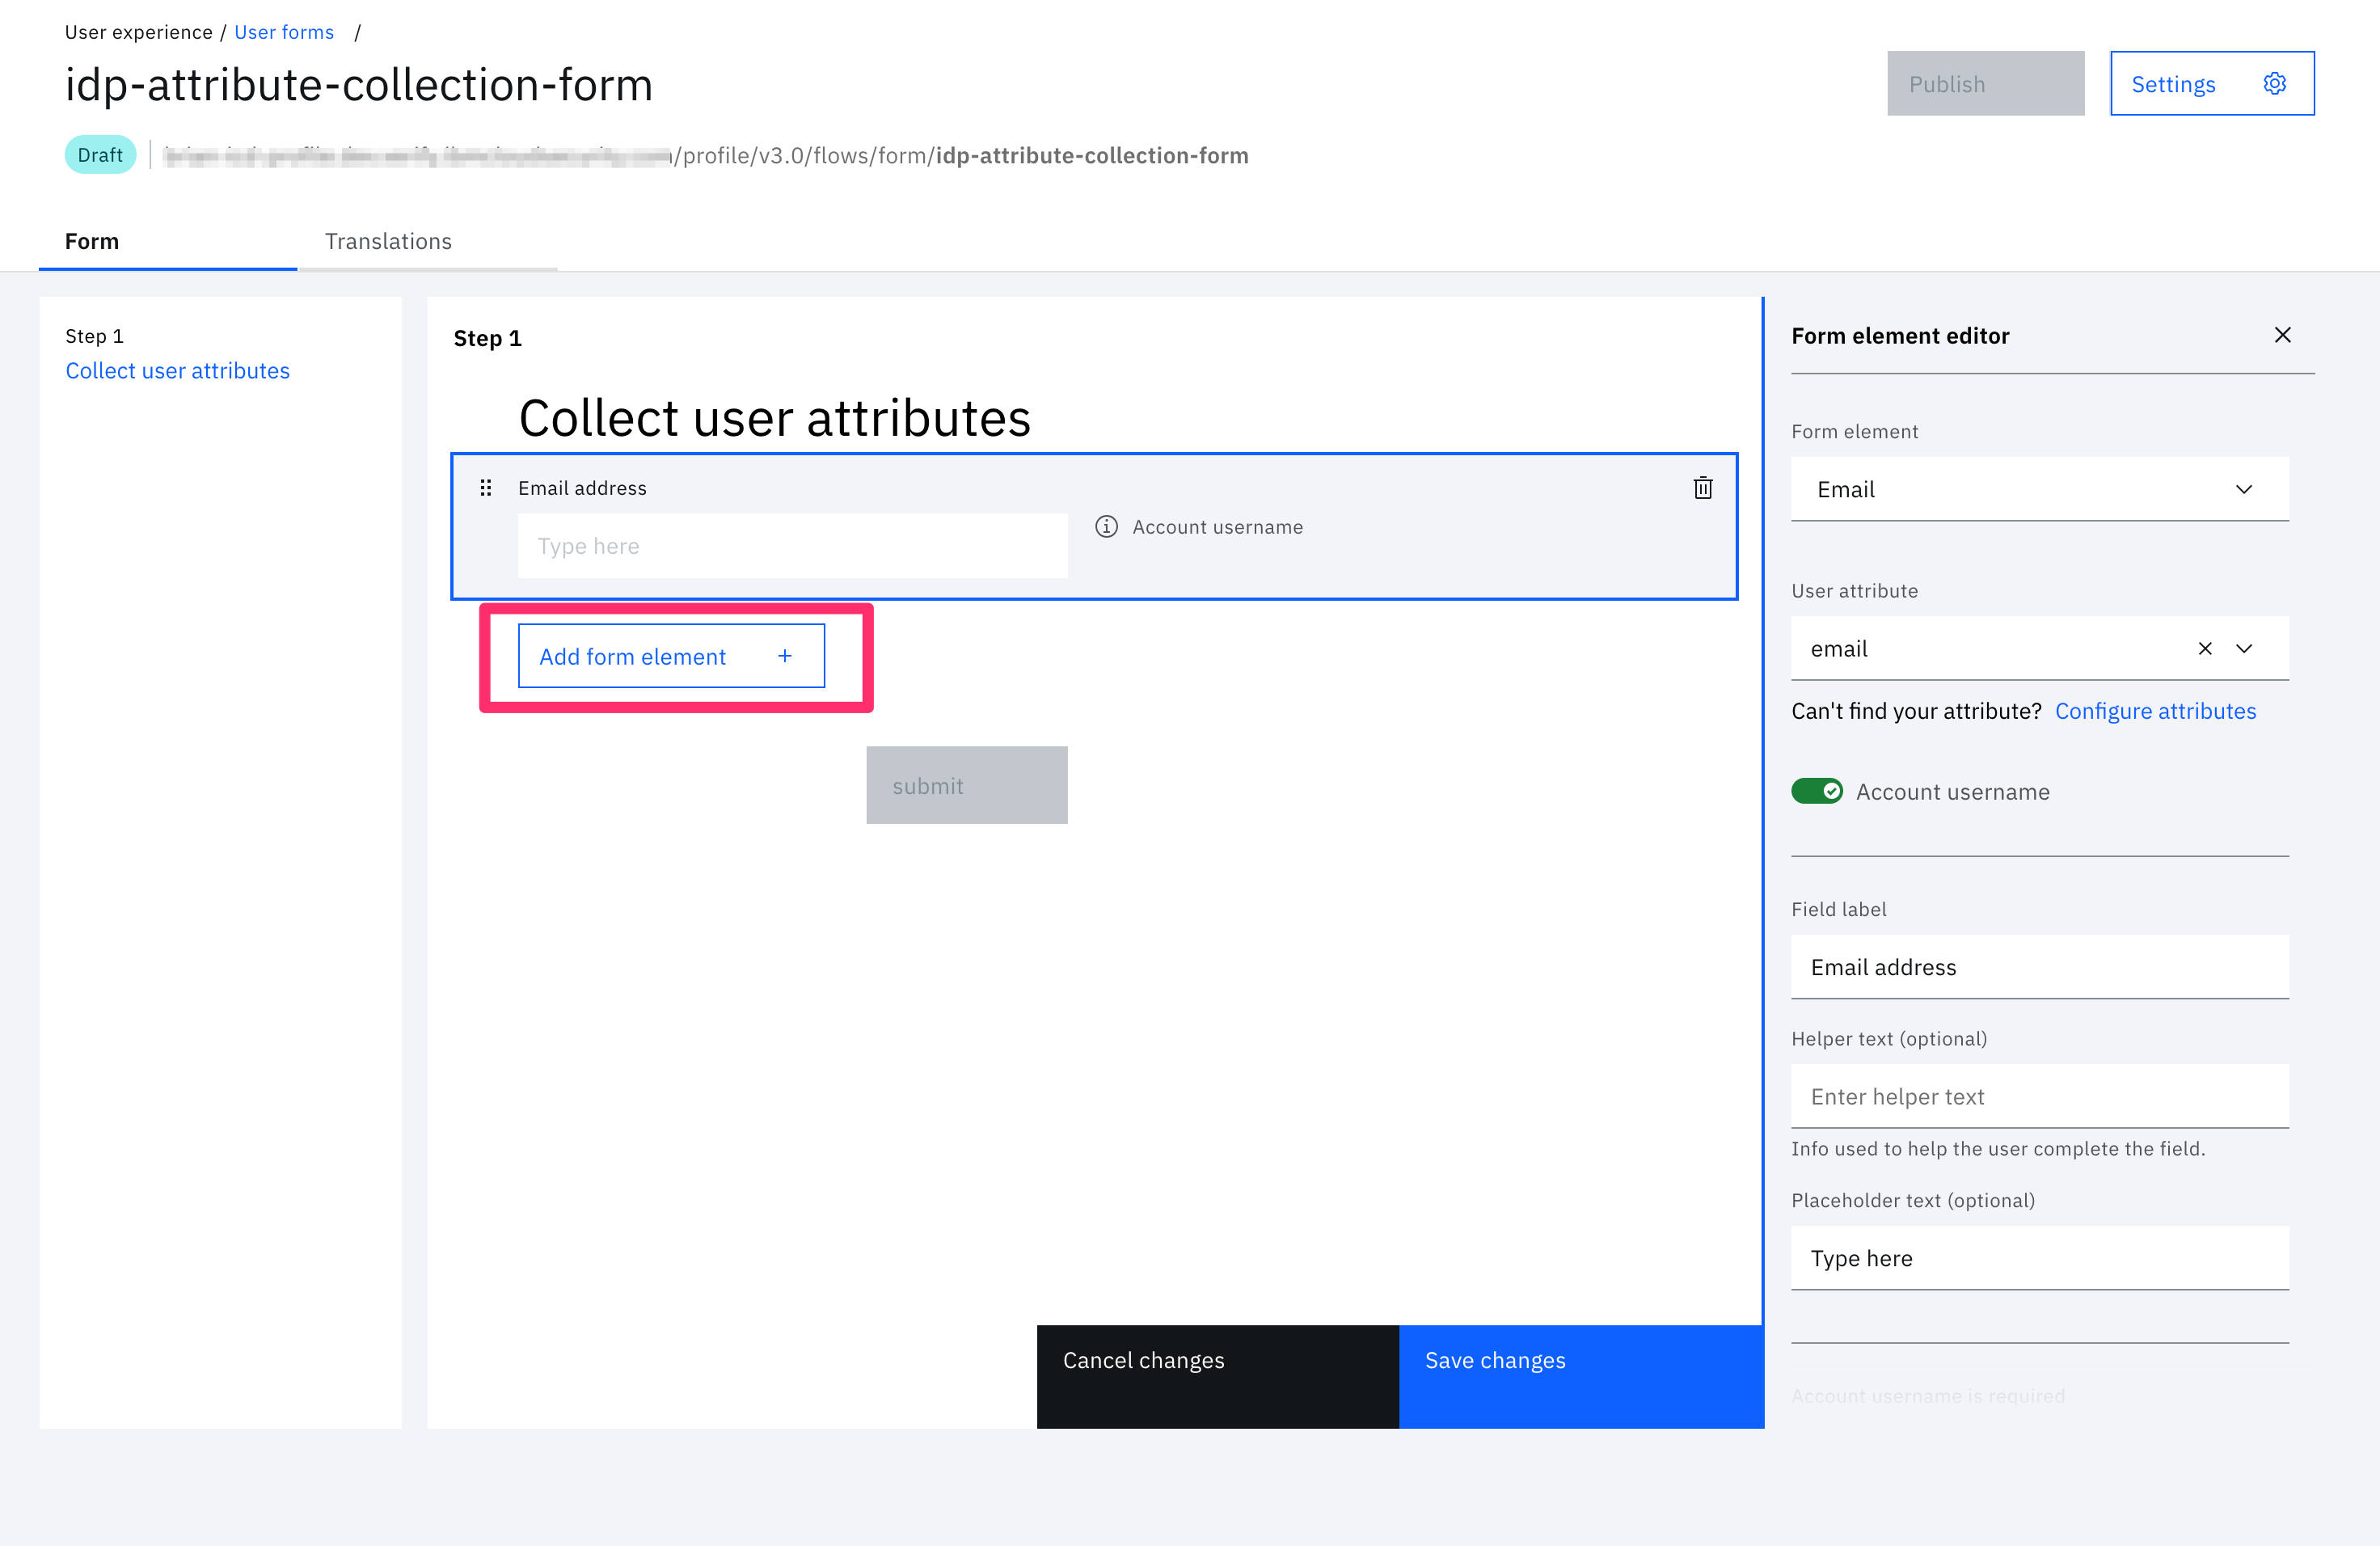
-
Add the relevant fields to collect the Email, Account Password, Given Name, Family Name, and Mobile Number of the user:
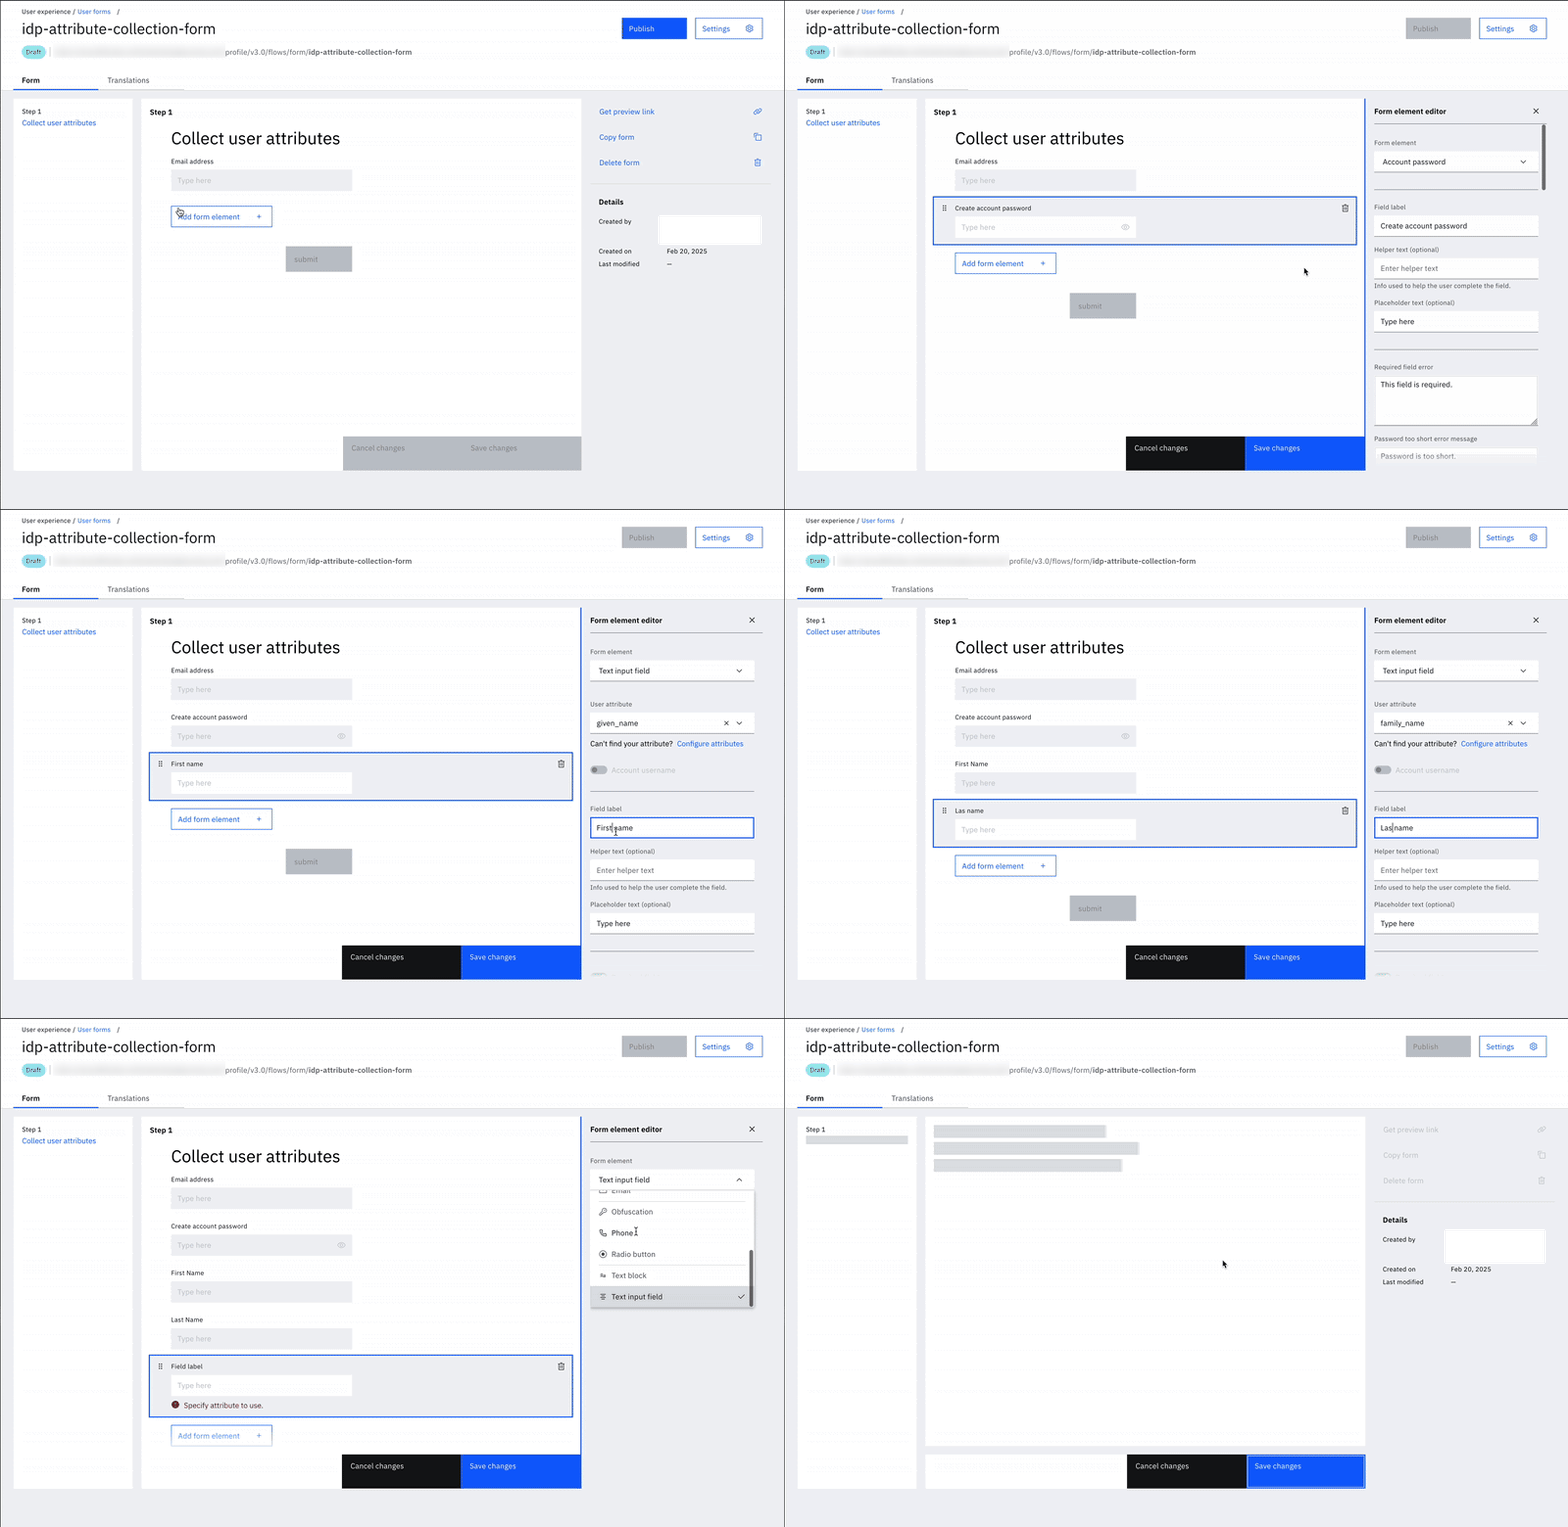
-
Click "Save changes" and "Publish".
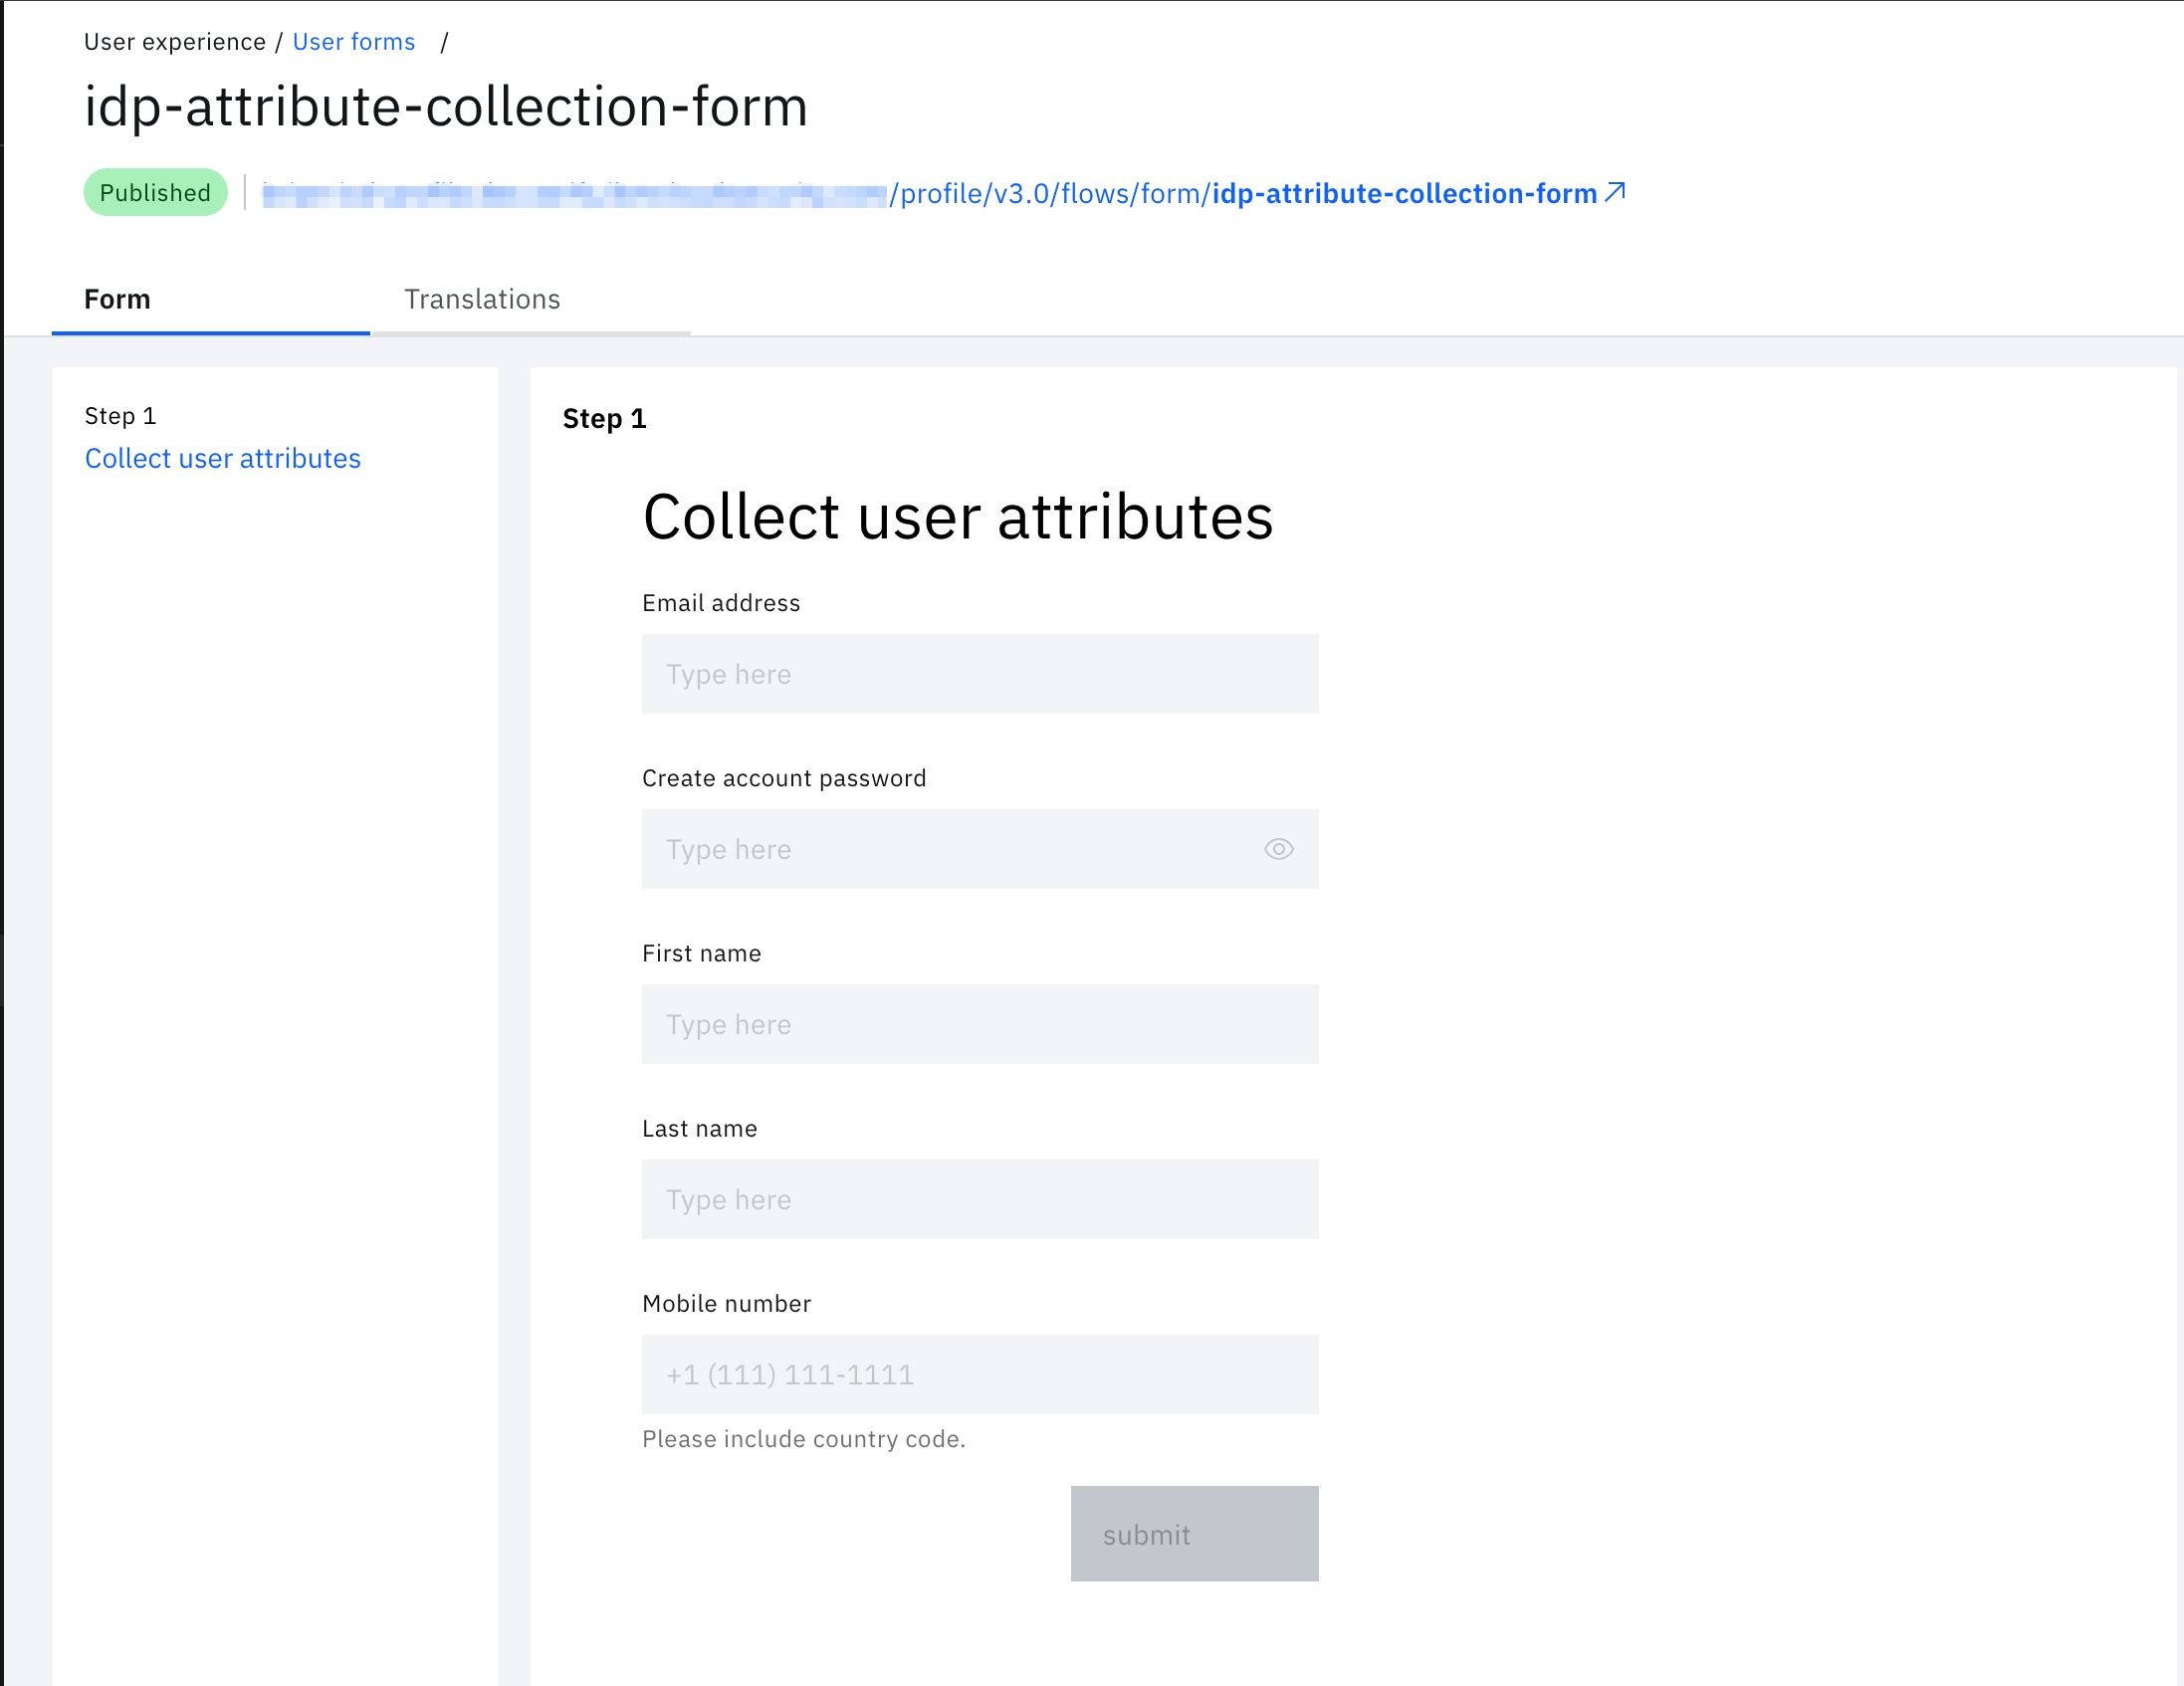
This step completed the user form needed for identity proofing. Note, other settings can be customized such as branding, displayed text for collecting user attributes, other fields for validation, and more.
Configuring the identity proofing flow
Please reference documentation on how to configure a stand-alone identity proofing flow.
When finished, you will see a single identity proofing flow under the Identity proofing section within IBM Verify, in Published state.
Import the workflow
-
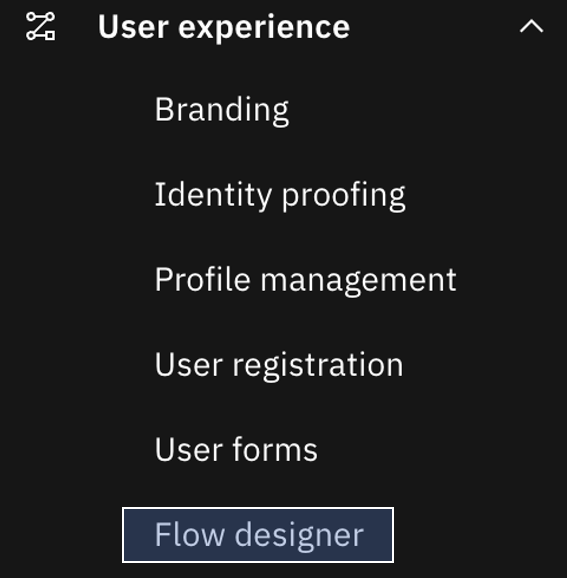
When logged in as administrator in the IBM Verify Admin UI, navigate to the "Flow designer".
-
Click the Import icon next to the Create flow button:

-
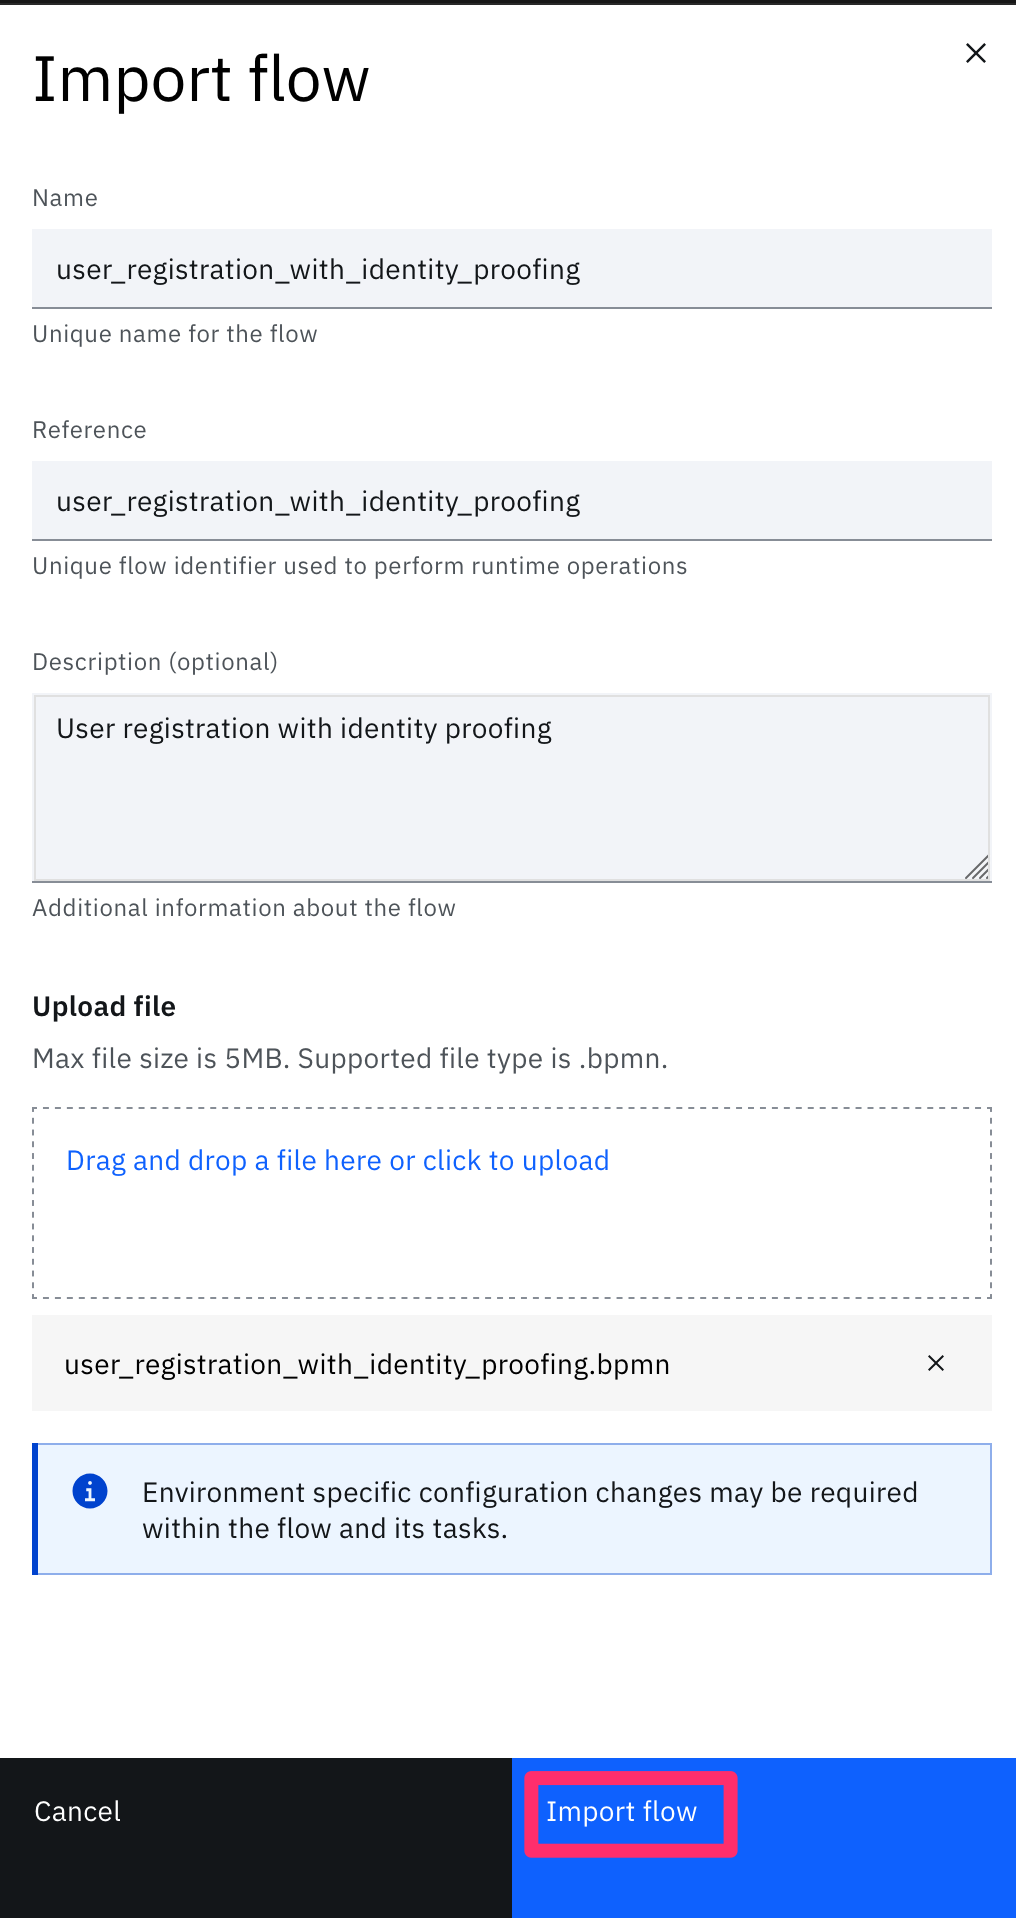
Complete the details and upload the file $GIT_REPO/flows/user_registration_with_identity_proofing/user_registration_with_identity_proofing.bpmn.
-
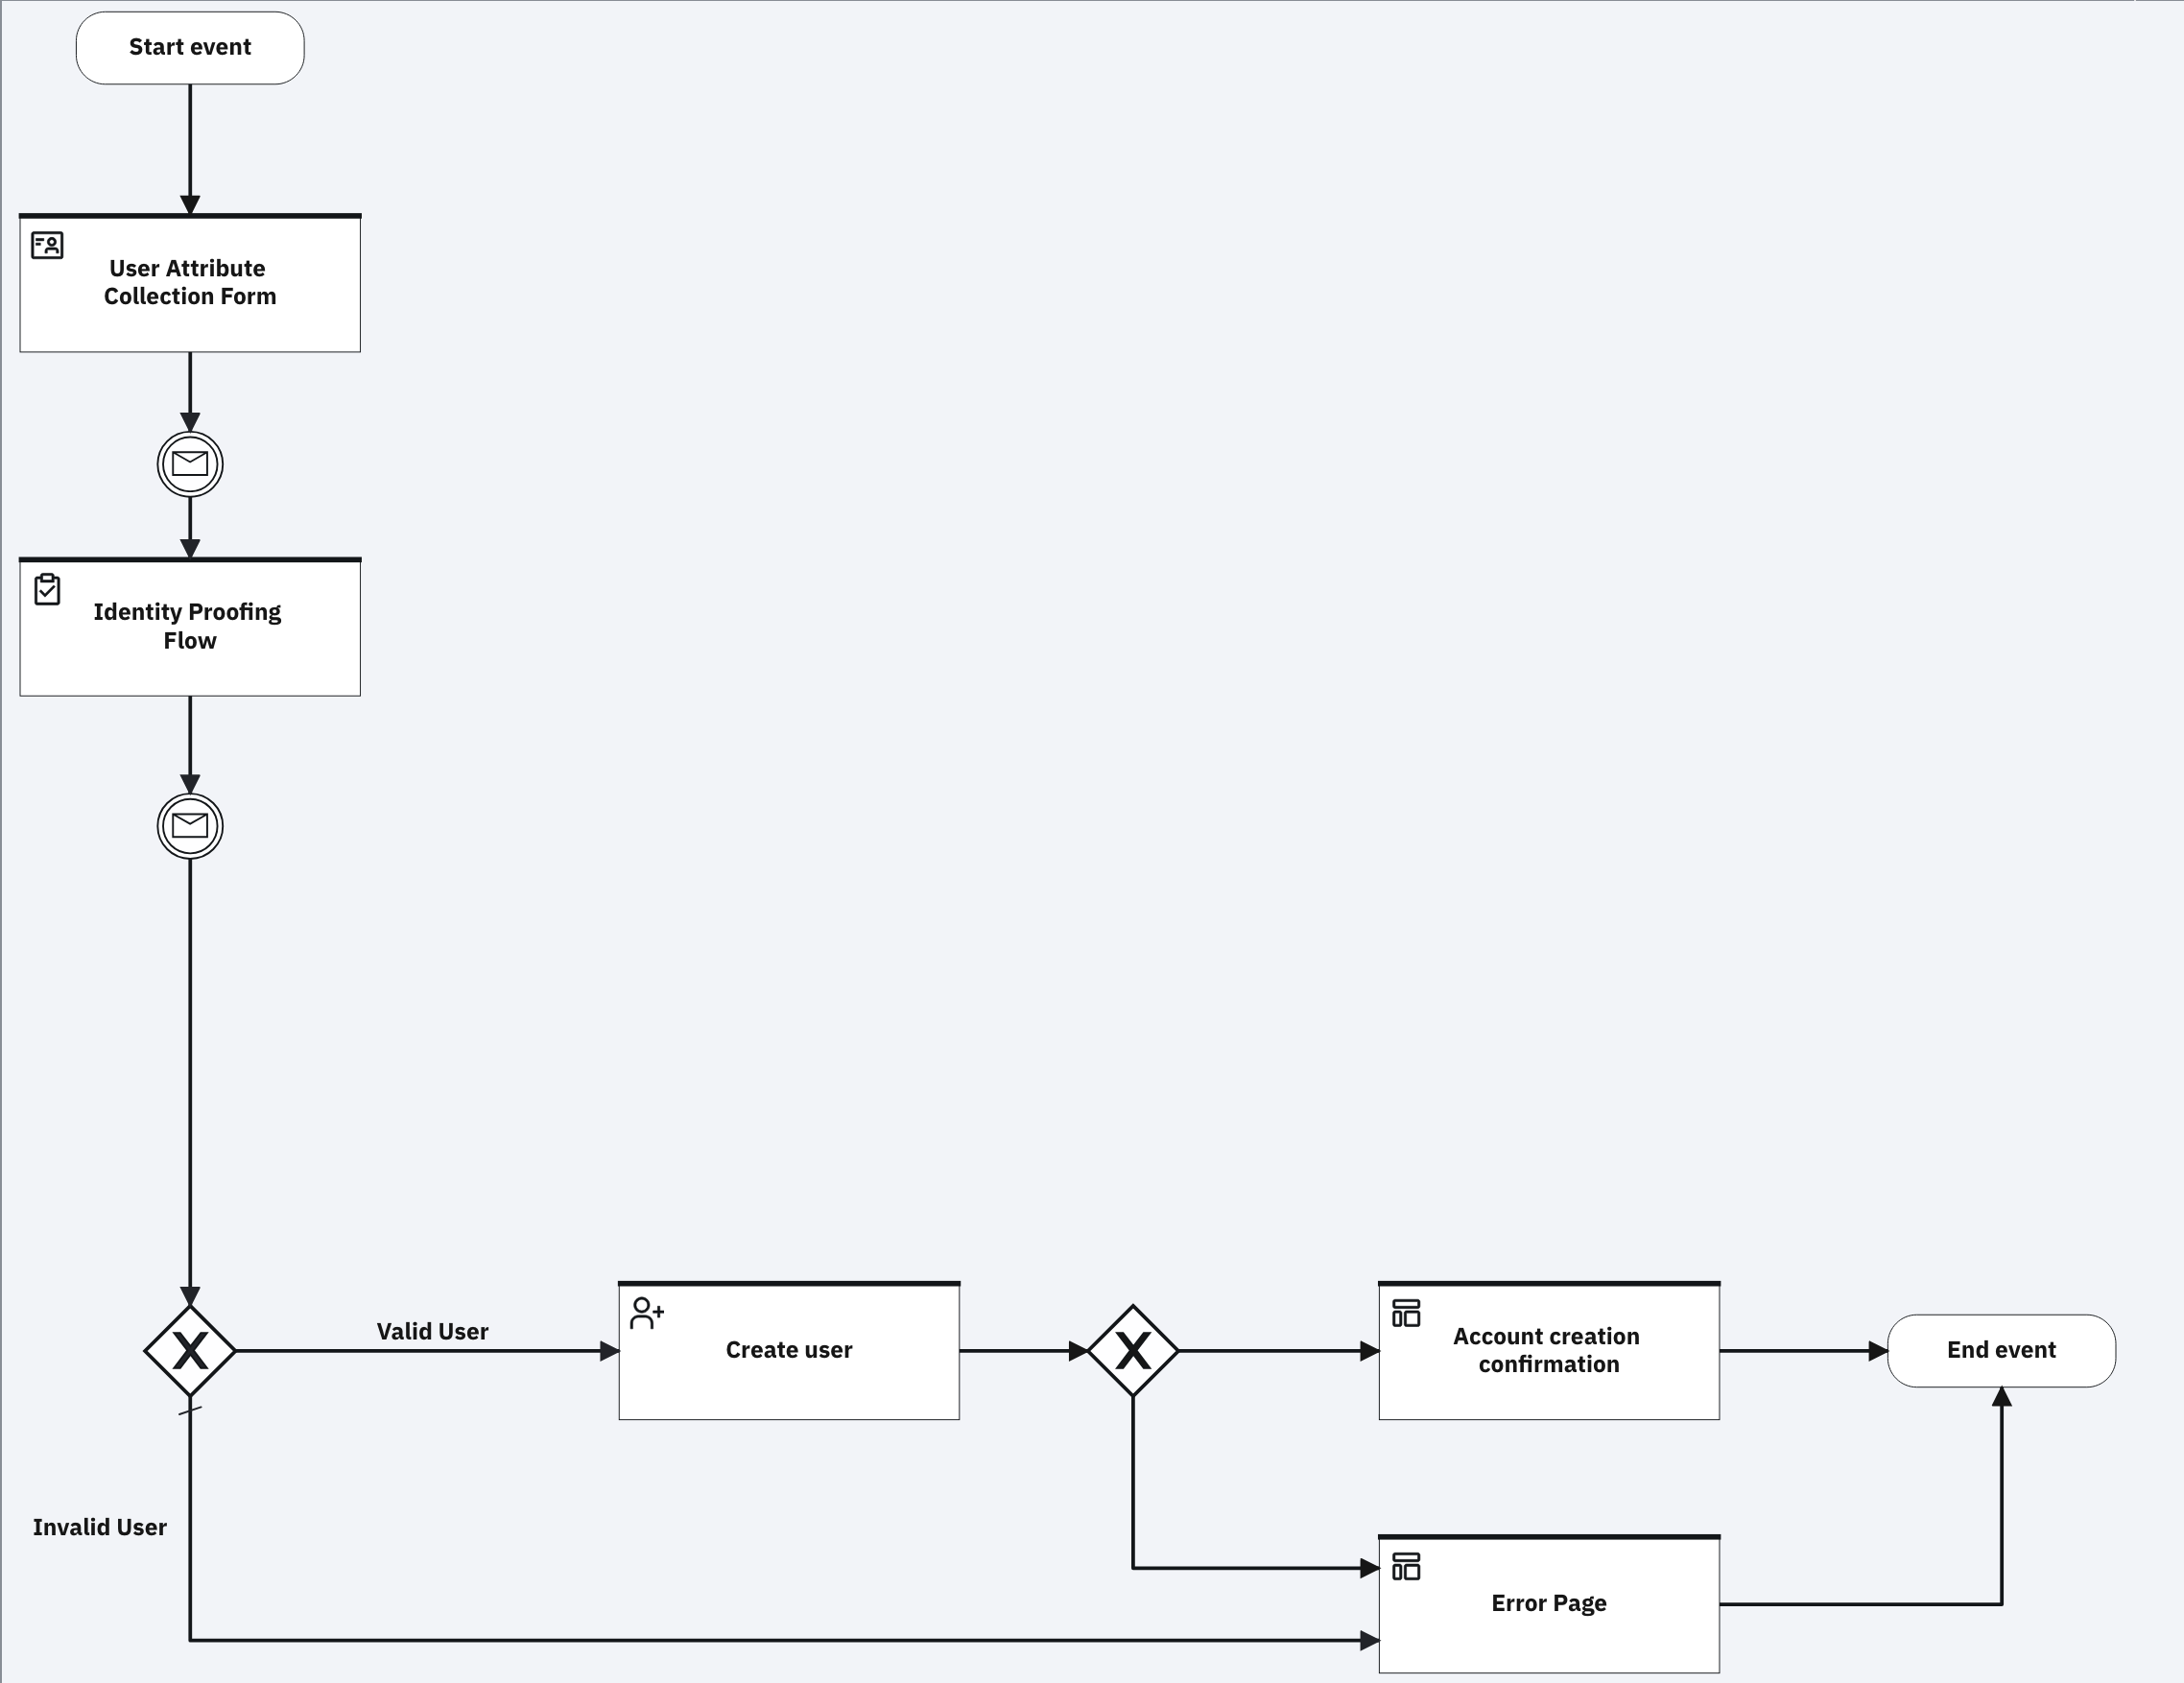
When the model is imported, the flow is saved in Draft mode. It shows up as follows in the Flow designer:
-
Update the user attribute collection form and identity proofing flow task as outlined in the Unpacking the flow.
-
After all changes are made, publish the workflow by clicking Publish.
Running the flow
After the flow is published, start the flow by using Execution URL:
-
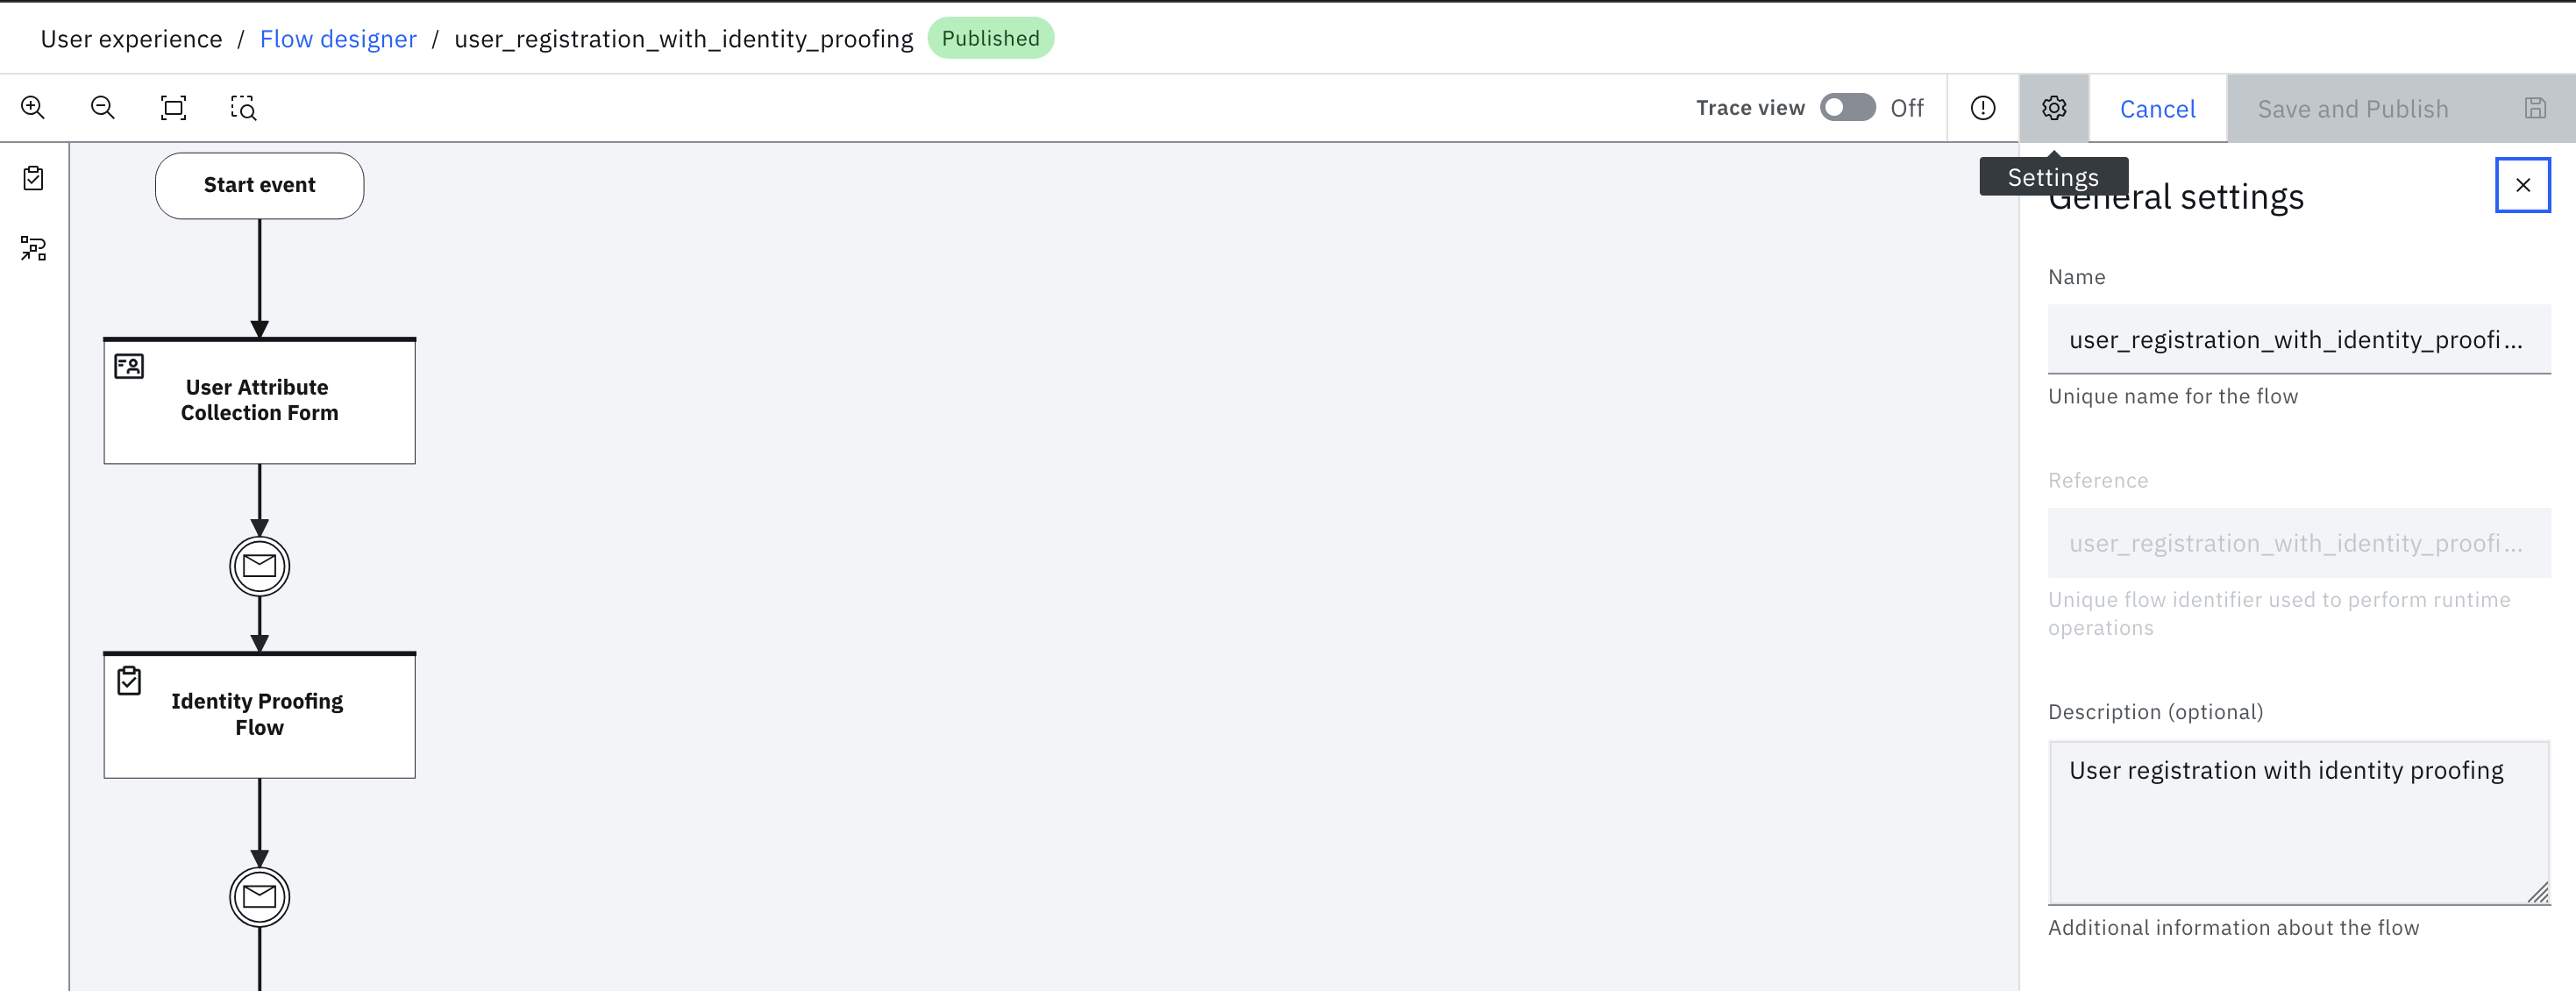
Open the Settings panel by clicking the information icon next to the Cancel button:
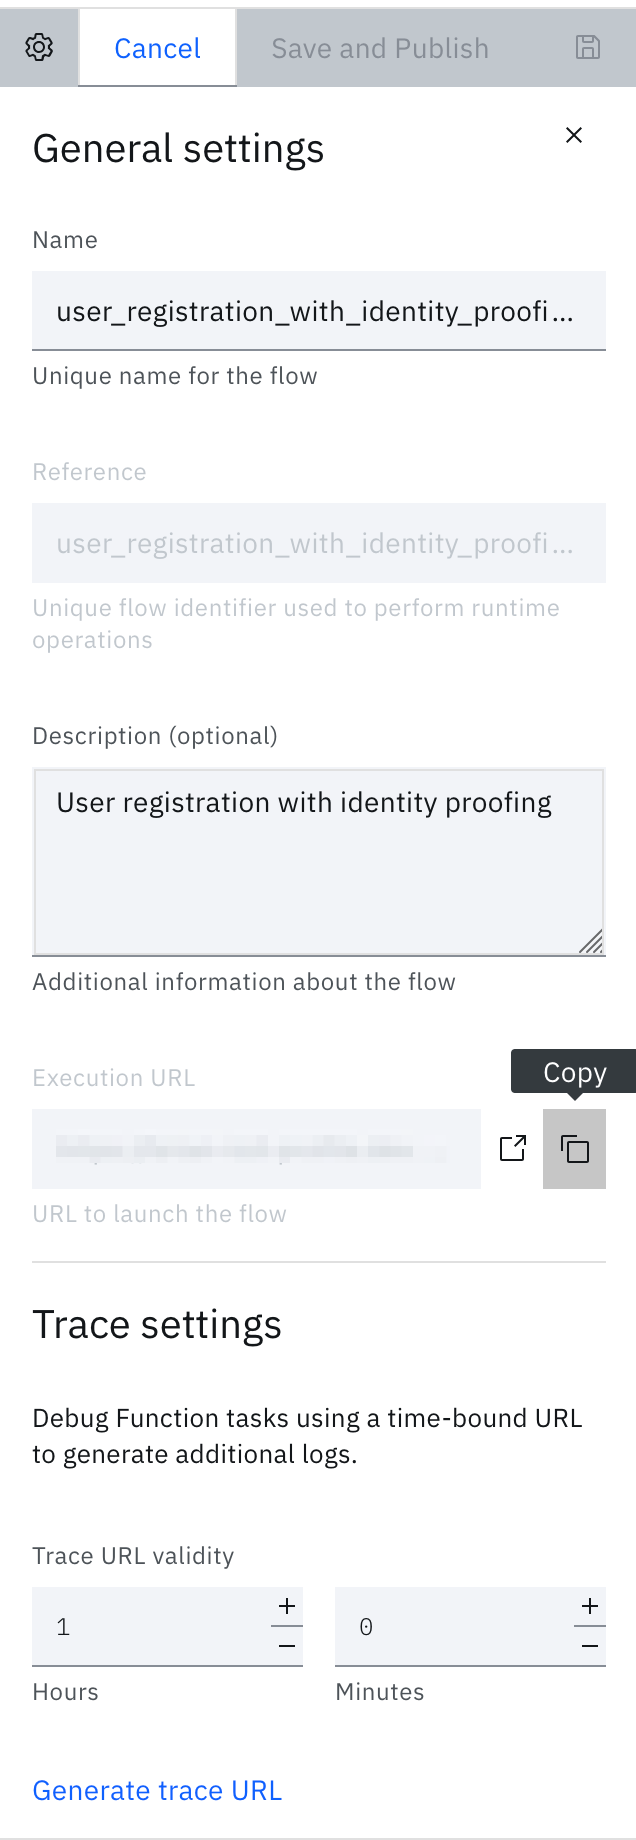
From the Settings panel, copy the Execution URL:
-
Open a browser window and go to this execution URL and complete the flow as directed.
Note
Typically, the prescribed flow is triggered as part of user registration; however, it is recommended to run the end-to-end flow before it is enabled for generic usage.
Unpacking the flow
This optional section describes the purpose of each step in the workflow.
User Attribute Collection Form
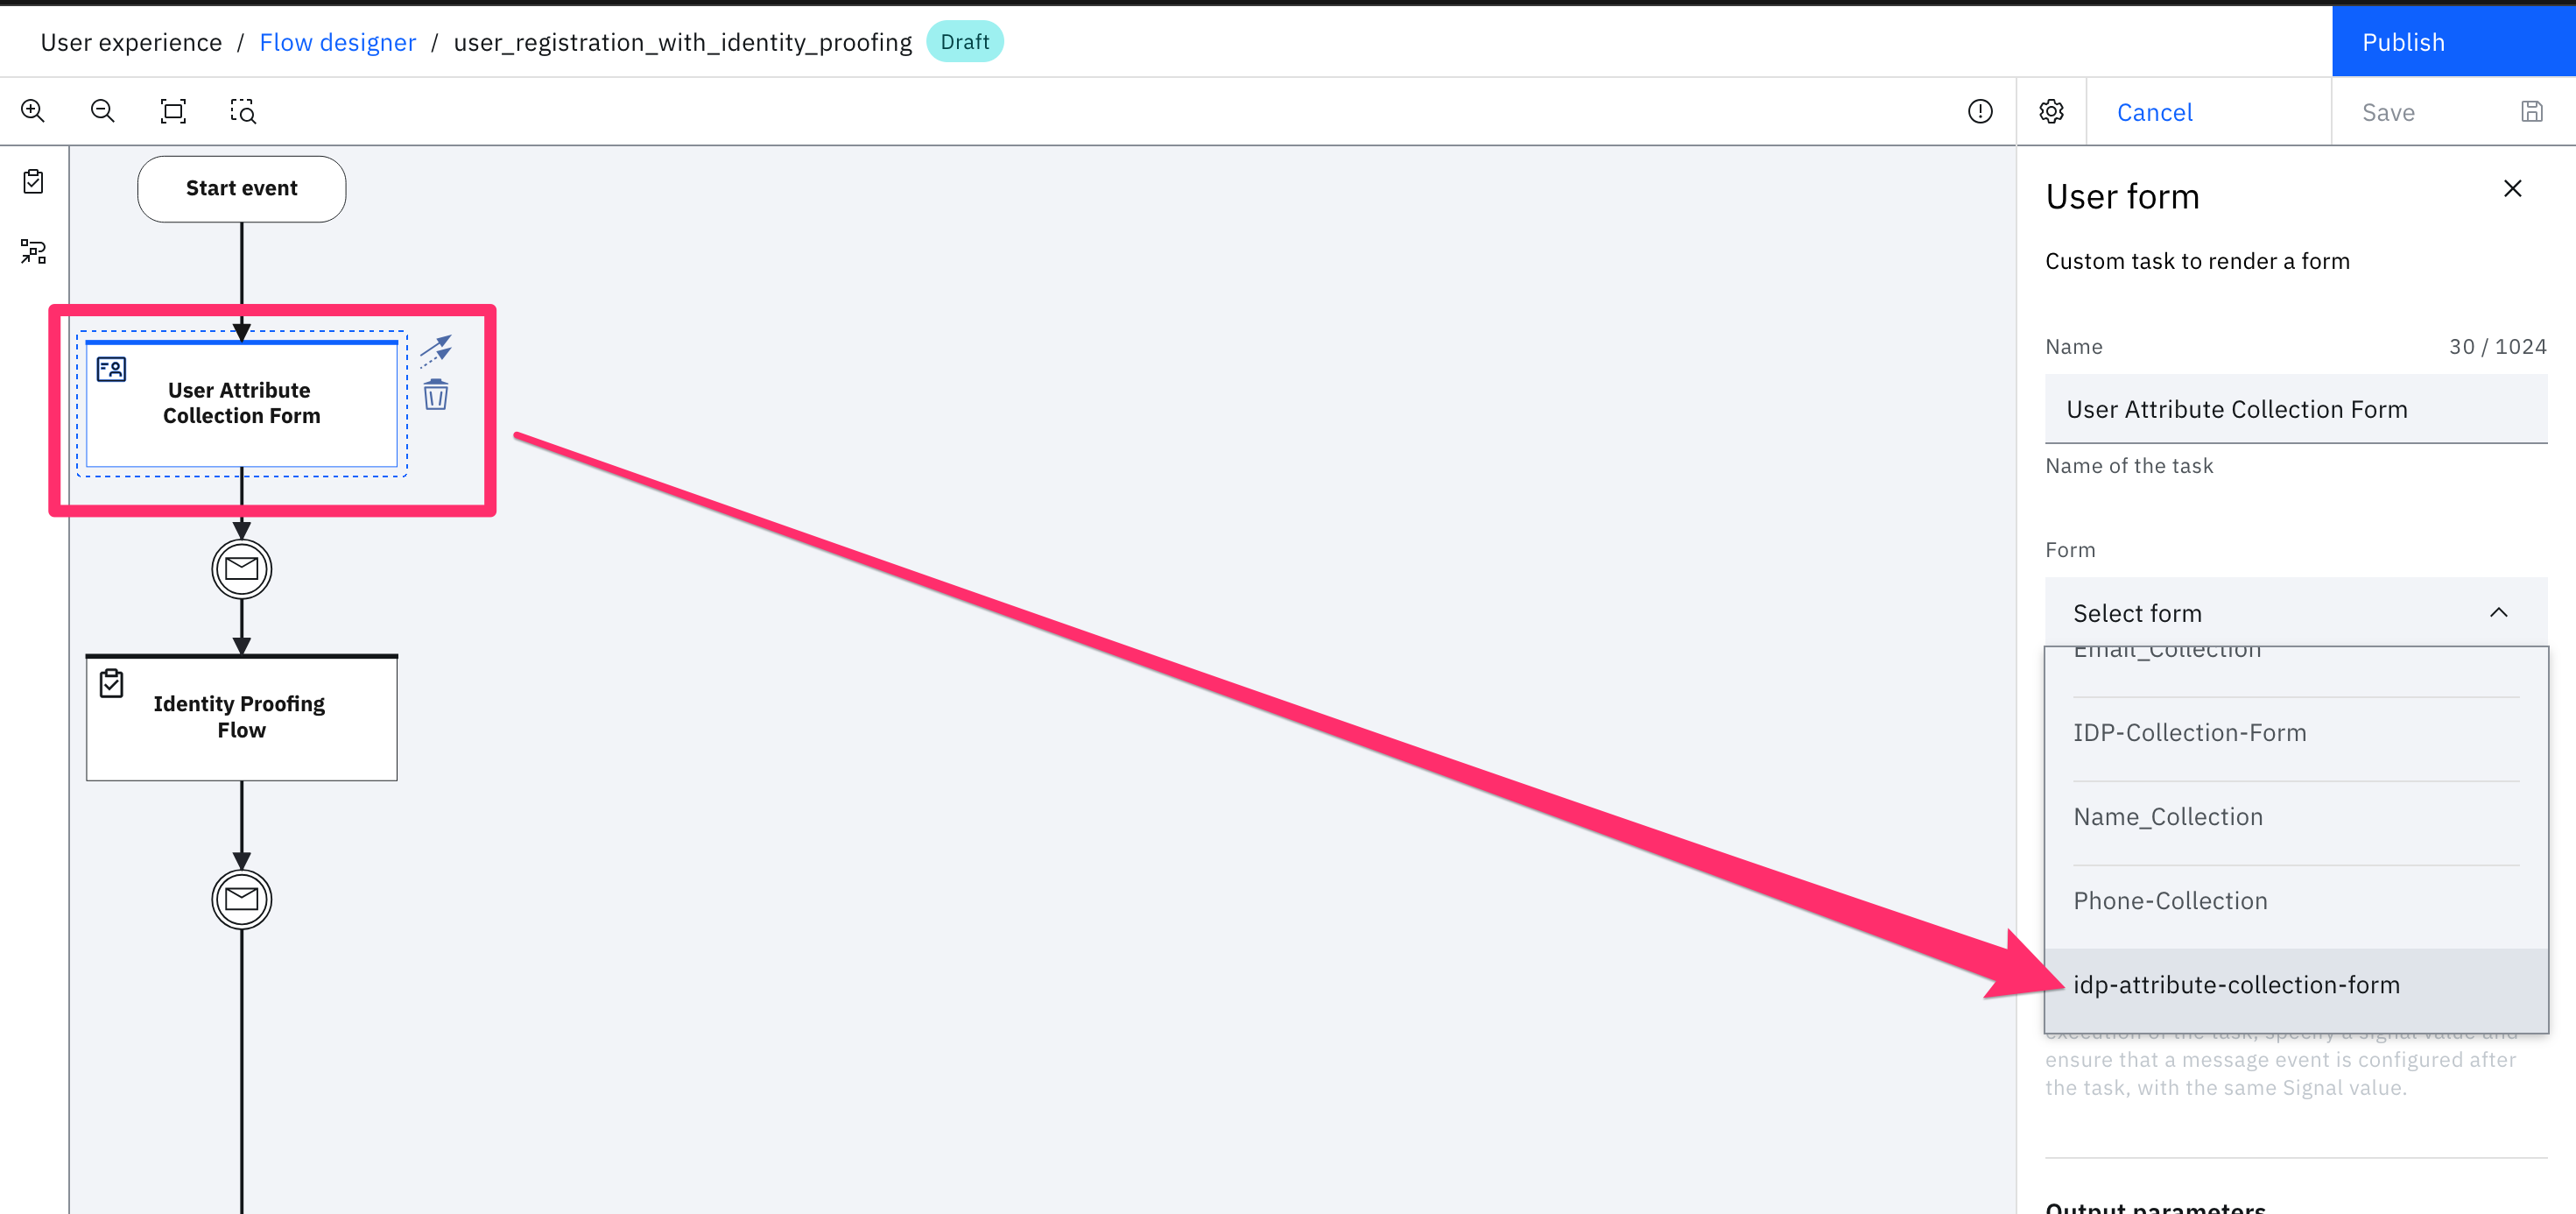
This is a user form that is presented for an end-user to specify their user attributes. Edit the form configuration to link to the form (idp-attribute-collection-form) that you created as part of the Configuring the user forms section.
When the data is submitted by the user, it is persisted in the userData property of userFormData, under the workflow context.
Identity Proofing Flow
This form is presented to the user to prove their identity on the external vendor.
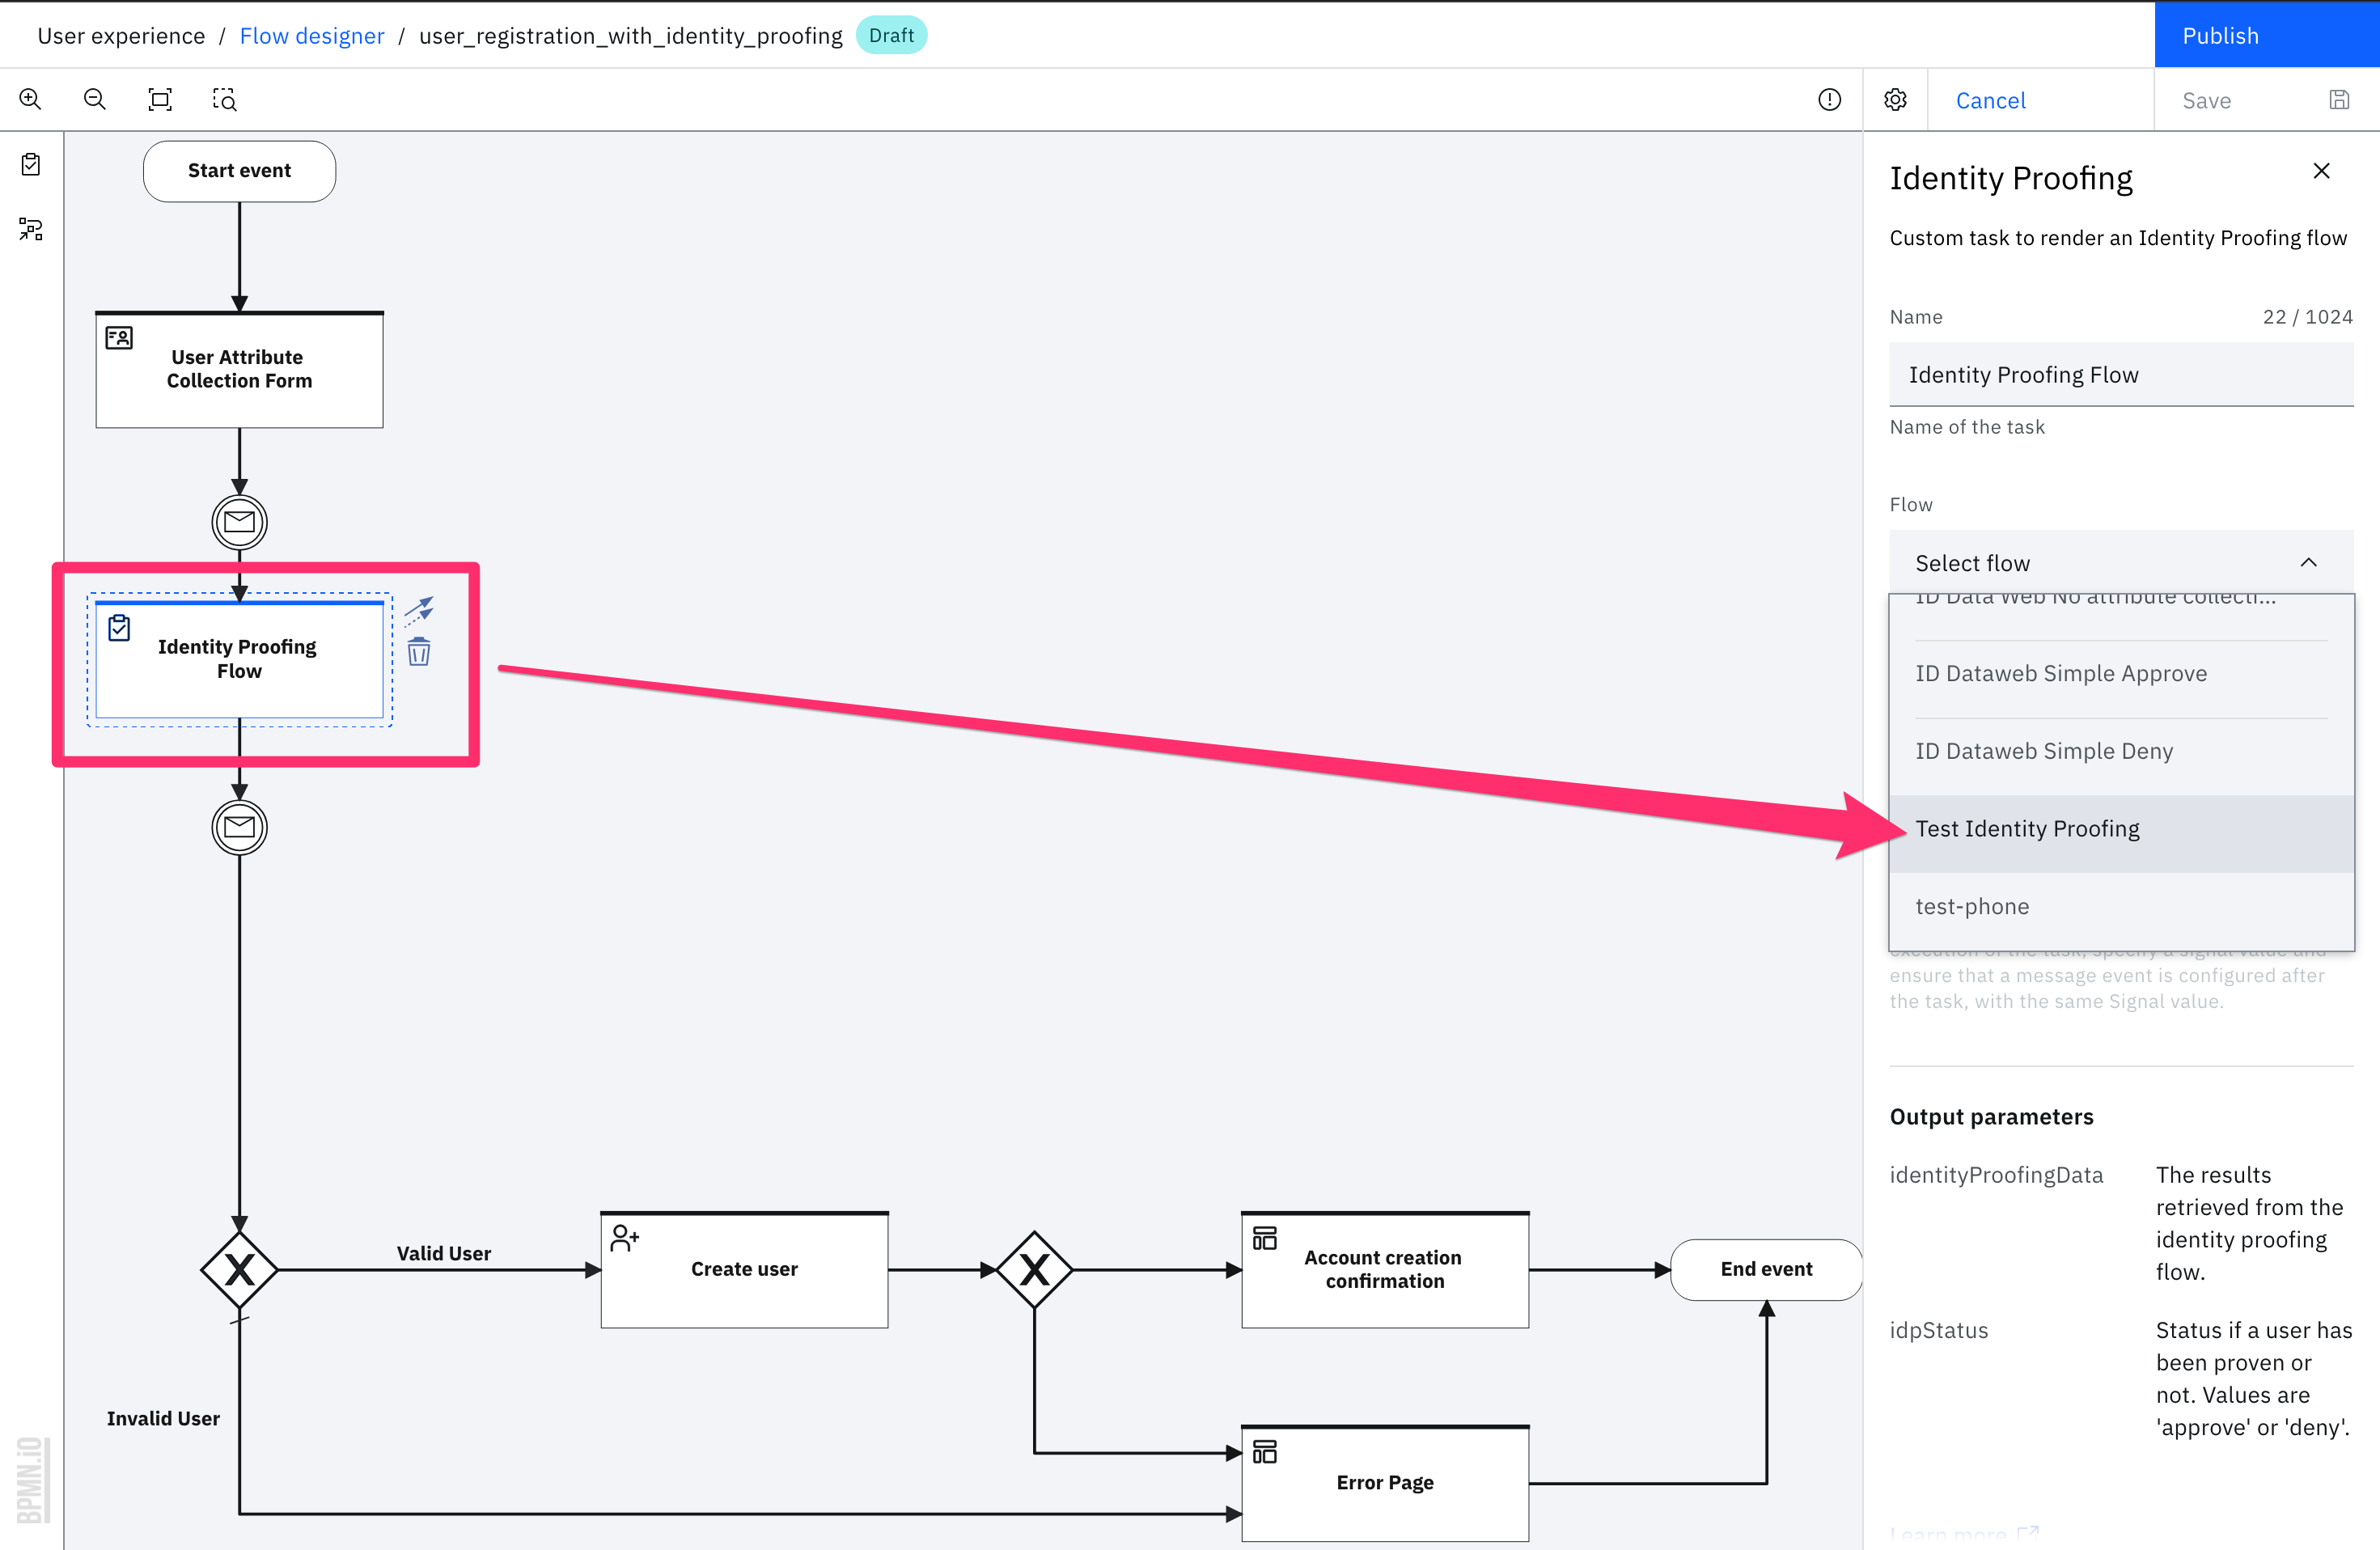
Edit the flow configuration to link to the flow (Test Identity Proofing) that you created as part of the Configuring the identity proofing flow section:
When the data is submitted by the user, it is persisted in the userData property of userFormData, under the workflow context.
Identity Proofing checking
If the user fails identity proofing, the flow uses a conditional gateway to direct the user to a custom error page.
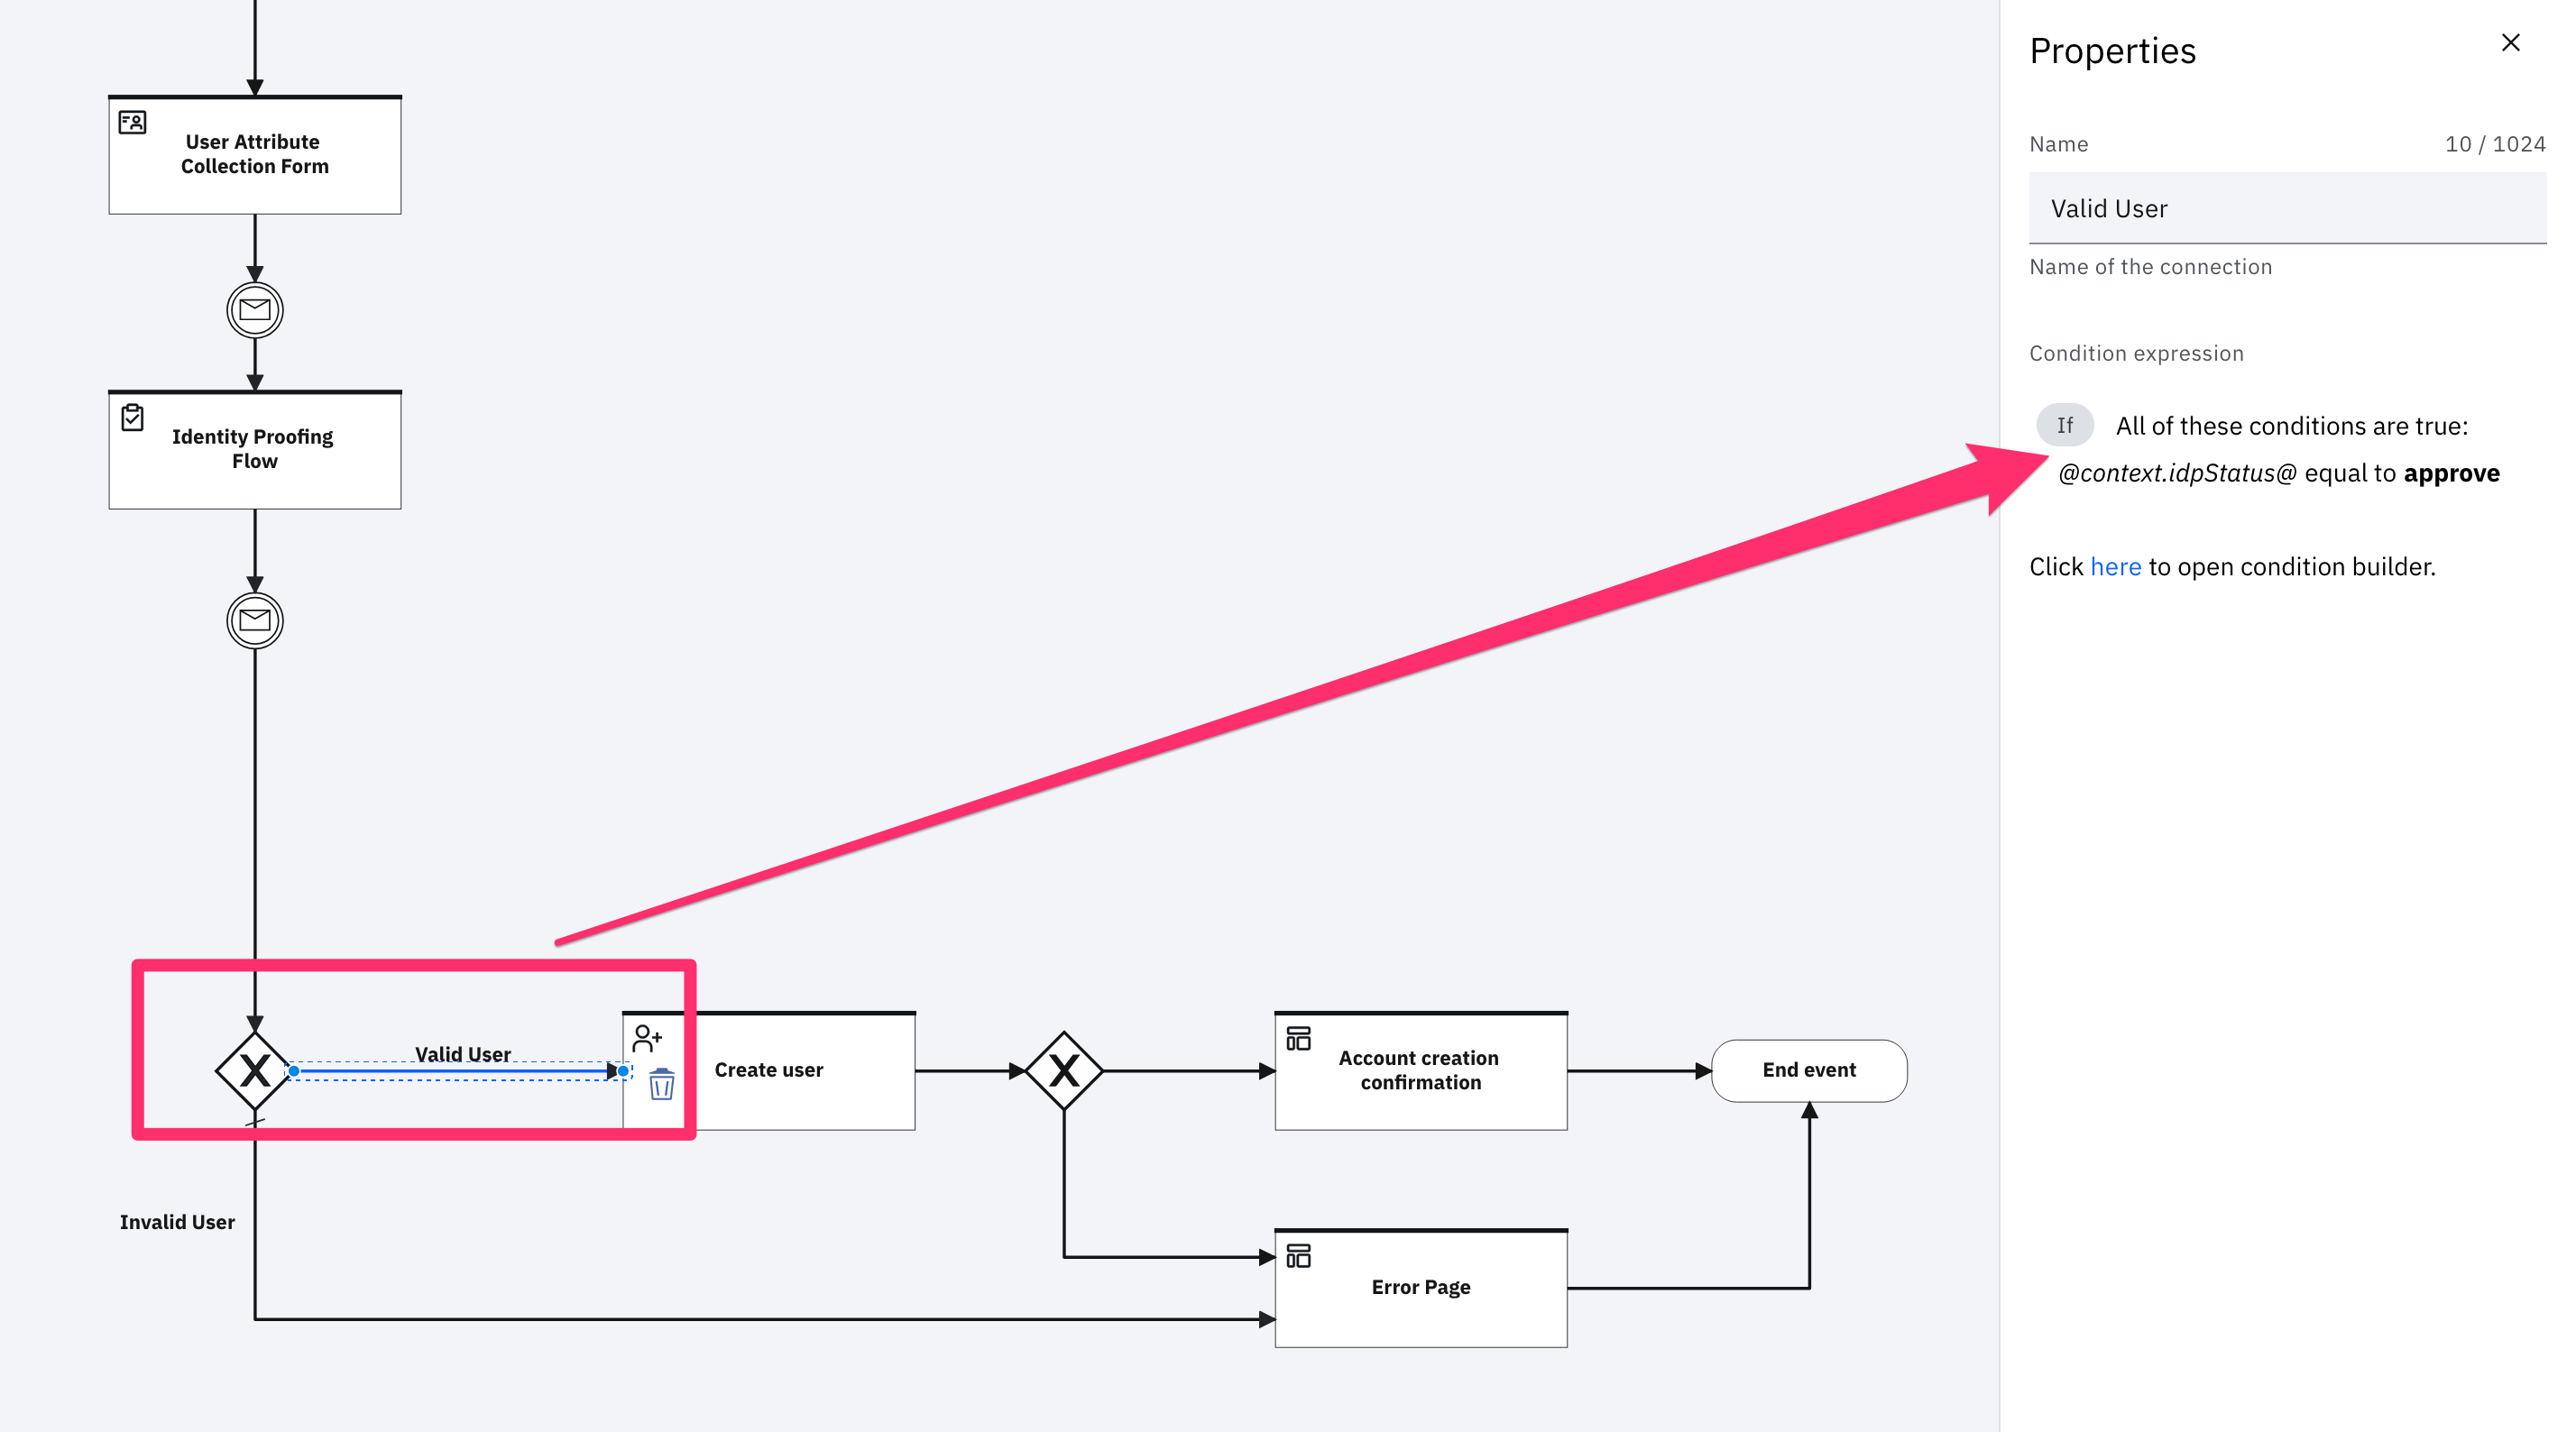
The flow is directed to the default error page. This page can be customized in the User Registration theme.
Create user
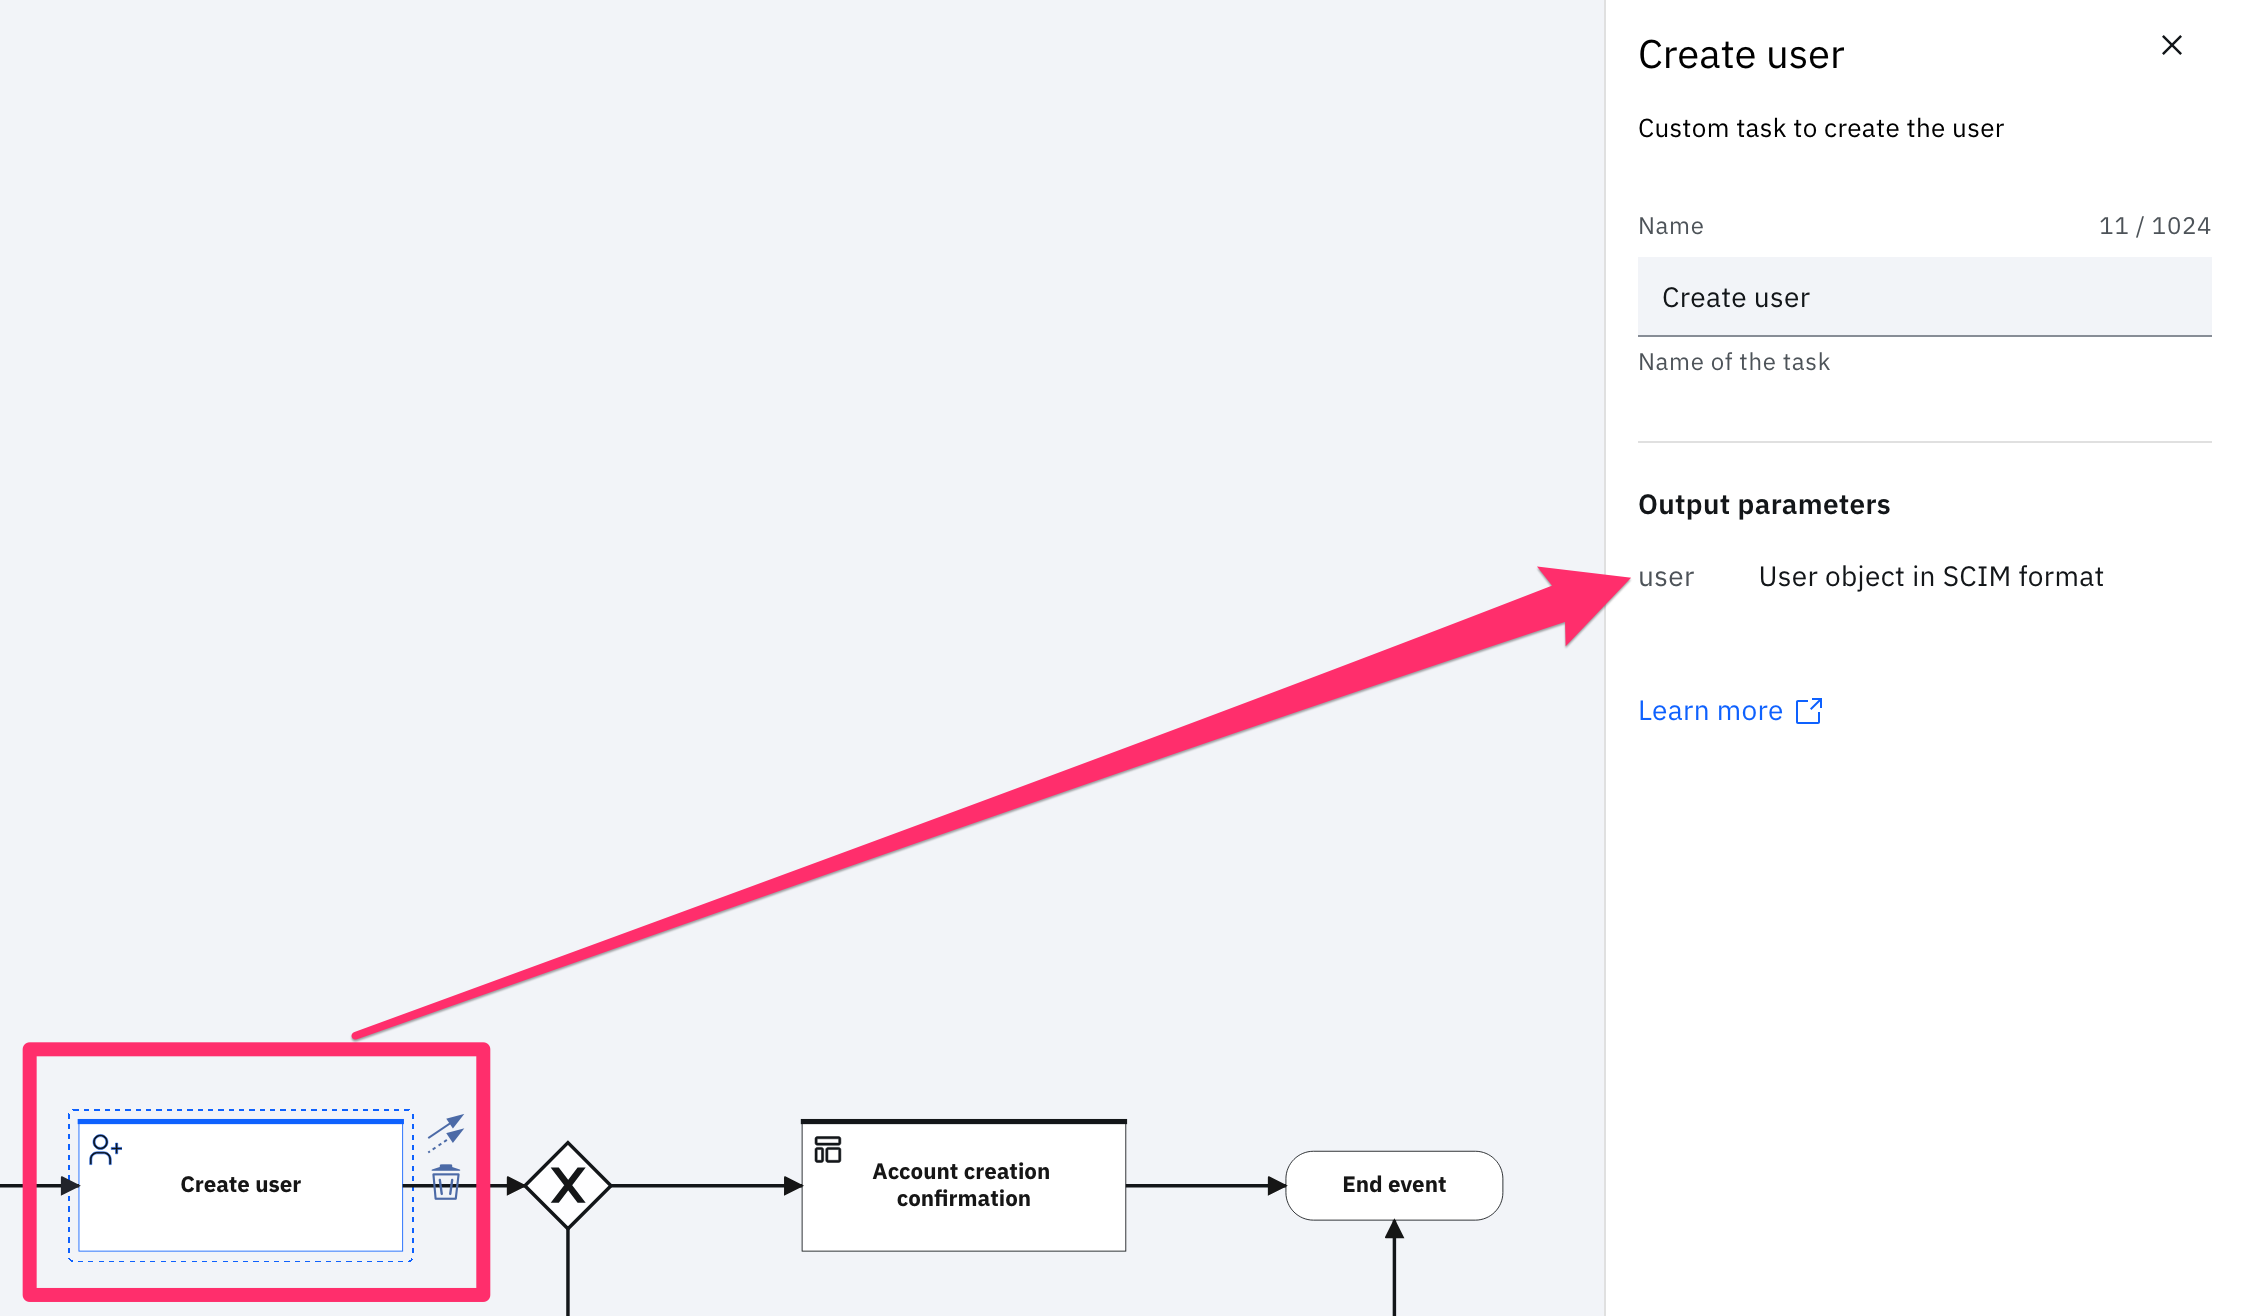
This task uses the data in the userFormData.userData property under the workflow context to register the user. If the registration is successful, the corresponding SCIM object is generated as a response and stored against the user object, in the workflow context.
Account creation confirmation
This task presents a custom page with a confirmation that the account was successfully created. The page contains a link to go to the Login page and logs in by using the credentials that were sent to the registered user by email.
Read more about the Page task here.
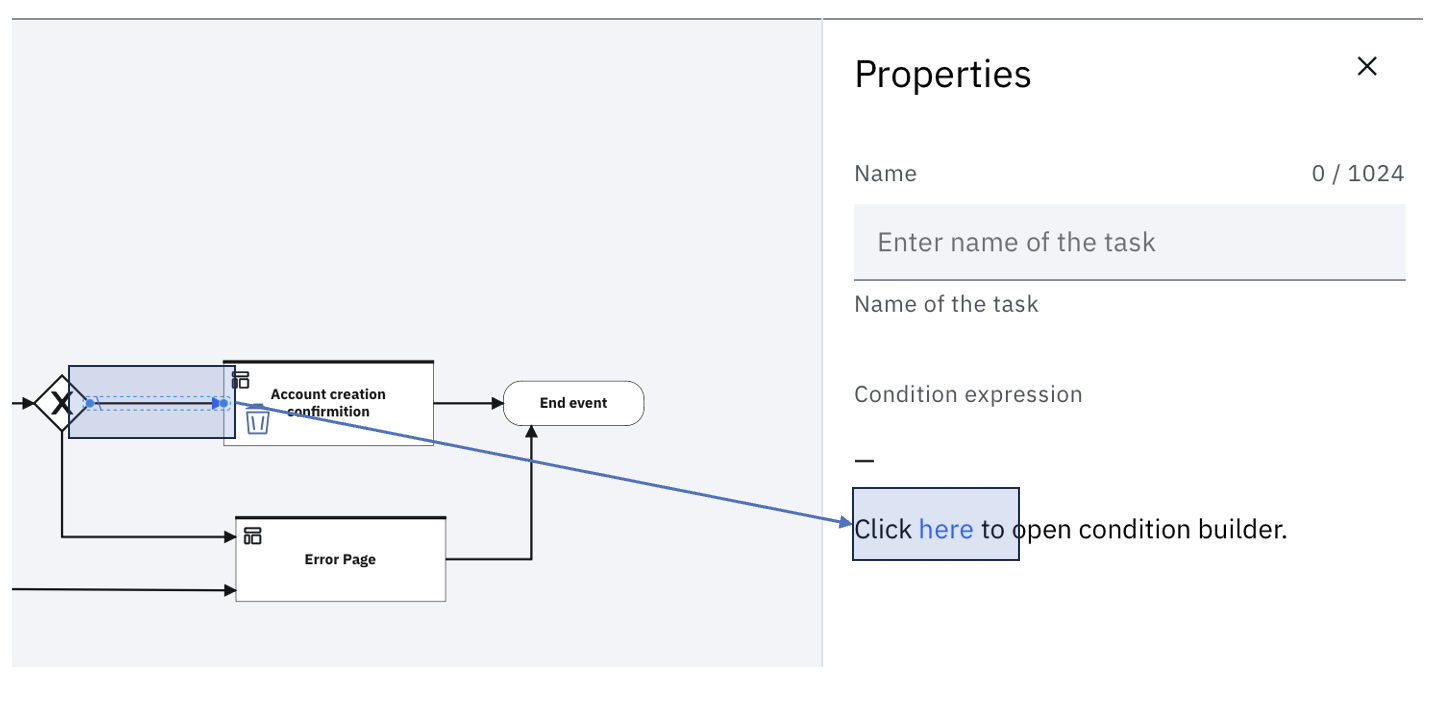
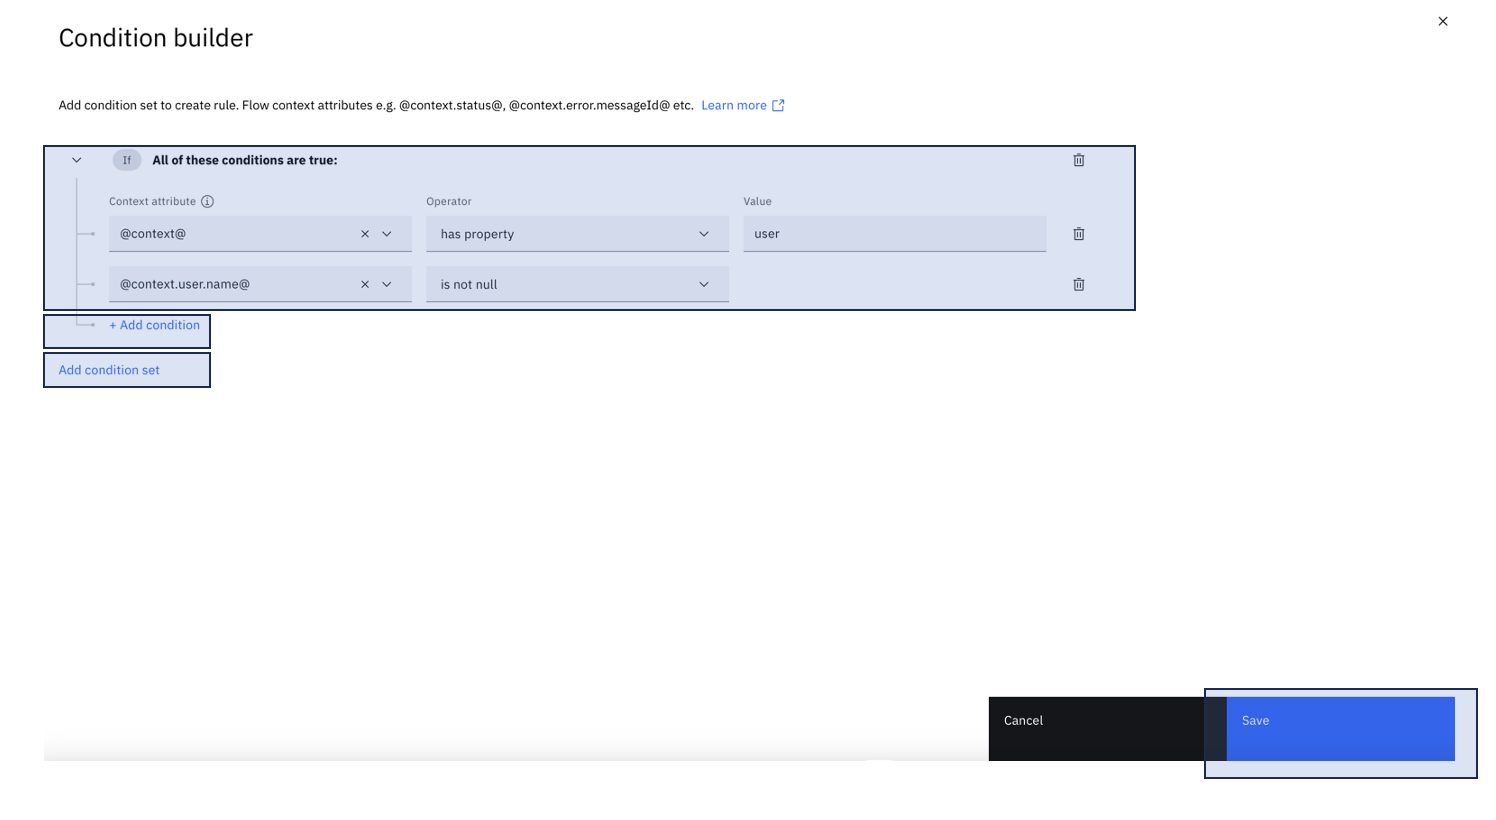
In the model referred to in this article, the workflow context is checked for the existence of the user object. This model can be fine-tuned for a more complex set of conditions, by using the Condition Builder.
To launch the Condition builder click the Arrow from Exclusive Gateway to Account creation confirmation. Click the highlighted link to launch the Condition builder.
In the Condition builder that shows up, add your own conditions to decide whether to show the Confirmation Page:
Error handling
If the user create operation fails, the flow uses a conditional gateway to direct the user to a custom error page.
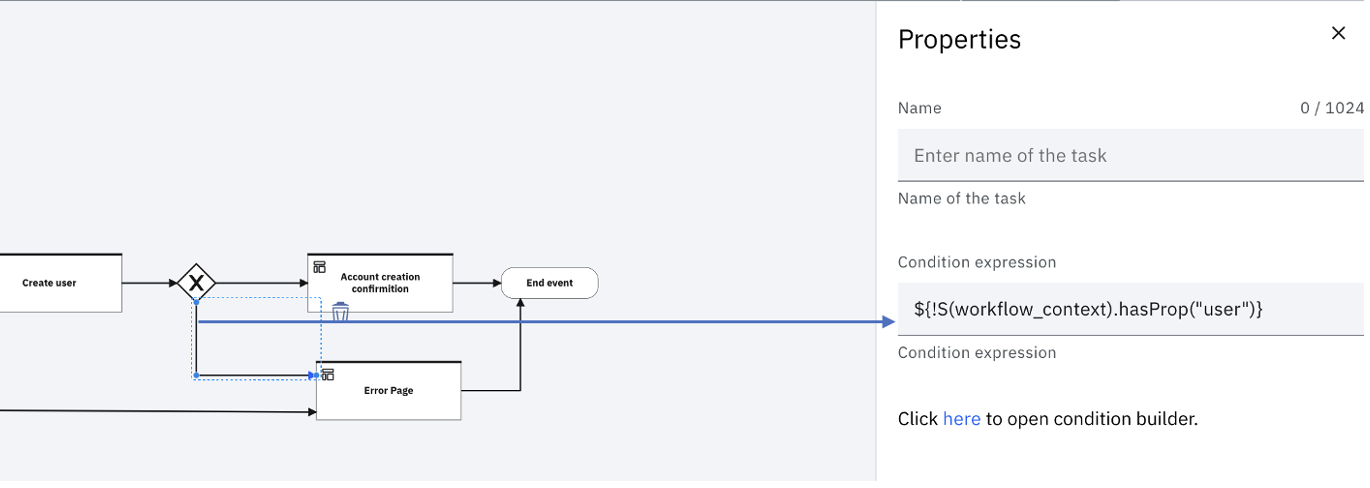
Follow steps similar to Account creation confirmation Section, to create your own set of conditions for when to show the Error Page.
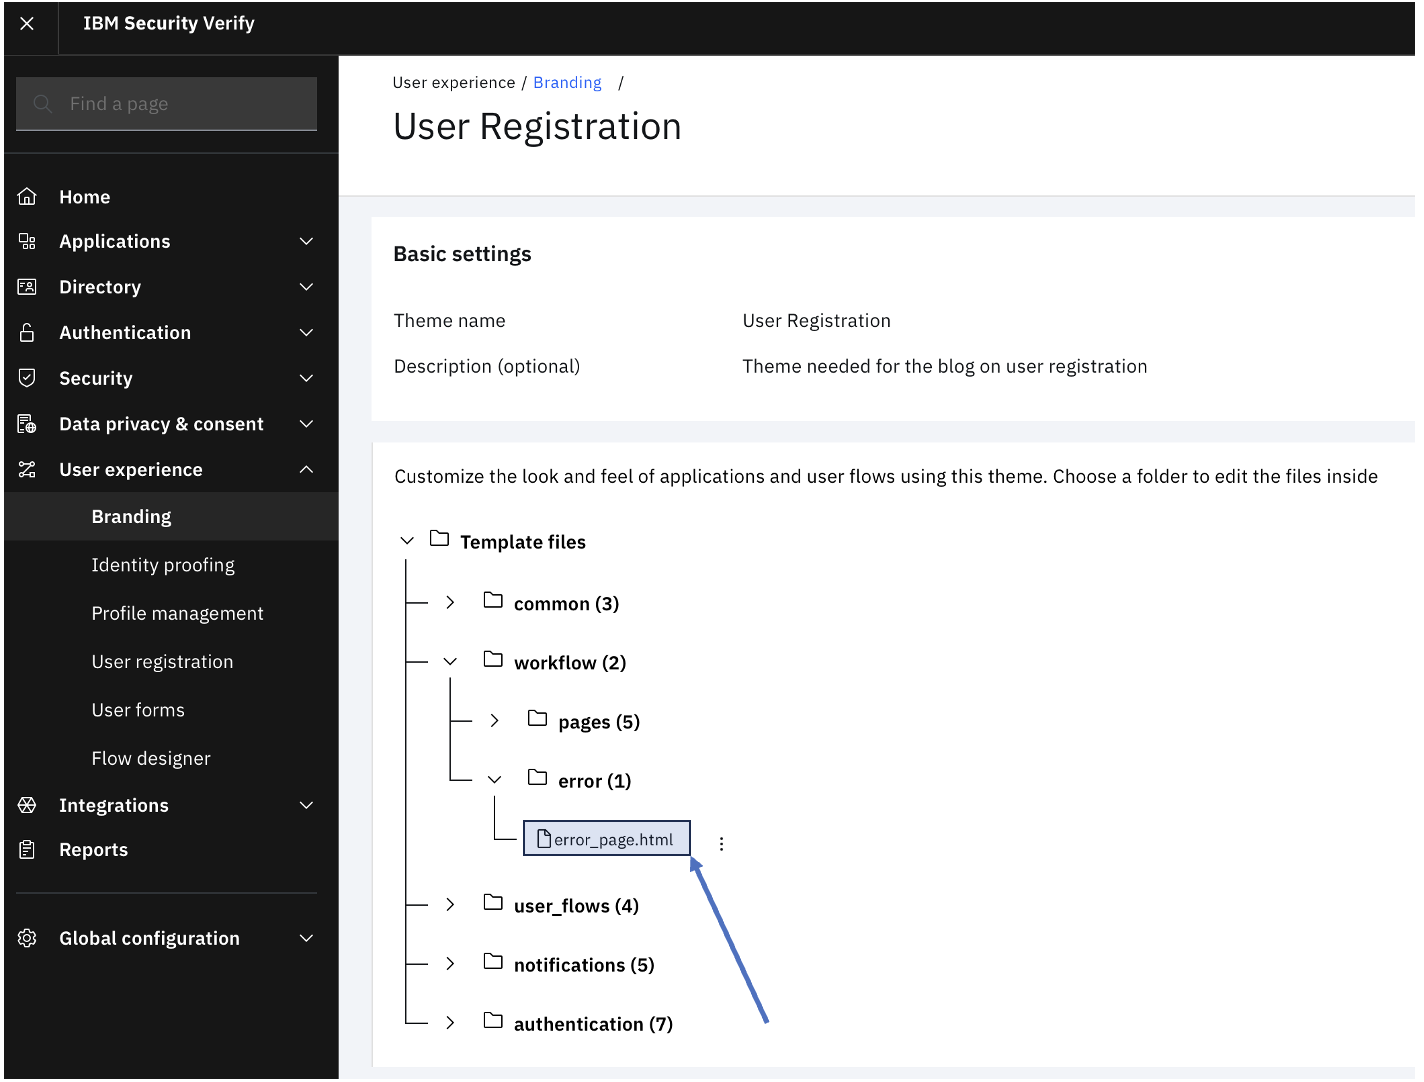
If a system error occurs, the flow is directed to the default error page. This page can be customized in the User Registration theme.
The wrap
This flow introduces a method to register a user with identity proofing. The flow also talks about user forms, which can be customized to suit individual needs.
Ramakrishna J Gorthi and 💎 Mansi Arora, IBM Security
Updated 19 days ago
