On-premises provisioning
Introduction
It is a common concern to manage accounts, fine-grained privileges on Cloud-inaccessible targets and applications such as LDAP, Active Directory or Oracle DB deployed on-premise.
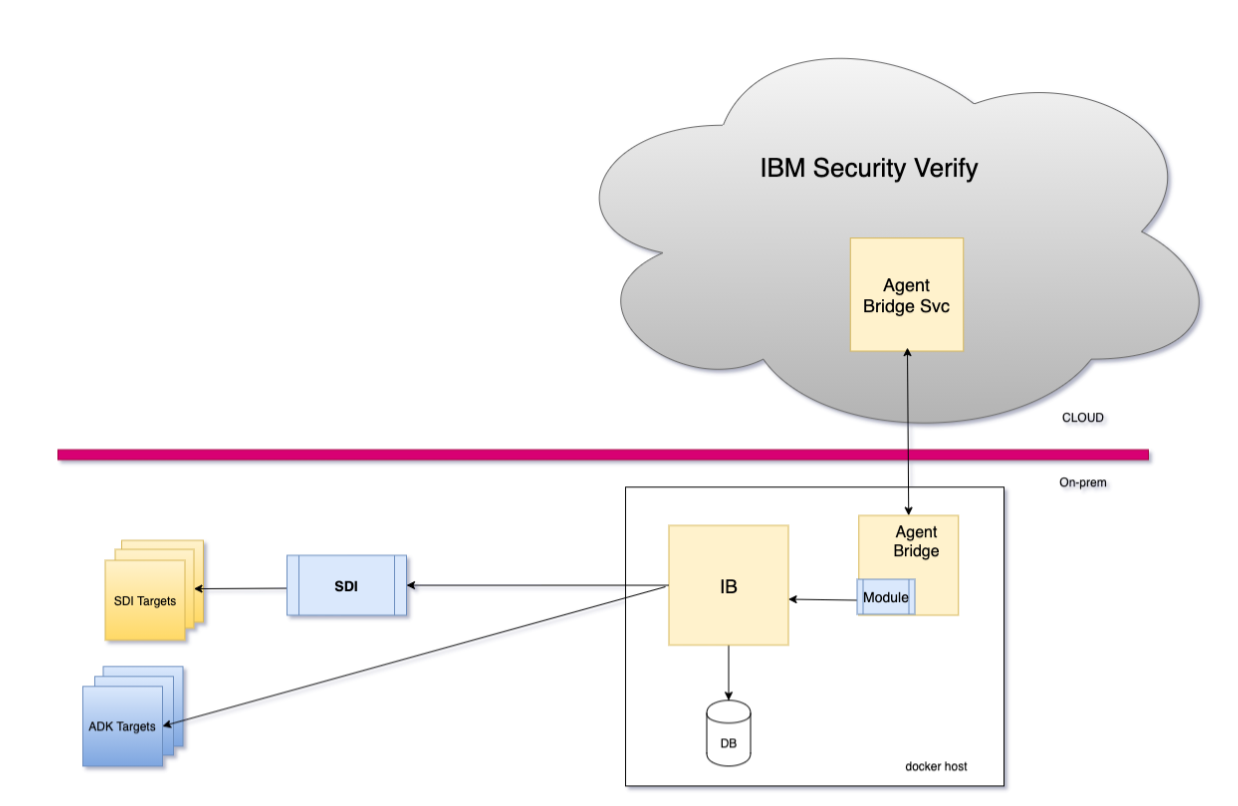
The issue can be resolved by using the Verify Bridge for Provisioning offered by IBM Verify. The method requires container images to be deployed in an environment that is able to access the targets. Various involved components can be deployed with any container orchestration environment, such as kubernetes.
- Verify Bridge: This component acts as the proxy to the target and communicates with the Verify tenant using a long-polling mechanism. Thus, the communication is from the agent to the tenant and requires no additional investment, such as VPN technologies.
- Verify Identity Brokerage: This component orchestrates the retrieval and provisioning of accounts and fine-grained permissions to the target.
- Identity Brokerage DB (Postgres): This component holds provisioning state during the process, particularly during the reconciliation process. In addition, this also holds the adapter configuration profiles.
The Identity brokerage manages some targets (such as Active Directory) through agents but for others (including LDAP or Oracle) it uses adapters running on IBM Security Directory Integrator.
These are the same adapters that are used by the IBM Verify Identity Governance product (previously known as IBM Security Identity Governance and Intelligence aka IGI). This enables services, business partners, and customers to reuse existing custom adapters and also help them to easily migrate to the SaaS platform.
Configure Identity Agent in Verify
Identity agent is a bridge that connects external user repositories with IBM® Security Verify to perform authentication or provisioning. By using the identity agent, the native application stays on-premises but, IBM® Security Verify can manage the same from cloud based tenant.
Follow the provided steps to configure identity agent:
• Login to IBM® Security Verify as tenant administrator (Scott)
• From the Admin console navigate to Integrations > Identity agents tab

• Click Create agent configuration
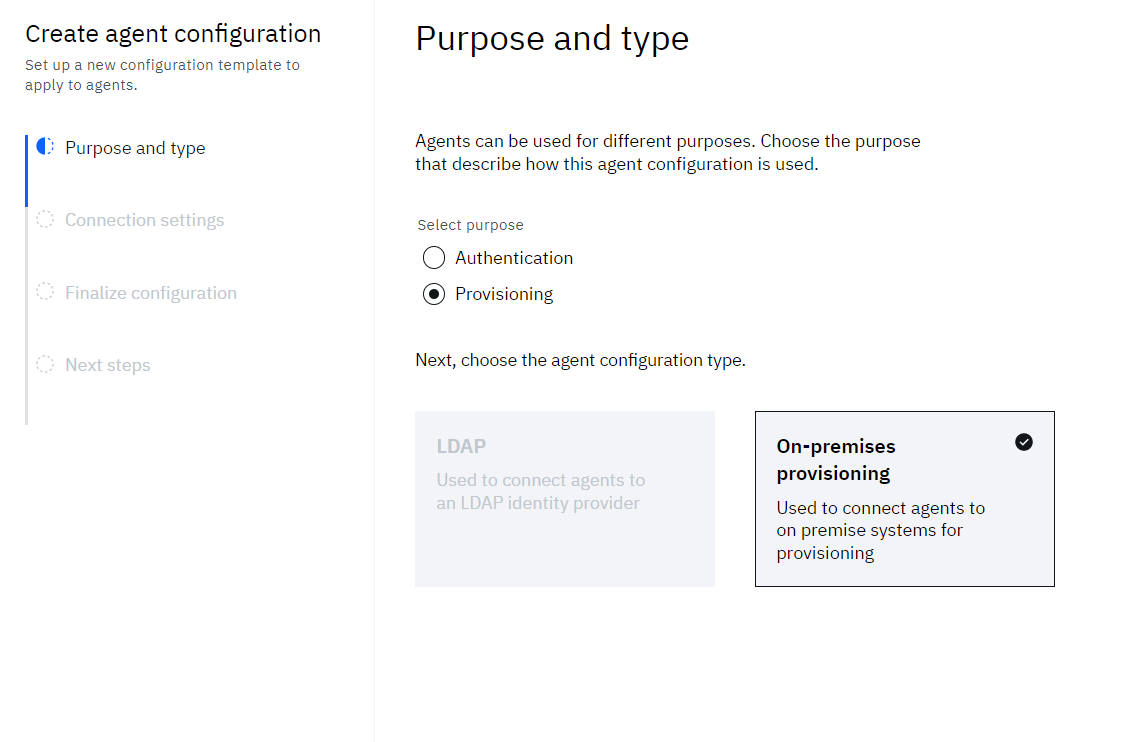
• In the Create agent configuration wizard, select purpose as Provisioning and configuration type as On-premises provisioning.
• Click Next
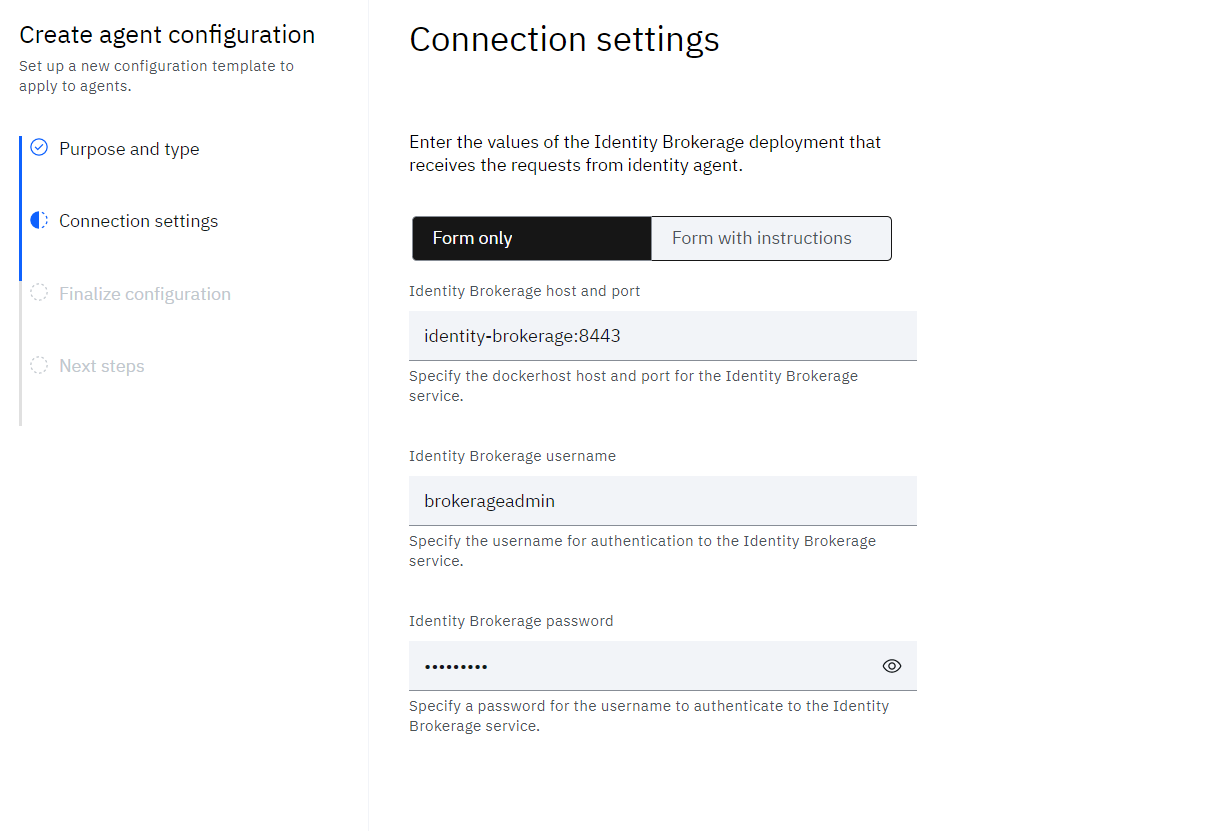
• On the Connection settings step, provide the details for:
o Identity Brokerage host and port – This is the hostname and port that the bridge uses to connect to the brokerage. In a standard podman-compose deployment, the identity-brokerage is:8443.
o Identity Brokerage username – provide some username (use this during brokerage configuration)
o Identity Brokerage password – provide some password (use this during brokerage configuration)
• Click Next
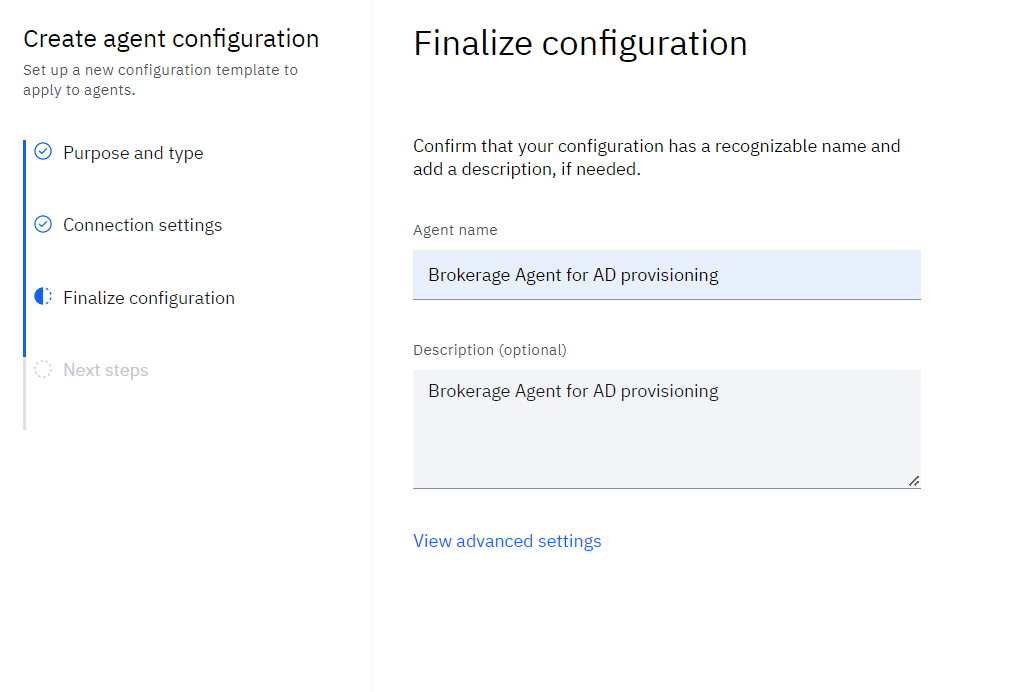
• Finalize the agent configuration by providing the Agent name and optional Description
• Click Save and continue
• As the agent gets saved, the Download package is displayed to the admin. The admin can Download Download developmnet package file and the API credentials details.
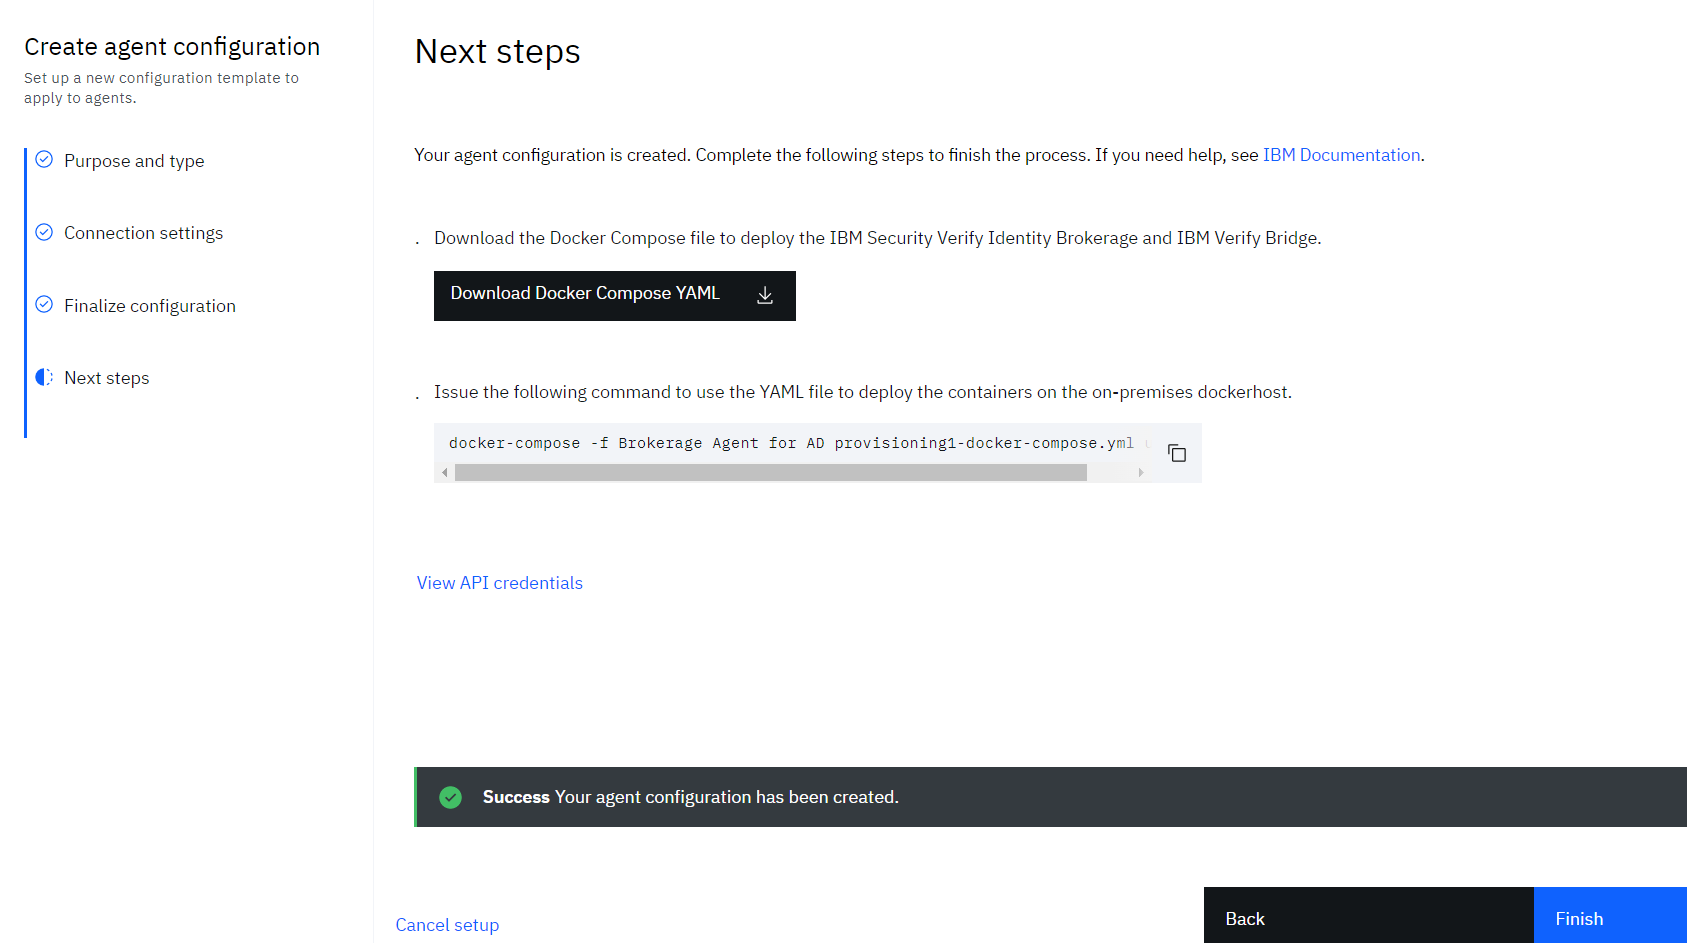
•• Click Download developmnet package to download the prefilled deployment configuration for containerized and Kubernetes environment.
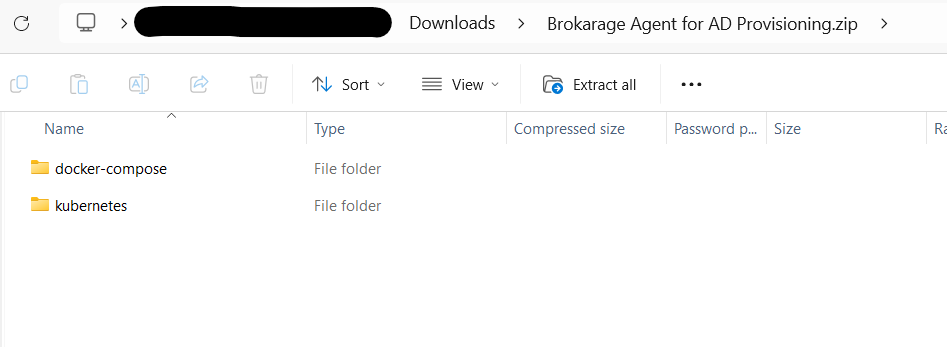
•• For this documentation we will use the docker-compose configuration. Review the downloaded README.md and YML file from the docker-compose folder of downloaded ZIP.

Review the downloaded YAML file for the following details:
- SCIM_USER – This is the "identity brokerage username" that is set while configuring identity agent in ISV
- SCIM_USER_PASSWORD – This is the "identity brokerage password" that is set while configuring identity agent in ISV
- TENANT_URI – Complete URL of your ISV tenant
- CLIENT_ID – Client ID copied after the agent was configured in ISV
- CLIENT_SECRET – Client Secret copied after the agent was configured in ISV
Optional SDI configuration
The downloaded YML file also has the deployment details for containerized version of SDI. Comment the Service 'isvdi' and 'initialize-prov-bridge' if SDI should not be deployed before actual deployment of containers.
Installing on-premise components
The on-premise applications such as LDAP, Active Directory or Oracle normally resides at the enterprise premise. In order to manage these applications few components are required which act as a bridge for communication with IBM Verify. The following components are required:
- Docker containers for:
- Postgresql database
- Identity brokerage
- Verify bridge
- Download the required IBM Security Identity Adapter — LDAP, Oracle, or Active Directory, based on the application you need to create.
- Create Application profile in Verify
Installing containers
In order to deploy container images, a Linux server is required with the following System requirements:
Operating System: Linux based operating system having support for Linux based containers. See Podman install guide](https://podman.io/docs/installation)
CPU: Four cores reserved.
System memory: 16 GB reserved.
Disk space: At least 100 GB free hard disk space
Podman engine: 5.5.1 or higher.
Podman Compose: See Podman compose details
Network connectivity to a IBM® Security Verify tenant with Identity Governance subscription.
Copy the downloaded ZIP file to the Linux server, extract its contents, and navigate to the docker-compose directory within the extracted folder. Use the following command to create the various required containers:
podman-compose -f docker-compose.yml up -d
Make sure that all containers get started and show status as running using "podman ps -a" command:
[root@xxxxxxxx ~]# podman ps -a
CONTAINER ID        IMAGE                              COMMAND                  CREATED STATUS              PORTS                                        NAMES
722165e62ae9        ibmcom/verify-bridge:latest        "/sbin/bootstrap.sh"     4 months ago        Up 4 weeks                                                       verify-bridge
f26aade1cec6        postgres:12-alpine                 "docker-entrypoint..."   5 months ago        Up 4 weeks          0.0.0.0:5432->5432/tcp                       ibdb
1b45372dc651        ibmcom/identity-brokerage:latest   "/sbin/bootstrap.sh"     6 months ago        Up 12 days          9080/tcp, 0.0.0.0:8443->8443/tcp, 9443/tcp   identity-brokerage
[root@xxxxxxxx ~]#
Download LDAP adapter profile (in order to manage IBM Directory Server only)
• Refer to the Adapter reference to get the part number for LDAP adapters.
• Download the “IBM Security Verify Adapter for LDAP” from Passport Advantage. Search by part number using M0GX4ML.
• Download the profile JAR files
Download Oracle adapter profile (in order to manage Oracle database only)
• Refer to the Adapter reference to get the part number for Oracle adapters.
• Download the “IBM Security Verify Adapter for Oracle Database” from Passport Advantage. Search by part number as M0HR0ML.
• Download the profile JAR files
Create Application profile in Verify
• Login to IBM® Security Verify as tenant admin (Scott)
• Navigate to Applications > Application profiles page
• Click the Create profile button

• Click Identity adapter profile
• Give some Profile name
• Upload the identity adapter profile JAR file downloaded earlier
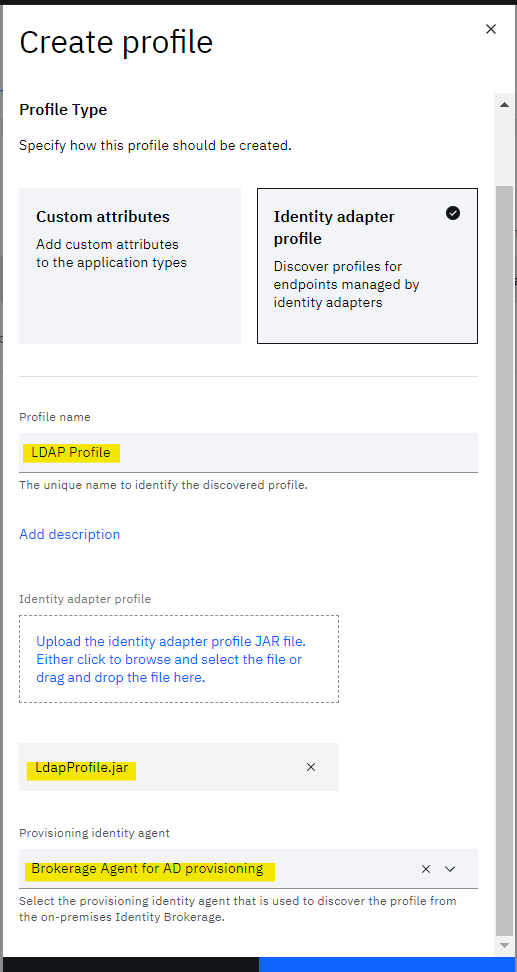
• Click Create profile
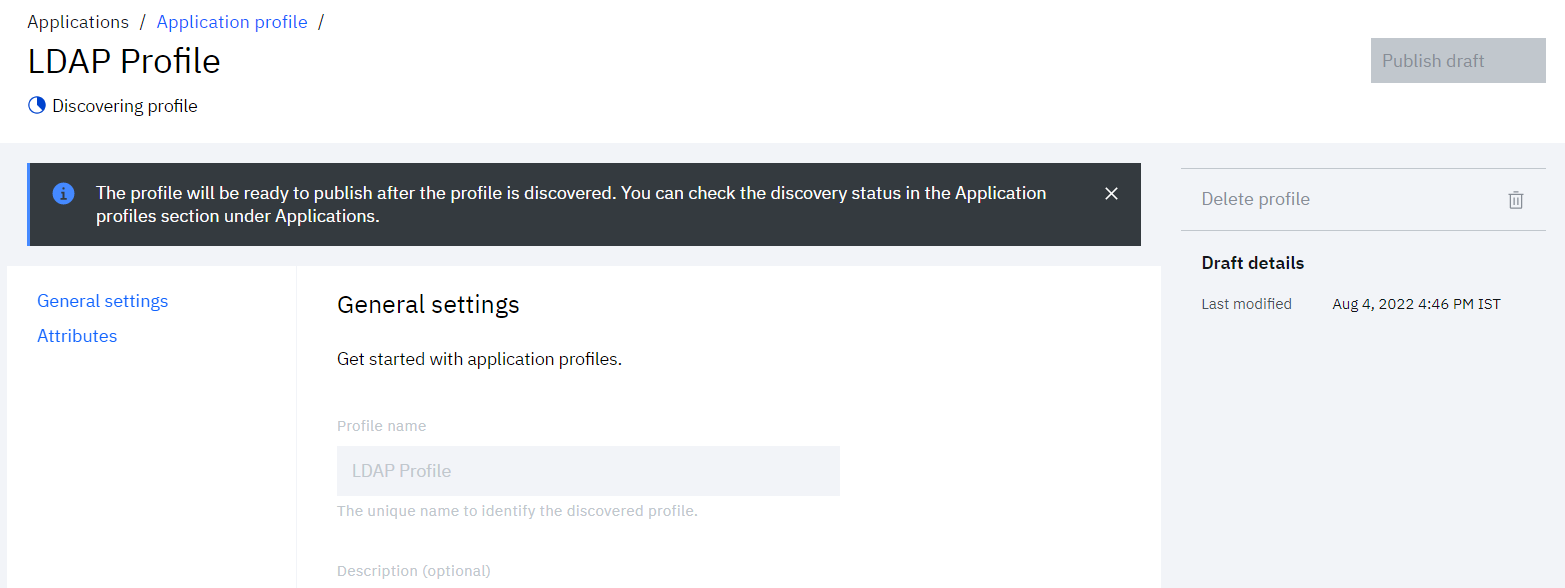
• New profile gets created in draft state. Wait till it gets ready to be published.
• Once ready, publish the profile by clicking Publish
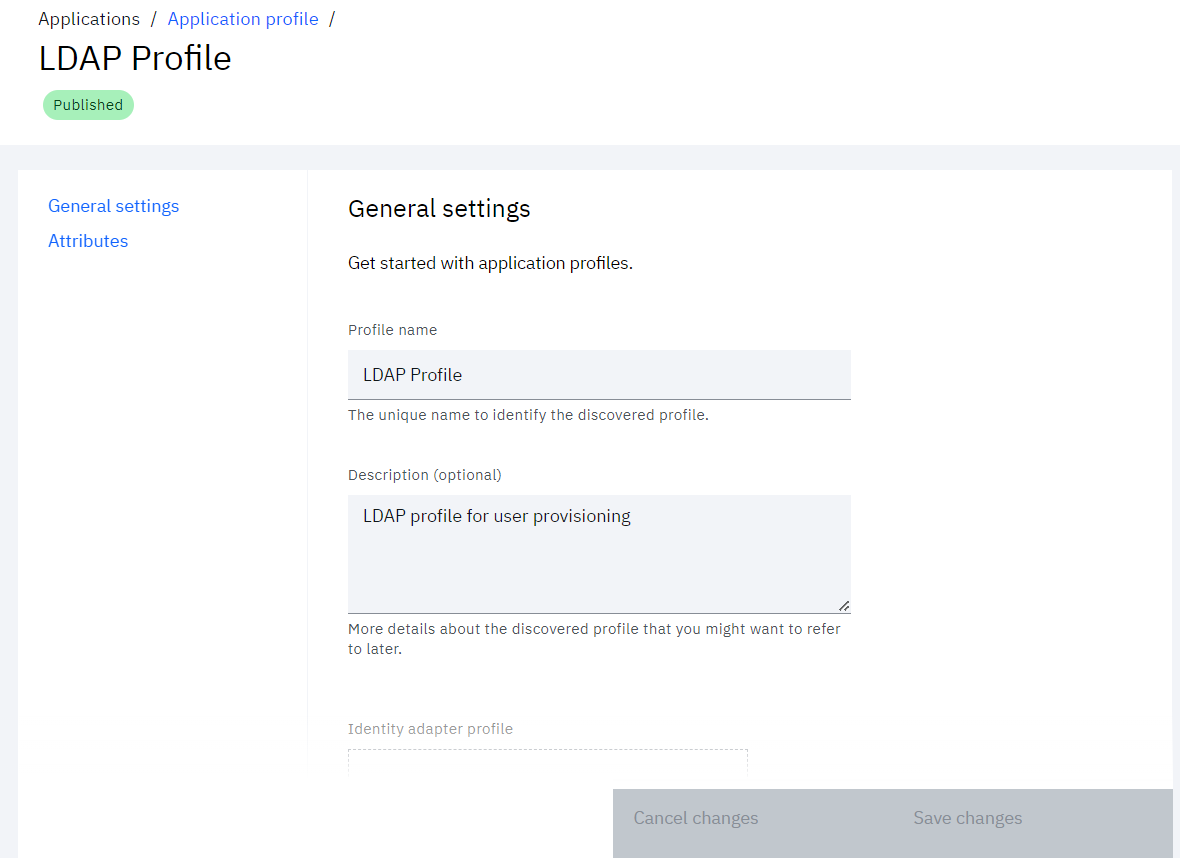
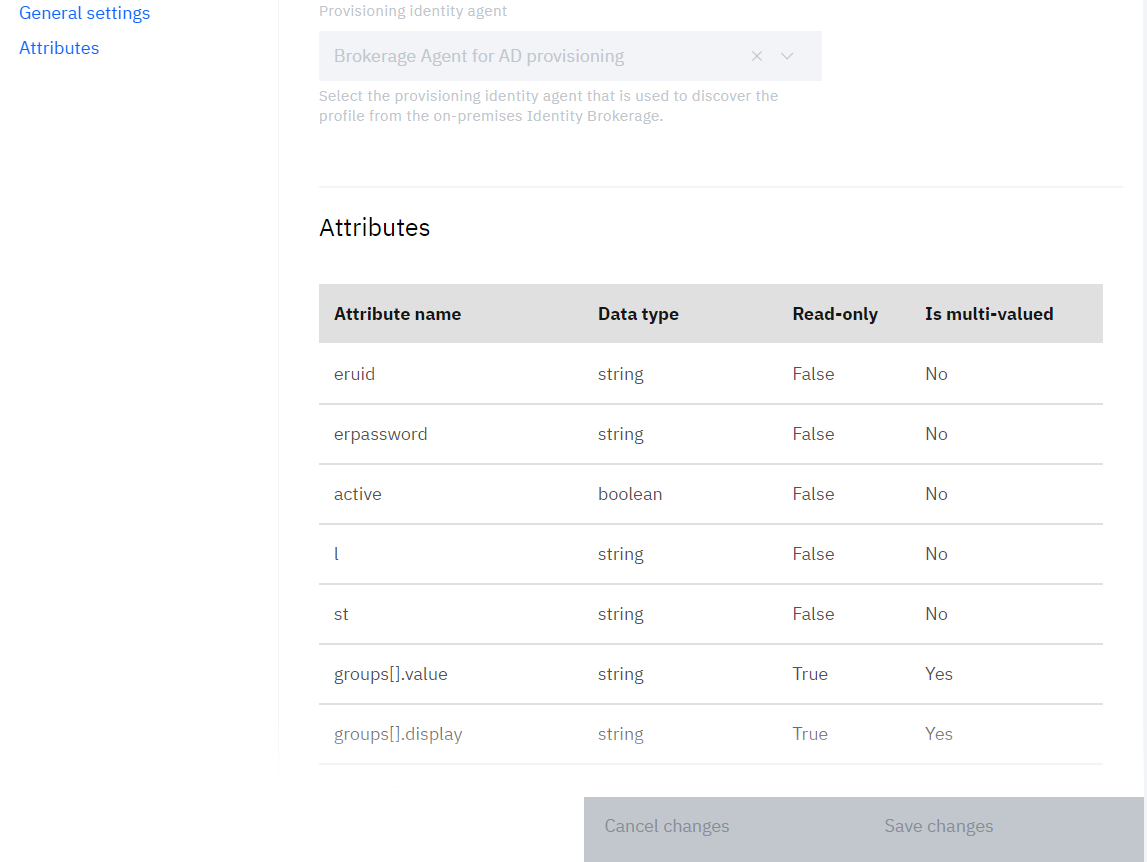
• After the profile is published, admin can review the General settings and Attributes section
Optional: Installing Security Directory Integrator (SDI)
- Refer to the [IBM Security Verify Directory Integrator (SDI) download] (https://www.ibm.com/support/pages/node/7037047) details page for various partnumber
- Download the license key from Passport Advantage. Search by part number using M0FGHML and download the binaries for required operating system
- Follow the
README.mdfrom the downloaded ZIP for details of SDI installation steps. - Add the license key downloaded from Passport Advantage portal in the sdi-config.yml file(https://www.ibm.com/support/knowledgecenter/en/SSCQGF_7.2.0/com.ibm.IBMDI.doc_7.2/adminguide.pdf).
- To add target SSL certificate, move the certificate file to the
configfolder present under the agent unzipped folder. - Uncomment the 'trusted-certificates' in the sdi-config.yml file and enter the certificates as an array in similar format.
    trusted-certificates:
       - "@/opt/IBM/isvsdi/config/Target.crt"
       - "@/opt/IBM/isvsdi/config/Target2.crt"
- (Optional) To load the target connector jar, add the jar in ./tdi/jars/connectors dir.
- (Optional) To load any other required target jar, add the jar in ./tdi/jars/3rdparty dir.
- Make sure that the Service 'isvdi' and 'initialize-prov-bridge' are not commented in the downloaded YML file
- Install the SDI using
podman-composecommand as mentioned above
SDI Port
Note: When SDI is installed, it creates a “Default server” which listens on port 1099. This can cause issues when installing the RMI Dispatcher (in later steps) which need the same port.
Hence, stop the “Default server” before installing the RMI Dispatcher.
- Validate the installation of various component using
podman-composecommand as mentioned above
[root@xxxxxxxx ~]# podman ps -a
CONTAINER ID        IMAGE                                                        COMMAND                  CREATED         STATUS           PORTS                                       NAMES
722165e62ae9        icr.io/isv-saas/verify-bridge:latest                         "/sbin/bootstrap.sh"     4 months ago    Up 4 weeks                                                   verify-bridge
f26aade1cec6        docker.io/library/postgres:12-alpine                         "docker-entrypoint..."   5 months ago    Up 4 weeks       0.0.0.0:5432->5432/tcp                      ibdb
1b45372dc651        icr.io/isv-saas/identity-brokerage:latest                    "/sbin/bootstrap.sh"     6 months ago    Up 12 days       9080/tcp, 0.0.0.0:8443->8443/tcp, 9443/tcp  identity-brokerage
1b83483dc651        icr.io/isvdi/verify-directory-integrator-dispatcher:latest   "/sbin/bootstrap.sh"     6 months ago    Up 12 days       9080/tcp, 0.0.0.0:8443->8443/tcp, 9443/tcp  isvdi
[root@xxxxxxxx ~]#
Configure Verify Password Policy
It is important to configure the Verify password policy which conform with any target server password rules.
This is required to make sure that new user account passwords get an appropriate new password.
- Login to Verify as tenant administrator (Scott)
- From the Admin console navigate to Security > Password policies
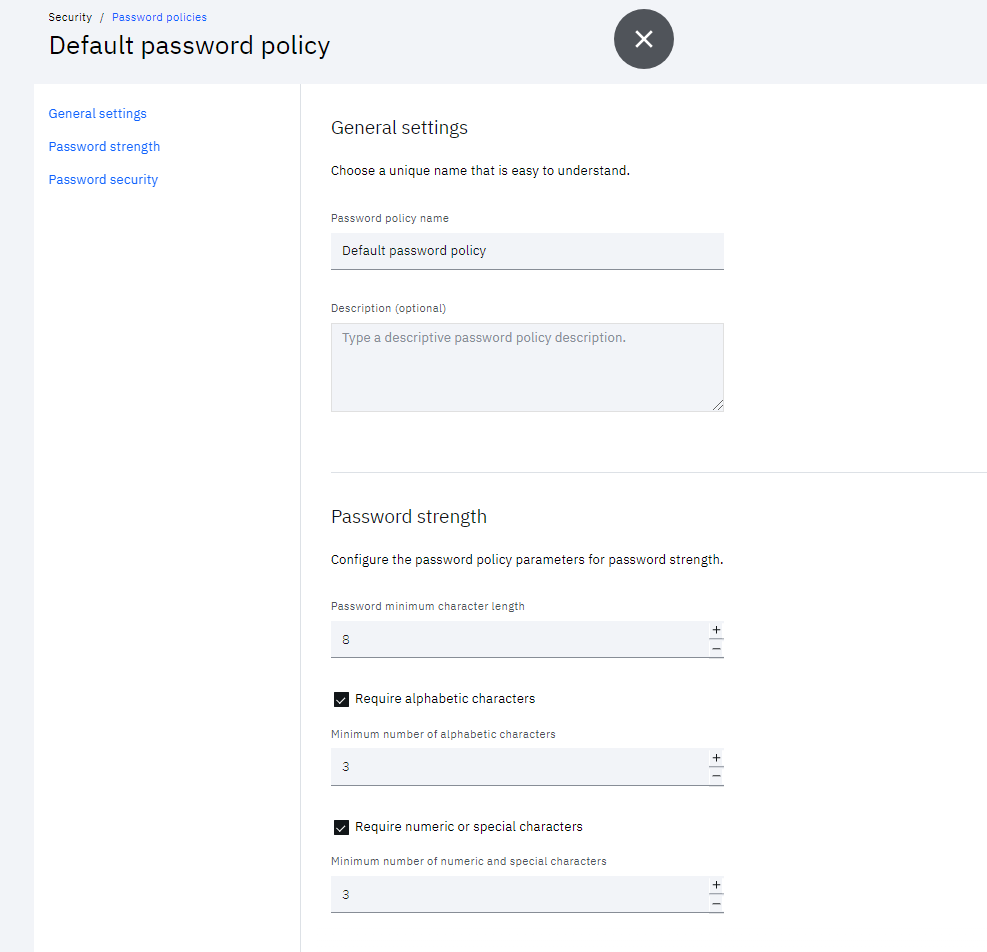
- Edit the Default password policy
- Click the Cloud Directory identity source
- Set the Password Strength which matches with the password rules of on-premise application to manage
Updated 6 months ago
Now that you have the on-premises provisioning infrastructure in place, you can set up provisioning to your on-premises systems.
