DPoP
Implement high assurance flows with IBM Verify and mobile apps
In this article, we are going to show you how to implement the use of 'Demonstration Proof-of-Possession' (DPoP) tokens from IBM Verify into your mobile and custom web app.
We describe the mechanisms for the relevant parties (client, authorization server, resource server) and then explain how to implement the relevant steps in the demo environment. This environment includes IBM Verify, a custom web app and a mobile application.
Table of Contents
Pre-requisite
You need access to an IBM Verify tenant and the permission to configure an application. If you don't have access to an IBM Verify tenant, you can start your trail here. You also need to be able to build and run an Android or iOS mobile application and a custom web app.
Introduction
The "OAuth Demonstrating Proof of Possession" adds an extra layer of security to the OAuth 2.0 protocol. It requires clients to prove their possession of a specific key, usually a cryptographic one, when they access protected resources through APIs. This mechanism is crucial for enhancing security by reducing the risks that are associated with token leakage, unauthorized access, and various types of attacks. In situations that are demanding robust security, such as those involving API providers and clients, DPoP serves as a vital security feature. It also defines a mechanism to prevent malicious actors from using an OAuth token that they obtained illicitly. This mechanism includes checks to verify whether the application that is presenting the access token is the same one the access token was initially issued to. The application proves it by binding the 'DPoP' token to a privately generated key, which is securely held by the client.
This diagram demonstrates the flow:
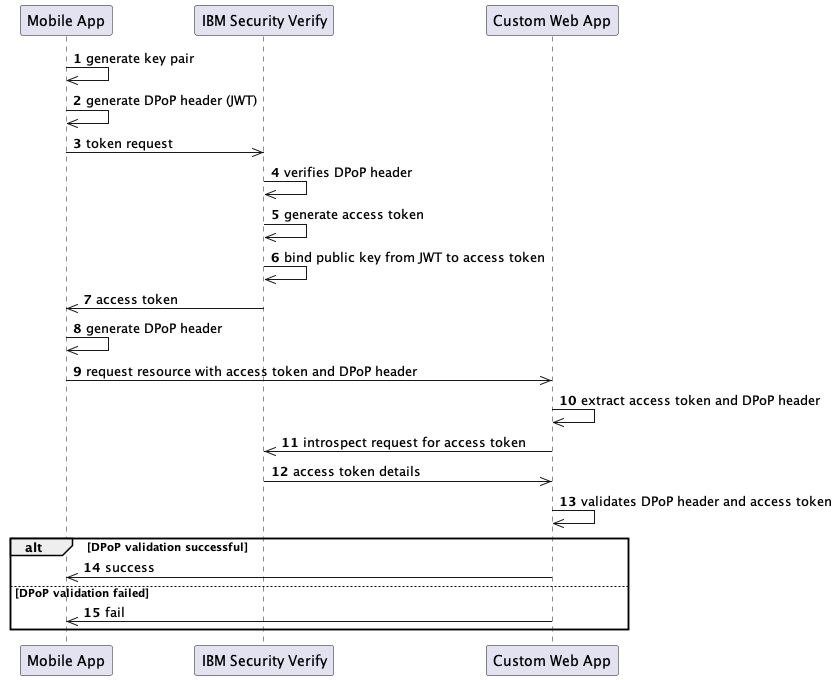
Let's go through each step more in detail:
-
The mobile app generates a key pair in the secure storage.
-
The DPoP Header is a JSON Web Token (
JWT) that includes the JSON Web Key (JWK) representation of the public key:typ: must bedpop+jwtalg: identifier for a JWS asymmetric digital signature algorithmjwk:{ "kty": "RSA" ...}
And a list of request-specific attributes in the payload:
jti: unique identifieriat: creation timestamp of the JWThtm: the value of the HTTP method (for exampleGET,POST)htu: the URI of the request without query and fragment parts
It is signed with the private key.
Example of the header and payload structure:
{ "alg": "RS256", "typ": "dpop+jwt", "jwk": { "kty": "RSA", "kid": "91e1b216-d330-47ec-b6a1-89c81049ff9f", "n": "0rP7xyhCH6Lauw5mA2nokBElT1NQ-zOAK4ybfIe-tEE_JRbXc-OCveJnQ8hHCFtjq9vZyHIqxA3TzQgnMP86ozLMqPt3BoxbSg7dAxXZ8UfNnwU--baVcXBKMVhc_vas8ZDWdI2BUBQqkLsdmzRdiXKwROMamVUzXoTNxHj513Ac-hcEZBaM7cLKADKCVjAl4h9Ui_Bep3IKxPfeGRf34yc_lxDxo08jc9ZPDW5LY76TOTGncKq7dJp7A0Z2btIX6mL-z6ctsfCFRfcGeL8w5umyxuNhXrut7LQd_d5KwClQXeTKEE7IRymK96pWiCldECdwfo0Fgrt7ZvxnsIB2eQ", "e": "AQAB" } } { "jti": "rImC2rQeKg2J1sQcUKRhqw", "iat": 1698124549, "htm": "POST", "htu": "https://your-tenant.verify.ibm.com/oauth2/token" } -
That
JWTis sent as theDPoPheader in the token request. -
The authorization server extracts the
DPoPheader and verifies its signature. -
An access token of type
DPoPis generated for the client. -
As part of this process, the thumbprint is generated from the
JWKembedded in theDPoPproof and added to the authorization grant as part of the "confirmation" claim (cnf). This confirmation claim is then made available as part of the token introspection response (see 12. in this list). -
The access token of type
DPoPis issued to the client. -
Every time the client wants to make a request with the issued
DPoPtoken, it must generate a correspondingDPoPheader. That header contains the same values as in 2. and according to the request:ath:base64urlencodedSHA256hash of the access token
-
The request is made to the resource server, including the generated
DPoPheader andDPoP <access token>as theAuthorizationheader. This prefix indicates the use of a DPoP-bound token and requires the proof to be included as part of theDPoPheader. -
The resource server extracts the
DPoPheader and access token from the request. -
The resource server calls the authorization server to introspect the token, for example here.
-
The authorization server returns the introspection details of the access token.
-
The resource server performs a couple of checks to validate the
DPoPtoken and the request. The "proof of possession" is validated by:- comparing the
athvalue from theDPoPheader with the computed value of the access token - comparing the bas64url encoding
SHA256hash of the public key from theDPoPheader with thecnf.jktattribute from the introspection response
- comparing the
-
If all validations are successful, the access to the resource is granted.
-
Or rejected otherwise.
Demo environment
We provide a sample app for Android and iOS and a web app that allows you to test the described flow end-to-end.
IBM Verify
- Login to your tenant as an administrator.
- From the sidebar menu:
Applications-->Applications - Click
Add Application - In the search bar, type in
openand selectOpenID Connectin the list of available applications and clickAdd Application(lower right button) - Fill-in the values for the required attributes and configure the application as you need.
- The relevant parts for this demo are on the
Sign-ontab:- for
Grant typesselectAuthorization codeandClient credentials - in the
Proof-of-Possession settingssection (further below), selectEnforce DPoP-bound access token
- for
- Click
Save. - That saves your configuration and creates the
Client IDandClient secret. These values are needed to configure the mobile and web applications.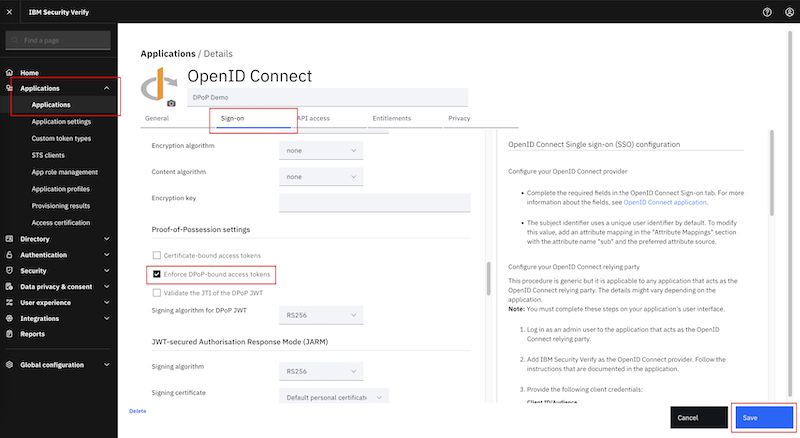
Custom Web App
The custom web app mimics a resource server that validates DPoP tokens.
Setup
- Download the demo app from here
- Configure the relevant parameter in
app.js - Run
node install - Start the server by
node app.js
That starts the server on https://localhost:8080.
Endpoints
It provides two endpoints:
/statusGET - returnsRunning/validate-tokenGET - validates the DPoP token. ReturnsHTTP 204if the token is successfully validated. OrHTTP 401otherwise.
Upon receiving a request, the server extracts the DPoP header (JWT) and access token:
const accessToken = request.headers.authorization.split(" ")[1]
const dpopHeader = request.headers["dpop"]
It then checks that only one DPoP header is present...
let dpopProof = true
dpopProof = dpopProof && (request.headers["dpop"].split(',').length == 1)
console.log("There is only one DPoP HTTP request header field: " + dpopProof)
...and validates the signature of the JWT and extracts the payload...
let dpopHeaderUnpacked = await jose.JWS.createVerify().verify(dpopHeader, { allowEmbeddedKey: true })
let jsonPayload = JSON.parse(dpopHeaderUnpacked.payload)
...and then does the remaining checks that are listed in https://datatracker.ietf.org/doc/html/rfc9449#name-checking-dpop-proofs
-
All required claims are contained in the
JWTdpopProof = dpopProof && (jsonPayload.htu !== undefined) ... // htu, htm, ath, jti, ait must be present -
The type JOSE Header Parameter has the value
dpop+jwtdpopProof = dpopProof && (dpopHeaderUnpacked.header.typ === "dpop+jwt") -
The
algJOSE Header Parameter indicates a registered asymmetric digital signature algorithmdpopProof = dpopProof && (dpopHeaderUnpacked.header.alg === "RS256") -
The
htmclaim matches the HTTP method of the current requestdpopProof = dpopProof && (jsonPayload.htm === request.method) -
The
htuclaim matches the HTTP URI value for the HTTP requestconst fullUrl = request.protocol + '://' + request.get('host') + request.originalUrl dpopProof = dpopProof && (jsonPayload.htu === fullUrl) -
The creation time of the JWT is within an acceptable window
const timeInSec = new Date().getTime() / 1000 dpopProof = dpopProof && (iat < timeInSec + 1) && (exp > timeInSec) -
The value of the ath claim equals the hash of that access token
let digest = crypto.createHash('sha256').update(accessToken).digest()
let atHash = jose.util.base64url.encode(digest);
dpopProof = dpopProof && (atHash === jsonPayload.ath)
The public key to which the access token is bound matches the public key from the
DPoPproof:let thumbprint = await dpopHeaderUnpacked.key.thumbprint('SHA-256'); computedFingerprint = jose.util.base64url.encode(thumbprint); ... doTokenInspectionRequest(accessToken).then((response) => { const introspectionResponse = JSON.parse(response) dpopProof = dpopProof && (introspectionResponse["cnf"]["jkt"] !== undefined) dpopProof = dpopProof && (introspectionResponse["cnf"]["jkt"] === computedFingerprint) })
For validating that the client is the legitimate owner of the access token, the resource server verifies that the public key to which the access token is bound (the jkt.cnf claim) matches the public key of the DPoP proof (from the DPoP header). It also verifies that the access token hash in the DPoP proof matches the access token that is presented in the request.
For the request to be successful, each of the checks that are listed above need to be passed.
When successfully validated, the accessToken is added to a cache along with its expire time (exp value). That cache is checked before an introspection call if the accessToken is present and not expired to avoid unnecessary network requests.
Mobile Apps
The mobile apps demonstrate how to obtain a DPoP token from IBM Verify and how that token is used in subsequent requests to the resource server.
CAUTION
The recommendation for a mobile application is to obtain an authorization code with a browser authorization flow as described in OAuth 2.0 for Native Apps and exchanges that code for an access token.
We use the OAuth Client Credentials flow in the demo app for not unnecessarily bloating the code. It is not recommended to store Client ID and Client secret in a mobile application in production as a bad actor will extract those credentials.
Android App
Setup
- Download the demo app from here
- Open the app in "Android Studio"
- Configure the relevant parameters in
MainActivity.kt: theresourceServeris the IP address of the custom web app.
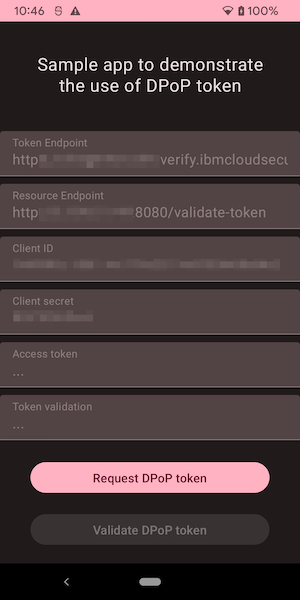
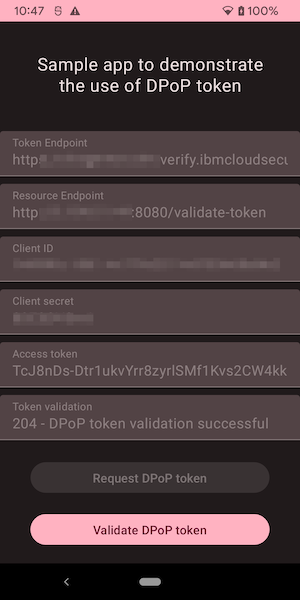
The app presents a single activity, showing the configuration and two buttons to request and validate a DPoP token:
In this demo app, we use the jose4j library that provides convenient support for the JSON Object Signing and Encryption (JOSE) standards.
Request DPoP Token
For every network request to the authorization and resource servers the app adds a DPoP header that is generated in the generateDpopHeader function:
private fun generateDpopHeader(htu: String, htm: String, accessToken: String?): String {
    val jwtClaims: JwtClaims = JwtClaims()
    jwtClaims.setGeneratedJwtId()
    jwtClaims.setIssuedAtToNow()
    jwtClaims.setClaim("htm", htm)
    jwtClaims.setClaim("htu", htu)
    if (accessToken != null) {
        val bytes = accessToken.toByteArray(StandardCharsets.UTF_8)
        val messageDigest = MessageDigest.getInstance("SHA-256")
        messageDigest.update(bytes, 0, bytes.size)
        val digest = messageDigest.digest()
        val base64encodedFromDigest =
            Base64.getUrlEncoder().withoutPadding().encodeToString(digest)
        Log.d(TAG, "Token: $accessToken")
        Log.d(TAG, "Base64 encoded (digest): $base64encodedFromDigest")
        jwtClaims.setClaim("ath", base64encodedFromDigest)
    }
    val jws: JsonWebSignature = JsonWebSignature()
    jws.payload = jwtClaims.toJson()
    jws.key = getRsaSigningKey()
    jws.algorithmHeaderValue = "RS256"
    jws.jwkHeader = RsaJsonWebKey(keyStore.getCertificate(RSA_KEY_NAME).publicKey as RSAPublicKey)
    jws.setHeader("typ", "dpop+jwt")
    return jws.compactSerialization
}
The token request is sent to the server:
--> POST https://your-tenant.verify.ibm.com/oauth2/token
Content-Type: application/x-www-form-urlencoded
Content-Length: 114
Accept: application/json
DPoP: ey... from generateDpopHeader(...)
client_id=...&client_secret=...&grant_type=client_credentials&scope=openid
--> END POST (114-byte body)
<-- 200 https://your-tenant.verify.ibm.com/oauth2/token (2672ms)
x-backside-transport: OK OK
content-type: application/json;charset=UTF-8
content-length: 274
date: Fri, 27 Oct 2023 01:34:13 GMT
{"access_token":"abc...123","expires_in":1799,"grant_id":"228048a8-2de0-42f0-8642-0111eb8a0c17","scope":"openid","token_type":"DPoP"}
<-- END HTTP (274-byte body)
The server returns an access token of type DPoP.
Also note the absence of a refresh token because of grant_type=client_credentials. From the docs:
The refresh token that is used to obtain new access tokens. It is only available for
authorization_codegrant if therefresh_tokengrant is enabled.
Validate DPoP Token
With the DPoP token, the app can perform subsequent requests to the resource server. For each request, a new DPoP header needs to be constructed with the generateDpopHeader(...) method listed above...
val headers = HashMap<String, String>()
headers["DPoP"] = generateDpopHeader(
    htu = resourceEndpoint,
    htm = "GET",
    accessToken = dpopToken.accessToken)
...and the /validate-token endpoint ot the custom web app is called:
apiService.validateDpopToken(
    headers,
    String.format("DPoP %s", dpopToken.accessToken),
    resourceEndpoint)
    .enqueue(object : Callback<ResponseBody> {
        override fun onResponse(
            call: Call<ResponseBody>,
            response: Response<ResponseBody>
        ) {
            if (response.isSuccessful) {
                Log.d(TAG, "DPoP token validation successful")
            } else {
                Log.d(TAG, "DPoP token validation failed")
            }
        }

        override fun onFailure(call: Call<ResponseBody>, t: Throwable) {
            throw (t)
        }
    })
--> GET http://your-resource-server:8080/validate-token
Accept: application/json
DPoP: ey... from generateDpopHeader(...)
Authorization: DPoP abc...123
--> END GET
Protecting the Signing Key
The RSA keypair that is bound to the access token and that used to sign the JWT, is generated in the Android keystore to protect it.
private fun getRsaSigningKey() : Key {

        if (keyStore.containsAlias(RSA_KEY_NAME)) {
            Log.d(TAG, "Key $RSA_KEY_NAME found in KeyStore")
        } else {
            val keyGenParameterSpec = KeyGenParameterSpec.Builder(
                RSA_KEY_NAME,
                KeyProperties.PURPOSE_SIGN or KeyProperties.PURPOSE_VERIFY
            )
                .setDigests(KeyProperties.DIGEST_SHA256)
                .setSignaturePaddings(KeyProperties.SIGNATURE_PADDING_RSA_PKCS1)
                .setAlgorithmParameterSpec(RSAKeyGenParameterSpec(2048, RSAKeyGenParameterSpec.F4))
                .build();

            val keyPairGenerator = KeyPairGenerator.getInstance(KeyProperties.KEY_ALGORITHM_RSA,ANDROID_KEYSTORE)
            keyPairGenerator.initialize(keyGenParameterSpec)
            Log.d(TAG, "Key $RSA_KEY_NAME generated")
            keyPairGenerator.generateKeyPair()
        }

        return keyStore.getKey(RSA_KEY_NAME, null)
    }
This key might be rotated for every token request.
The private key is passed into the JWS for the signing operation...
jws.key = getRsaSigningKey()
...and the public key is added as a JWK header:
jws.jwkHeader = RsaJsonWebKey(keyStore.getCertificate(RSA_KEY_NAME).publicKey as RSAPublicKey)
iOS App
Setup
- Download the demo app from here
- Open the app in "Xcode"
- Configure the relevant parameters in
ViewModel.swift: theresourceServeris the IP address of the custom web app.
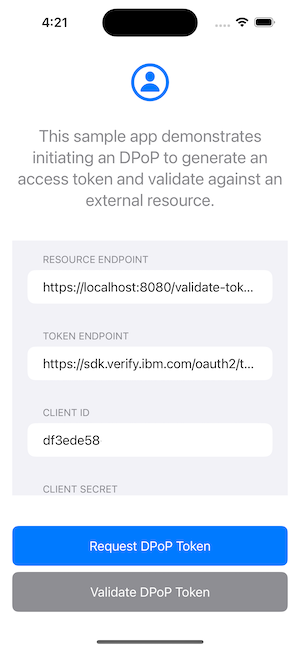
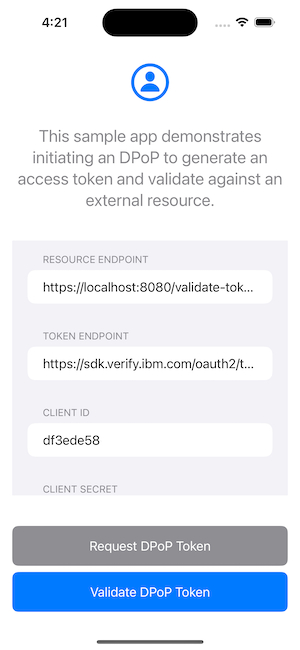
The app presents a single view, showing the configuration and two buttons to request and validate a DPoP token:
Request DPoP Token
For every network request to the authorization and resource servers the app adds a DPoP header that is generated in the DPoP.generateProof function, which is part of the Verify SDK Authentication module.
import Authentication
import Core

var token: TokenInfo? = nil
private let key = RSA.Signing.PrivateKey()

public func requestToken() async {
    do {
        let parameters: [String: Any] = ["grant_type": "client_credentials",
                                         "client_id": "\(clientId)",
                                         "client_secret": "\(clientSecret)"]

        let body = urlEncode(from: parameters).data(using: .utf8)!

        // Generate the request for a DPoP access token
        let tokenResource = HTTPResource<TokenInfo>(json: .post,
                                                    url: URL(string: tokenURL)!,
                                                    contentType: .urlEncoded,
                                                    body: body,
                                                    headers: ["DPoP": try DPoP.generateProof(key, uri: tokenURL)],
                                                    timeOutInterval: 30)

        self.token = try await URLSession(configuration: .default).dataTask(for: tokenResource)
        print("Succesfully request an access token with a DPoP header.")
    }
    catch let error {
        print(error.localizedDescription)
    }
}
The token request is sent to the server:
--> POST https://your-tenant.verify.ibm.com/oauth2/token
Content-Type: application/x-www-form-urlencoded
Content-Length: 114
Accept: application/json
DPoP: ey... from generateDpopHeader(...)
client_id=...&client_secret=...&grant_type=client_credentials&scope=openid
--> END POST (114-byte body)
<-- 200 https://your-tenant.verify.ibm.com/oauth2/token (2672ms)
x-backside-transport: OK OK
content-type: application/json;charset=UTF-8
content-length: 274
date: Fri, 27 Oct 2023 01:34:13 GMT
{"access_token":"abc...123","expires_in":1799,"grant_id":"228048a8-2de0-42f0-8642-0111eb8a0c17","scope":"openid","token_type":"DPoP"}
<-- END HTTP (274-byte body)
The server returns an access token of type DPoP.
Also note the absence of a refresh token because of grant_type=client_credentials. From the docs:
The refresh token that is used to obtain new access tokens. It is only available for
authorization_codegrant if therefresh_tokengrant is enabled.
Validate DPoP Token
With the DPoP token, the app can perform subsequent requests to the resource server. For each request, a new DPoP header needs to be constructed with the generateProof(...) function listed above and the /validate-token endpoint ot the custom web app is called:
public func validateToken() async {
    guard let token = self.token else {
        print("No token to validate")
        return
    }

    do {
        // Generate the JWT to validate the DPoP against the intraspection resource.
        let validationResource = HTTPResource<()>(.get,
            url: URL(string: resourceServer)!,
            headers: ["DPoP": try DPoP.generateProof(key,
                uri: resourceServer, method: .get,
                accessToken: token.accessToken),
                "Authorization": "\(token.tokenType) \(token.accessToken)"],
            timeOutInterval: 30)

        try await URLSession(configuration: .default, delegate: SelfSignedCertificateDelegate(), delegateQueue: nil).dataTask(for: validationResource)
        print("Succesfully validated the access token with a DPoP header against \(resourceServer).")

    }
    catch let error {
        print(error.localizedDescription)
    }
}
--> GET https://your-resource-server:8080/validate-token
Accept: application/json
DPoP: ey... from generateProof(...)
Authorization: DPoP abc...123
--> END GET
Protecting the Signing Key
The RSA keypair that is bound to the access token and that used to sign the JWT, is generated in the iOS keystore to protect it.
// Generate the private key.
let privateKey = RSA.Signing.PrivateKey()

// Save the private key to the Keychain.
try KeychainService.default.addItem("MyPrivateKey", value: privateKey.derRepresentation)
This key might be rotated for every token request.
Limitations
Using DPoP prevents bad actors from getting access to protected resources by extracting an access token from a client. They would also need access to the crypto key that is bound to that token - that significantly increases the complexity of an attack.
While DPoP and other sender-constrained token methods prevent unauthorized use of stolen tokens, if a client has a valid set of client credentials, it can generate its own DPoP proof and obtain a token that can be used to access the protected resource. Certificate bound tokens (https://docs.verify.ibm.com/verify/docs/oauth-20-cert-bound-access-tokens), in contrast, can mitigate this if the process of certificate issuance is properly governed. However, this is typically not practical for mobile and single-page applications.
In addition, other mitigations, such as new device detection and adaptive access with strong authentication methods should always be used.
Conclusion
OAuth DPoP support is relevant for businesses that rely on OAuth 2.0 for securing their APIs, particularly when strong security and protection against certain types of attacks are crucial, for example financial institutions. OAuth DPoP enhances the security of OAuth 2.0 by providing a way to prove the possession of a cryptographic key when making requests to an OAuth-protected API.
In summary, we described the mechanisms for the relevant parties (client, authorization server, resource server) and explained how to implement the relevant steps in a demo environment, including IBM Verify, a custom web app and a mobile application.
Updated 7 months ago
