User registration into a different Identity Provider
The article Multi-step user registration helped understand how a basic user registration experience can be created by using the Flow designer. The goal of that article was to on-board a new user into IBM Verify.
There are enterprises though, which need to deal with multiple Identity Providers to manage their user population. At times, they need to devise steps to consolidate the data across different Identity Providers, for better user management. Data consolidation, in itself, is a complex task, especially given the challenges associated with different schema for different Identity Providers.
This article illustrates how organizations can manage identities across several different Identity Providers without consolidating data and by using one common flow. The article is an extension to Multi-step user registration, with the additional steps on how to create the user in Identity Providers beyond IBM Verify.
Overview of the flow
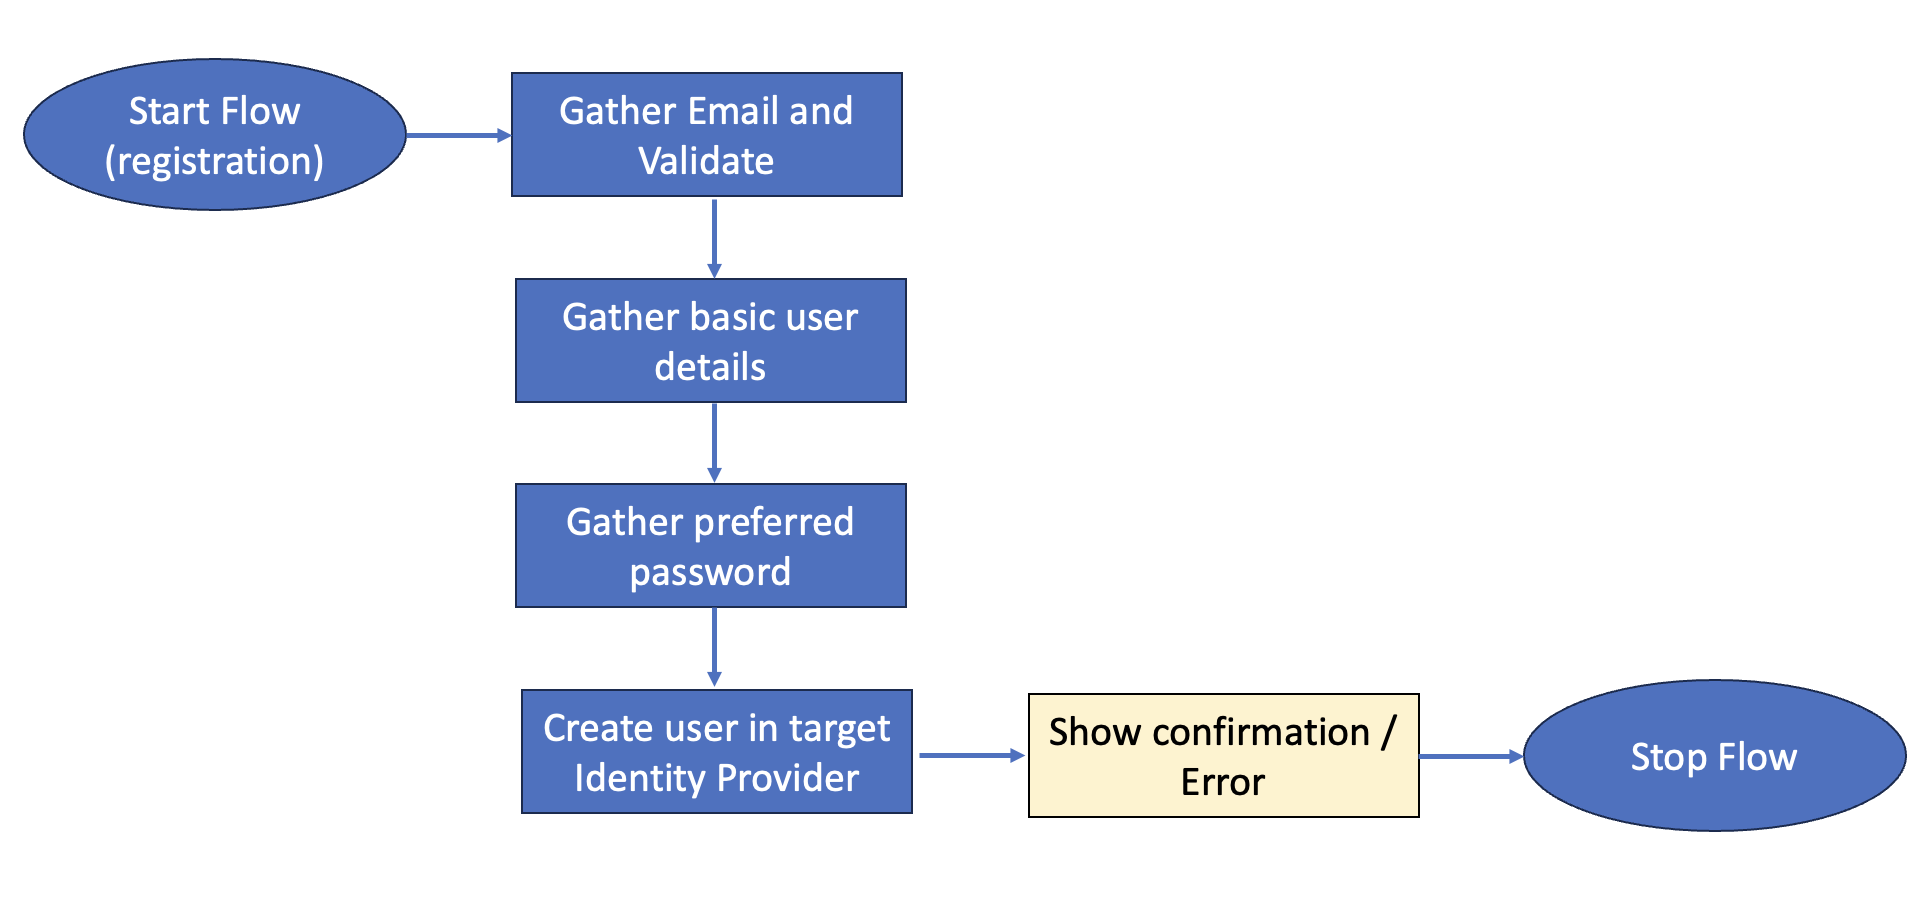
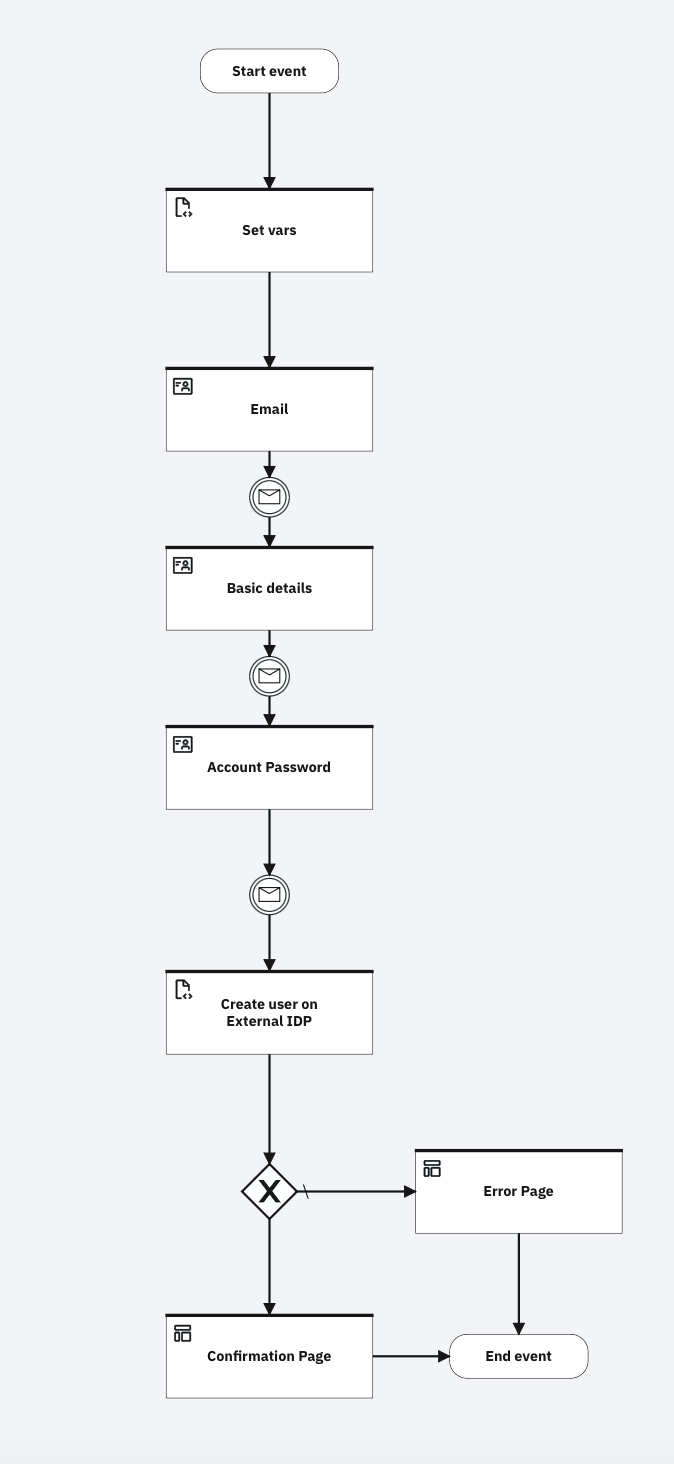
The flow includes the following steps:
- Ask the user to provide an email and also use the email as the username.
- Ask the user to verify their email with an Email-OTP.
- Ask the user to provide some basic details, such as First name, Family name.
- Ask the user to provide a password.
- Map the collected data to the schema of the target Identity Provider.
- Create a user profile in the target Identity Provider.
- Show a confirmation or error page to the user.
Prerequisites
- IBM Verify tenant
- Flow designer must be enabled in your tenant.
Configuring the flow forms
Create the appropriate user forms
Create the user forms that are to be used for orchestrating the end-to-end registration experience. In this case, three user forms must be created.
Note
This guide only demonstrates the creation of 3 forms with specific fields. More attributes and forms can be created and connected to expand the attribute collection steps in the wanted registration flow. This can be done by introducing more elements in the form builder.
A. Email capture and verification form
-
When logged in as administrator in IBM Verify, navigate to "User experience".
-
Under "User experience", select "User forms" > "Create form".
-
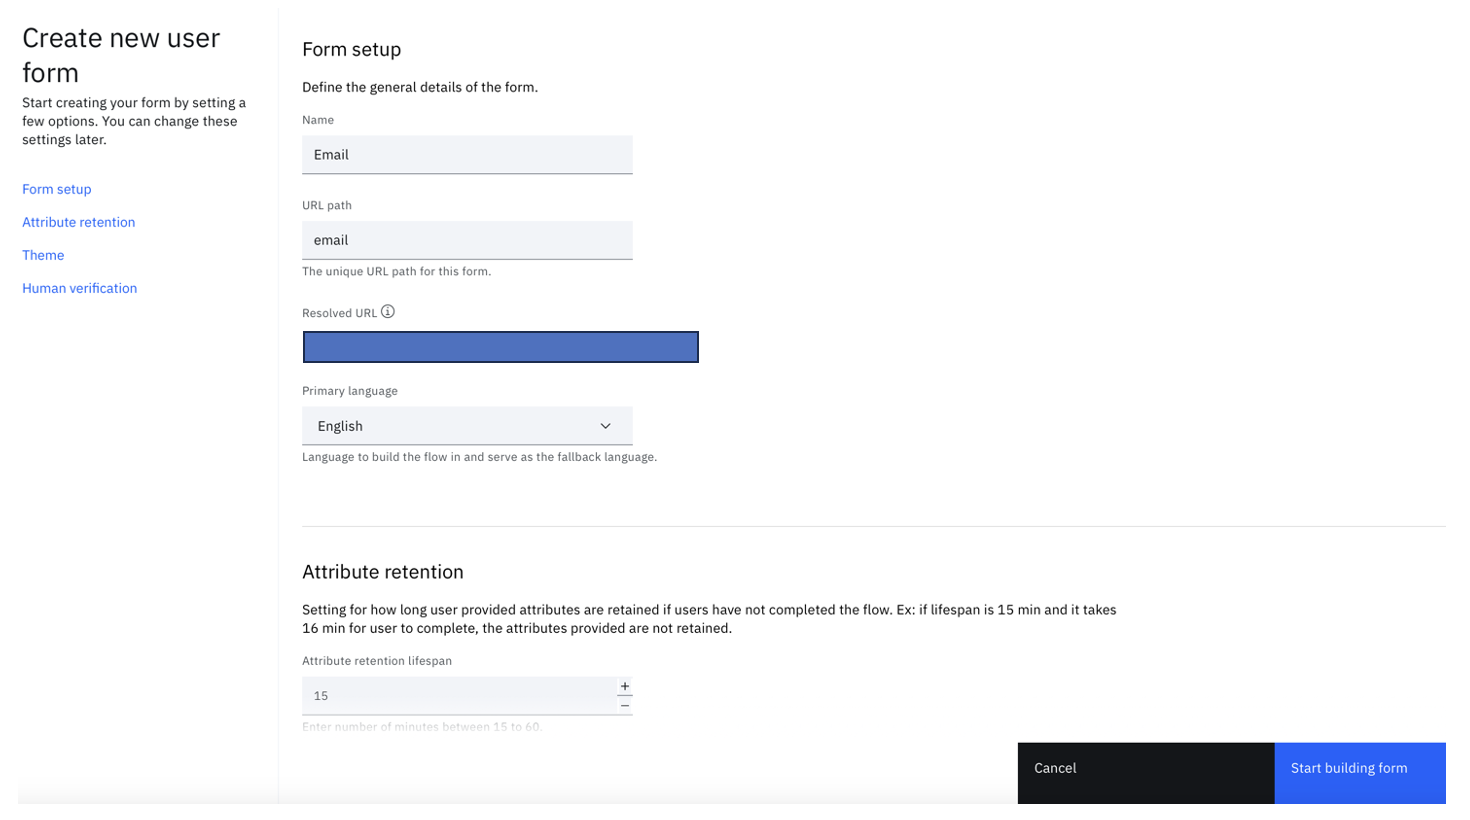
Enter a form name. For example, "Email". You may modify other settings, such as the Primary language, Session management, Theme, and Human verification.
-
Click "Start building form".
-
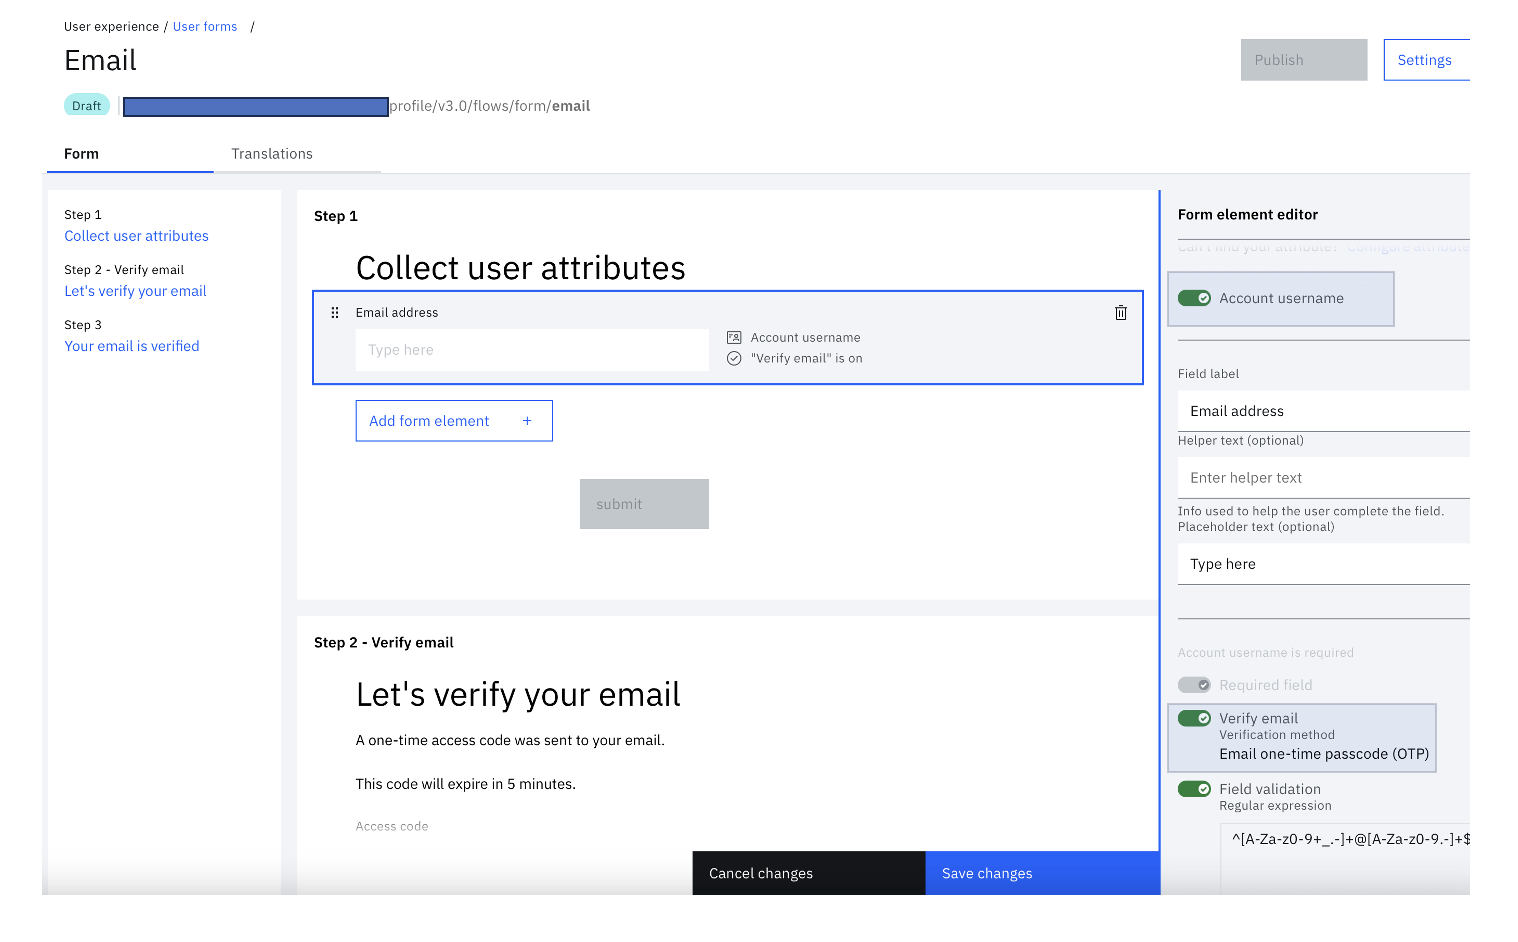
Click the "Email address" element in the form to set the proper settings in the "Form element editor" panel.
-
Switch on the "Account username" and "Verify email" toggle button. Click "Save changes" and "Publish".
-
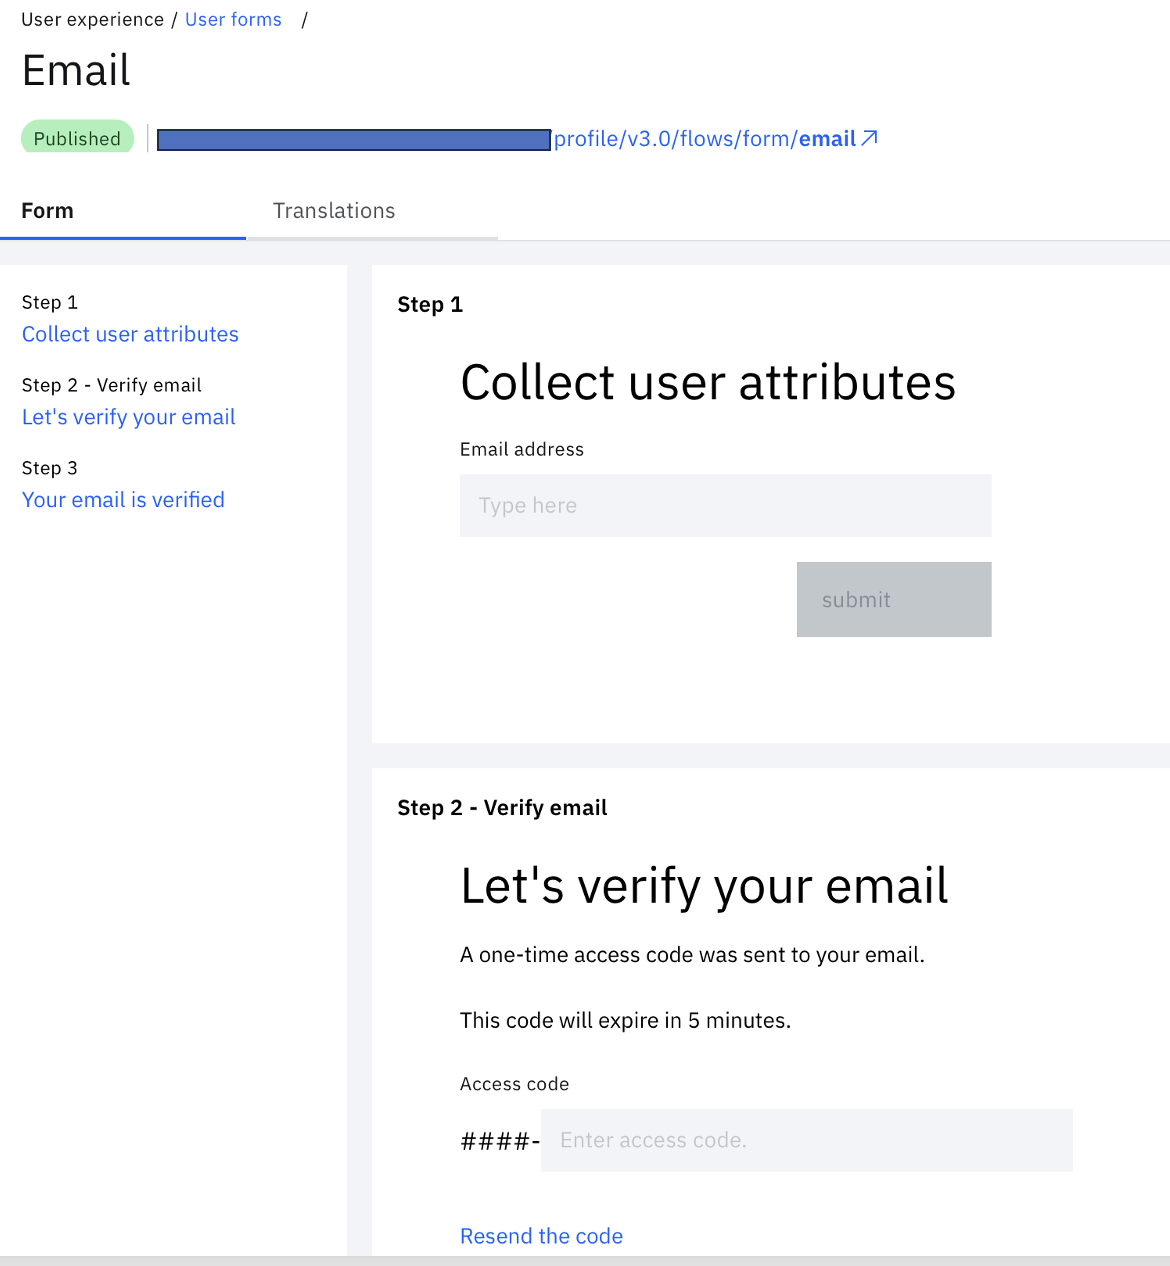
After publishing, validate that the published form is shown as:
Note
Other settings such as branding, text that is displayed in Email OTP verification, attribute field text, and more can be customized in any user form.
B. Capture basic registration details
-
When logged in as administrator in IBM Verify, navigate to "User experience".
-
Under "User experience", select "User forms" > "Create form".
-
Enter a form name. For example, "Basic Details". You may modify other settings, such as the Primary language, Session management, Theme, and Human verification.
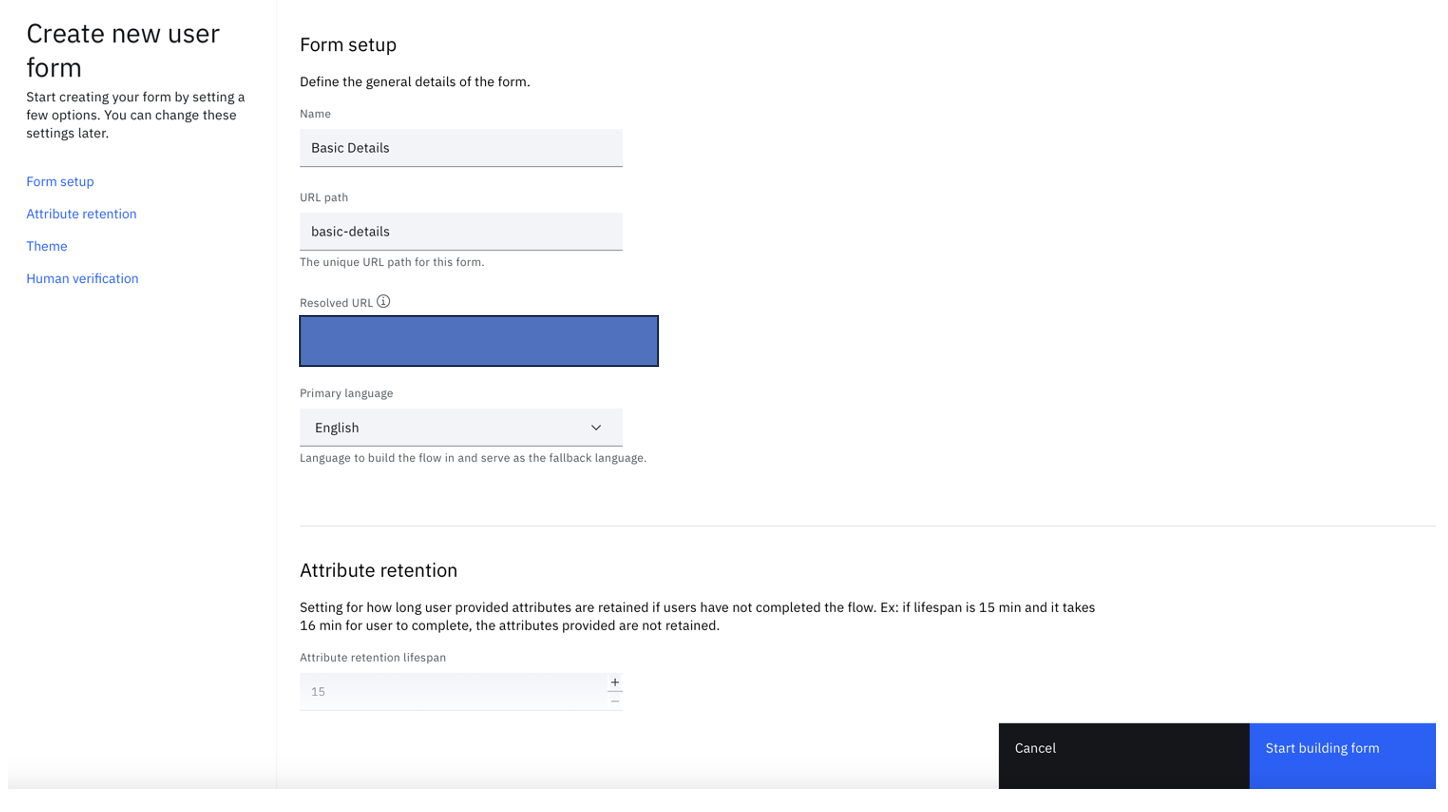
-
Click "Start building form".
-
Delete the field "Email address". Add two new fields to collect the "Given name" and "Family name". Click "Save changes" and "Publish".
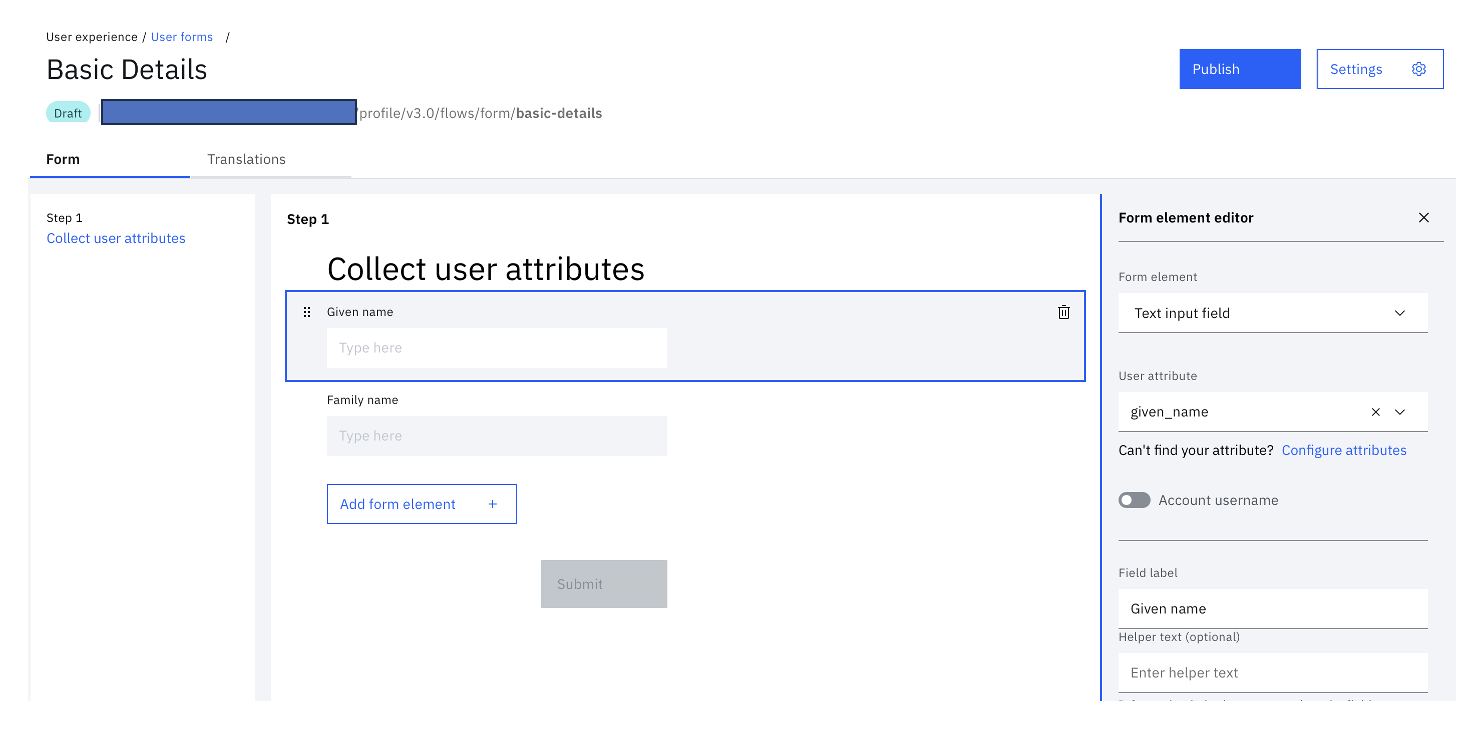
-
After publishing, validate that the published form is shown as:
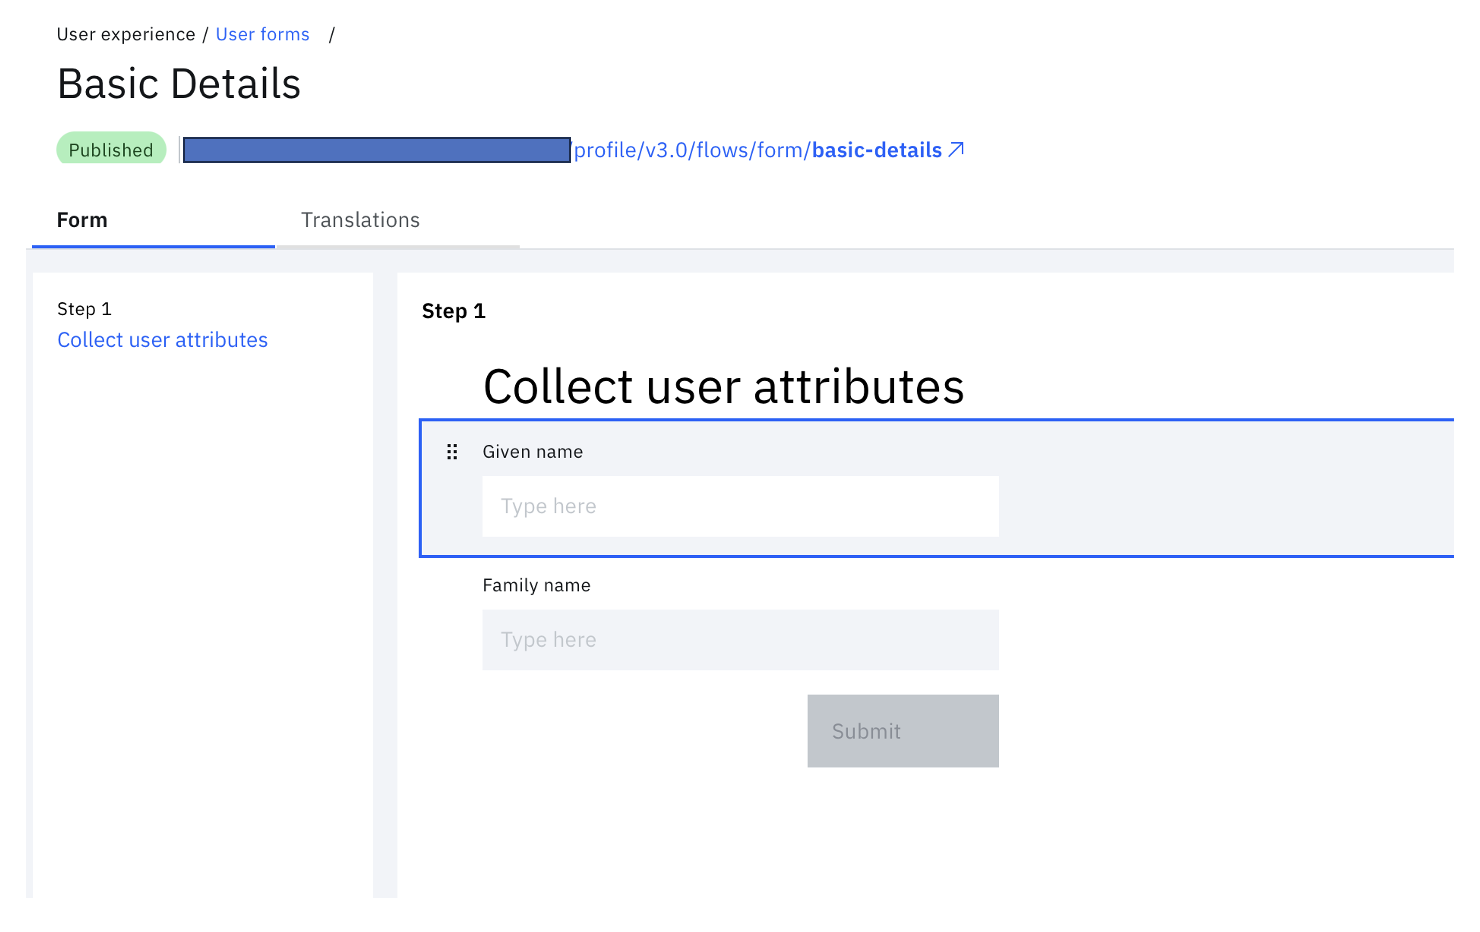
Note
Other settings such as branding, text that is displayed in Email OTP verification, attribute field text, and more can be customized in any user form.
C. Password creation form
-
When logged in as administrator in IBM Verify, navigate to "User experience".
-
Under "User experience", select "User forms" > "Create form".
-
Enter a form name. For example, "Password". You may modify other settings, such as the Primary language, Session management, Theme and Human verification.
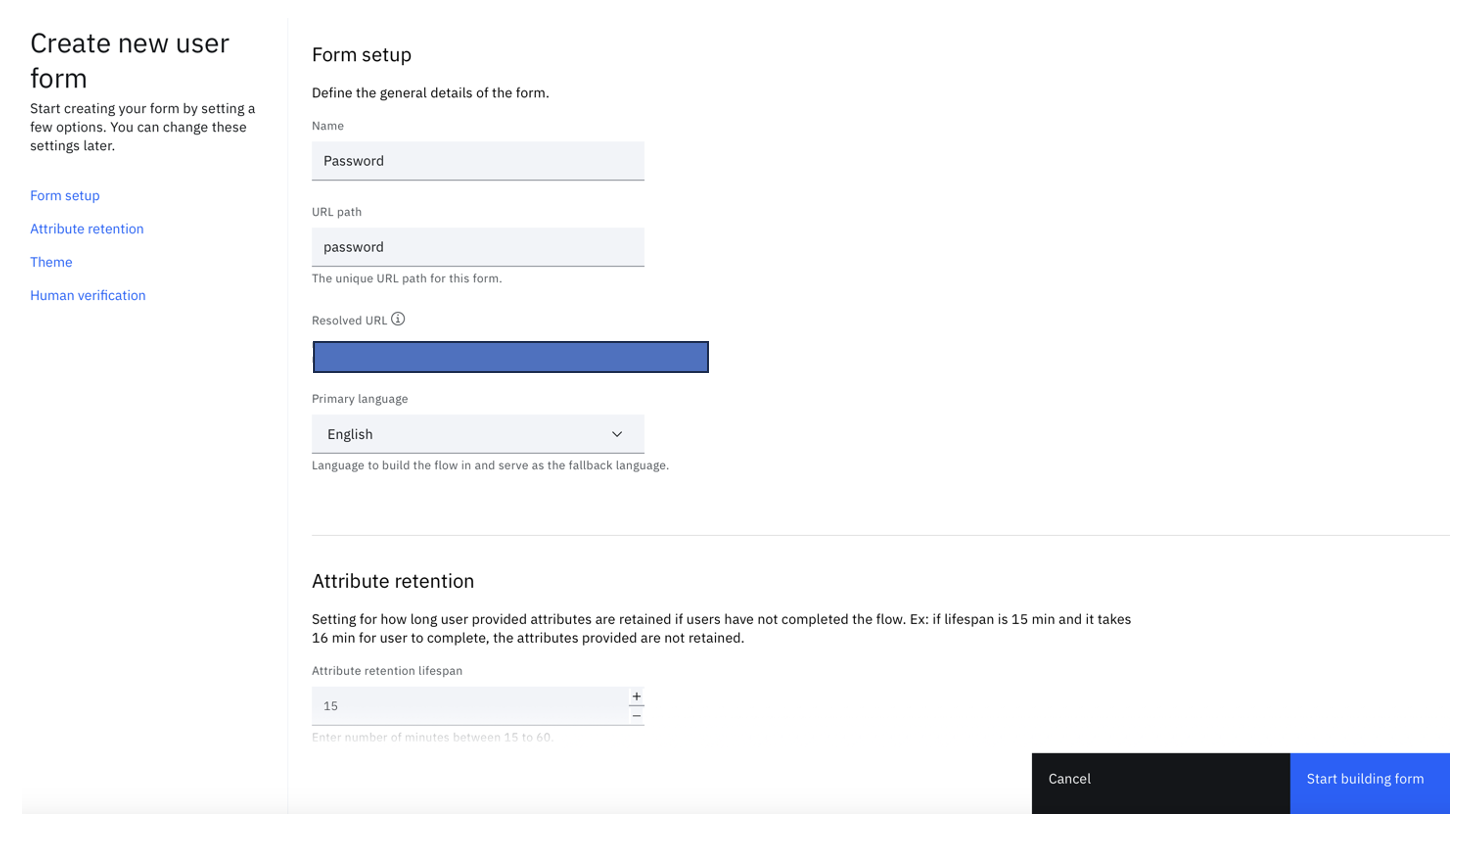
-
Click "Start building form".
-
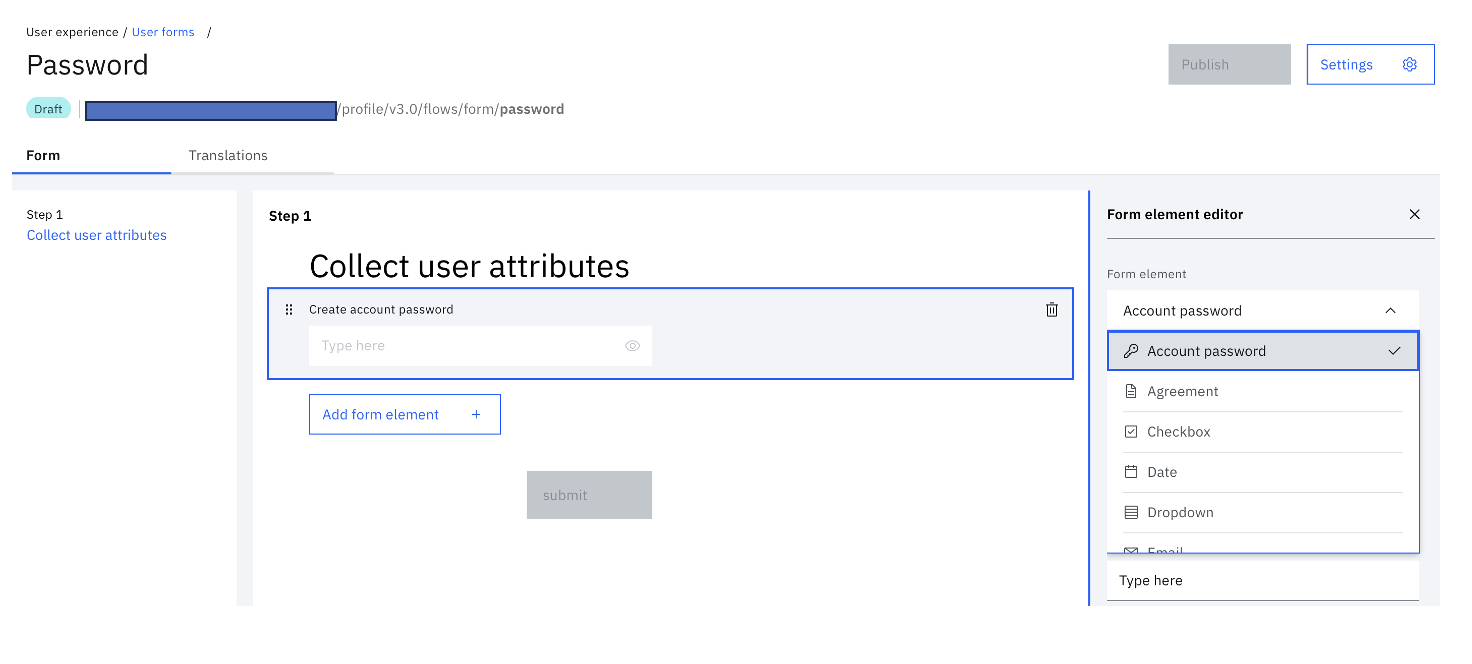
Click the "Email address" element in the form to change the element to "Password".
-
In the "Form element editor" panel, select "Account password" from the "Form element" drop down. Click "Save changes" and "Publish".
-
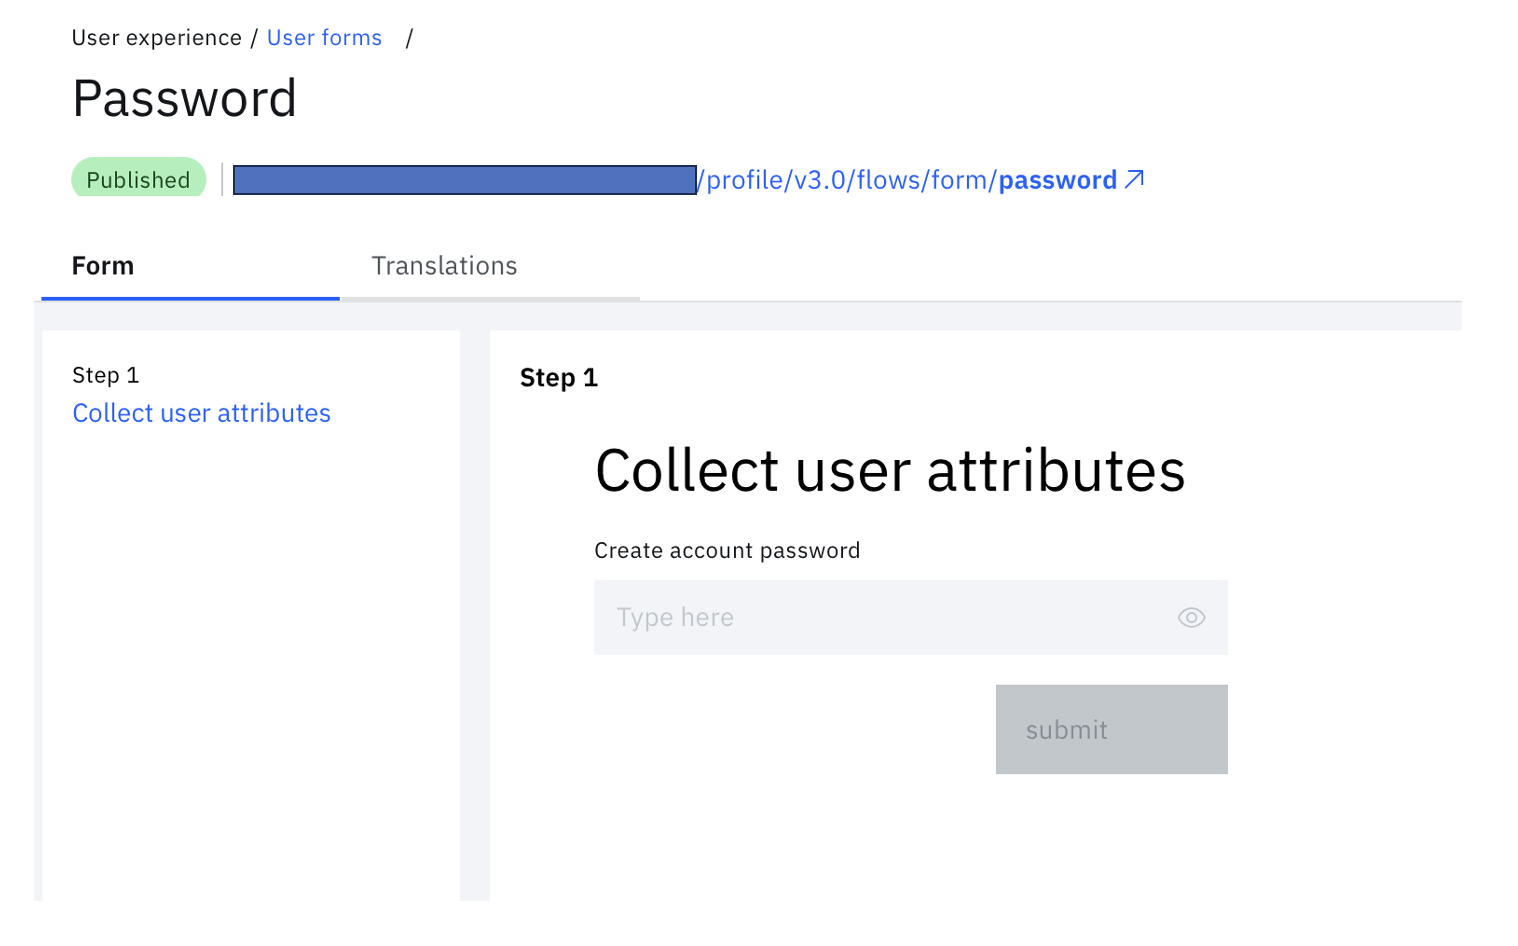
After publishing, validate that the published form is shown as:
With this, you have now created all three forms that are needed for the flow. The "User forms" listing shows up as follows:

Orchestrating the flow
After all the necessary forms are created, the next step is to join the forms together in an end-to-end registration experience.
-
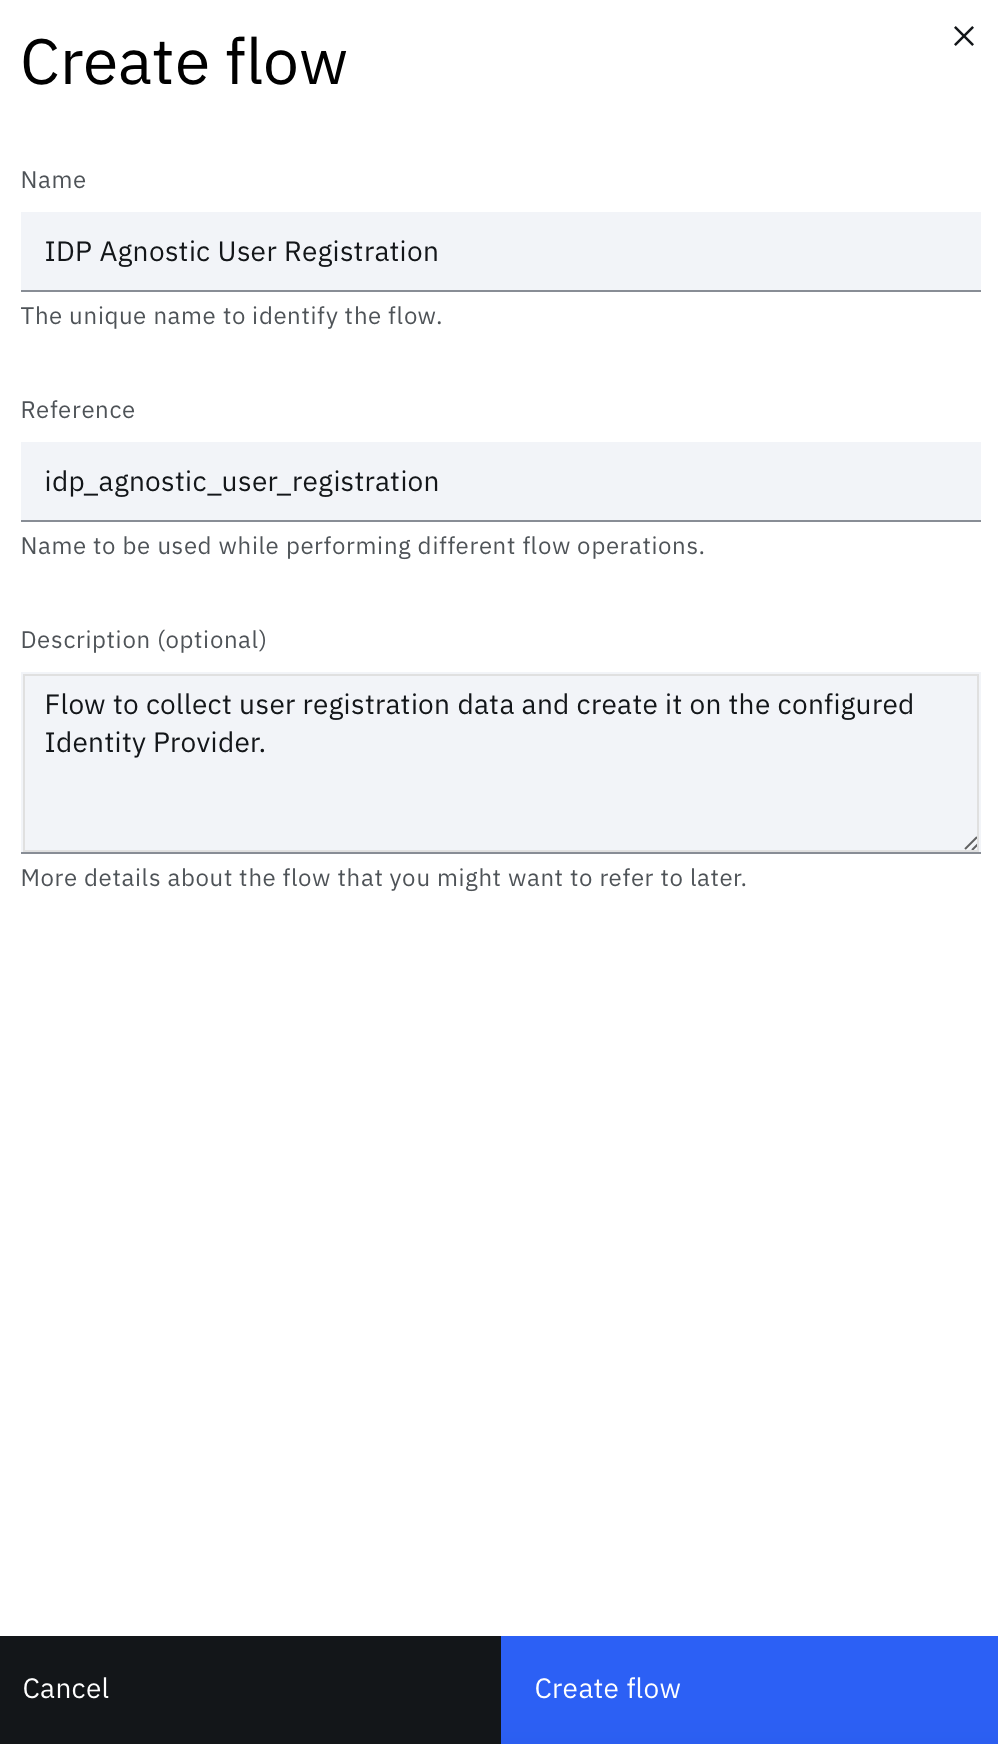
Navigate to "Flow designer" under "User experience" and select "Create flow".
-
Enter the corresponding flow name, for example "IDP Agnostic User Registration". Create the flow.
-
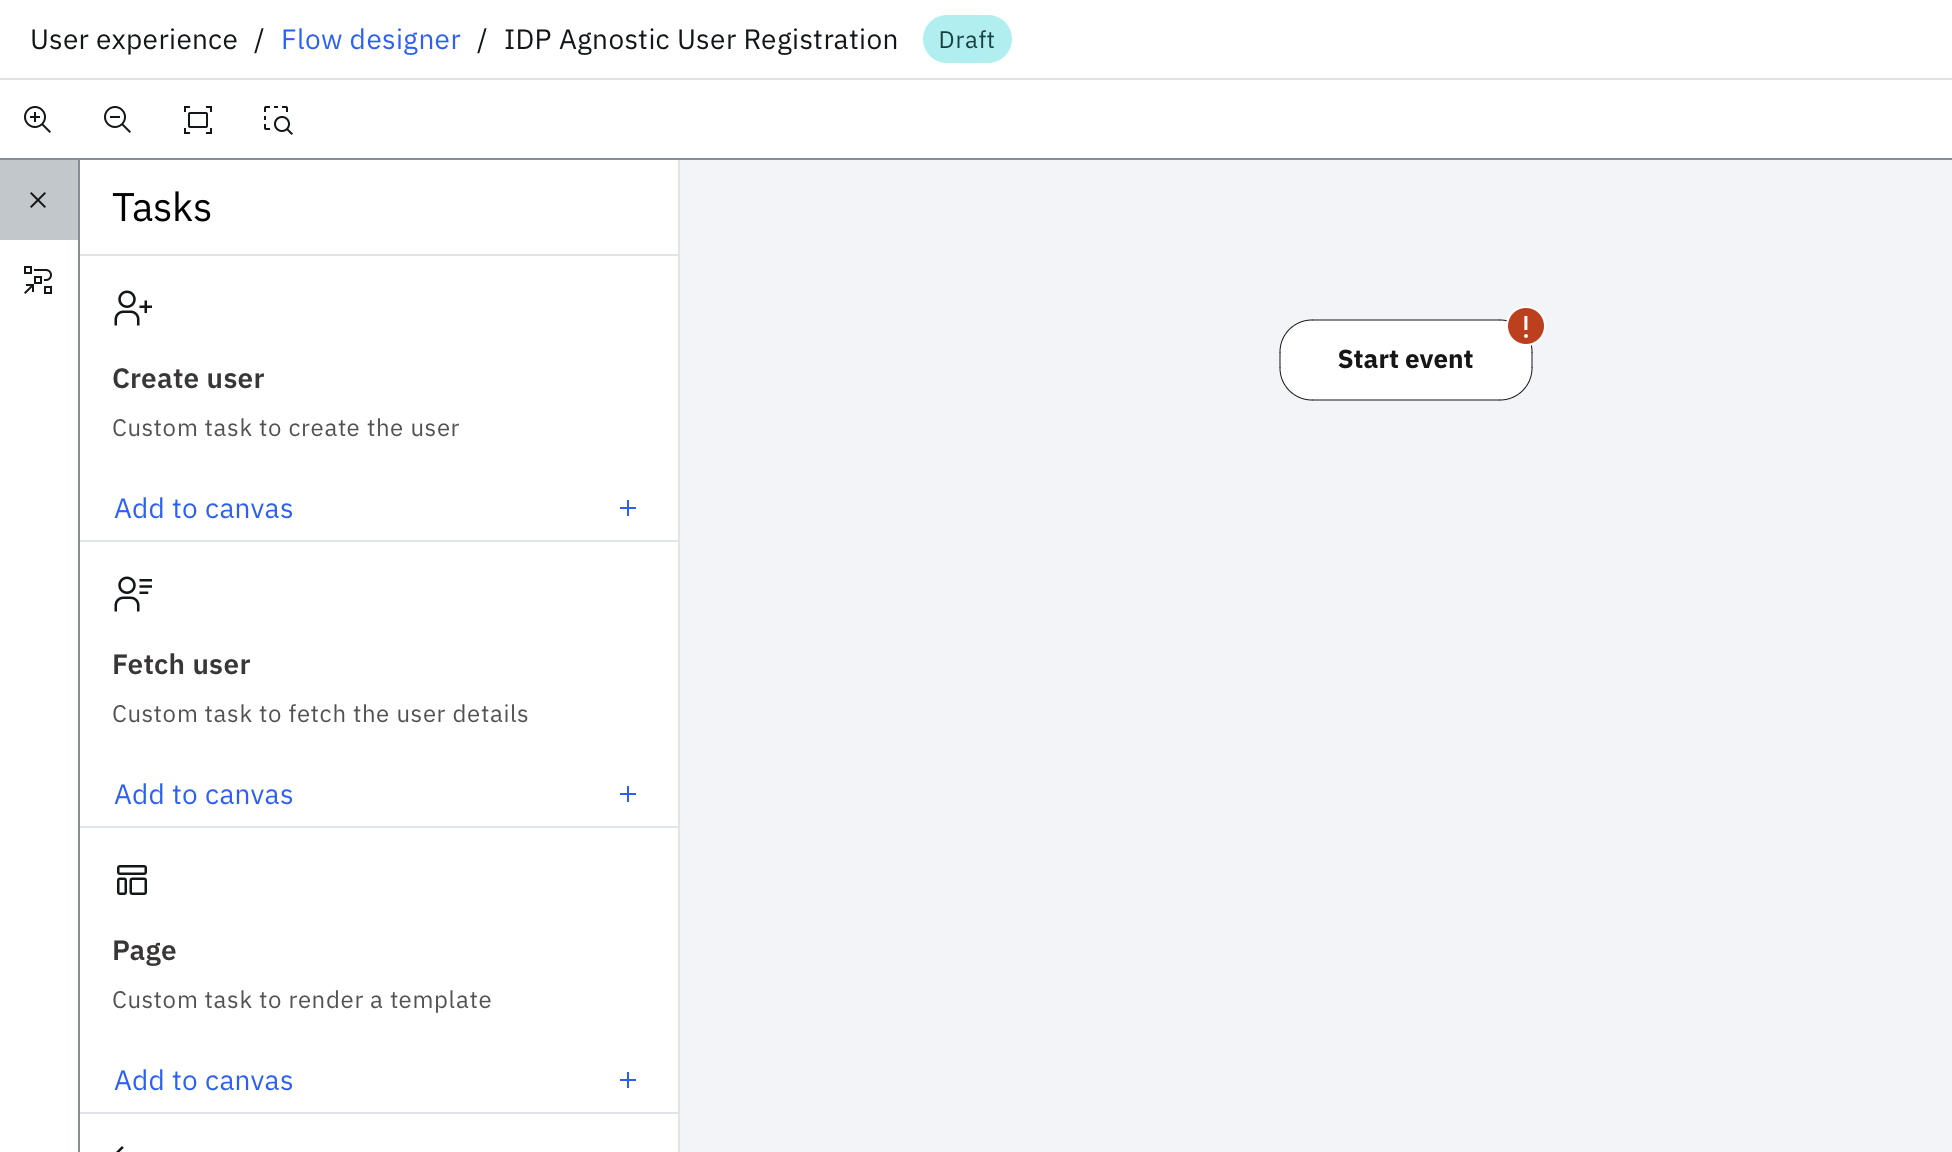
A blank canvas with a Start event node appears. This is the "Start" node that is needed to start the flow.
-
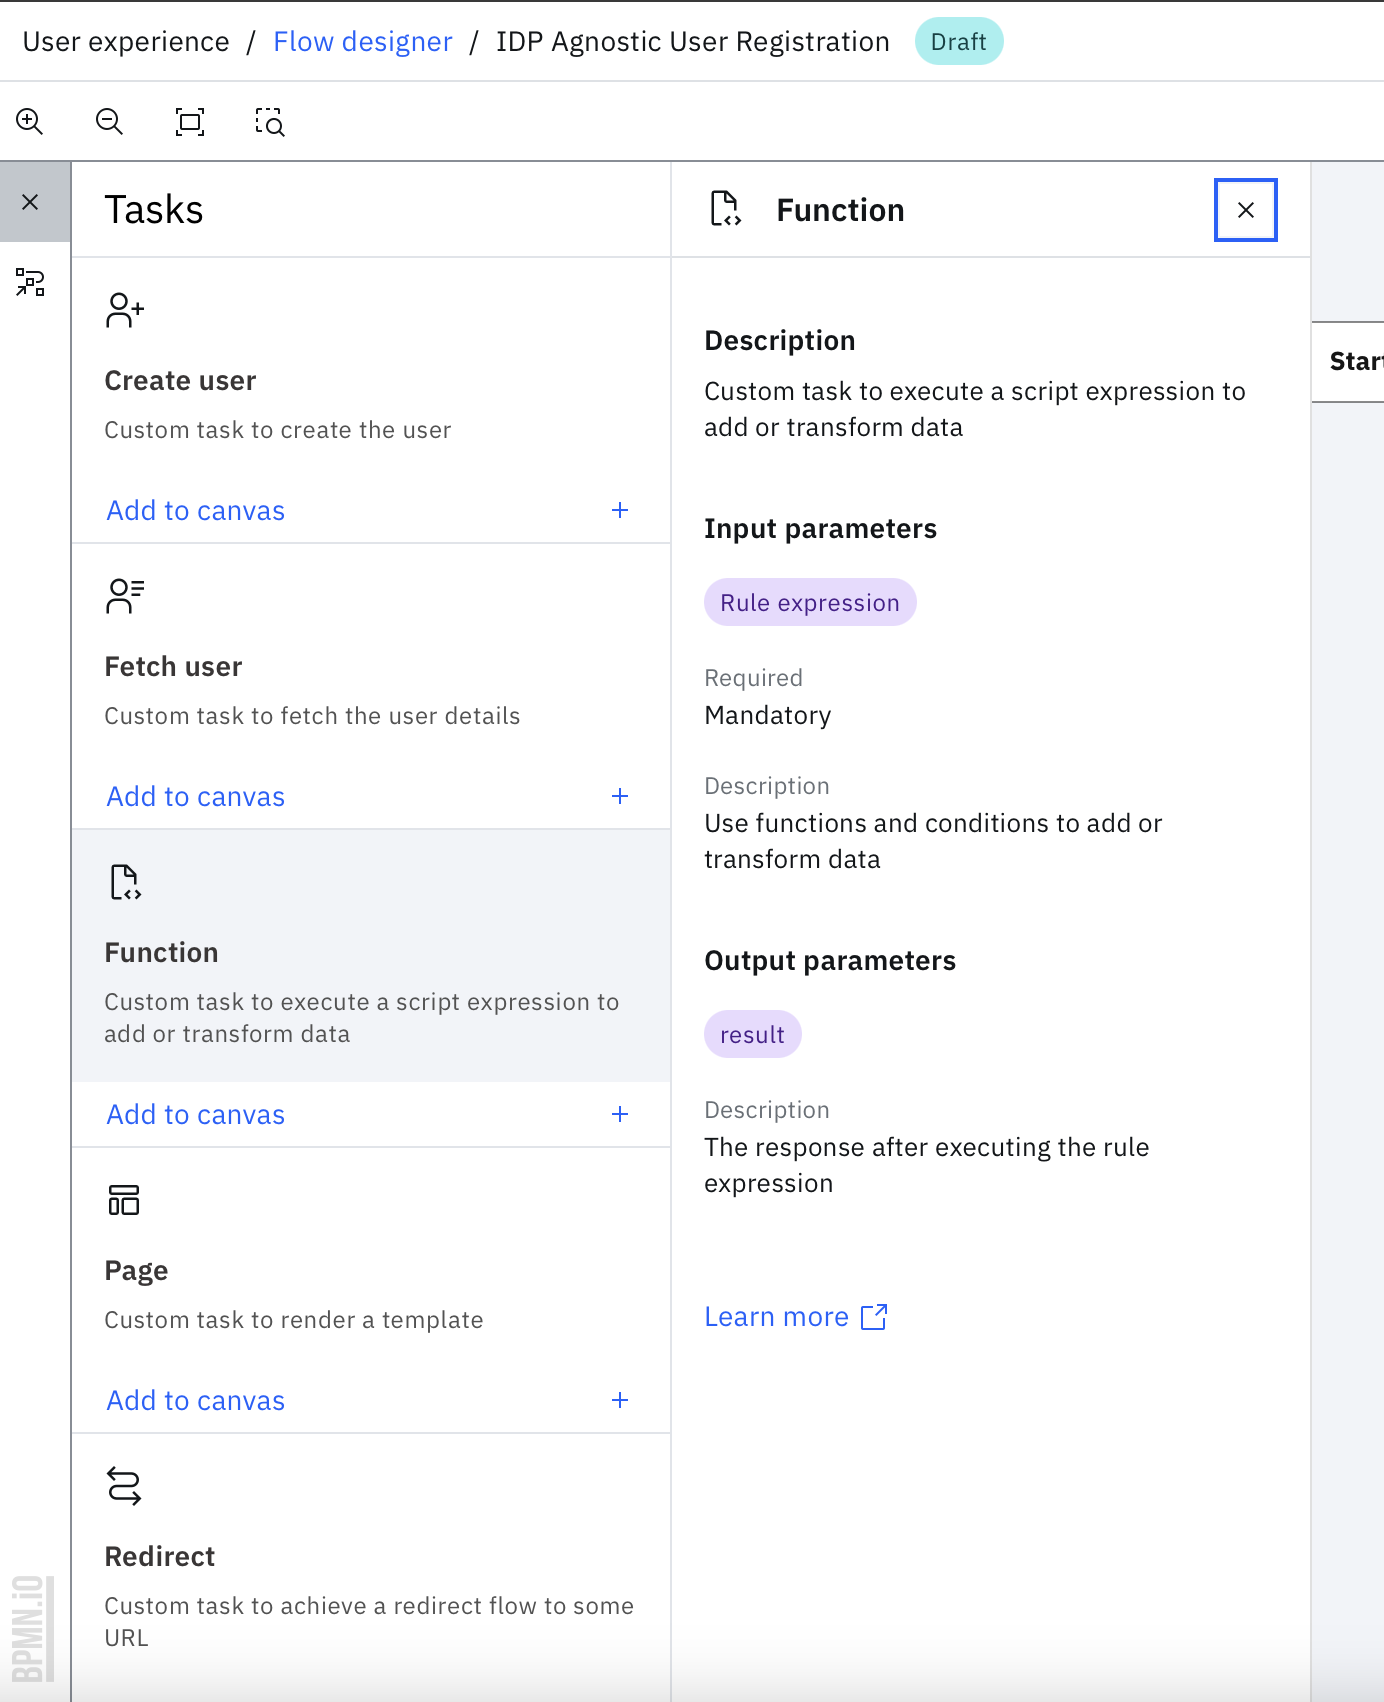
Click the "Function" task.
-
Click "Add to canvas" and exit out of the "Function" side panel.
-
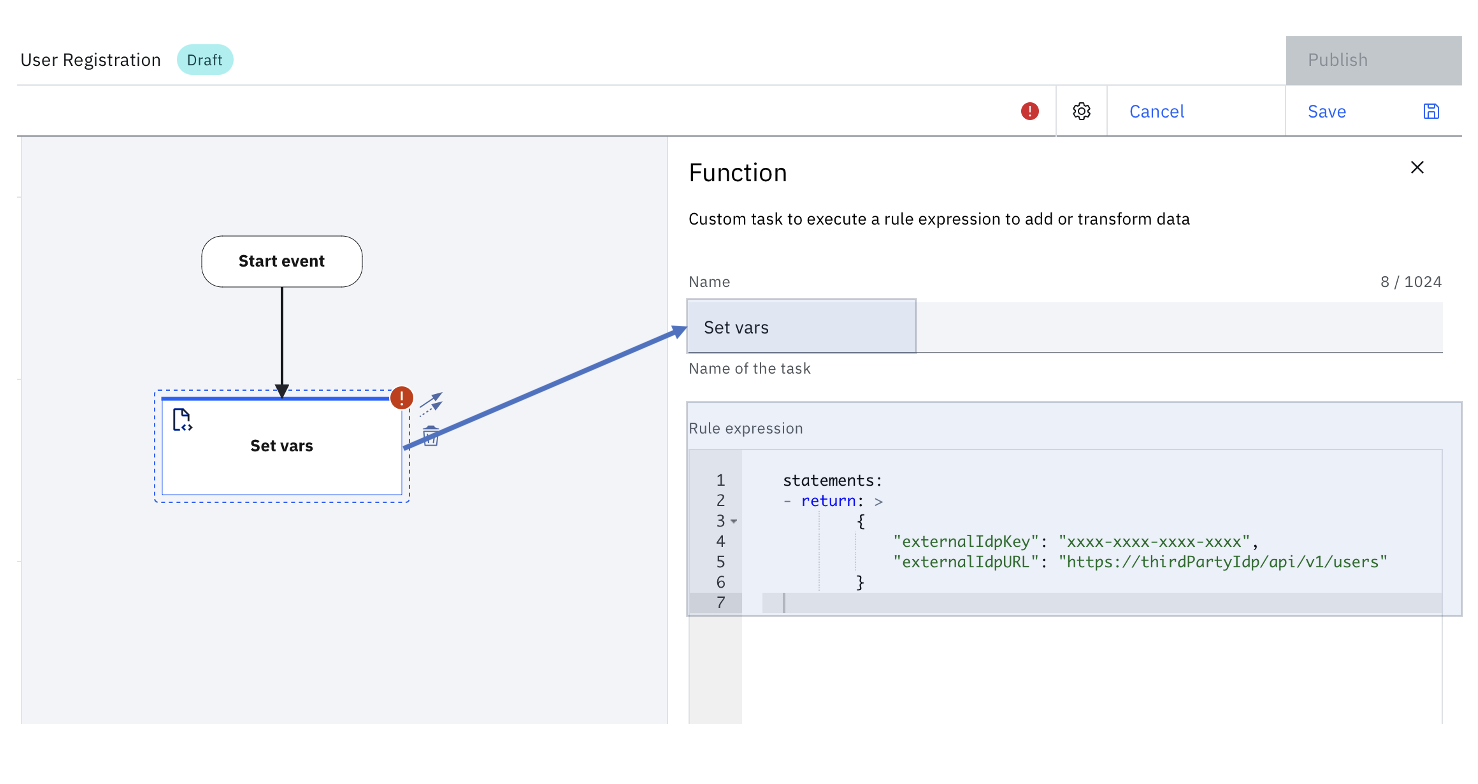
Name the task as "Set vars" and use this task for initializing the properties that are needed to connect to your wanted Identity Provider.
Note
Each Identity Provider has its own way to authenticate. Some rely on a user name or password combination, some rely upon a client ID or secret, whereas there are some that rely upon API Keys.
For the scope of this article, it is assumed that you would need the Target end point and a key to connect to your Identity Provider. Hence, two variables are initialized, externalIdpURL and externalIdpKey.
The specific list of variables that need to be initialized entirely depends upon the Identity Provider you need to connect to.
-
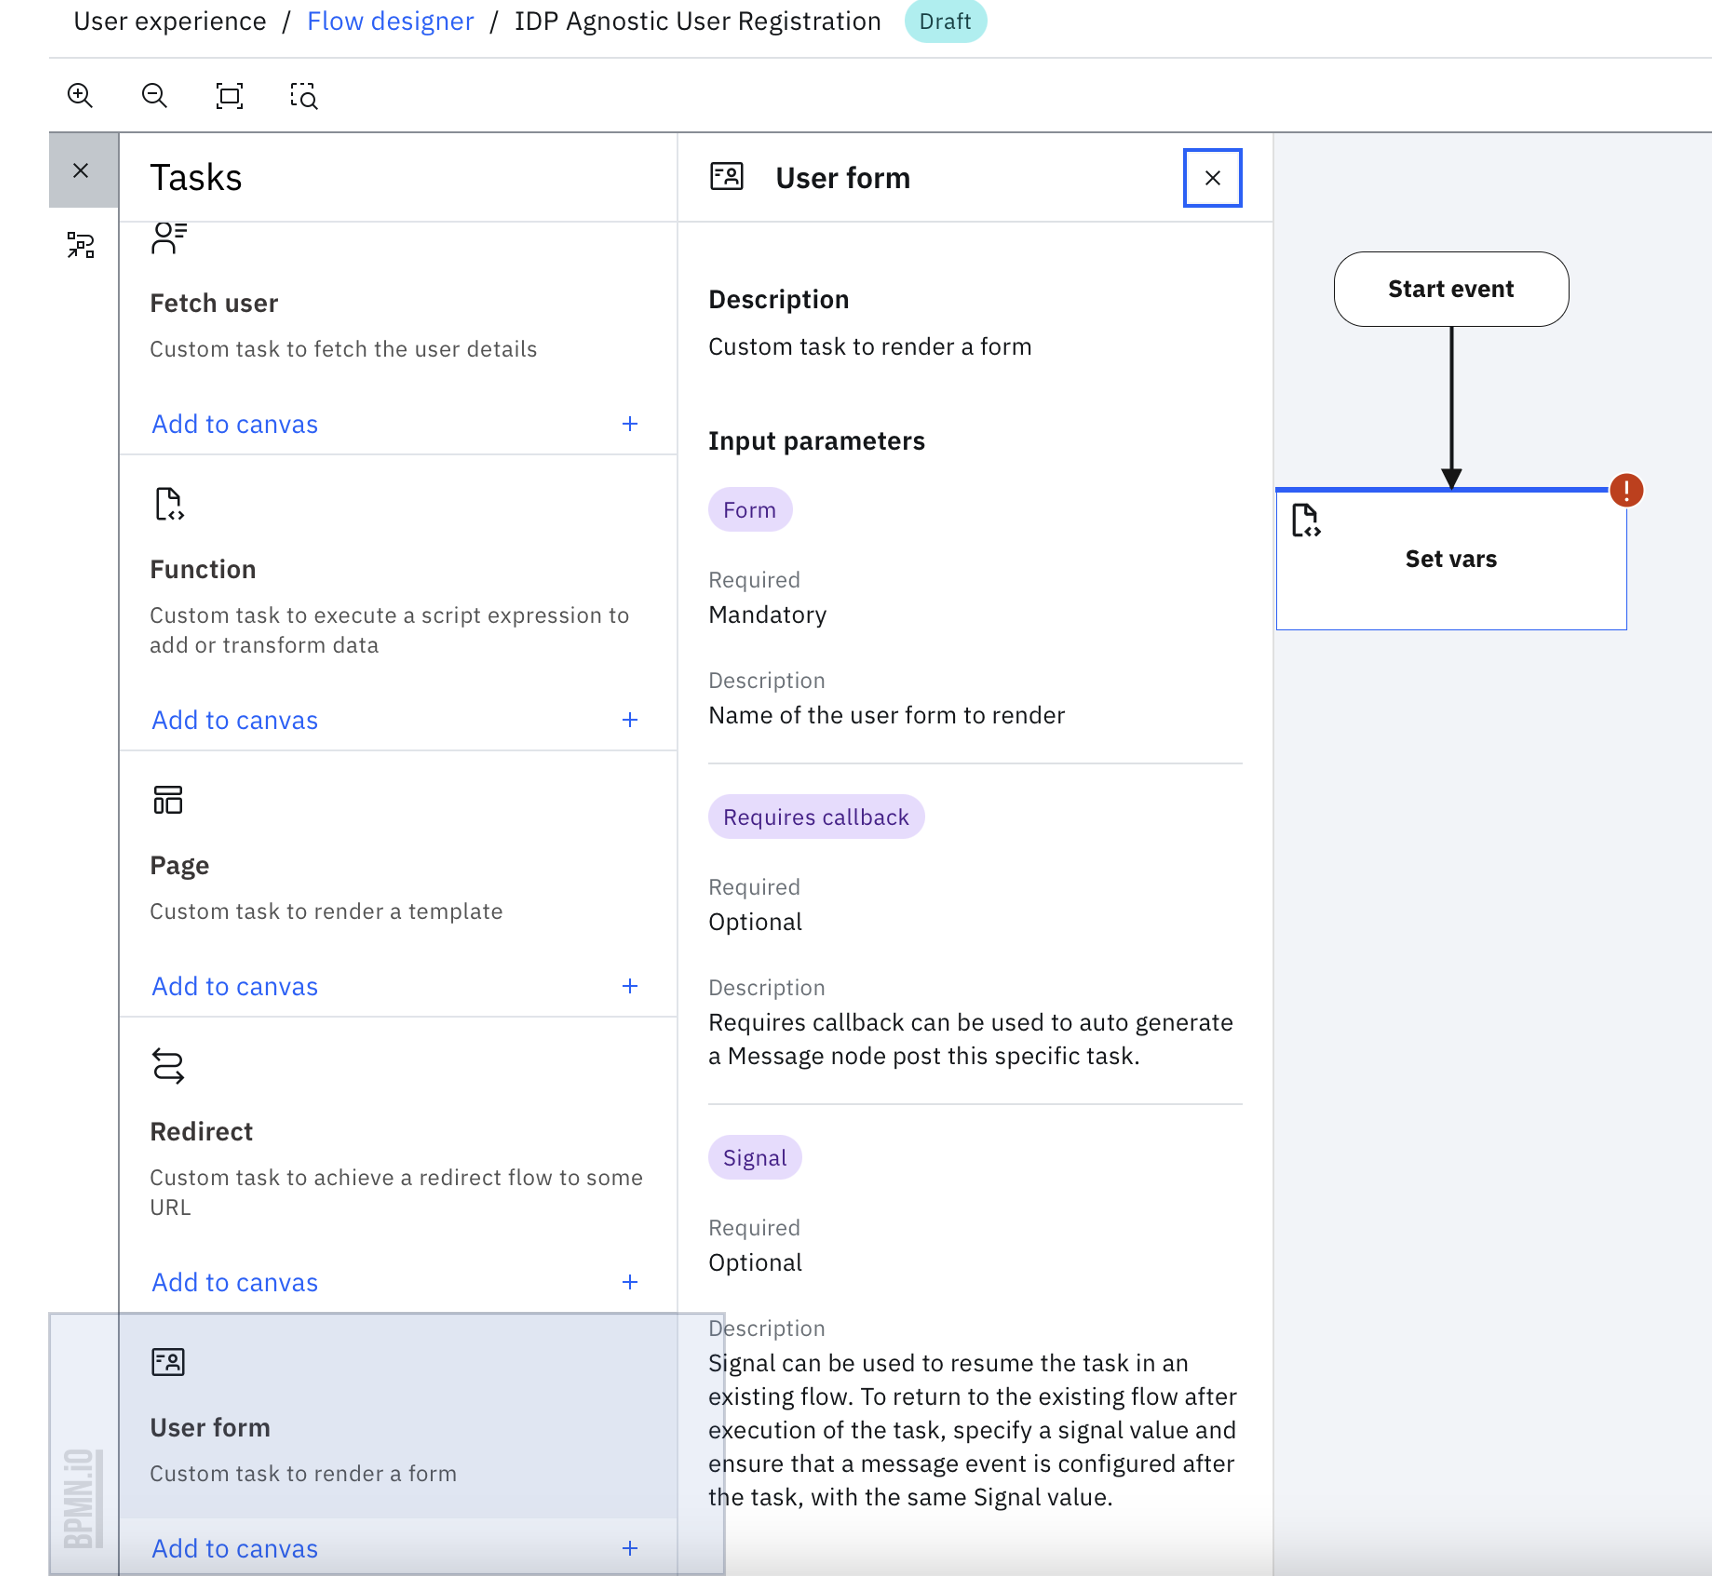
Once the variables are initialized, add the forms that are needed for the flow. To achieve this, click the "User form" task.
-
Click "Add to canvas" and exit out of the "User form" side panel.
-
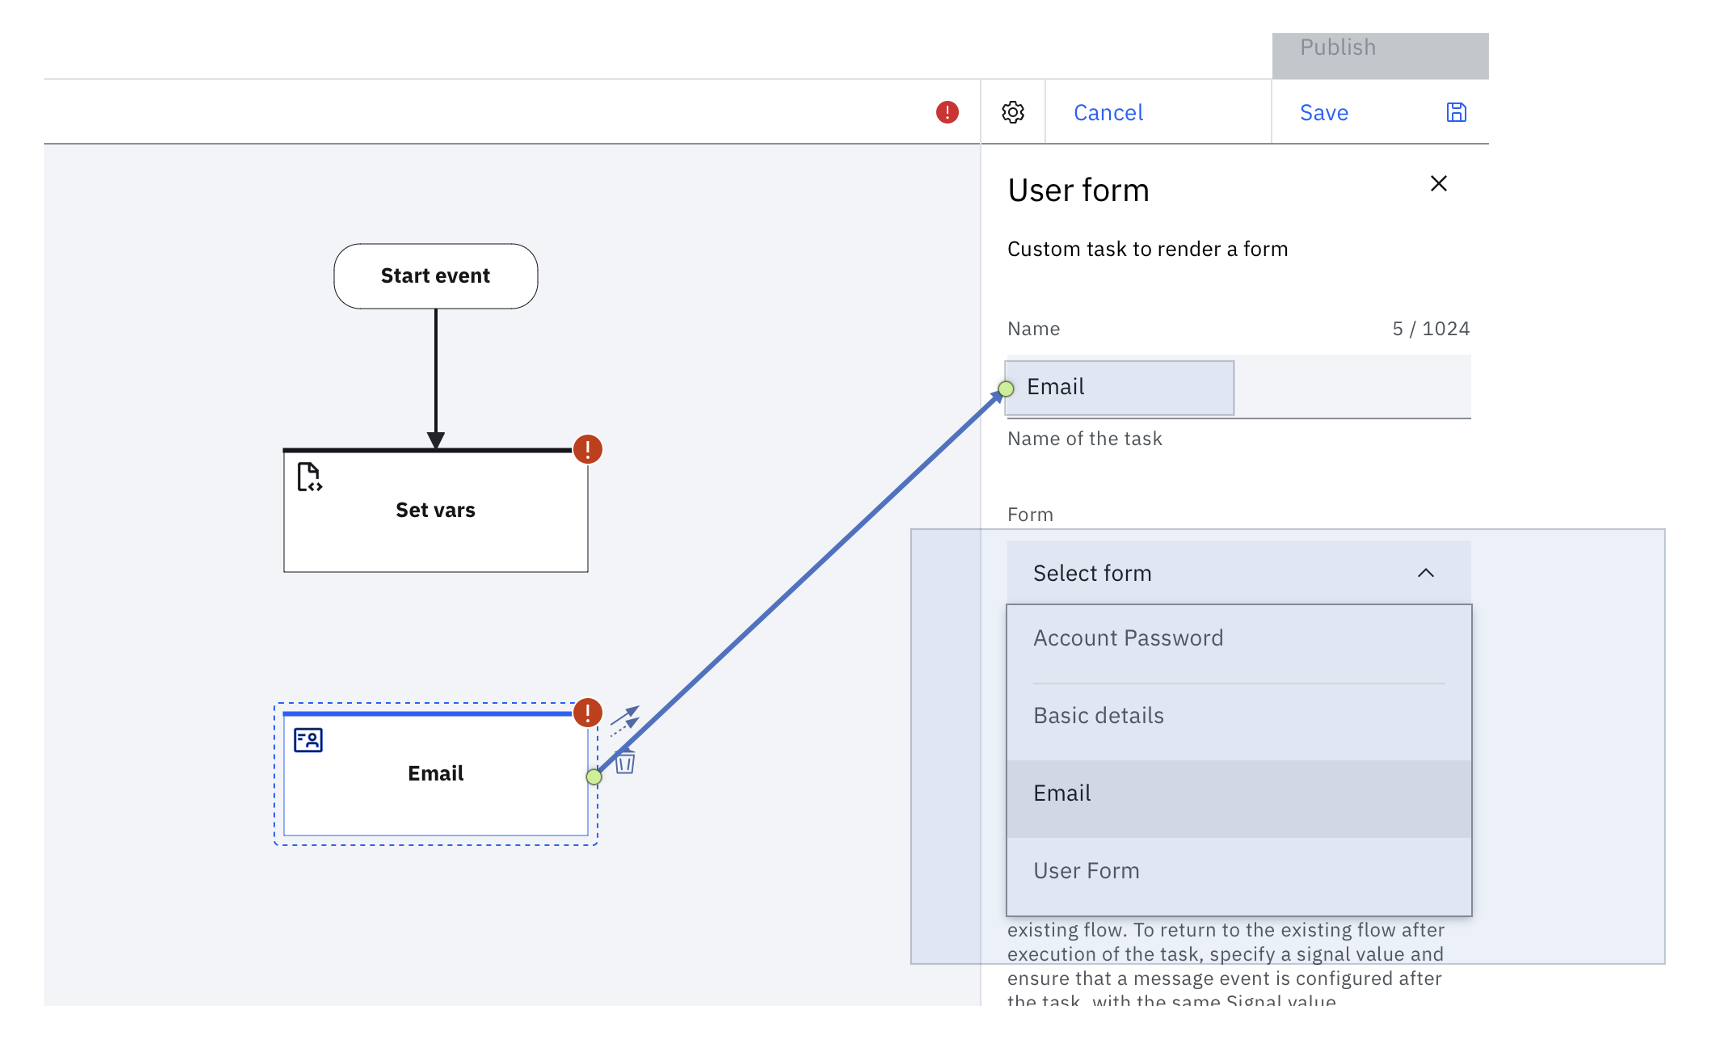
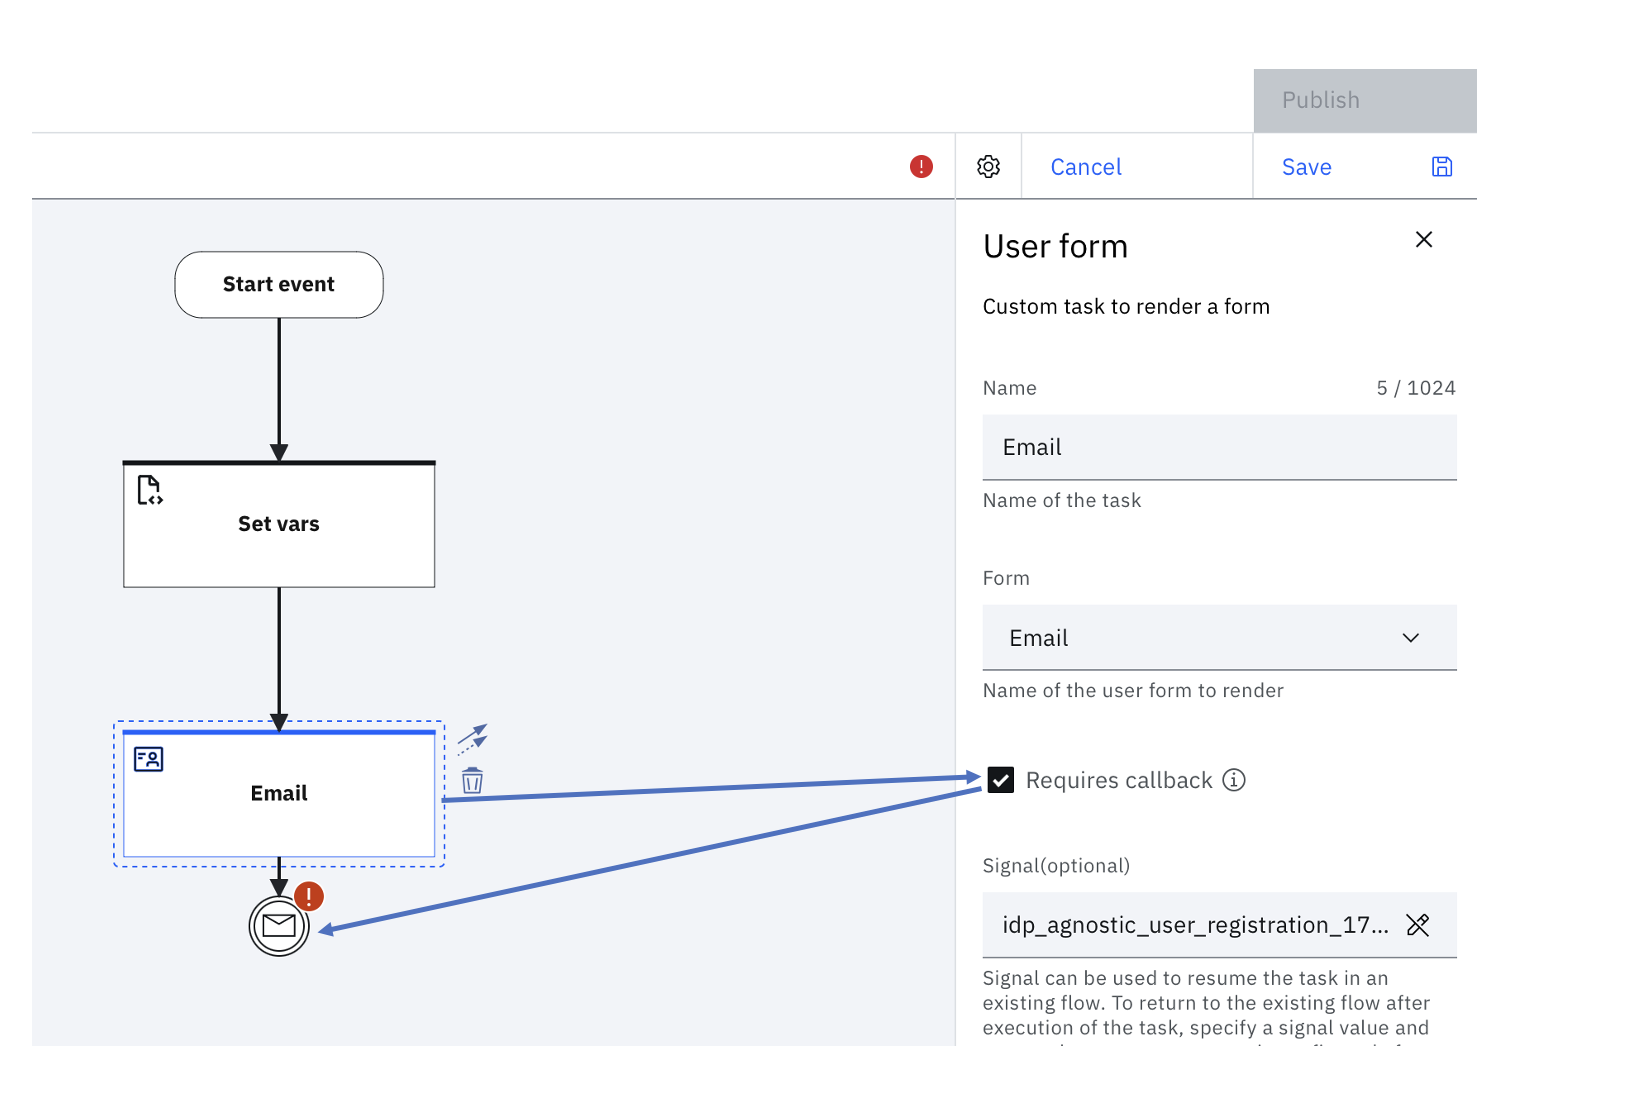
Select the "User form" on the canvas that was added. Name it appropriately and ensure the "Form" is "Email".
-
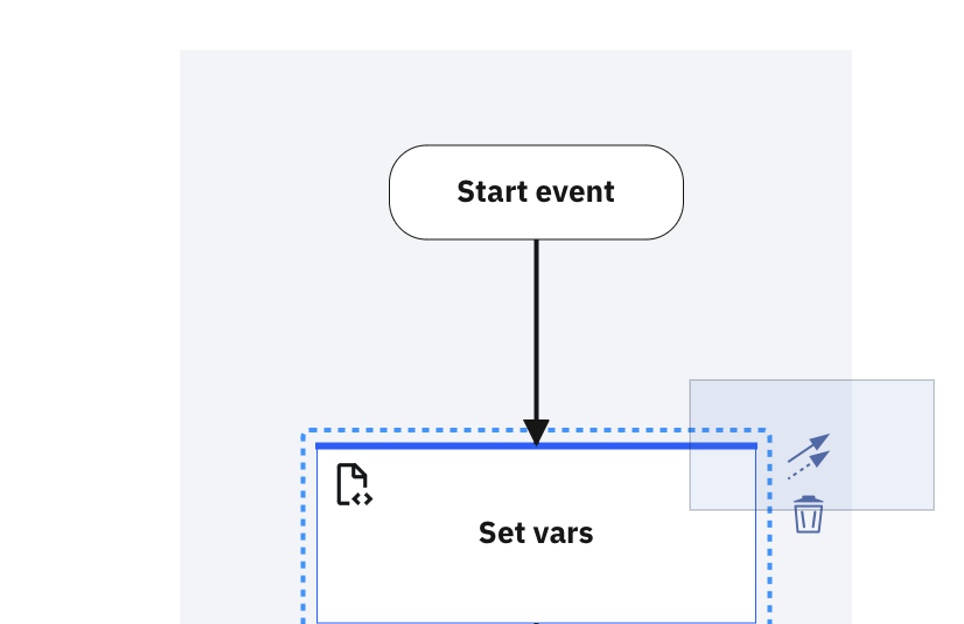
Click the "Set vars" task. A blue arrow appears on the upper-right of the node. Connect that arrow to the newly created "Email" task on the canvas.
-
The flow needs to be interrupted till the user enters the Email ID and validates the same. Such an interrupt is achieved by adding a call-back to the flow, after the form that was added. The moment, you click on "Requires callback", a "Message event" is automatically populated in the canvas, after the node. This would mean that the flow would not proceed till the signal configured in the "Message event" is relayed to the workflow. The signal is relayed to the flow, when the user submits the form.
-
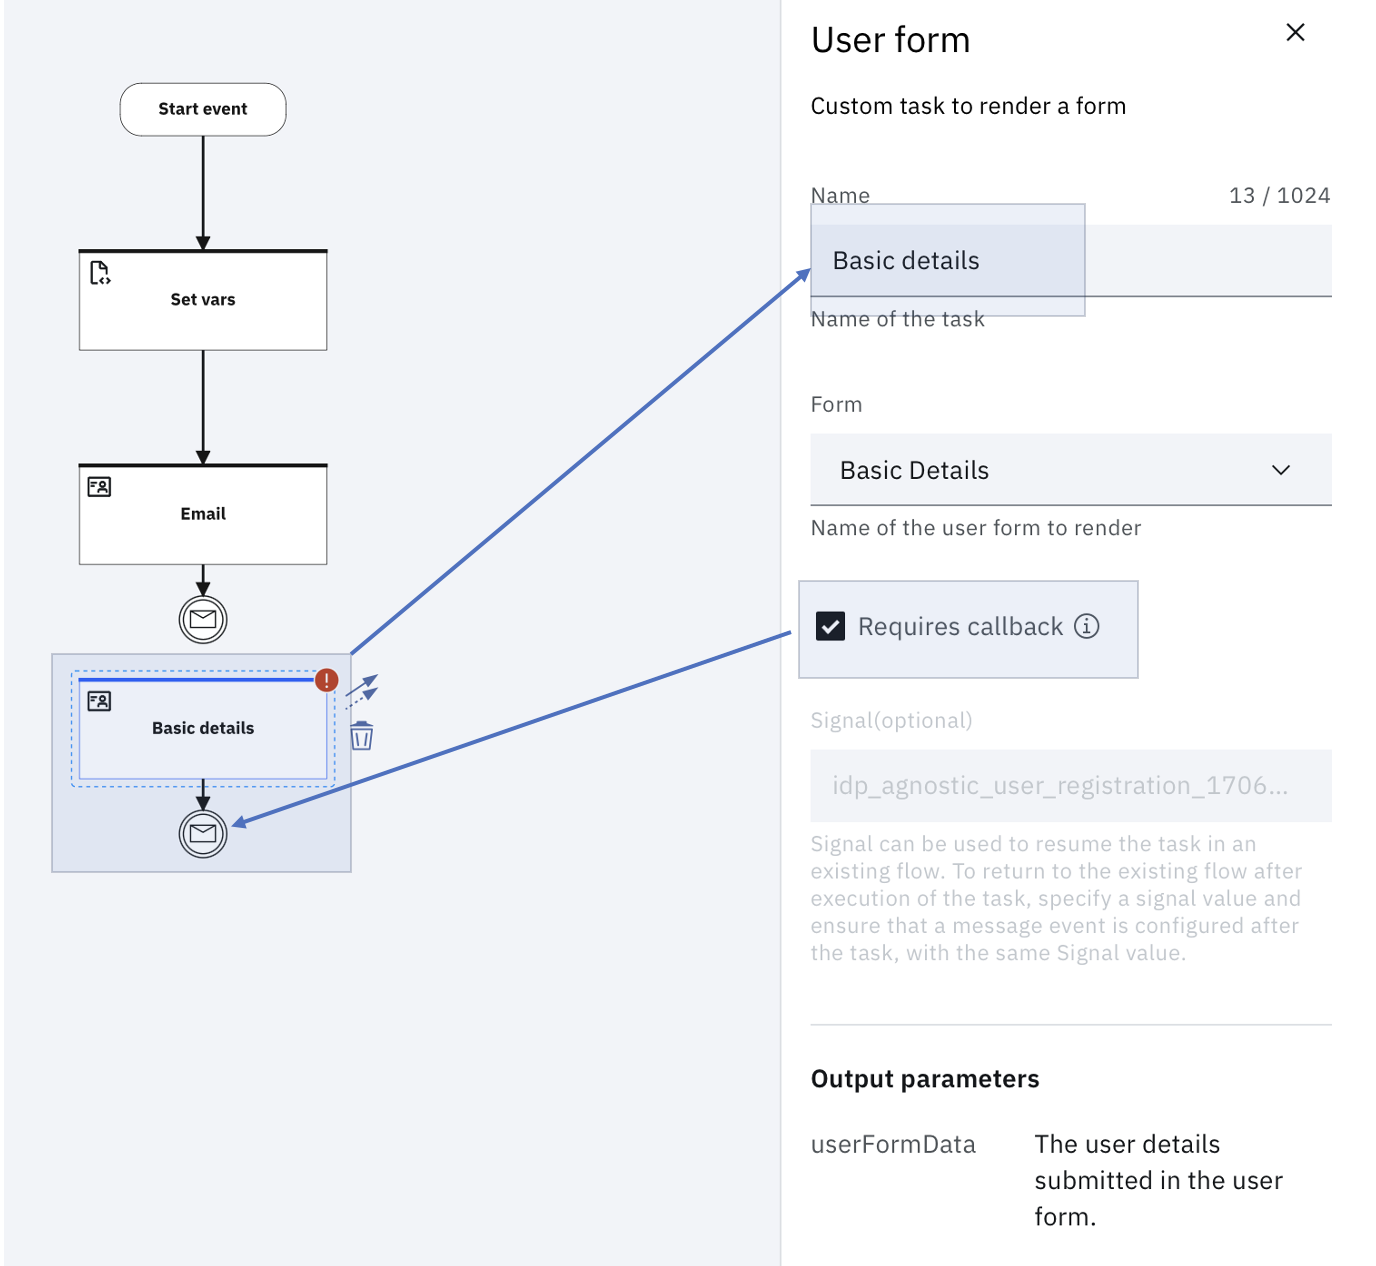
Add another "User form" using the Steps 7 - 11, this time for collecting the "Basic Details" from the user. Name it appropriately and ensure that the "Form" is "Basic Details". Do ensure that you check "Requires callback".
-
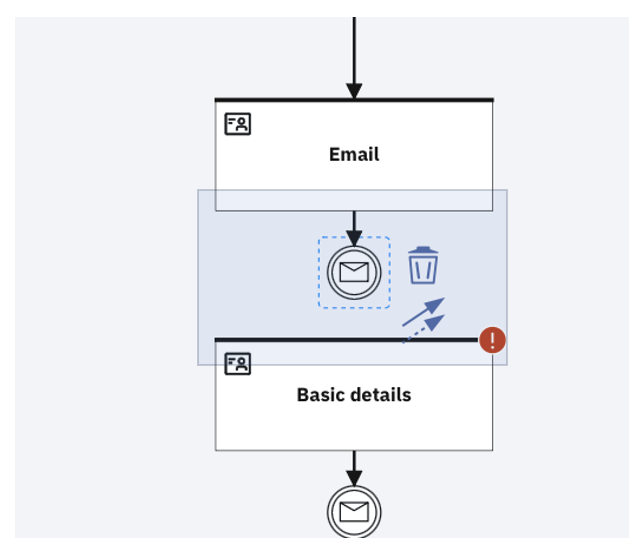
Select the "Message event" node that was auto-generated after the "Email" task. A blue arrow appears on the upper-right of the node. Connect that arrow to the newly created "Basic details" task.
-
Add another "User form" using the Steps 7 - 11, this time for collecting the "Account Password" from the user. Name it appropriately and ensure that the "Form" is "Password". Do ensure that you check "Requires callback".
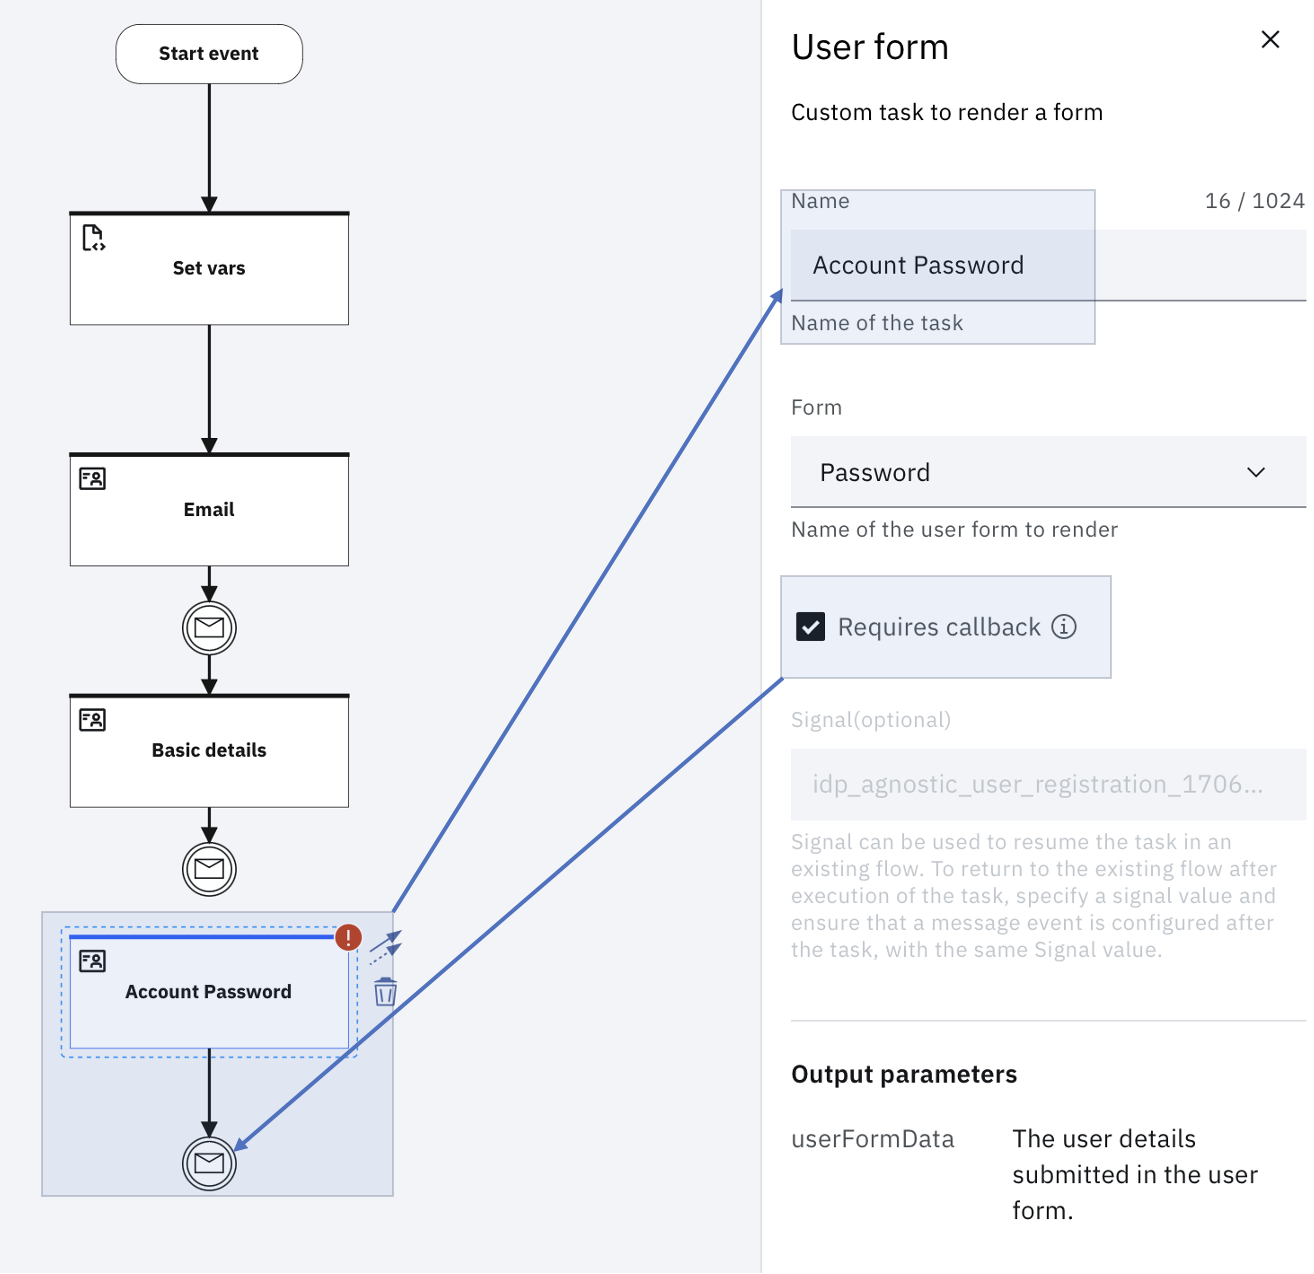
-
Select the "Message event" node that was auto-generated after the "Basic Details" task. A blue arrow appears on the upper-right of the node. Connect that arrow to the newly created "Account Password" task.
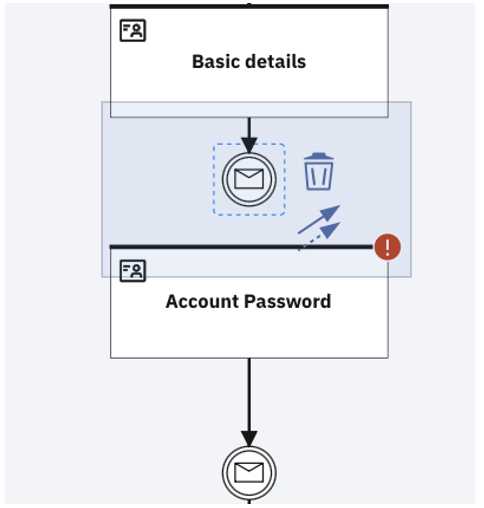
-
Navigate to "Tasks" and add the "Function" task to the canvas. Name it "Create user on external IDP".
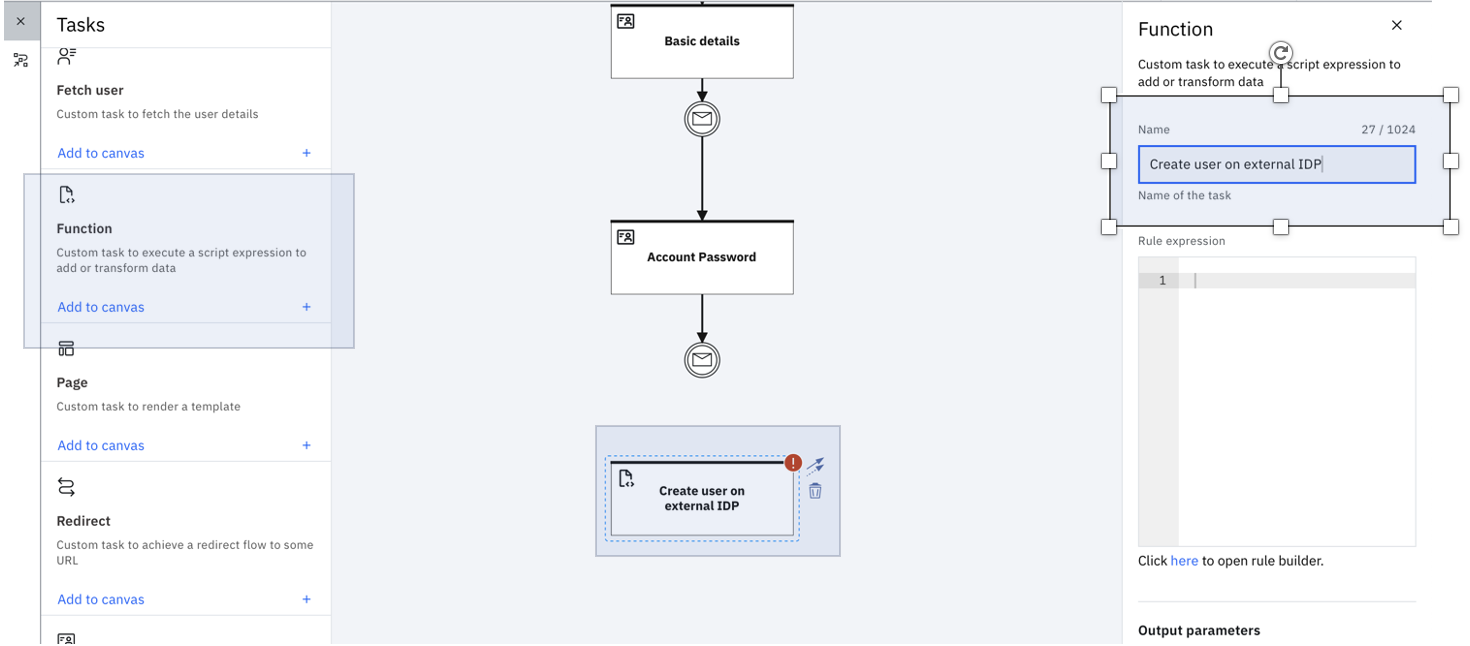
-
Select the "Message event" node that was auto-generated after the "Account Password" task. A blue arrow appears on the upper-right of the node. Connect that arrow to the newly created "Create user on External IDP" task.
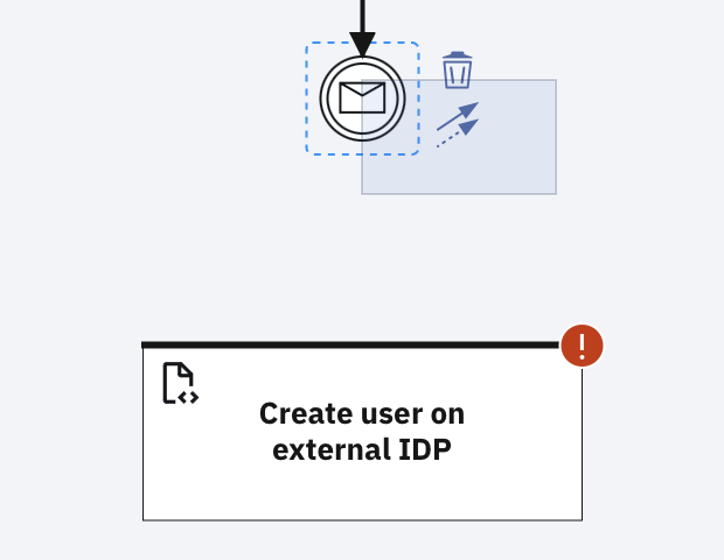
-
Select the "Create user on External IDP" task. This task carries the business logic to map the collected attributes to the relevant schema in the target IDP, and then triggers a REST End point to create the user on the same.
Here's a sample rule that you can use to:
- Extract the data entered in the different configured forms that is typically stored in ctx.userFormData.userData.
- Map the data to the target schema (postBody). For illustration purpose, Okta Identity Provider is taken as an example but you can extend it to the Identity Provider of your choice.
- Trigger the target end point to create the user by using the postBody as your payload.
statements:
- context: email := ctx.userFormData.userData['3']
- context: firstName := ctx.userFormData.userData['6']
- context: lastName := ctx.userFormData.userData['7']
- context: login := ctx.userFormData.userData['3']
- context: password := ctx.userFormData.userData['password']
- context: postBody := "{\"profile\":{\"email\":\""+  context.email + "\",\"firstName\":\""+ context.firstName + "\",\"lastName\":\"" +  context.lastName + "\",\"login\":\"" +   context.login + "\"}, \"credentials\":{\"password\":{\"value\":\"" + context.password + "\"}}}"
- return: >
        {
            "userCreated": hc.Post(ctx.externalIdpURL, {'Authorization': ctx.externalIdpKey , 'Content-Type': 'application/json', 'Accept': 'application/json'}, context.postBody).responseBody
        }
Copy over this Rule snippet into the "Rule expression" property of the "Create user on External IDP" task:
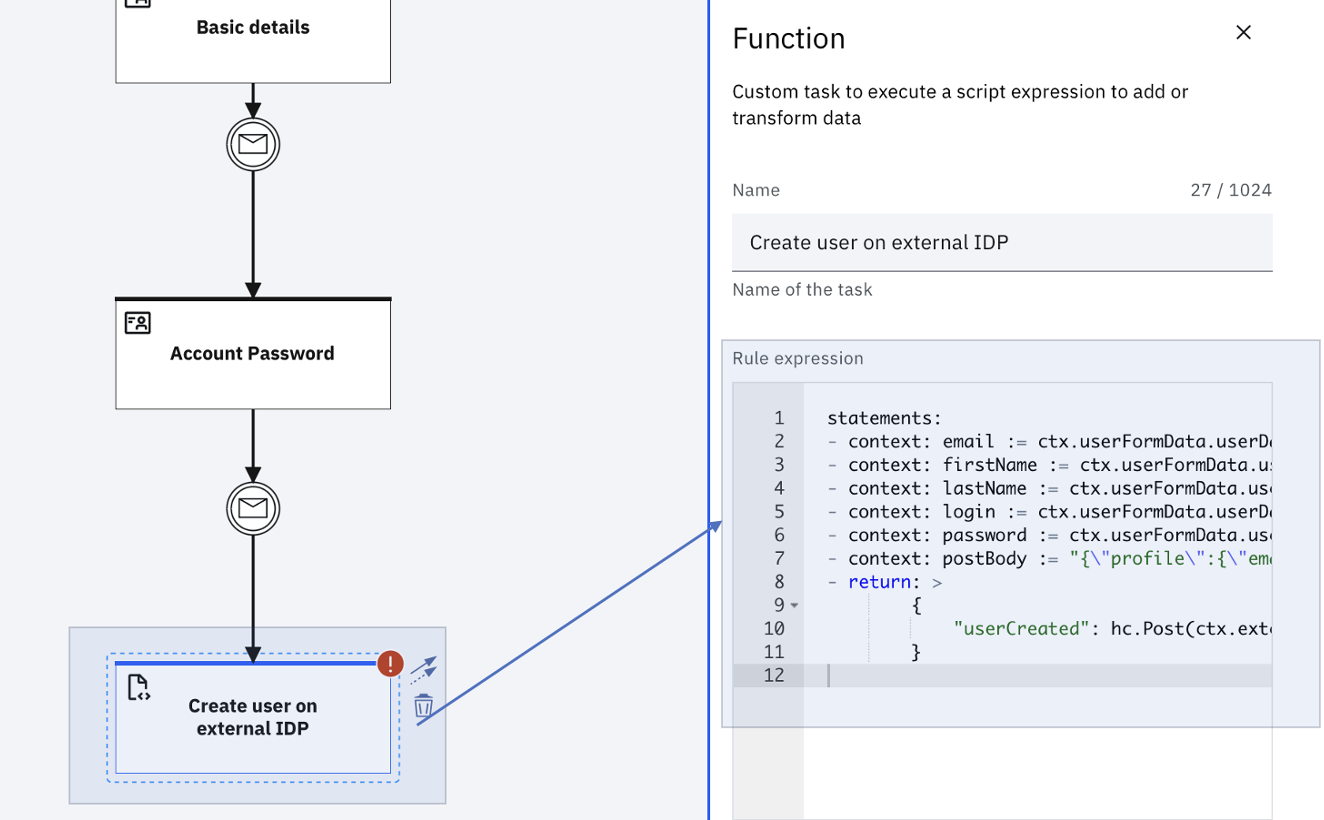
Click "Save" to save the "Rule expression", in the task.
-
Add a node to validate whether the user creation was successful or if it ended up in any error condition and make the flow decision based on this check. To do this, launch the "Decision Points".
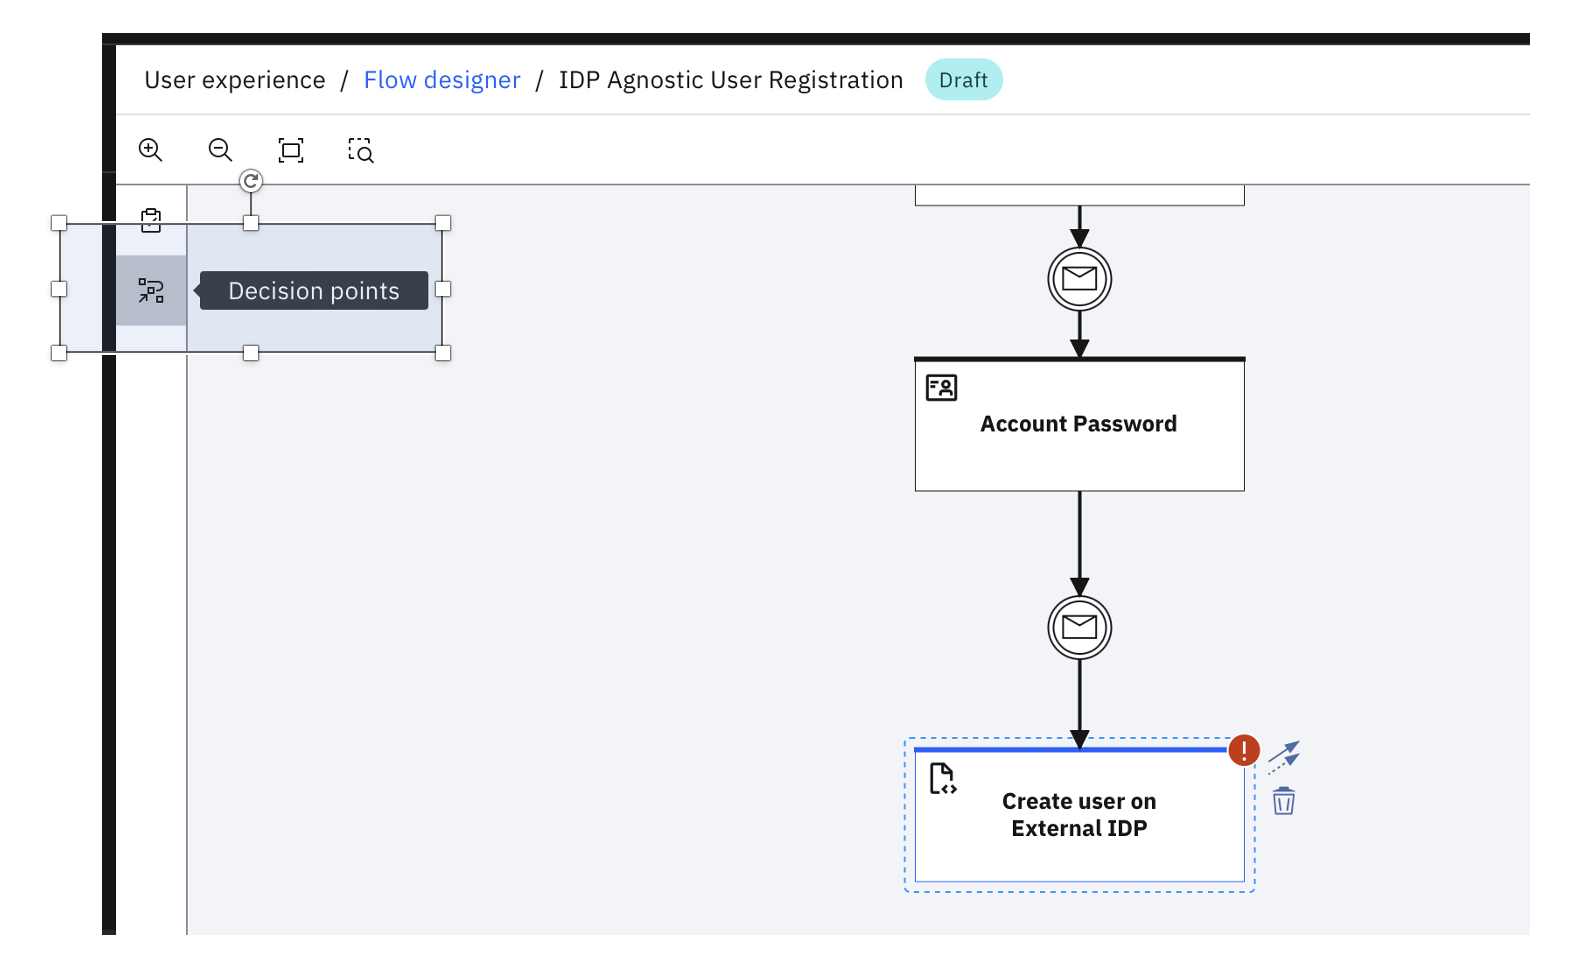
-
Click "Exclusive gateway":
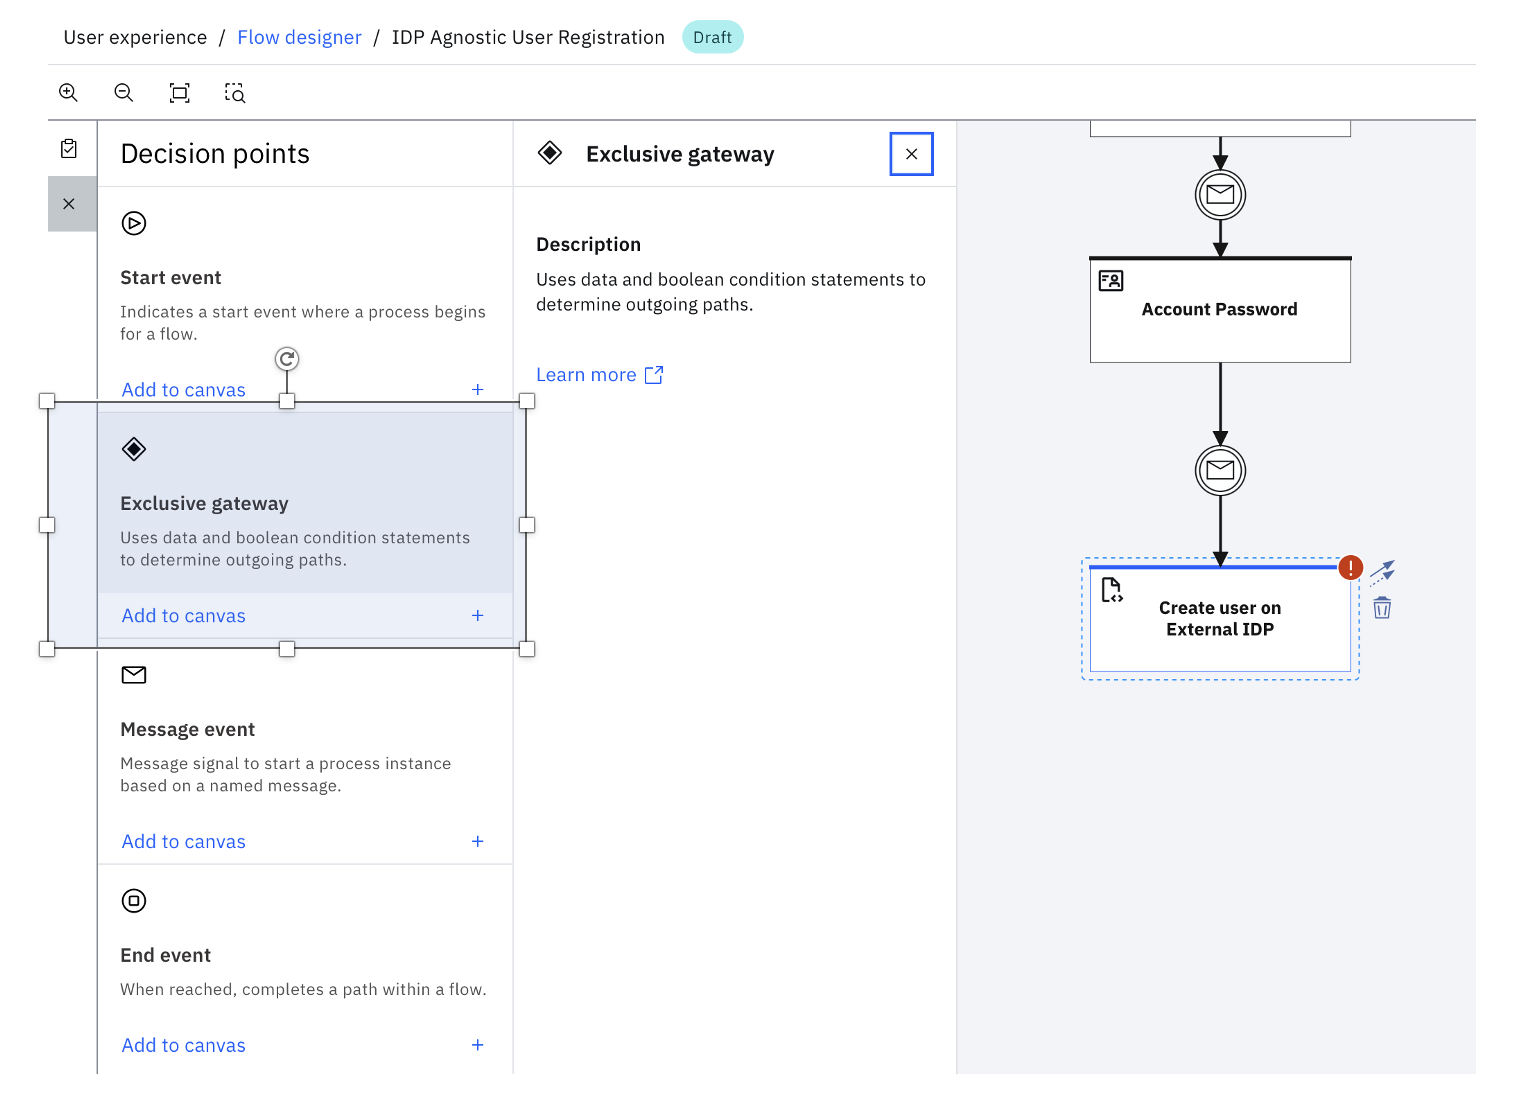
-
Click "Add to canvas" and exit out of the "Exclusive gateway" side panel.
-
Click the "Create user on External IDP" task. A blue arrow appears on the upper-right of the node. Connect that arrow to the newly added "Exclusive gateway".
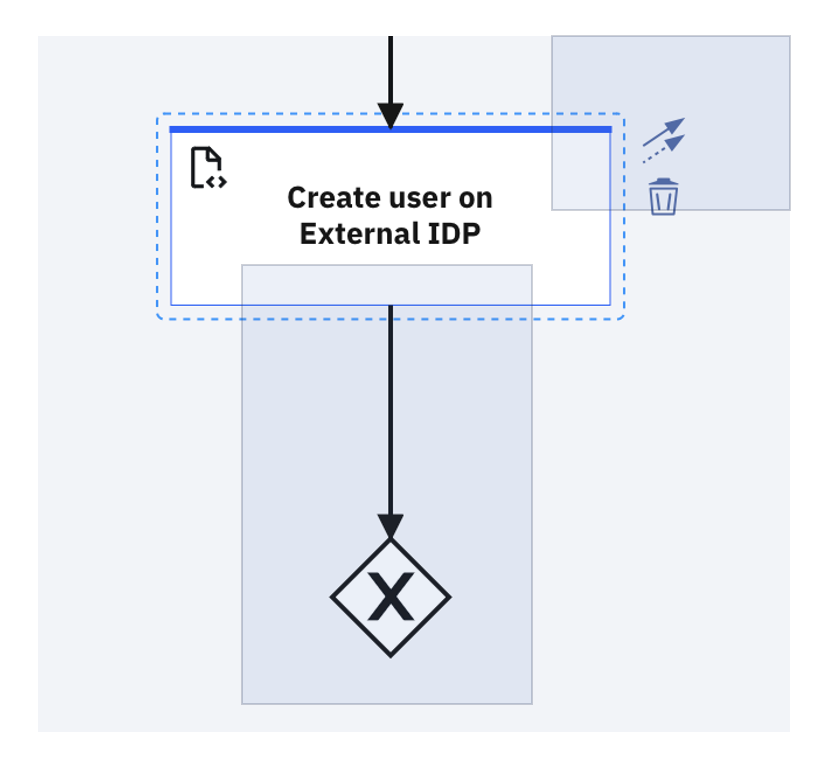
-
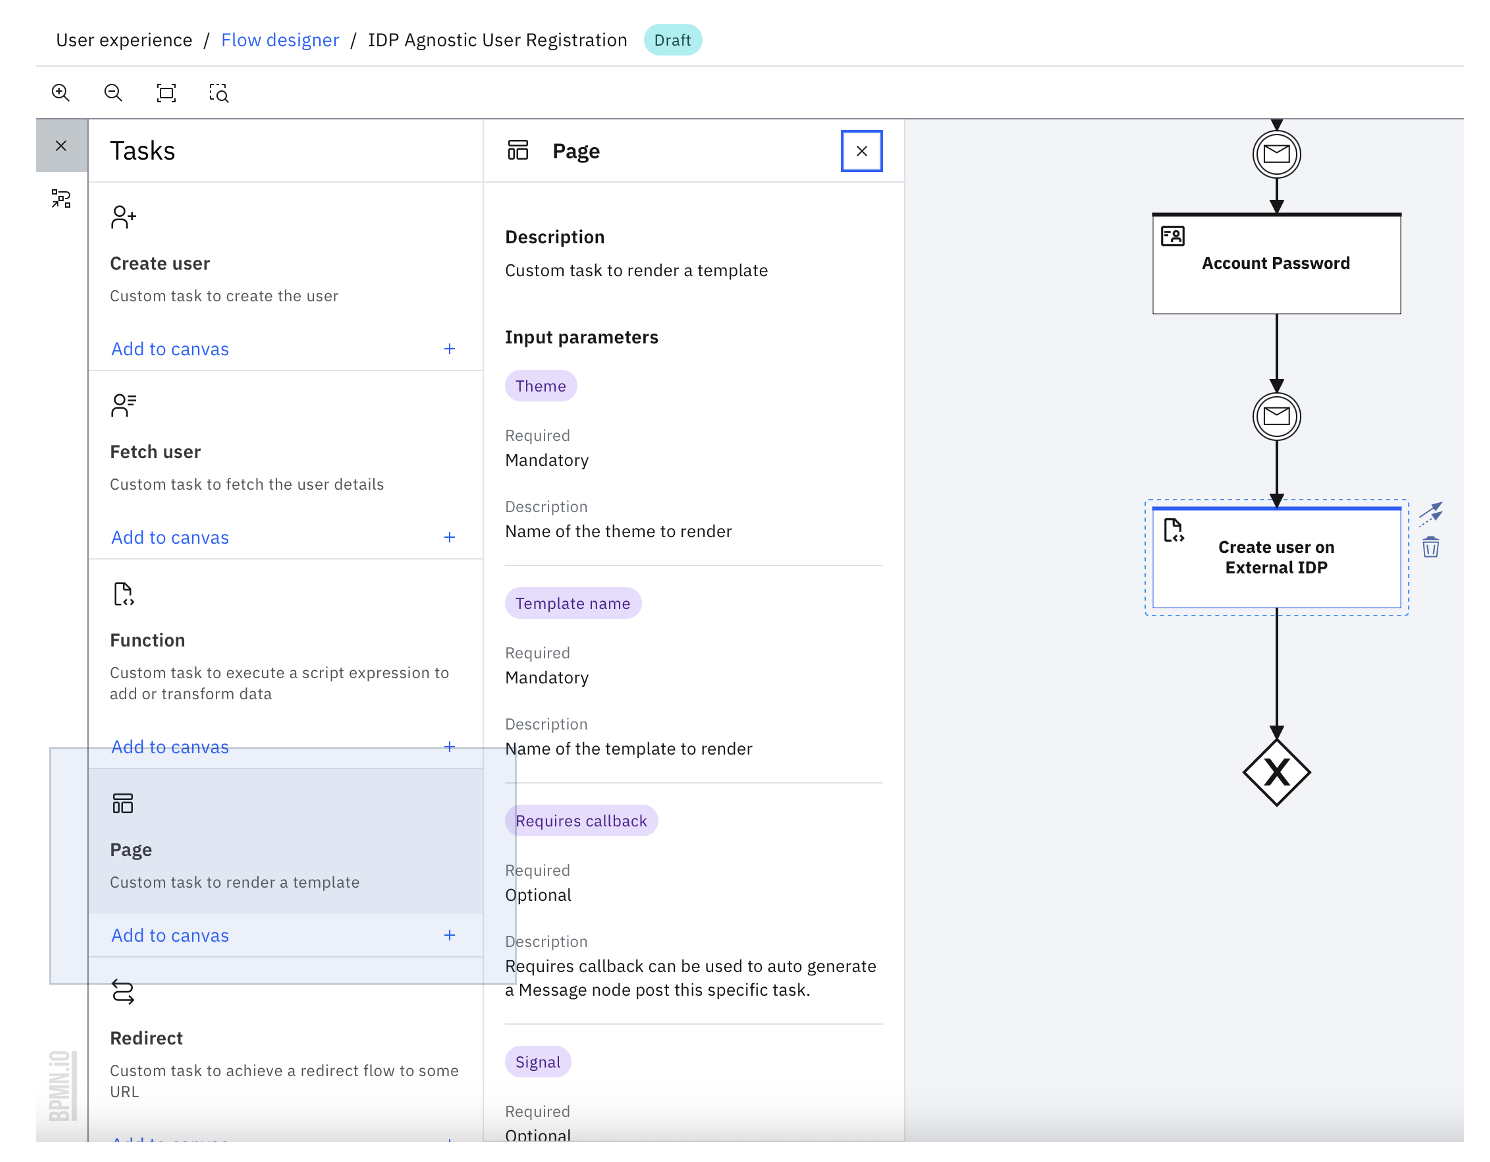
Create the pages to show the Success or Failure message to the user. To do this, navigate to "Tasks" and click the "Page" task.
-
Click "Add to canvas" and exit out of the "Page" side panel.
-
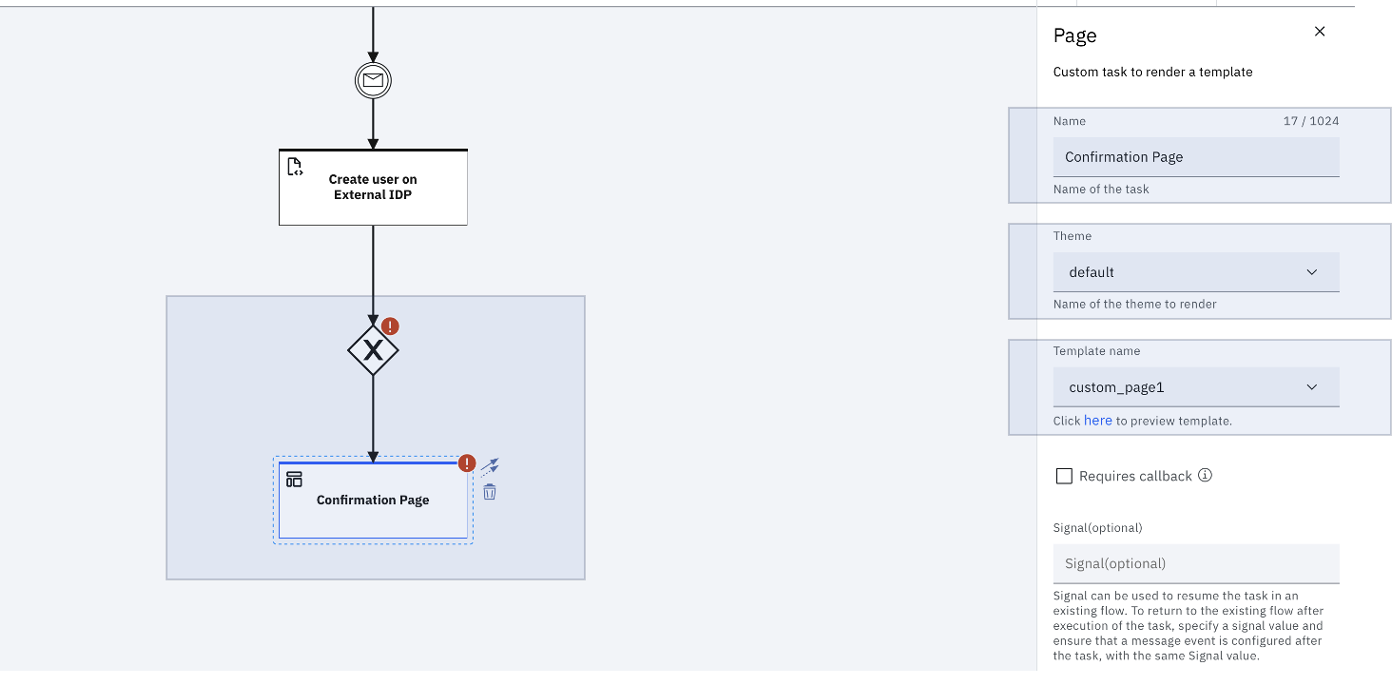
Name the "Page" as "Confirmation Page". Select the Page that you would like to configure as the confirmation page (custom_page1 in this case), along with the appropriate theme. Also, connect the "Exclusive gateway" to this "Confirmation Page" by using the arrow that appears when you click the "Exclusive gateway".
-
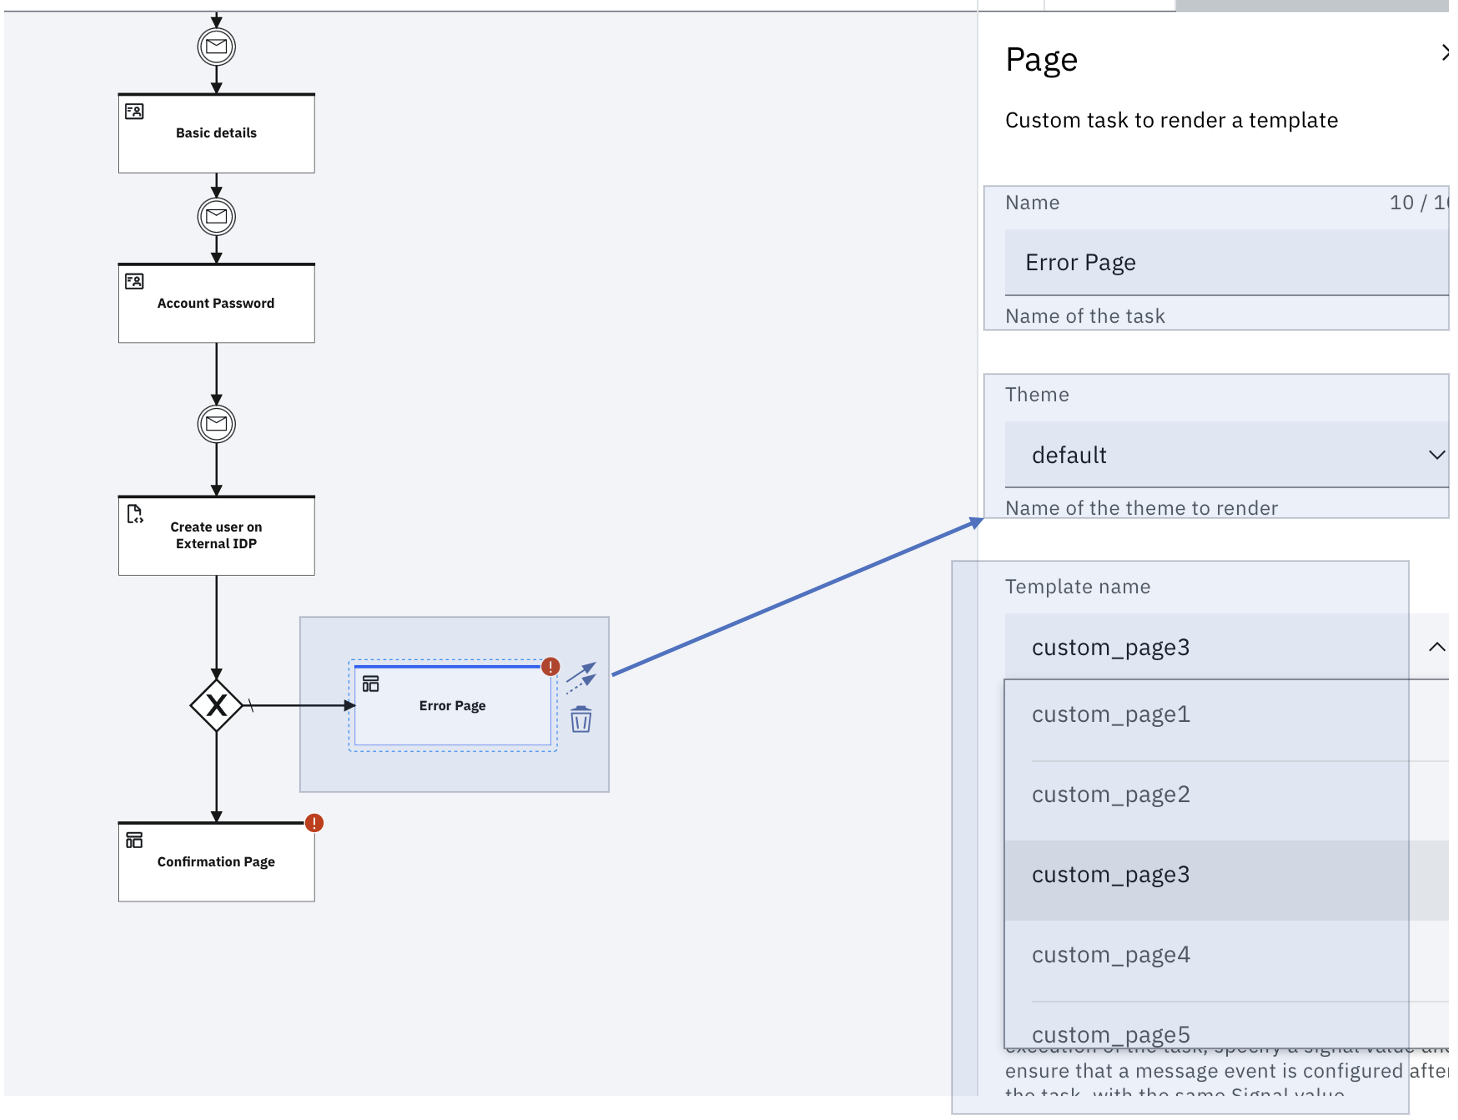
Navigate to "Tasks" and add another "Page" task to the canvas. Name this second page as "Error Page". Select the Page that you would like to configure as the Error page (custom_page3 in this case), along with the appropriate theme. Connect the "Exclusive gateway" to this "Error Page" by using the arrow that appears when you click the "Exclusive gateway".
Note
For Steps 25 & 26, it is assumed that you have updated the custom pages under the "Branding" section appropriately. You can refer to the "Custom branding theme" section under "Installation and configuration", of the article Login with username for specifics, in case these pages are not configured in your environment.
-
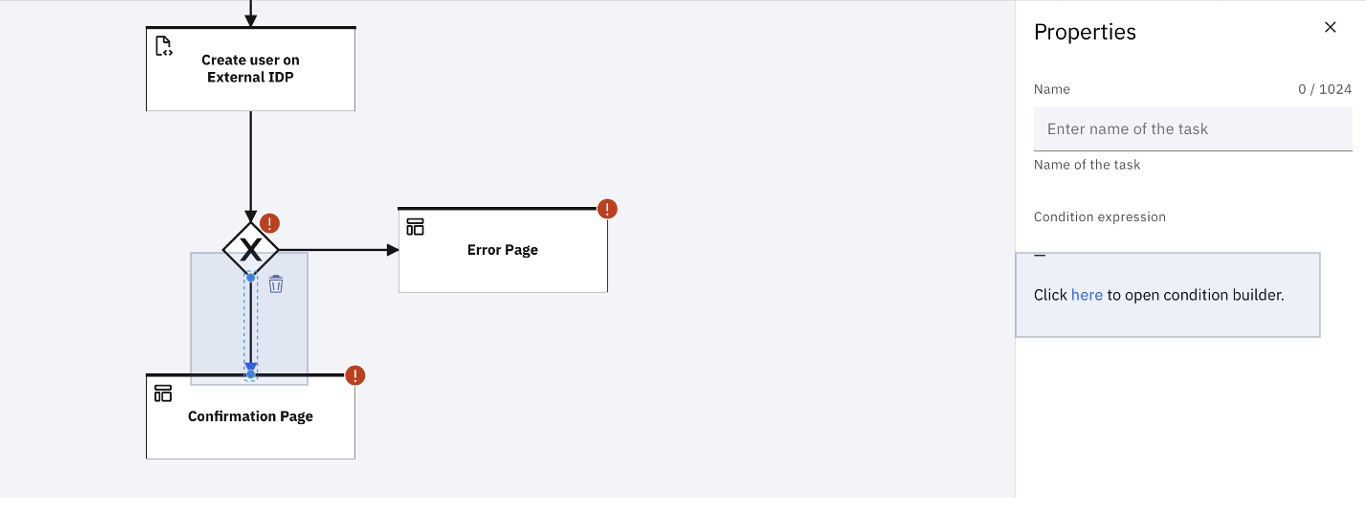
Define the conditions in which the flow is to be diverted to the "Confirmation page" OR "Error page". To define the condition in which the "Confirmation page" is to be shown, click the arrow from the "Exclusive gateway" to the "Confirmation page".
-
Build the conditions by launching the "Condition builder" through the link that is highlighted in Step 27 (in the "Properties" panel).

-
Click "Add condition set" to start building the condition.
-
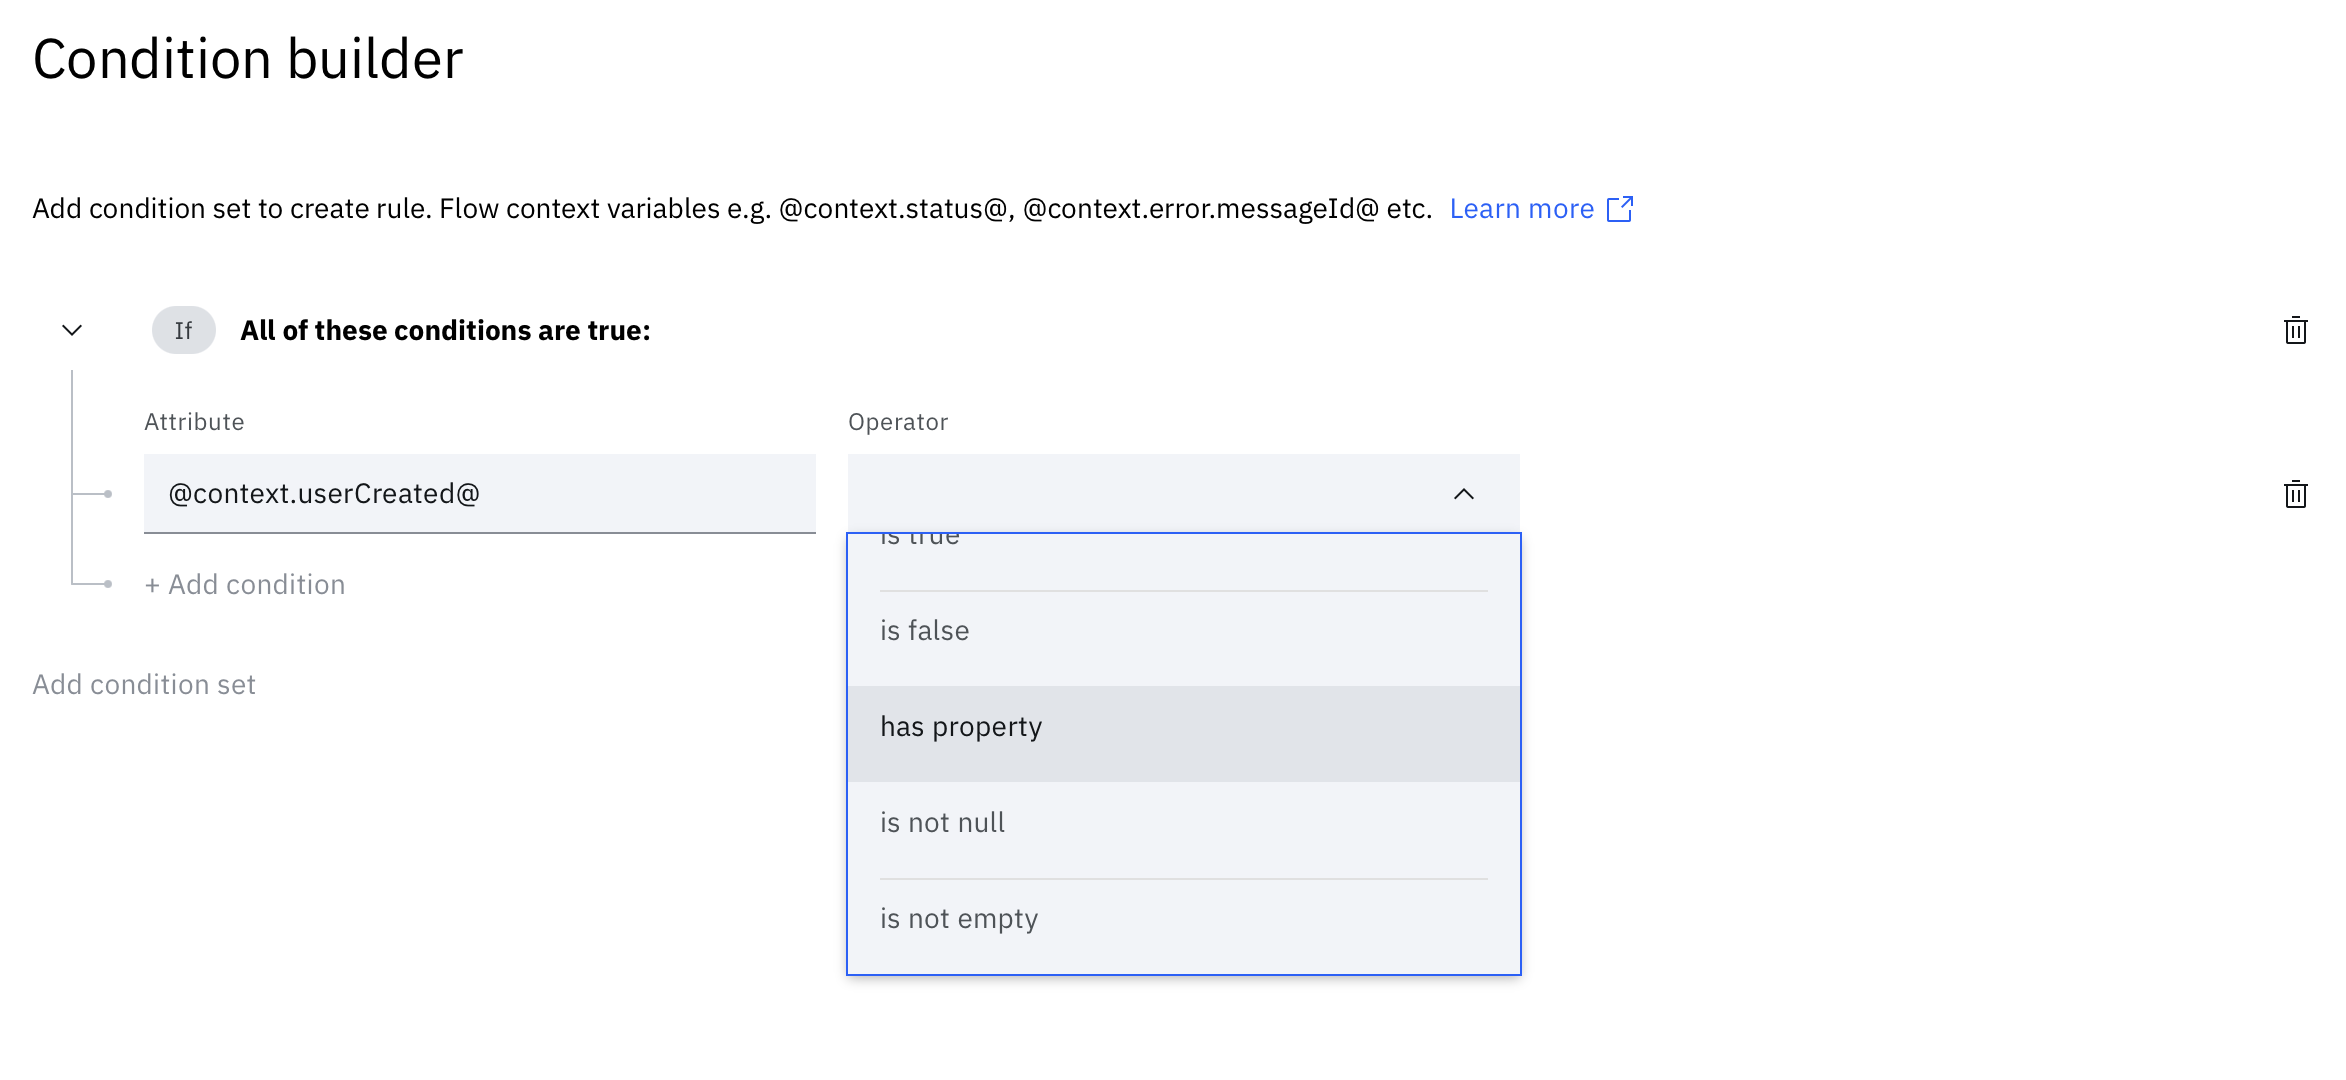
If the user is successfully created by using the "Rule" shared in Step 18, the object "userCreated" should be populated in the workflow context. So, a check on "userCreated" should be good enough to confirm the user was created successfully. For that, type [email protected]@_ in the "Attribute" field of the condition, and specify the "Operator" as "has property":
-
Once the "Operator" is specified, the "Value" field shows up. Specify the "Value" as "id" and "Save" the condition.

-
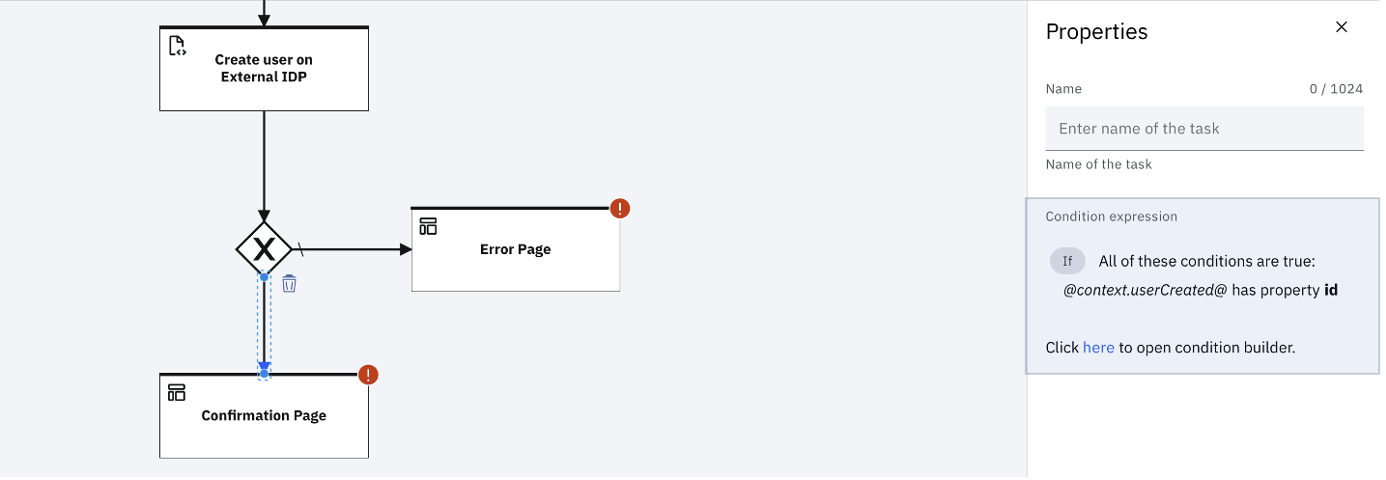
Here is a view of the Condition that is associated with the flow from the "Exclusive gateway" to the "Confirmation page":
-
If the "userCreated" object doesn't carry a legitimate "id", the flow is routed to the "Error page".
-
For simple illustration purpose, the article demonstrates the use of one condition. You may add more conditions to conclude on Success or Error, based on the business case.
-
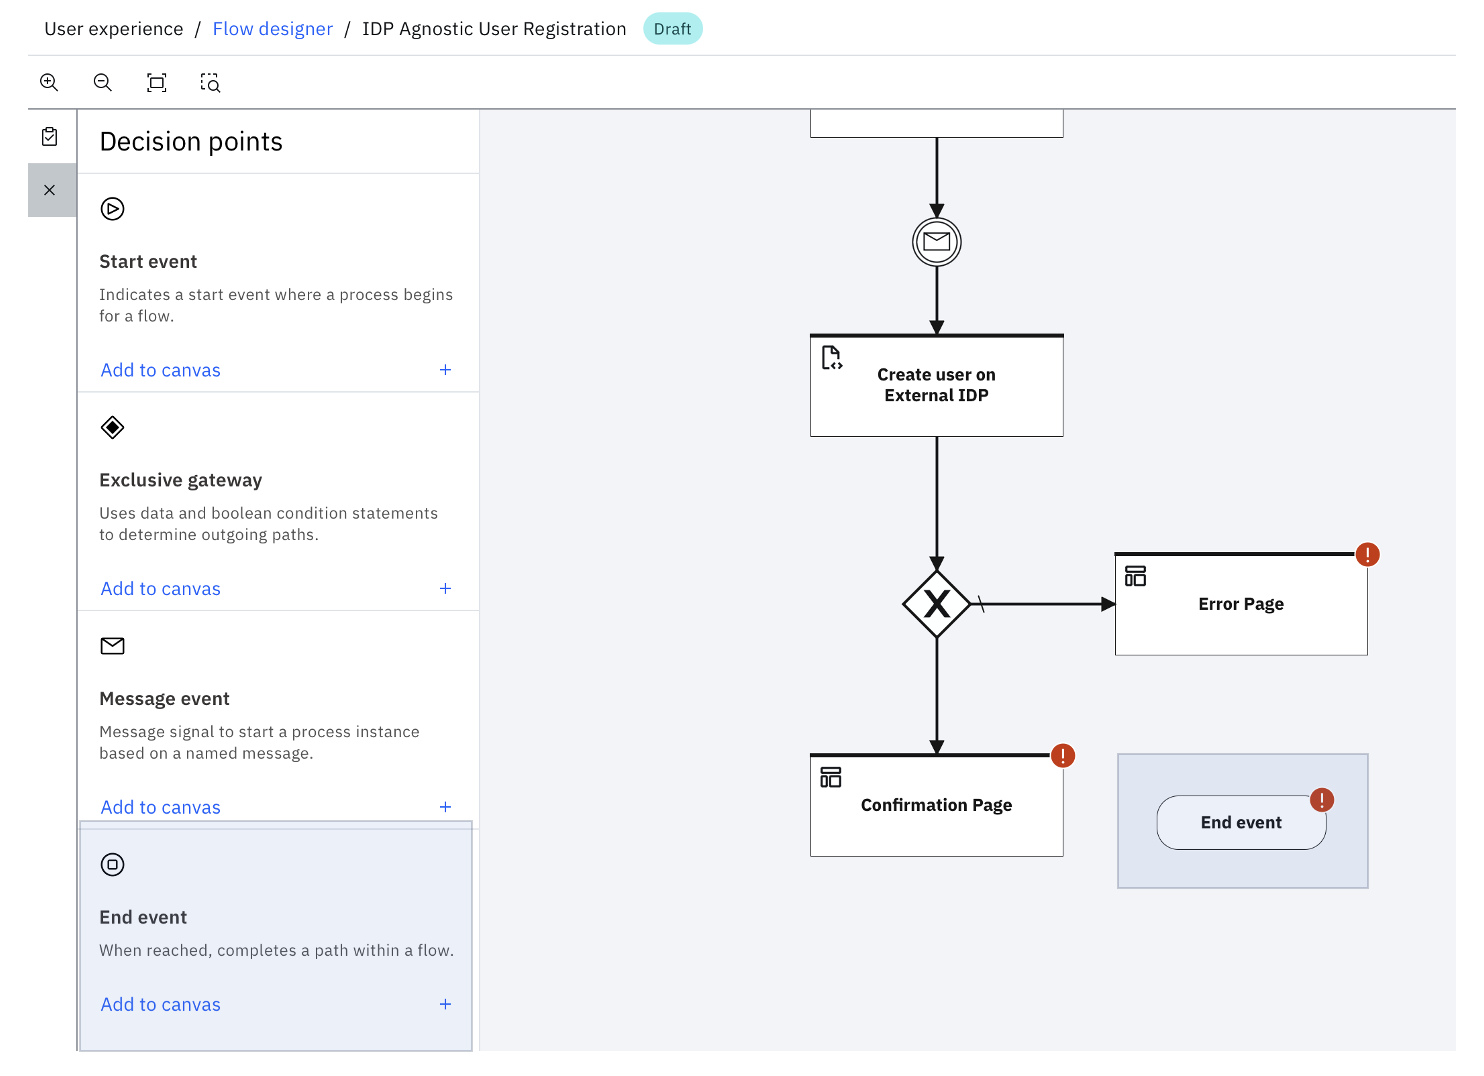
Navigate to "Decision points" to complete the flow by adding the "End event".
-
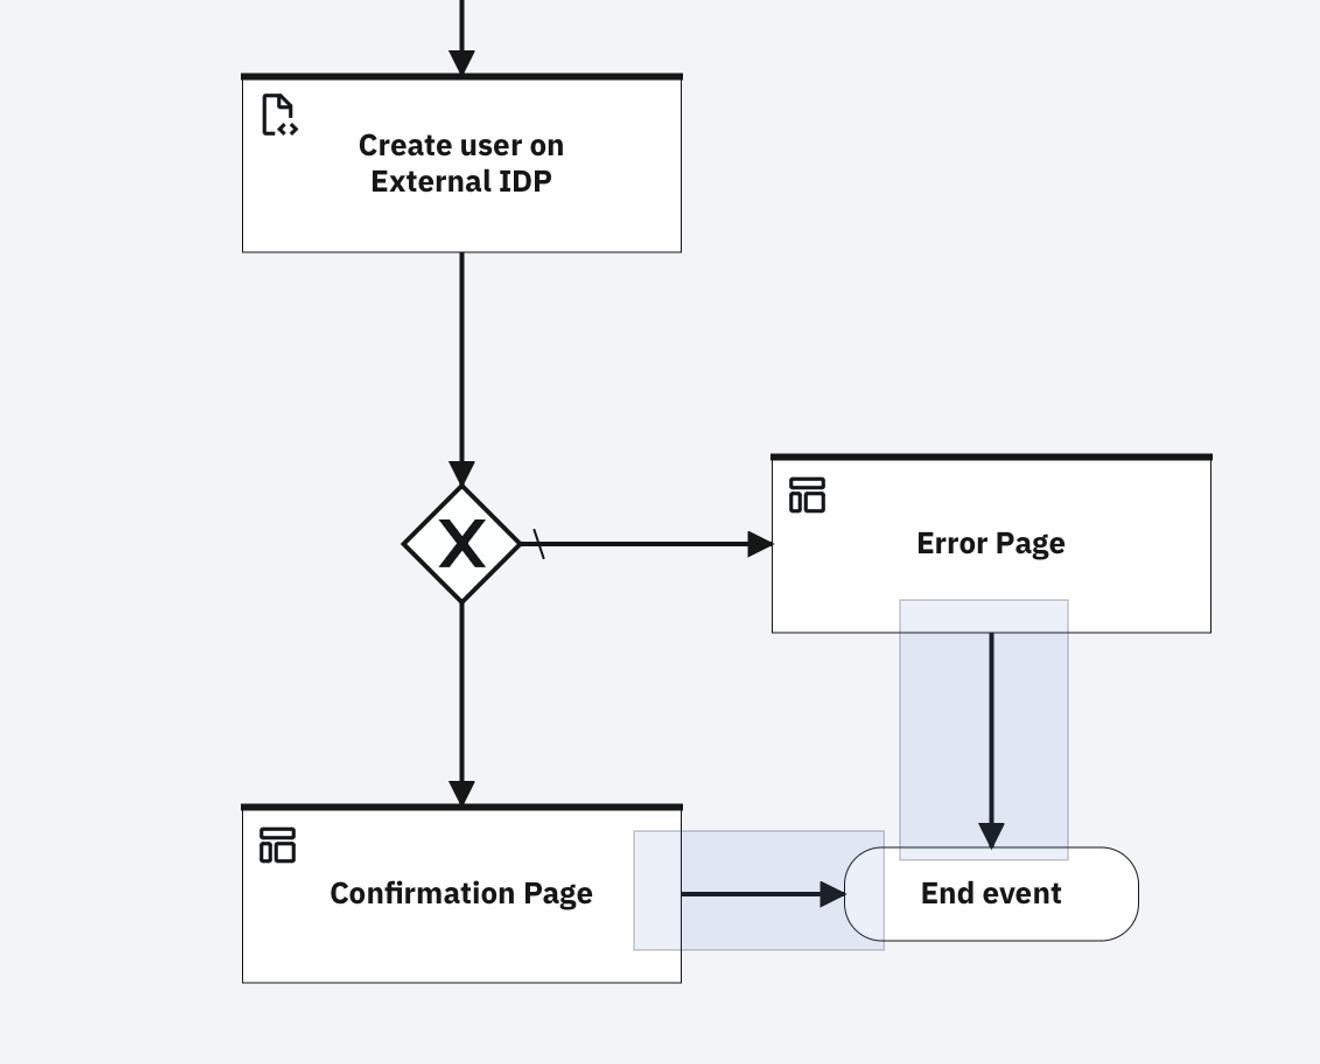
Connect the "Confirmation page" and "Error page" tasks with the "End event" decision point.
-
The flow is now created end to end.
-
Click "Save" and then "Publish".
-
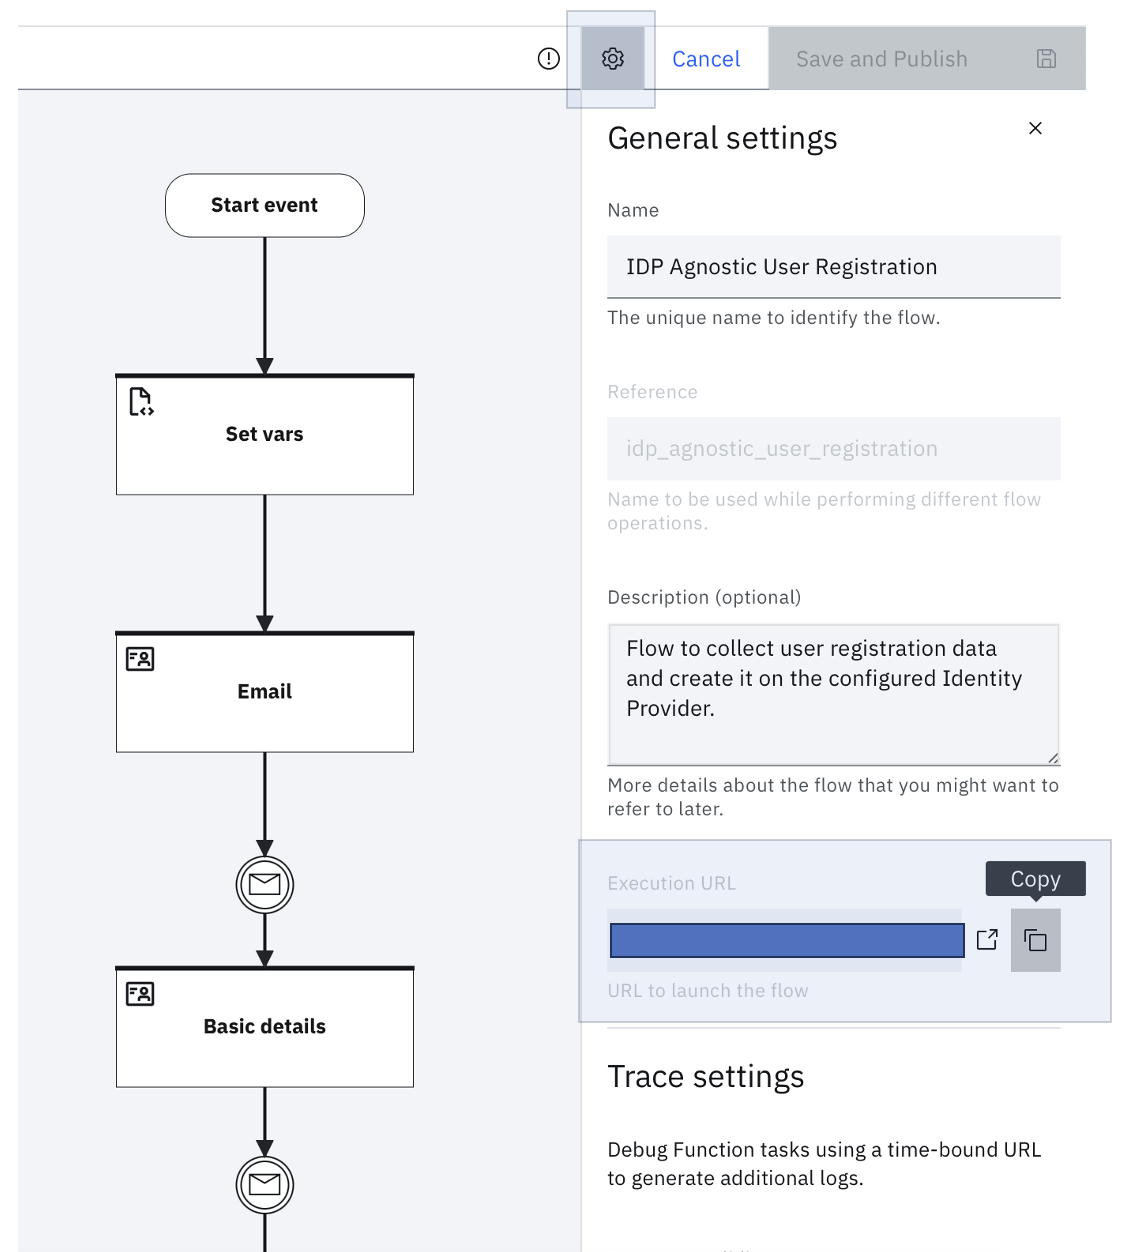
Navigate to the "Settings" icon within "Flow designer".

-
Copy the "Execution URL". The "Execution URL" triggers the user registration flow.
-
Paste the "Execution URL" in an incognito browser tab.
-
Use a personal email and proceed to complete the flow.
The wrap
This flow describes how you can easily create a multi-step user registration journey by using User forms and Flow designer and create user in any given Identity Provider. This end-to-end creation of the user journey required minimal coding and was as simple as dragging, defining, and dropping the appropriate artifacts within the IBM Verify platform.
Ramakrishna J Gorthi, Mansi Arora and Milan Patel, IBM Security
Updated 6 months ago
