Setup employee profile
Steps to guide you with examples
- Create a custom attribute.
- Create an end-user license agreement.
- Create employee profile and use custom attributes.
- Configuring the IBM identity providers for employee login.
- Integrate employee profile page with an application.
- Access the employee profile and update it.
- Access the privacy and the verification devices of the employee.
1. Create a custom attribute
The custom attribute is user attribute specific for a tenant. We need to create a custom attribute for use in the employee profile. Login to ISV tenant admin portal with admin credentials.
-
Navigate to the Admin -> Directory -> Attributes page.
-
Open the attributes setup page on click of the
Add attributebutton. Select the type of attribute as custom attribute and leave the purposes of the attribute as it is. -
Come to the 2nd page of the setup and enter attribute name as 'officephonenumber'. Now navigate to Source and value page. This page shows a selection of the source of the attribute values and the expected data type. Enter 'officephonenumber' again for the attribute name from the identity provider text field and click
nextbutton. -
This shows you the constraint page. Don't select any constraint for now and click on the
Add attributebutton.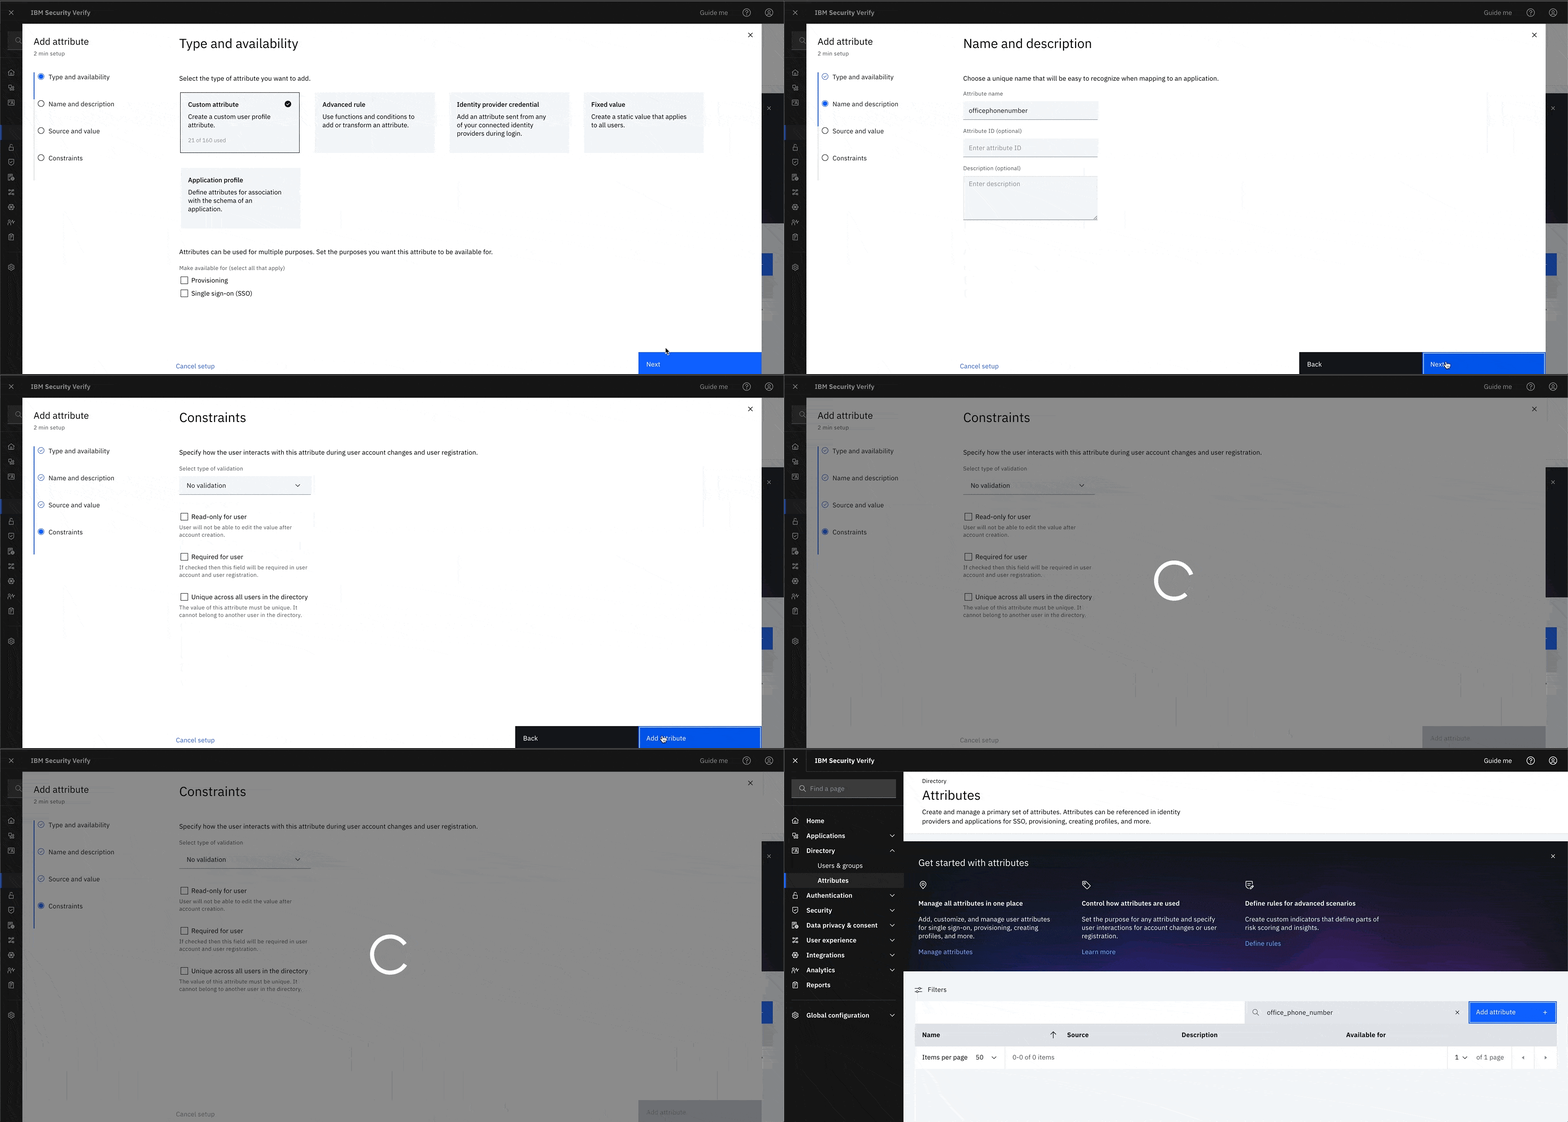
2. Create an end-user license agreement
The end user license agreement (EULAs) is the legal documentation users must consent to. After they are published, relevant EULAs can be associated with applications, user flows, and privacy profiles.
-
Navigate to Admin -> Data privacy & consent -> EULA agreements page.
-
Click on
Create EULAbutton. EnterEULA Employeeas EULA name then go to next screen of the setup. -
Here you need to enter the company URI where the terms of use document are located for the employee. Enter the url (ex: https://www.ibm.com/legal) in the Terms of use URI text box and then click to
Create EULAbutton. -
Publish the draft copy of the EULA by clicking on the
Publish draftbutton. You can see it live and ready to use in a profile.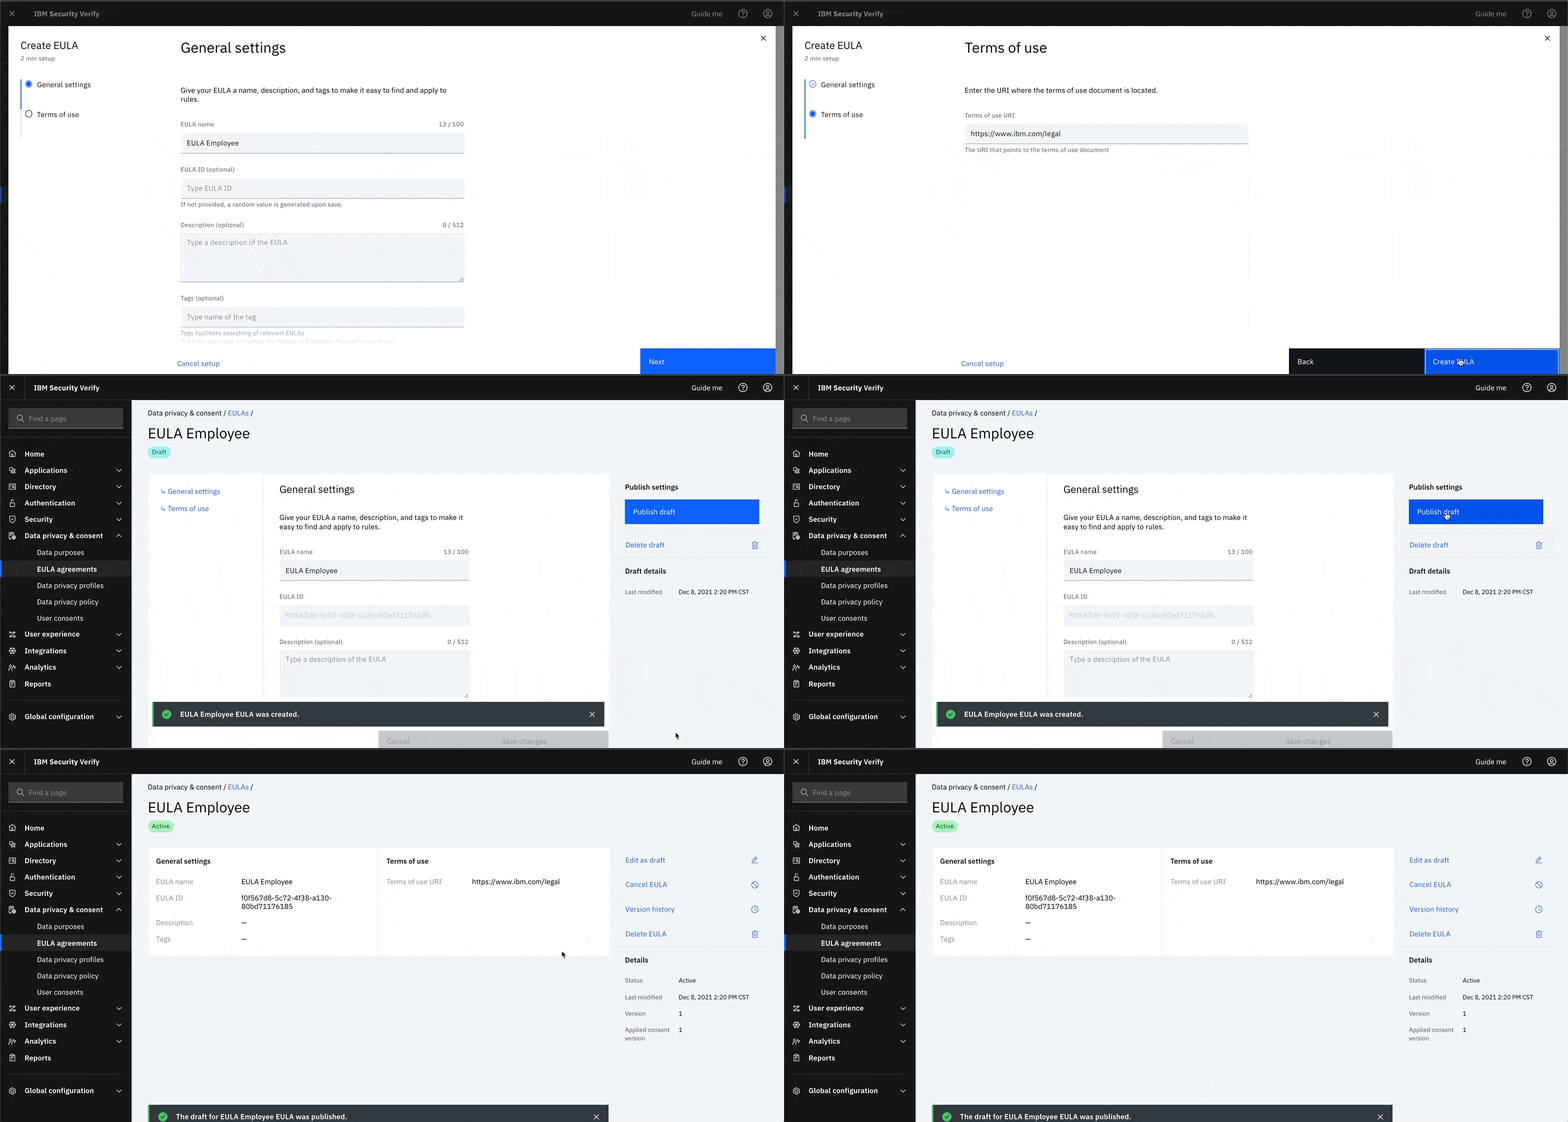
3. Create employee profile and use custom attributes
A user profile is a set of pre-defined or custom attributes like first name, last name, phone number, email id, etc. Follow these steps to create employee user profile.
-
Navigate to Admin -> User experience -> Profile management.
-
Click on the
Create user profilesbutton located at the top right corner of the profile management page and enter the profile name attribute as 'Employee' and URL path as 'employee' then click on theCreate profilebutton. This will launch the user profile in draft mode. -
The draft mode shows two steps (step 1 & 2) by default in the profile. There are five editable default elements provided to you in step 1. They are the 'Profile' section title, 'Email address' form element, 'Given name' form element, 'Surname' form element, and a 'Save profile' button.
-
Clicking any element would enable the form element editor window at the right side of the page. There are nine types of form elements (Agreement, Checkbox, Date, Dropdown, Email, Phone, Radio button, Text block, Text input field). Each newly added form element needs to attach with a pre-defined or custom attribute. On click of the 'Email address', the form element editor shows you that the
Verify emailis disabled along with other two validations. It would be enable in coming release. -
Now modify the employee form to add a few more elements using the form element editor.
- Click on the 'Profile' section title and rename it to 'Employee Profile'. This would be the title of the employee profile page.
- Add a new form element of type 'Phone' and select the pre-defined attribute 'officephonenumber'. Rename the field label to 'Office phone number'. You can put some helper text here if needed.
- Add a new form element of type 'Agreement' and select 'EULA Employee' the end-user license agreement that was created earlier.
- Optionally, in step 2, set the message for successful profile update.
-
Click on
Save changesbutton to save the draft profile and open the profile in the preview mode by clicking theGet preview linkbutton at the right side of the user profile. If you want to do any further modifications like label change or rearrange the position of the form elements, then you can reopen the draft profile and modify it.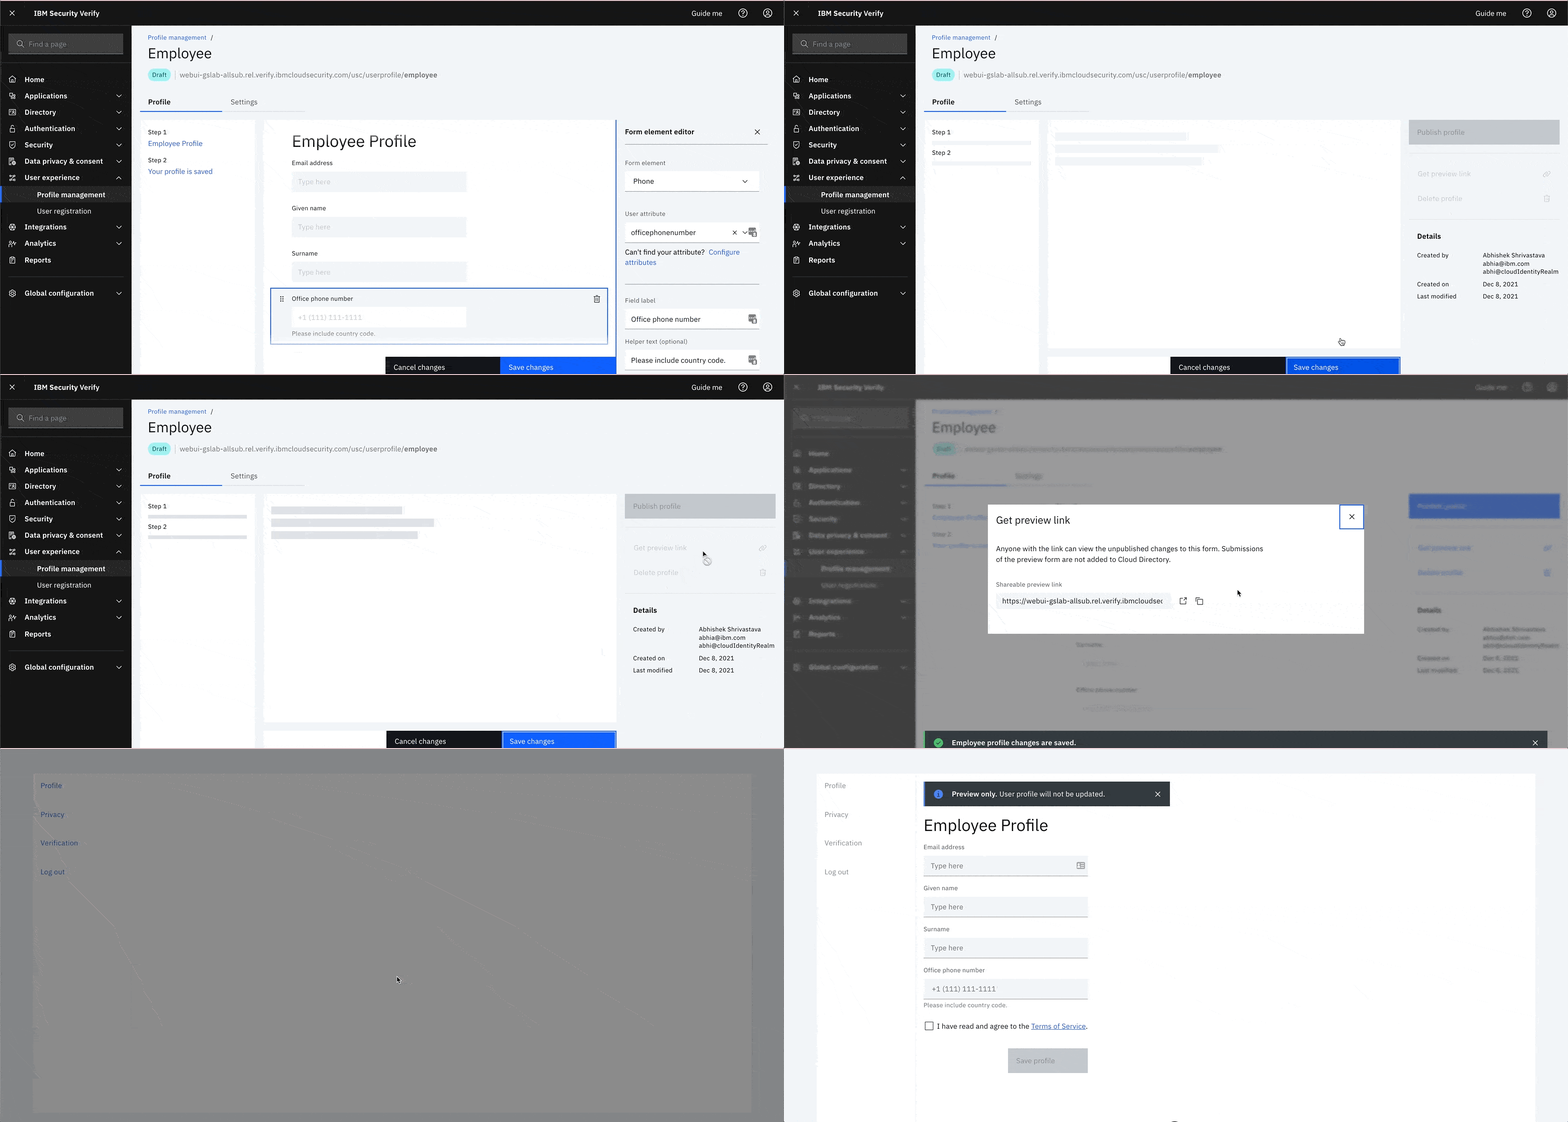
4. Configuring the IBM identity providers for employee login
The Settings tab of the profile gives us an option to change the profile name, URL, and identity providers for the user login.
-
Go to the Settings tab of the employee profile. In this case, leave the identity providers selection as default 'Allow all identity providers that are enabled for end users'.
-
Click on
Save changesbutton, and then click onPublish profilelink to make it live.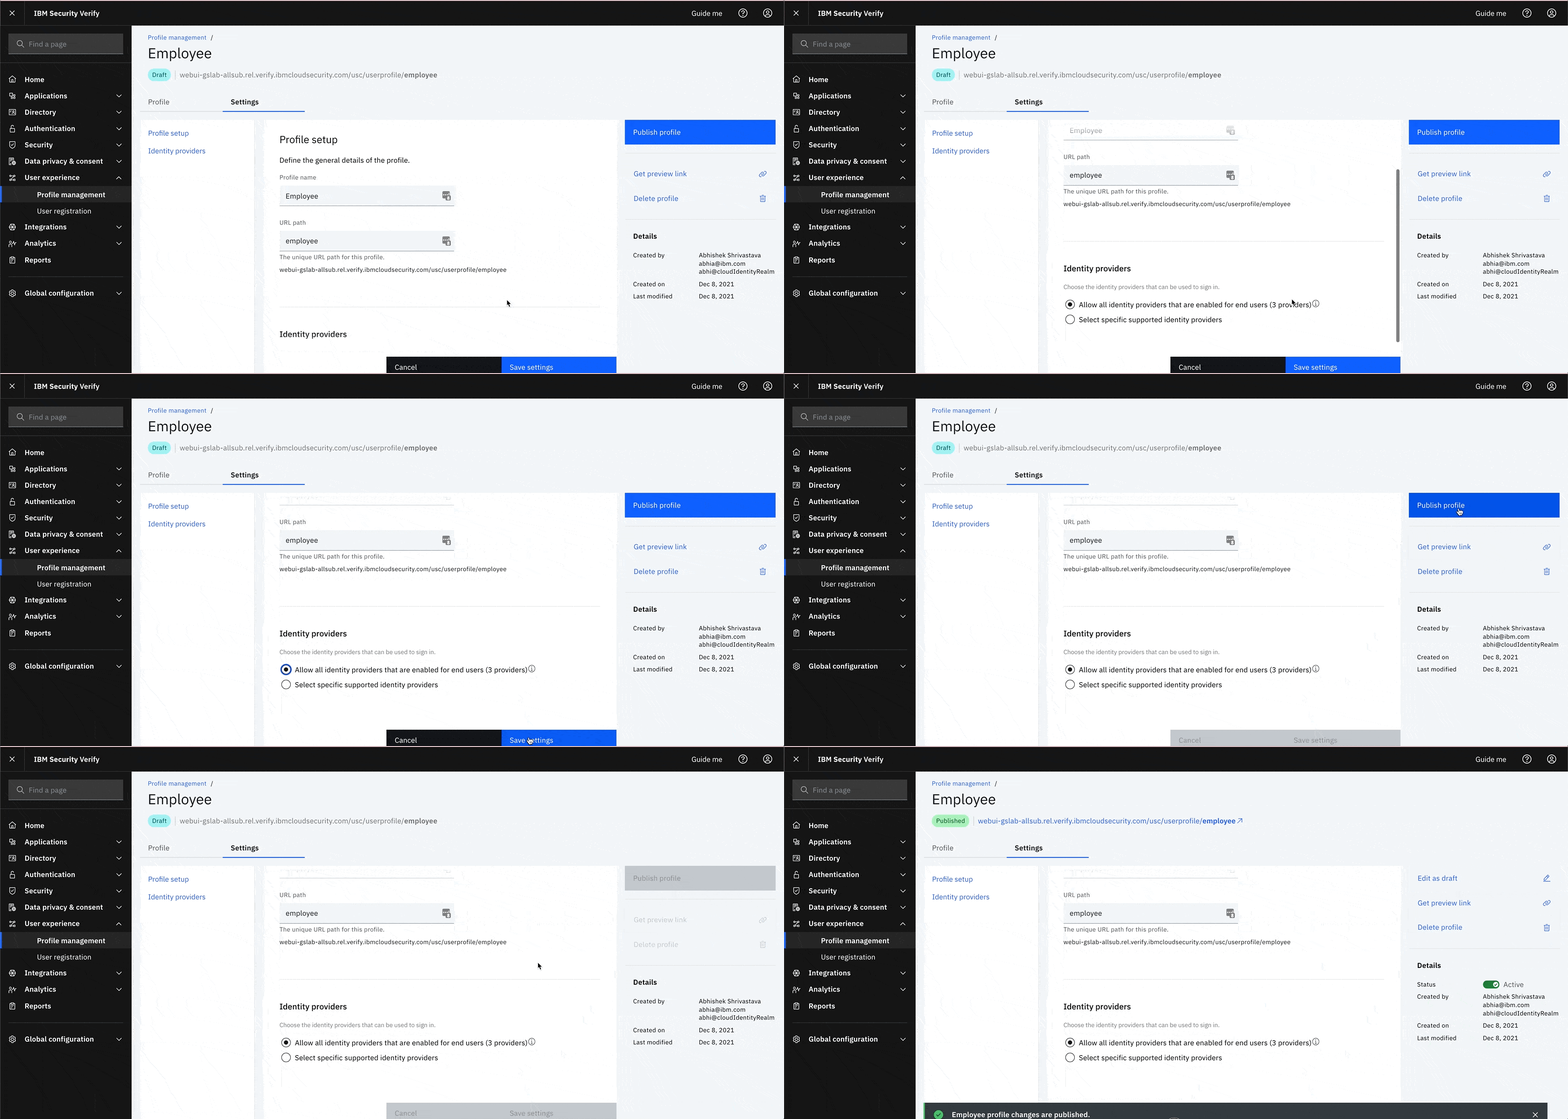
5. Integrate employee profile page with an application
The employee profile link is ready to embed into any 3rd party application. We can use this URL in a company website for the employee login and the profile modification.
-
Copy the employee profile URL (ex:
https://<tenant-hostname>/usc/userprofile/employee) which is shared at the very top of this user profile page. -
Use this URL in a regular HTML anchor tag inside the application like this:
<p>
	View your profile
	<a
		href="https://<tenant-hostname>/usc/userprofile/employee"
		target="_blank"
		rel="noopener noreferrer"
		>here</a
	>.
</p>
6. Access the employee profile and update it
It's time to launch and access the employee profile using any of the three provided login methods SAML, CD or IBMId.
-
On click of the user profile link from the application, employee gets the login page. If the employee is already authenticated then there is no further login page visible to the user otherwise it will ask user of the SSO authentication using SAML, CD or IBMId credential.
-
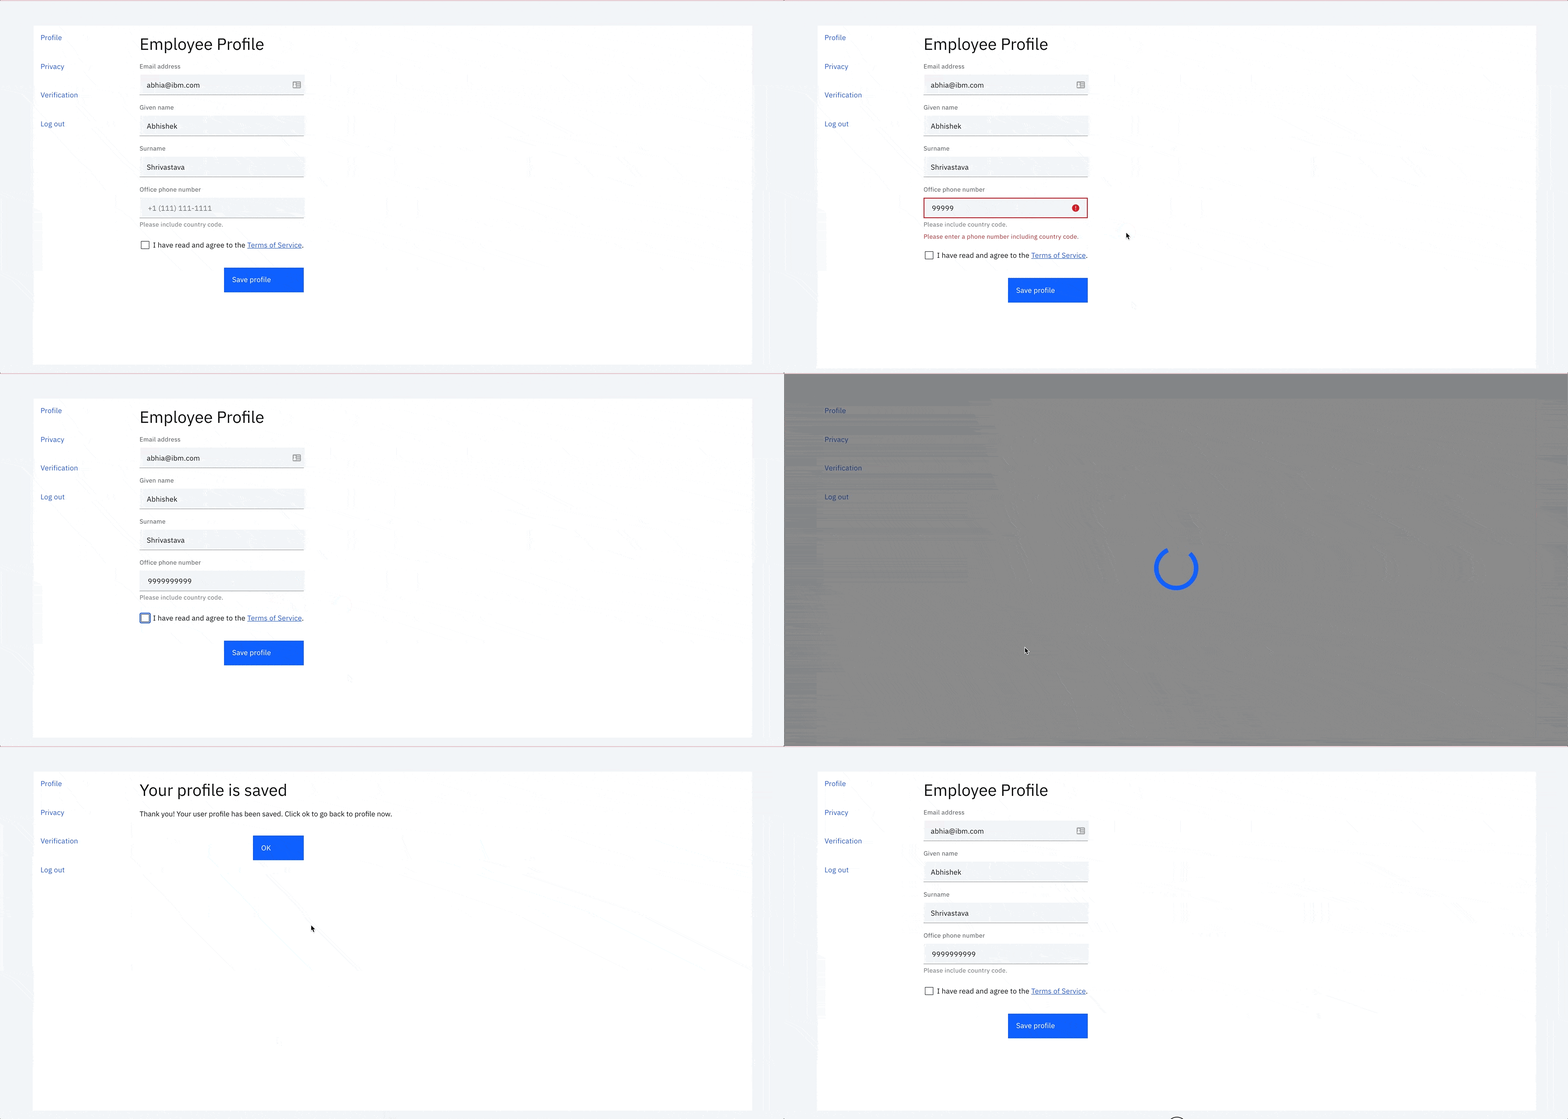
After login user can see the email id, given name, surname, and the office phone number. Each employee can use this link to update the editable custom attributes like office phone number.
-
Now enter some invalid or unformatted office phone number like
99999and try to save. It shows you error message that the number is invalid. Try to save it once again after correcting the number. It will show you another error message to select the agreement checkbox. Actually, to save the employee profile, you need to comply with the user agreement created at the time of the profile creation. -
Save the profile once you changed the valid office phone number and with a selected agreement. It will show you the success message that 'Your profile is saved'. On click of
Okbutton, it navigates back to shows you the updated profile of the employee.
7. Access the privacy and the verification devices of the employee
After saving profile, the employee can navigate to the Privacy and Verification sections of the profile. This section gives user a way to manage the employee privacy consents and the MFA devices.
-
After saving profile, click on the
Privacytab of the left navigational bar. The employee can review the list of the basic and the advance consents. The user can delete any of them if needed.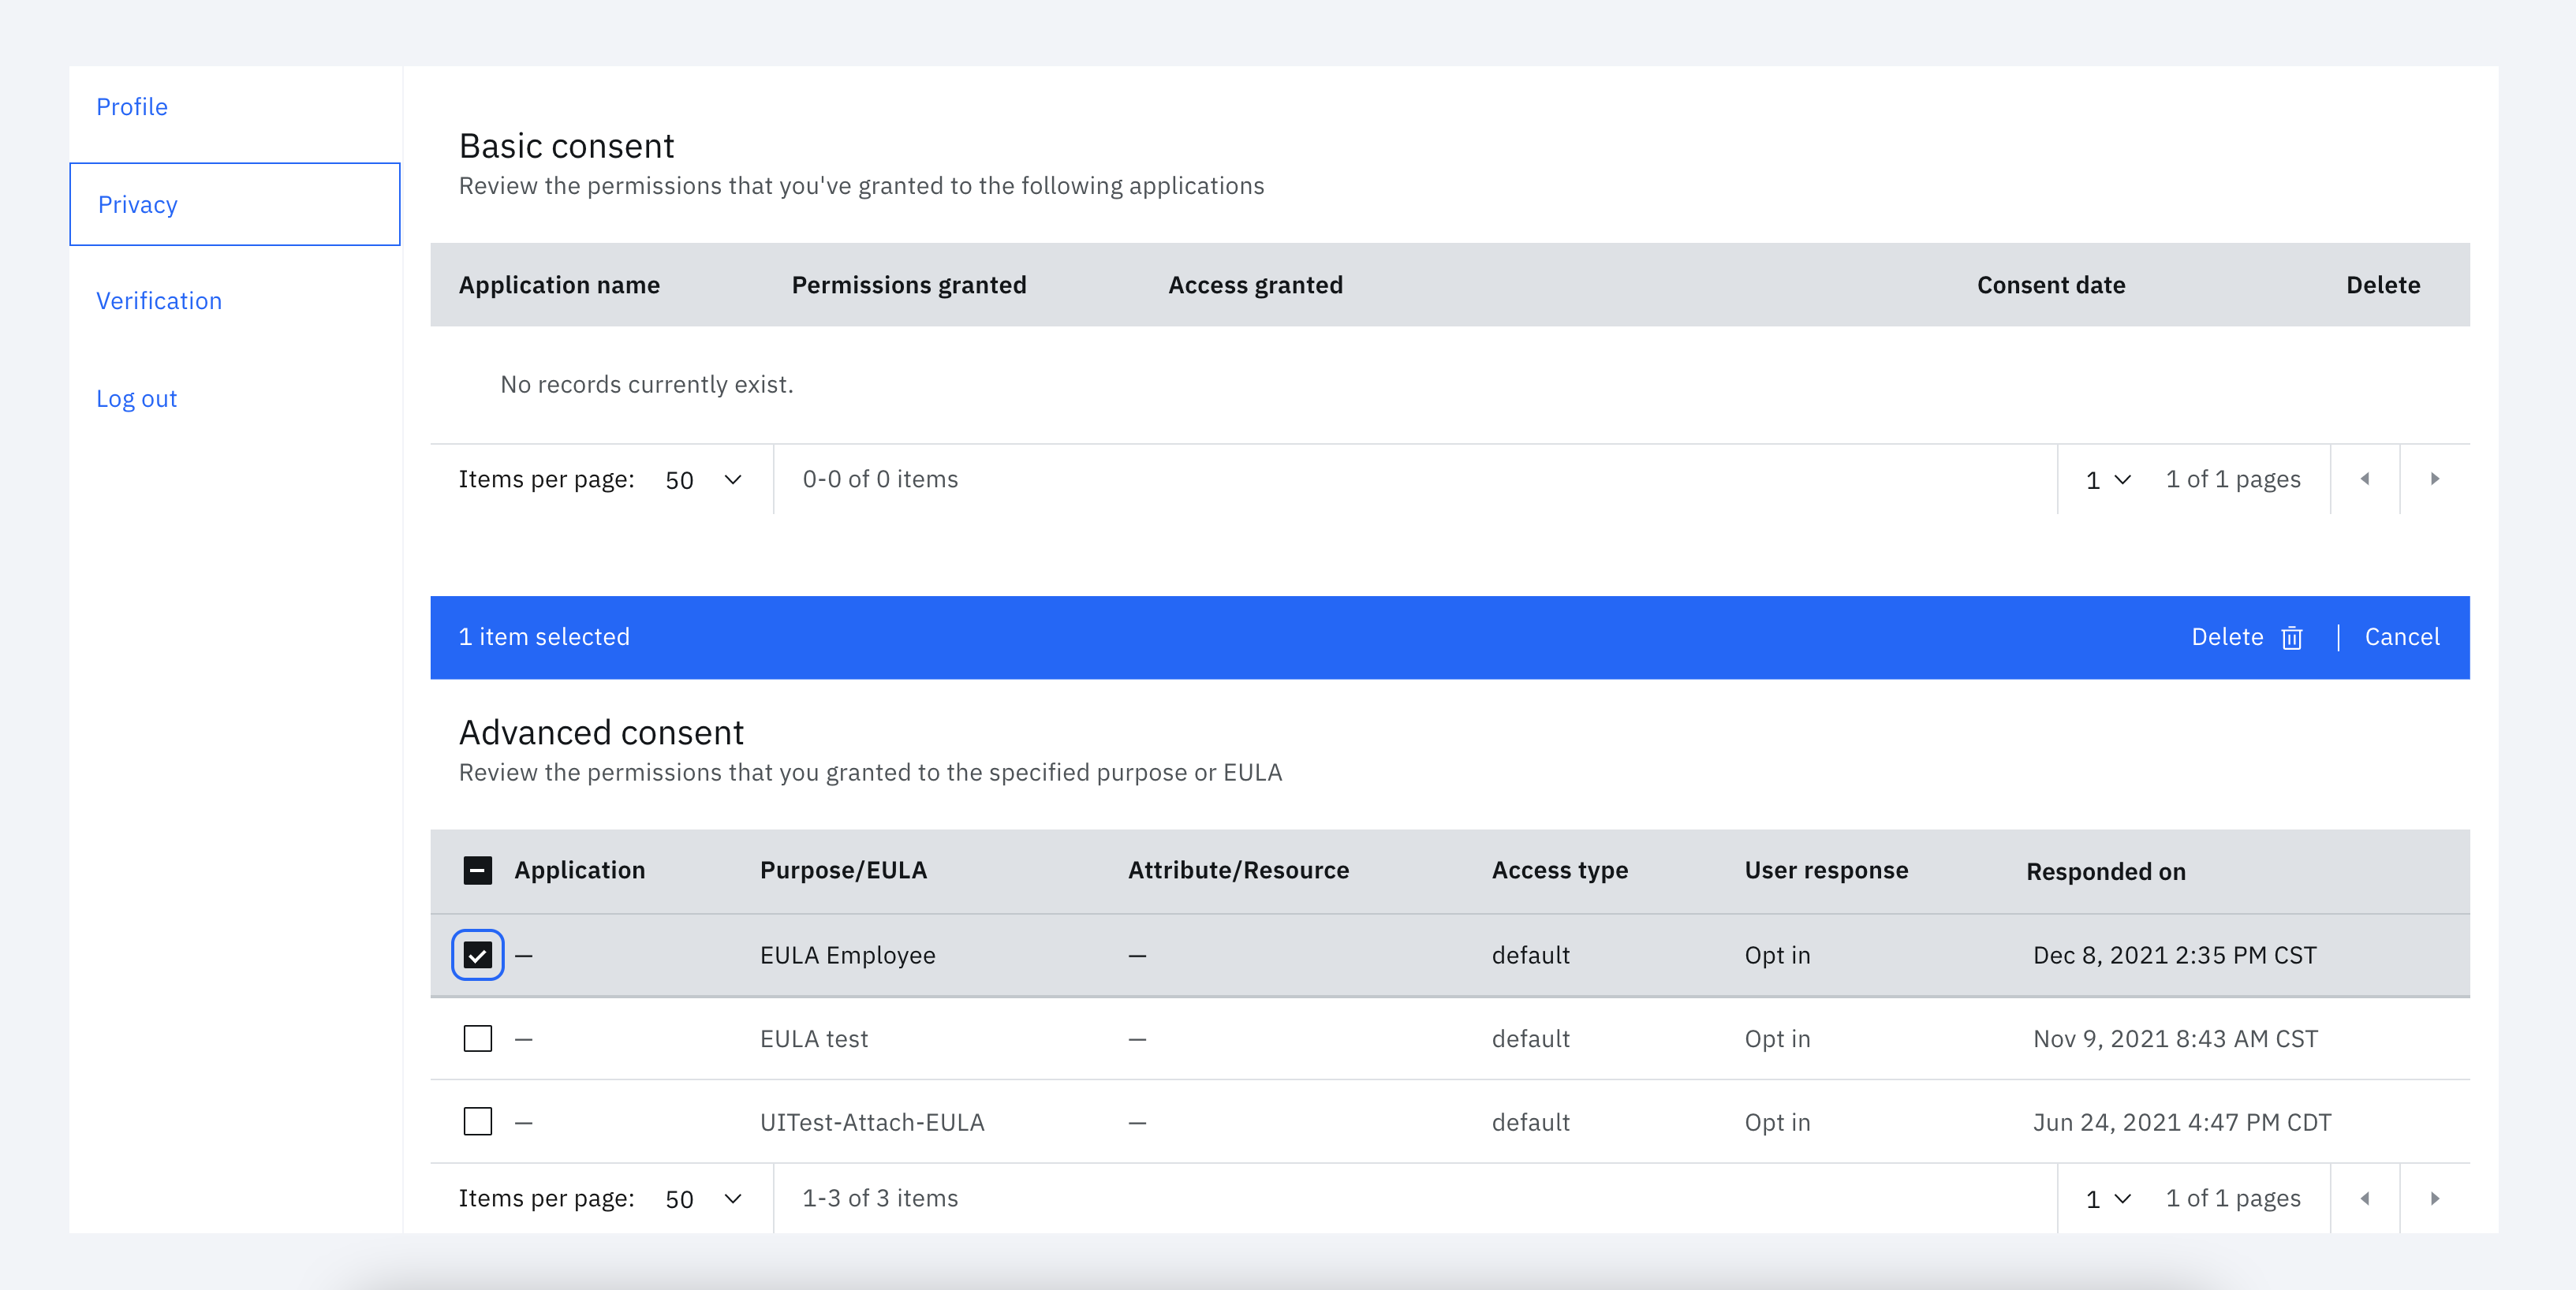
-
Now click on the
Verificationtab located at the left navigational bar. The user verification protects employee's account access with a strong password plus an additional verification method as well as recovery options if the user get locked out. On click of the verification tab, it redirects you to the MFA page for an additional verification of the employee. You can see there are six verification method or device like email, text message, phone call, which can be added by the employee for additional security. Actually, this section is used to manage the list of user MFA verification methods, change the user password and set the security questions and answers.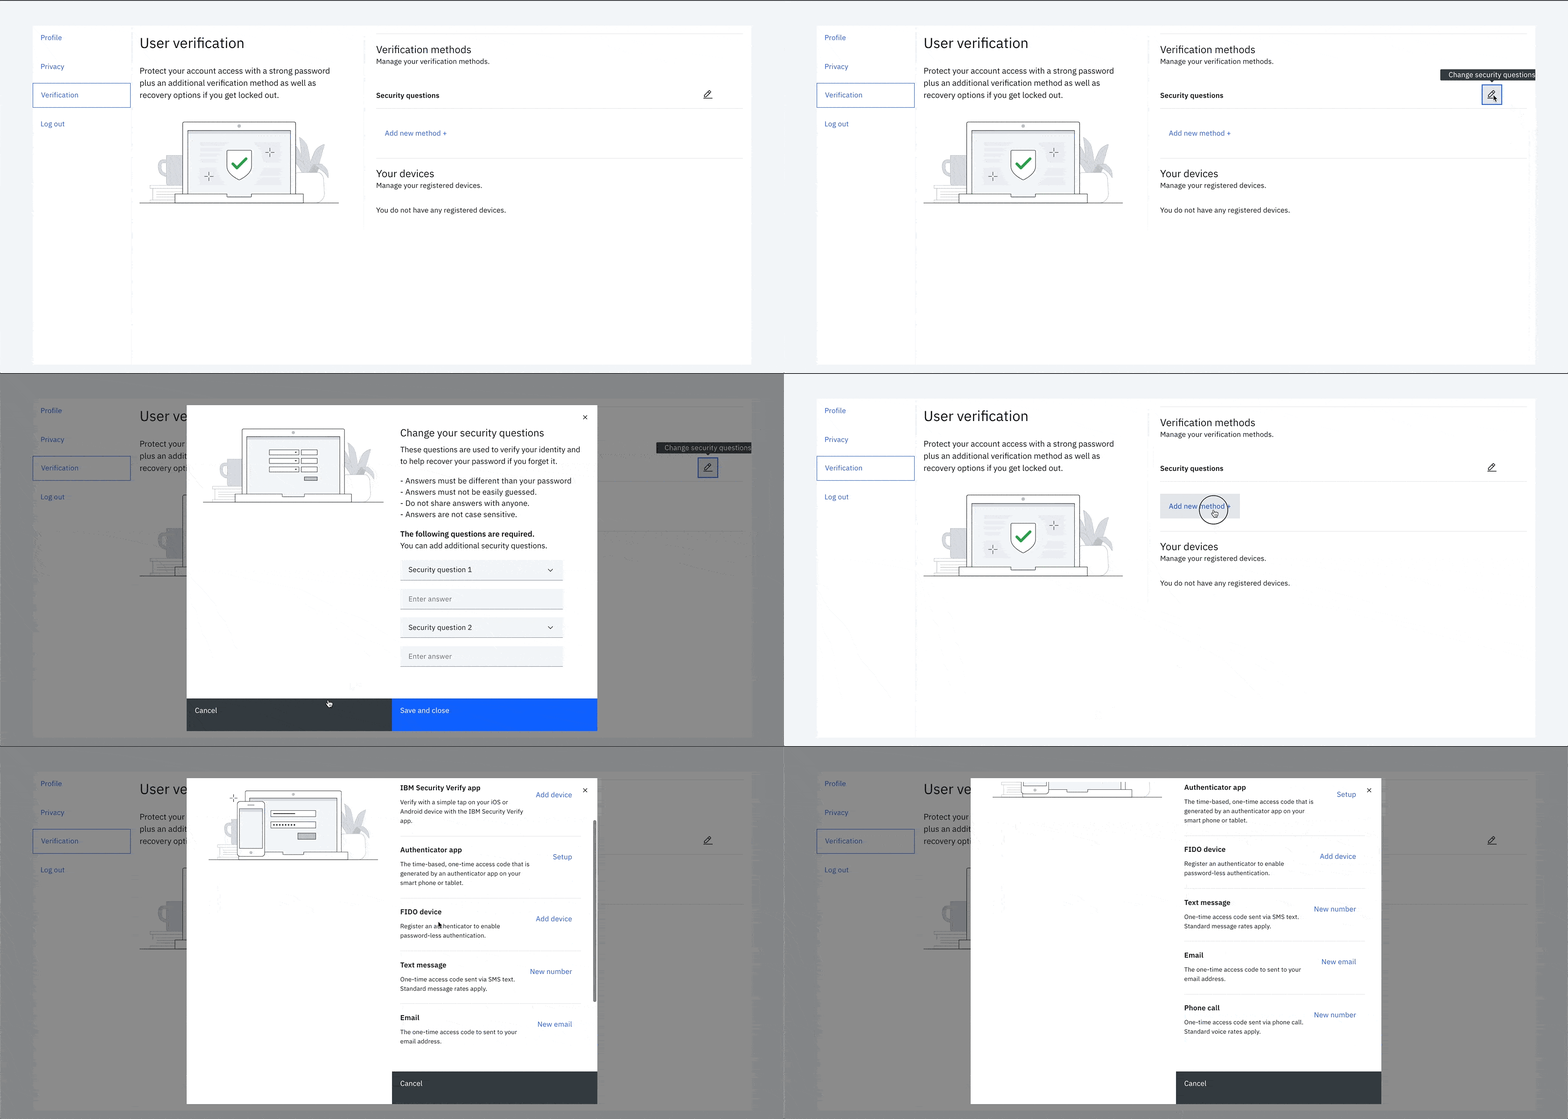
-
The employee would be signed out on click of the
Log outlink.
Abhishek Shrivastava, IBM Security
Stephen Miessner, IBM Security
Updated almost 2 years ago
