
User Registration with Aadhaar-based Identity Proofing
User Registration with Aadhaar-based Identity Proofing
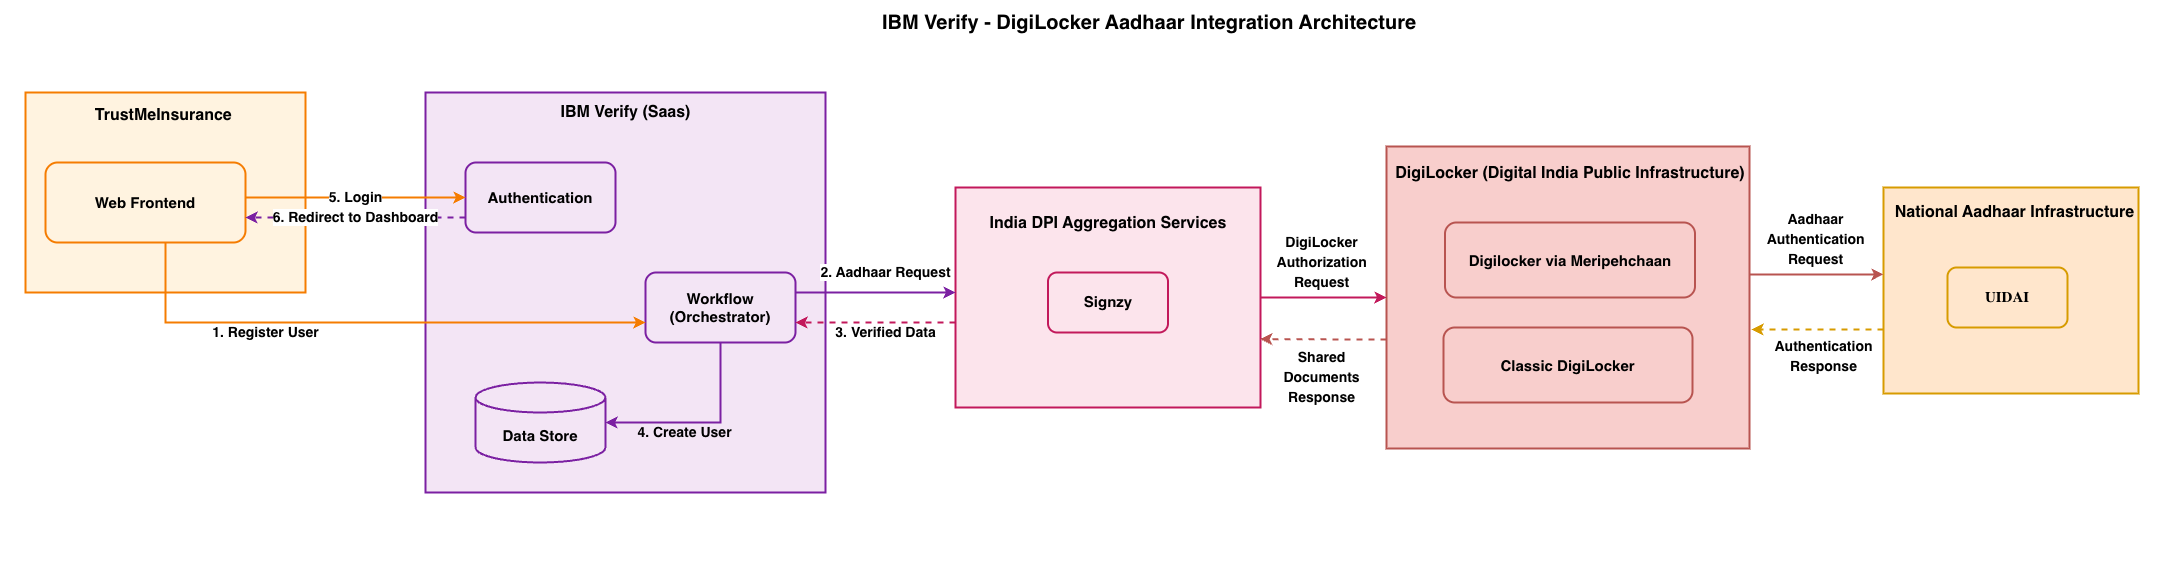
IBM Verify enables organizations to onboard Indian users with government-verified identities by integrating with India's Aadhaar identity system.
Use Case
Personas
Admin (Identity or Application Owner)
An IT administrator or developer at a financial institution, insurance company, or government-facing enterprise (for example, TrustMeInsurance) responsible for configuring a secure, compliant user onboarding flow. This persona wants to:
- Eliminate manual KYC (Know Your Customer) processes by automating government identity verification at registration time.
- Ensure that every self-registered user is a verified Indian resident whose provided details (name, mobile, email, date of birth) match their Aadhaar record.
- Reduce fraud and duplicate accounts by tying registration to a unique, government-issued identity.
- Remain compliant with Indian data-protection and regulatory requirements for identity proofing.
End User (Indian Resident)
An Indian resident registering for a service for the first time. This persona wants to:
- Register quickly without uploading physical documents or visiting a branch.
- Authenticate once by using the Aadhaar OTP-based verification they already know, and let the system prefill and cross-check their details automatically.
- Give explicit consent before their Aadhaar data is used, and receive clear confirmation when their account is created.
Understanding the Identity Verification Ecosystem
Aadhaar
Aadhaar is a 12-digit unique identification number issued by the Unique Identification Authority of India (UIDAI) to all Indian residents. It serves as a proof of identity and address, and is linked to biometric and demographic data.
Aadhaar Authentication
Aadhaar-based identity verification in this flow relies on OTP-based authentication. When a user is redirected to MeriPehchaan, they authenticate by entering their Aadhaar-linked mobile number and providing a one-time passcode (OTP) sent by UIDAI.
DigiLocker
DigiLocker is a digital locker service provided by the Government of India that enables Indian citizens to store and share their documents digitally. It provides secure access to authentic documents issued by various government agencies, including Aadhaar.
MeriPehchaan
MeriPehchaan is India's Single Sign-On (SSO) platform that provides a unified authentication gateway for accessing government services. It authenticates users through Aadhaar OTP-based authentication and allows them to consent to share their personal information with service providers.
API Aggregators
To integrate with these government services, various API aggregators provide simplified access to Aadhaar verification and DigiLocker services. For this implementation, Signzy is used as the API aggregator.
NoteBefore you begin, contact your chosen aggregator to provision and configure the following on their side:
- Enable Aadhaar OTP authentication and DigiLocker access for your account.
- Obtain your authorization key (API credential) and the base URL for the sandbox or production environment.
- Verify that the redirect or callback URL for your IBM Verify tenant is allowlisted in the aggregator's portal.
- Review the aggregator's flow parameters (timeout values, consent scopes, logo or branding fields) and note any values you may need to adjust in the workflow's CELx function tasks.
Once the aggregator account is ready, proceed with the IBM Verify configuration steps below.
Overview of the flow

The user registration flow with Aadhaar-based identity proofing follows these steps:
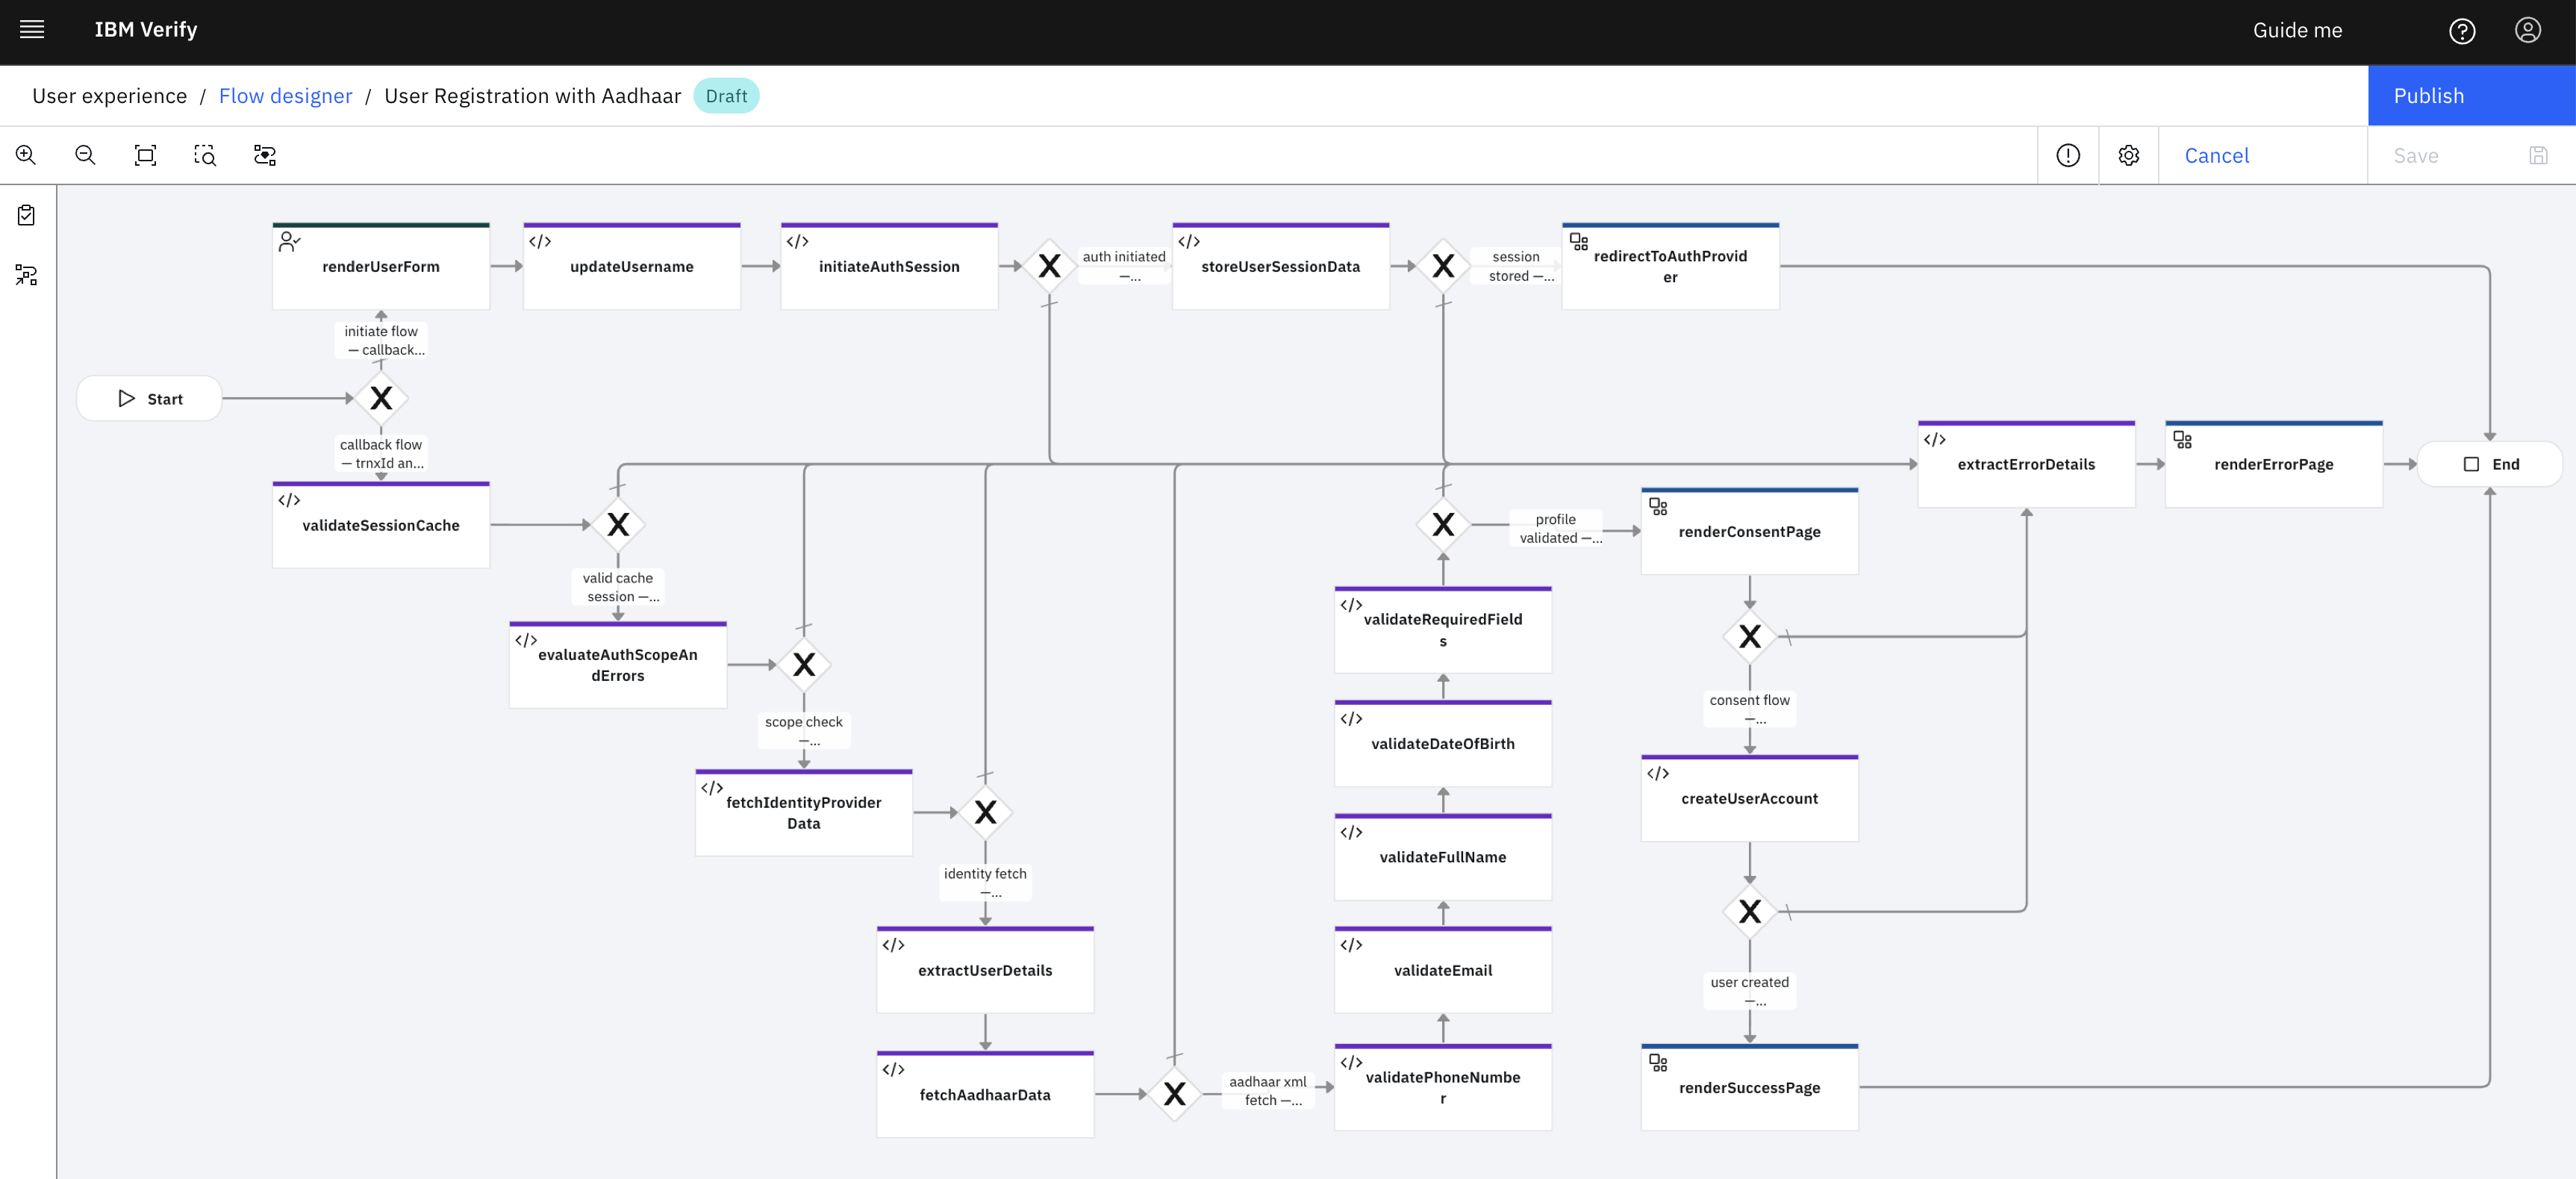
- User data collection: The user fills in a registration form with their email address, mobile number, full name, and date of birth.
- Initialize Aadhaar authentication session: IBM Verify calls the API aggregator to create a DigiLocker authentication session and receives a redirect URL for MeriPehchaan.
- Redirect to MeriPehchaan for Aadhaar OTP authentication: The user is redirected to MeriPehchaan, where they authenticate by using their Aadhaar-linked mobile number and an OTP sent by UIDAI. After successful authentication, the user consents to share their DigiLocker data with the service.
- Validate Aadhaar authentication scope and errors: Upon return from MeriPehchaan, IBM Verify verifies that the authentication completed successfully and that the user granted the required DigiLocker consent scope.
- Fetch DigiLocker profile: Retrieve the user's DigiLocker profile information (email, phone, DigiLocker ID) from the aggregator using the authenticated session.
- Fetch Aadhaar data: Retrieve the Aadhaar XML record—including name, date of birth, and photo—from DigiLocker through the aggregator.
- Cross-validate user-provided data against Aadhaar record:
- Mobile number: user-provided number matches the Aadhaar-linked number
- Email address: user-provided email matches the DigiLocker-registered email
- Full name: user-provided name matches the name in the Aadhaar record
- Date of birth: user-provided DOB matches the Aadhaar record
- Data adjustments: Perform necessary data transformations (for example, date format normalization) to align Aadhaar-sourced values with the IBM Verify user directory schema.
- User consent page: Display the cross-validation results and prompt the user for final consent before account creation.
- Create user account: If all validations pass and the user consents, create a verified user account in IBM Verify with the validated identity data.
- Success or error handling: Show a success confirmation page or a descriptive error page depending on the outcome.
Prerequisites
-
IBM Verify configurations:
- Access to IBM Verify administration console
- Flow Designer enabled in your tenant: Beta CI-49771: Workflow Modeler (contact IBM Verify support)
- Session/cache management enabled: Beta VDEV-32965: Session context cache (contact IBM Verify support)
-
API aggregator access:
- Account with an API aggregator (for example, Signzy)
- API credentials (authorization key)
- API endpoint access (production or sandbox)
-
Application (Optional):
- To start and bind flows together
- Here, the TrustMeInsurance sample application is used for setups. You can use any other appropriate application.
Installation and Configuration
Step 1: Create Custom Branding Theme
This flow uses custom pages for error handling, consent collection, and success confirmation. Create a dedicated theme to prevent affecting other flows.
-
Log in to the IBM Verify administration console.
-
Navigate to User experience > Branding.
-
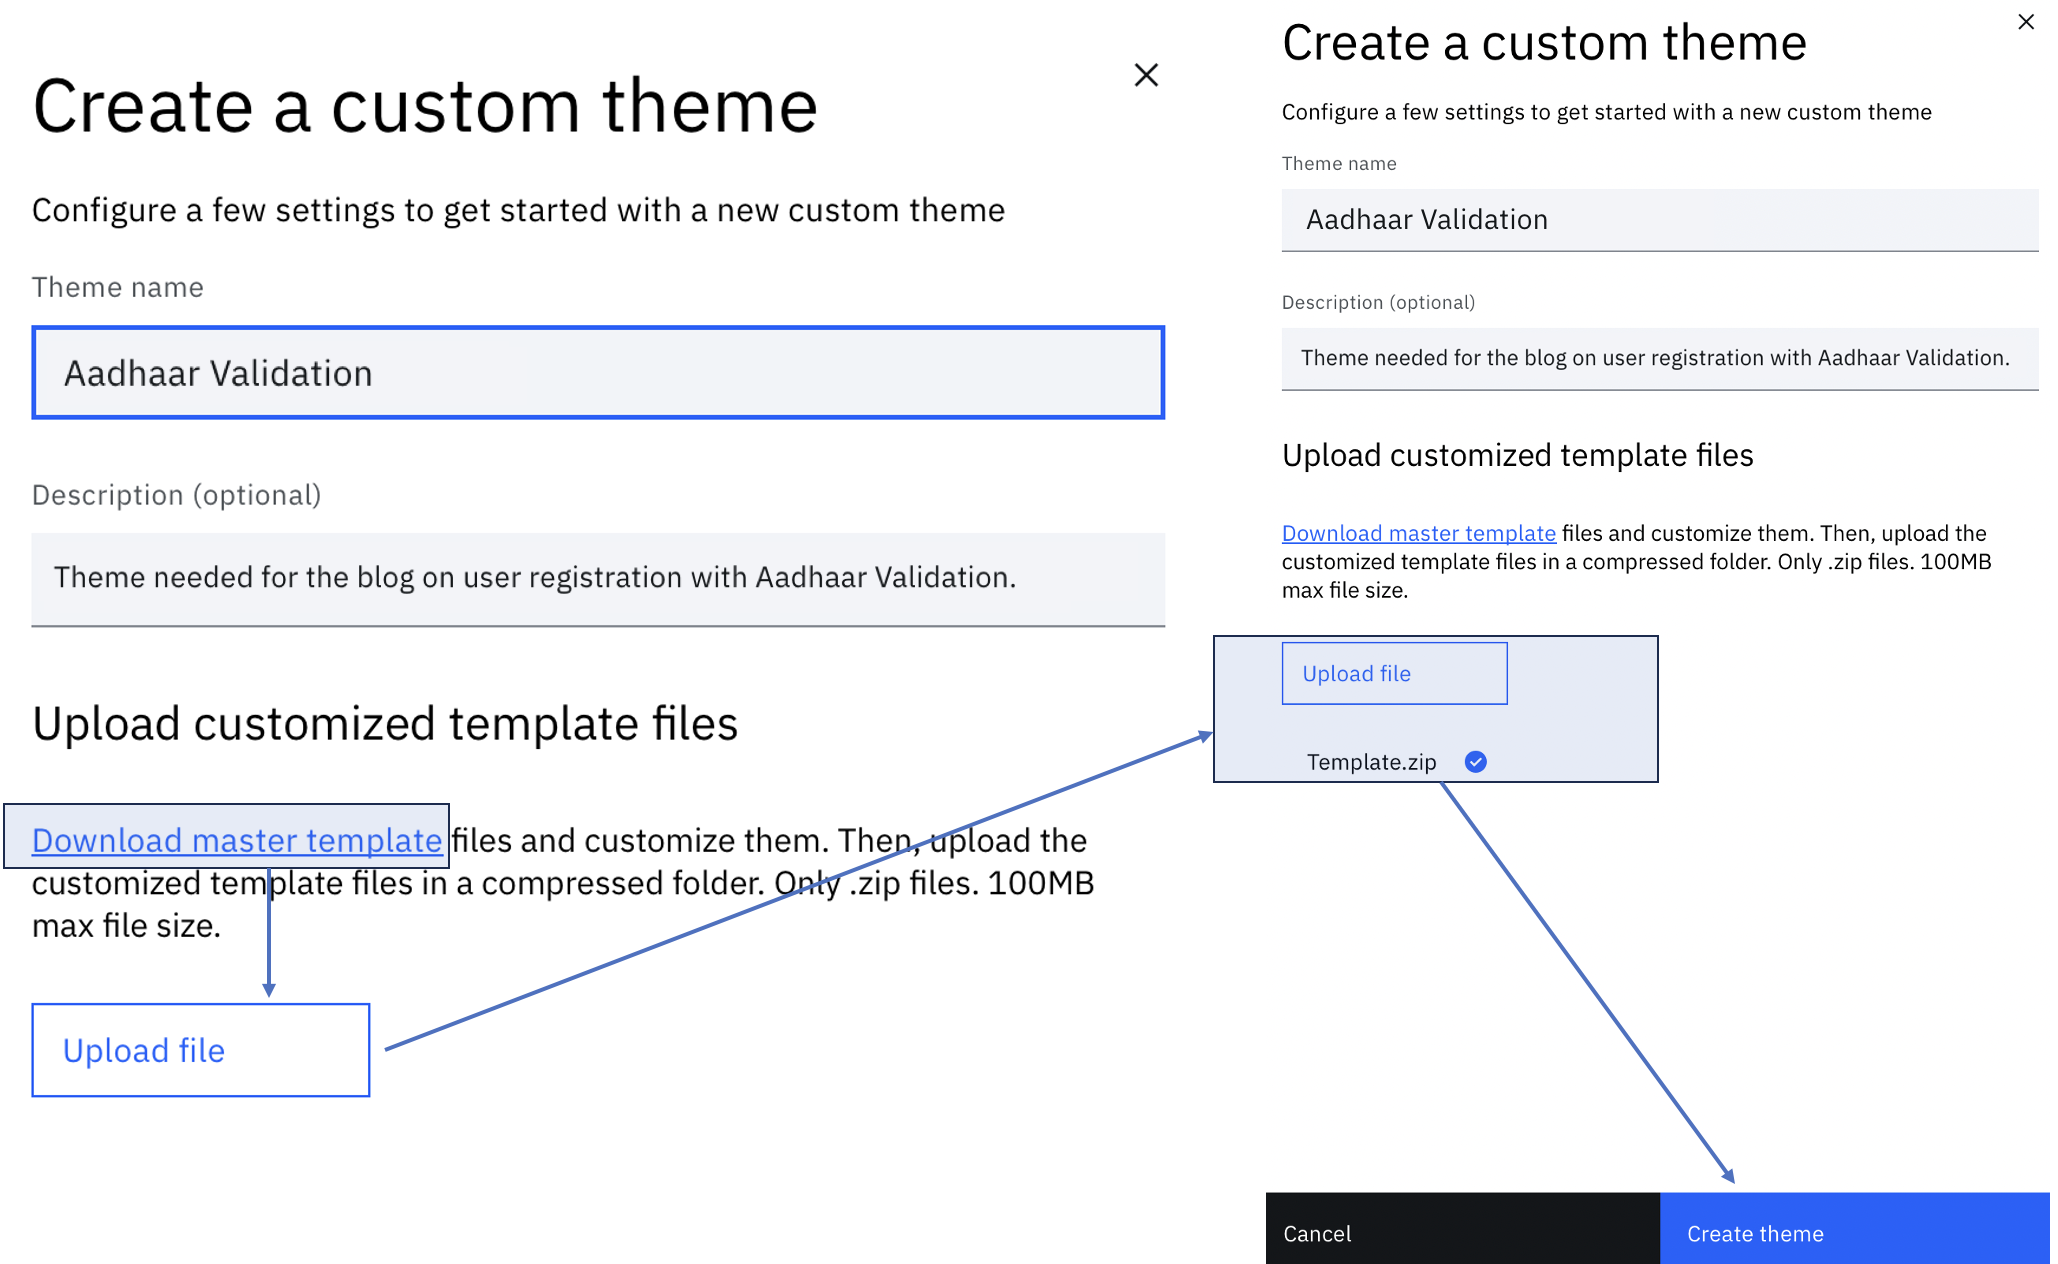
Create a new theme (for example, "Aadhaar Validation"):
 Note
NoteKeep a copy of the theme ID for later use in the workflow configuration.
-
Download the master theme template and customize the following pages:
Workflow Pages (path:
workflow/pages/):custom_page1.html: Consent page with validation resultscustom_page2.html: Success confirmation pagecustom_page3.html: Error page with detailed error messages
Error Pages (path:
workflow/error/):-
error_page.html: Generic error page
NoteGet these sample pages from the GitHub repository: verify-saas-resources
Custom page themes are associated with TrustMeInsurance for the demo purpose only. You might need to customize the pages according to your application.
-
Upload the customized pages to your theme:
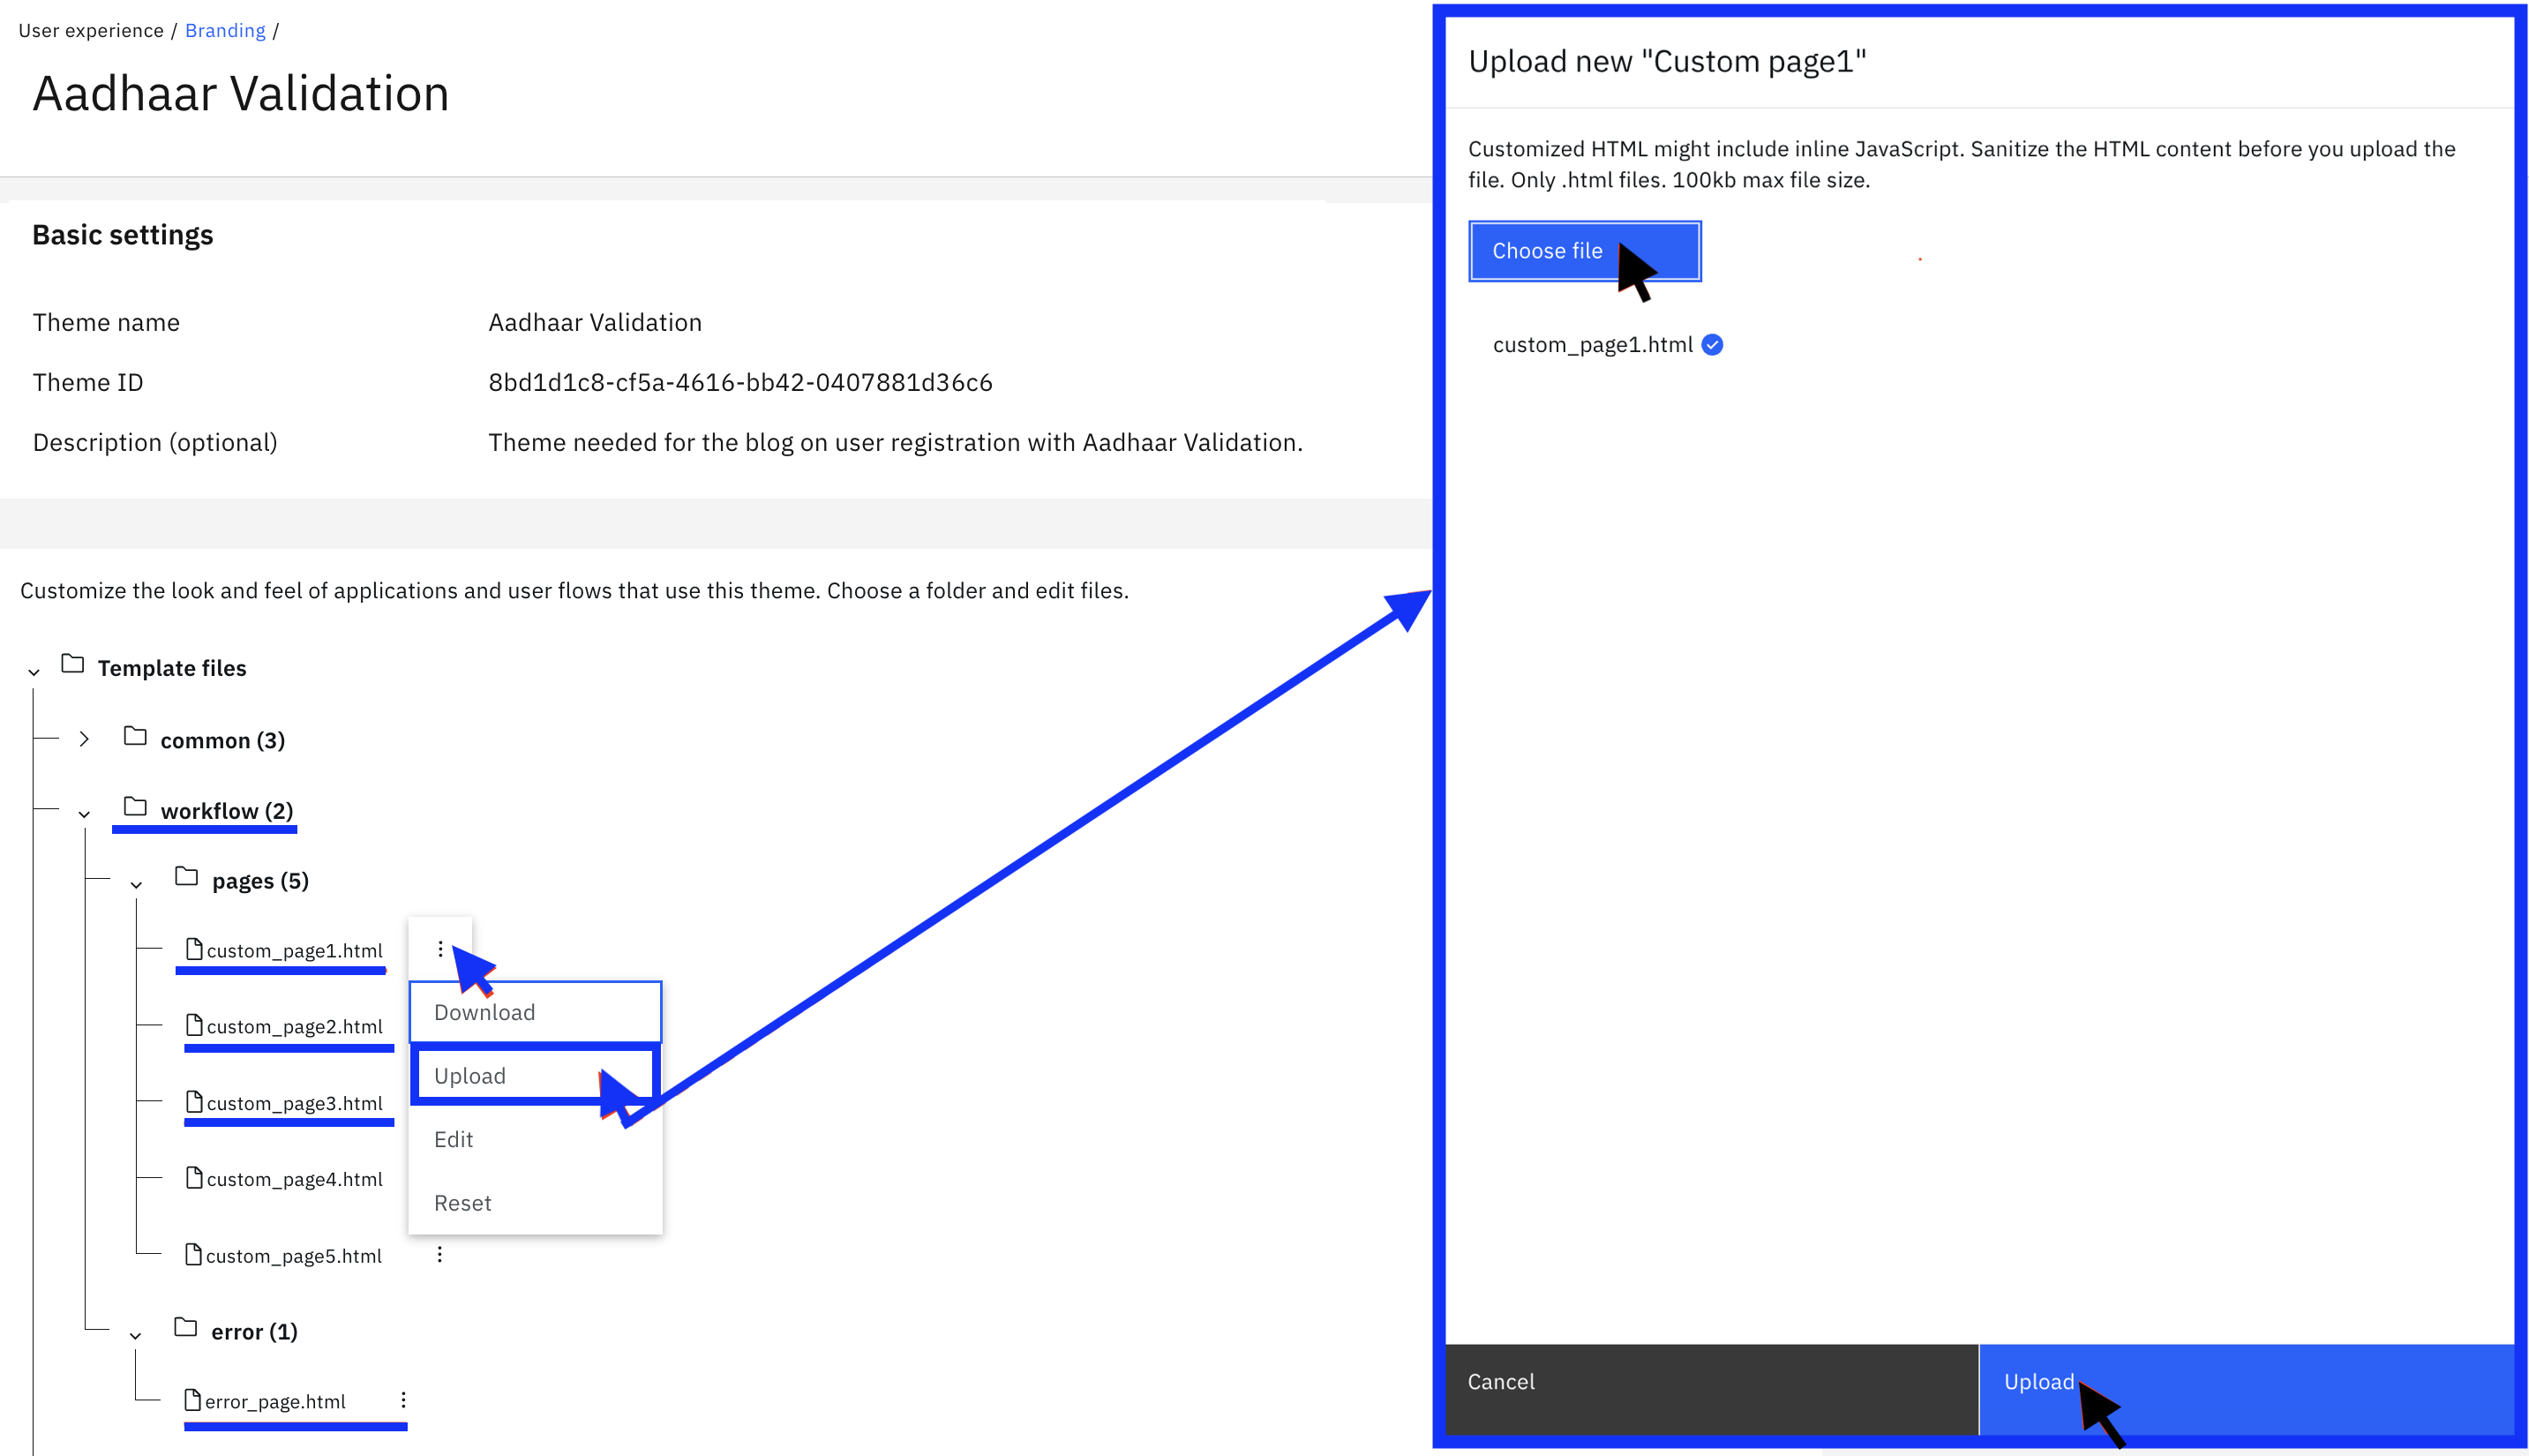
- Click the three vertical dots next to each custom page.
- Click Upload and select your customized HTML file.
Step 2: Creating Custom Attributes
This step creates custom attributes to store DigiLocker-specific information for users.
-
Log in to the IBM Verify administration console.
-
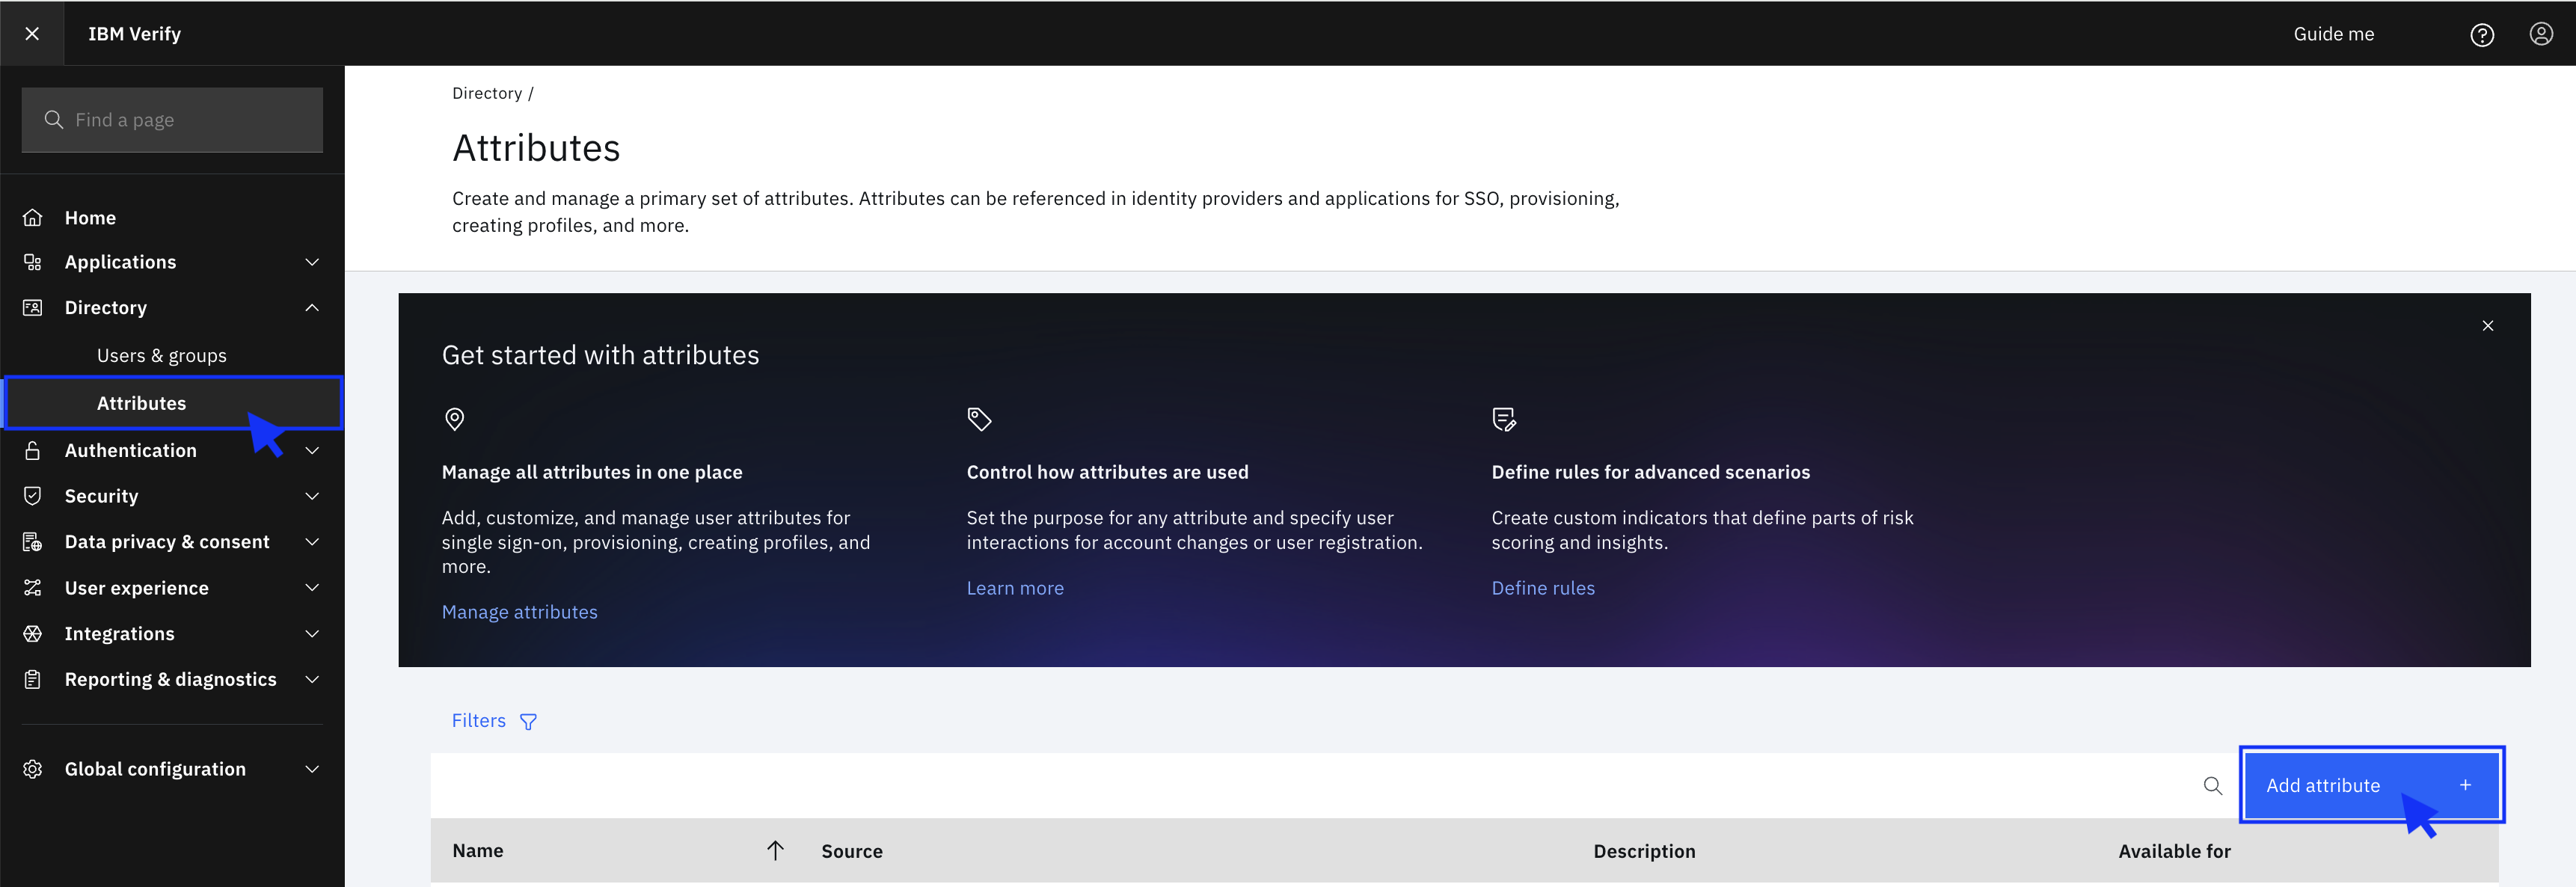
Navigate to Directory > Attributes.
-
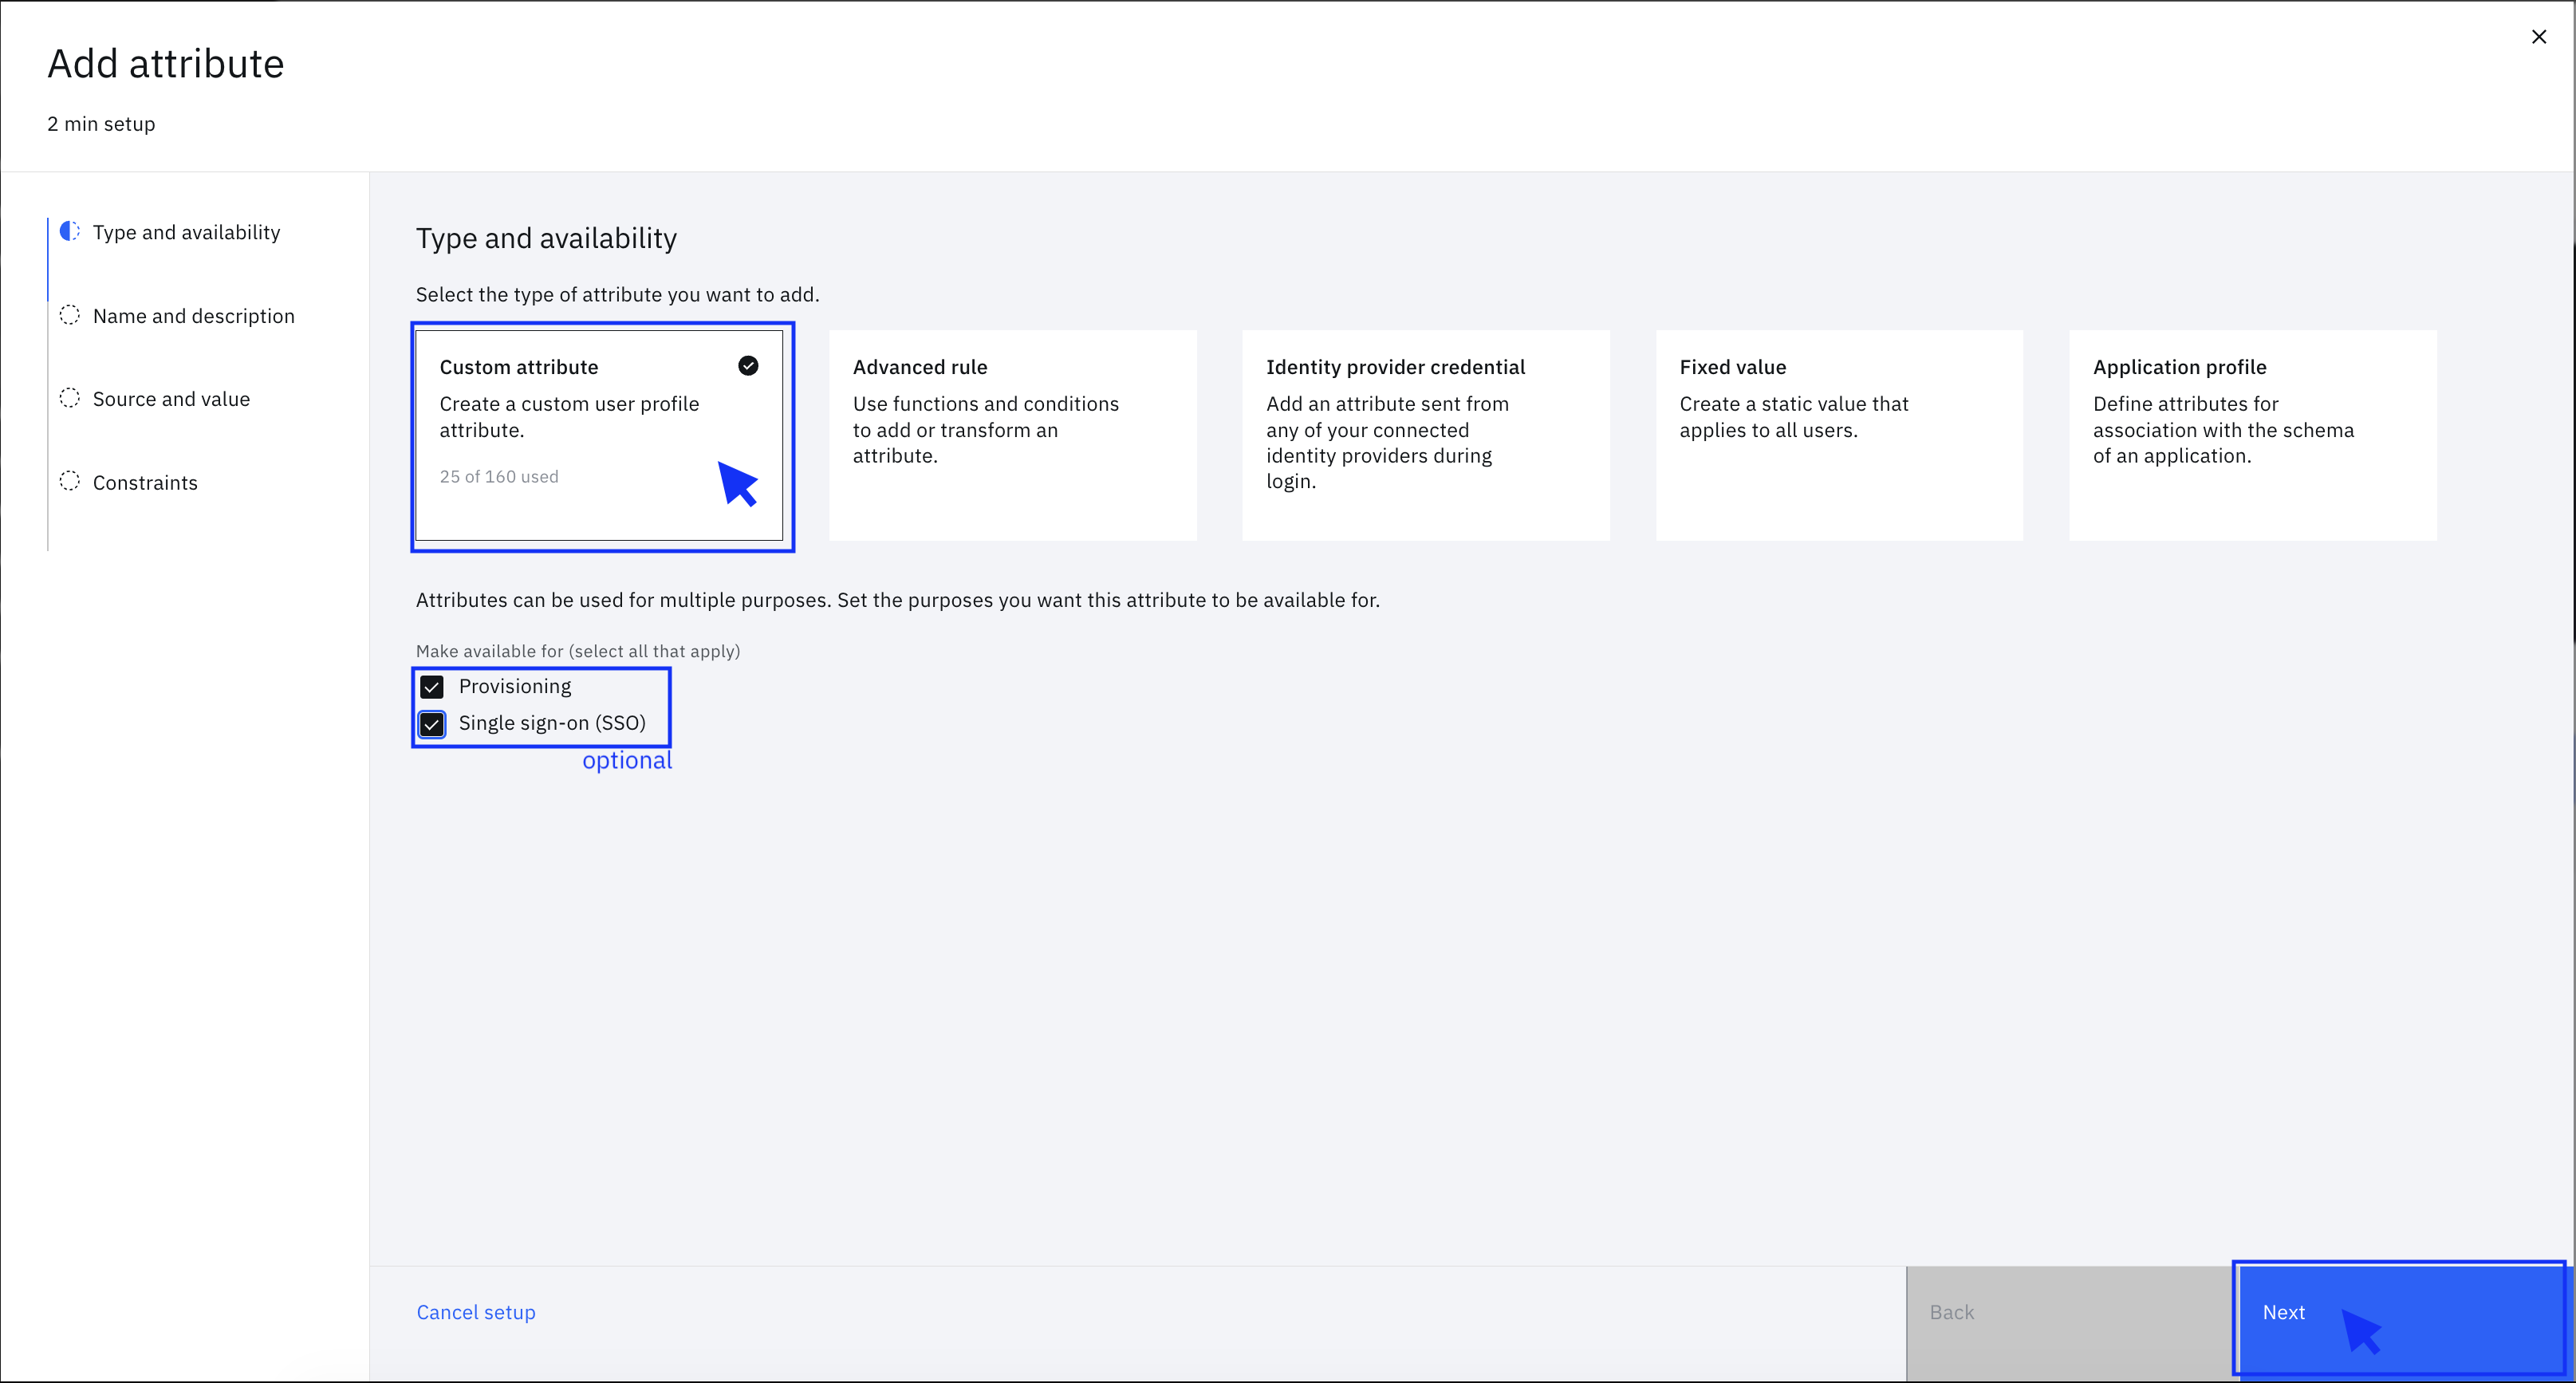
Click Add attribute:
-
Select Custom attribute. If needed, select the checkboxes for Provisioning and SSO, then click Next:
Creating the Date of Birth (DOB) Attribute
-
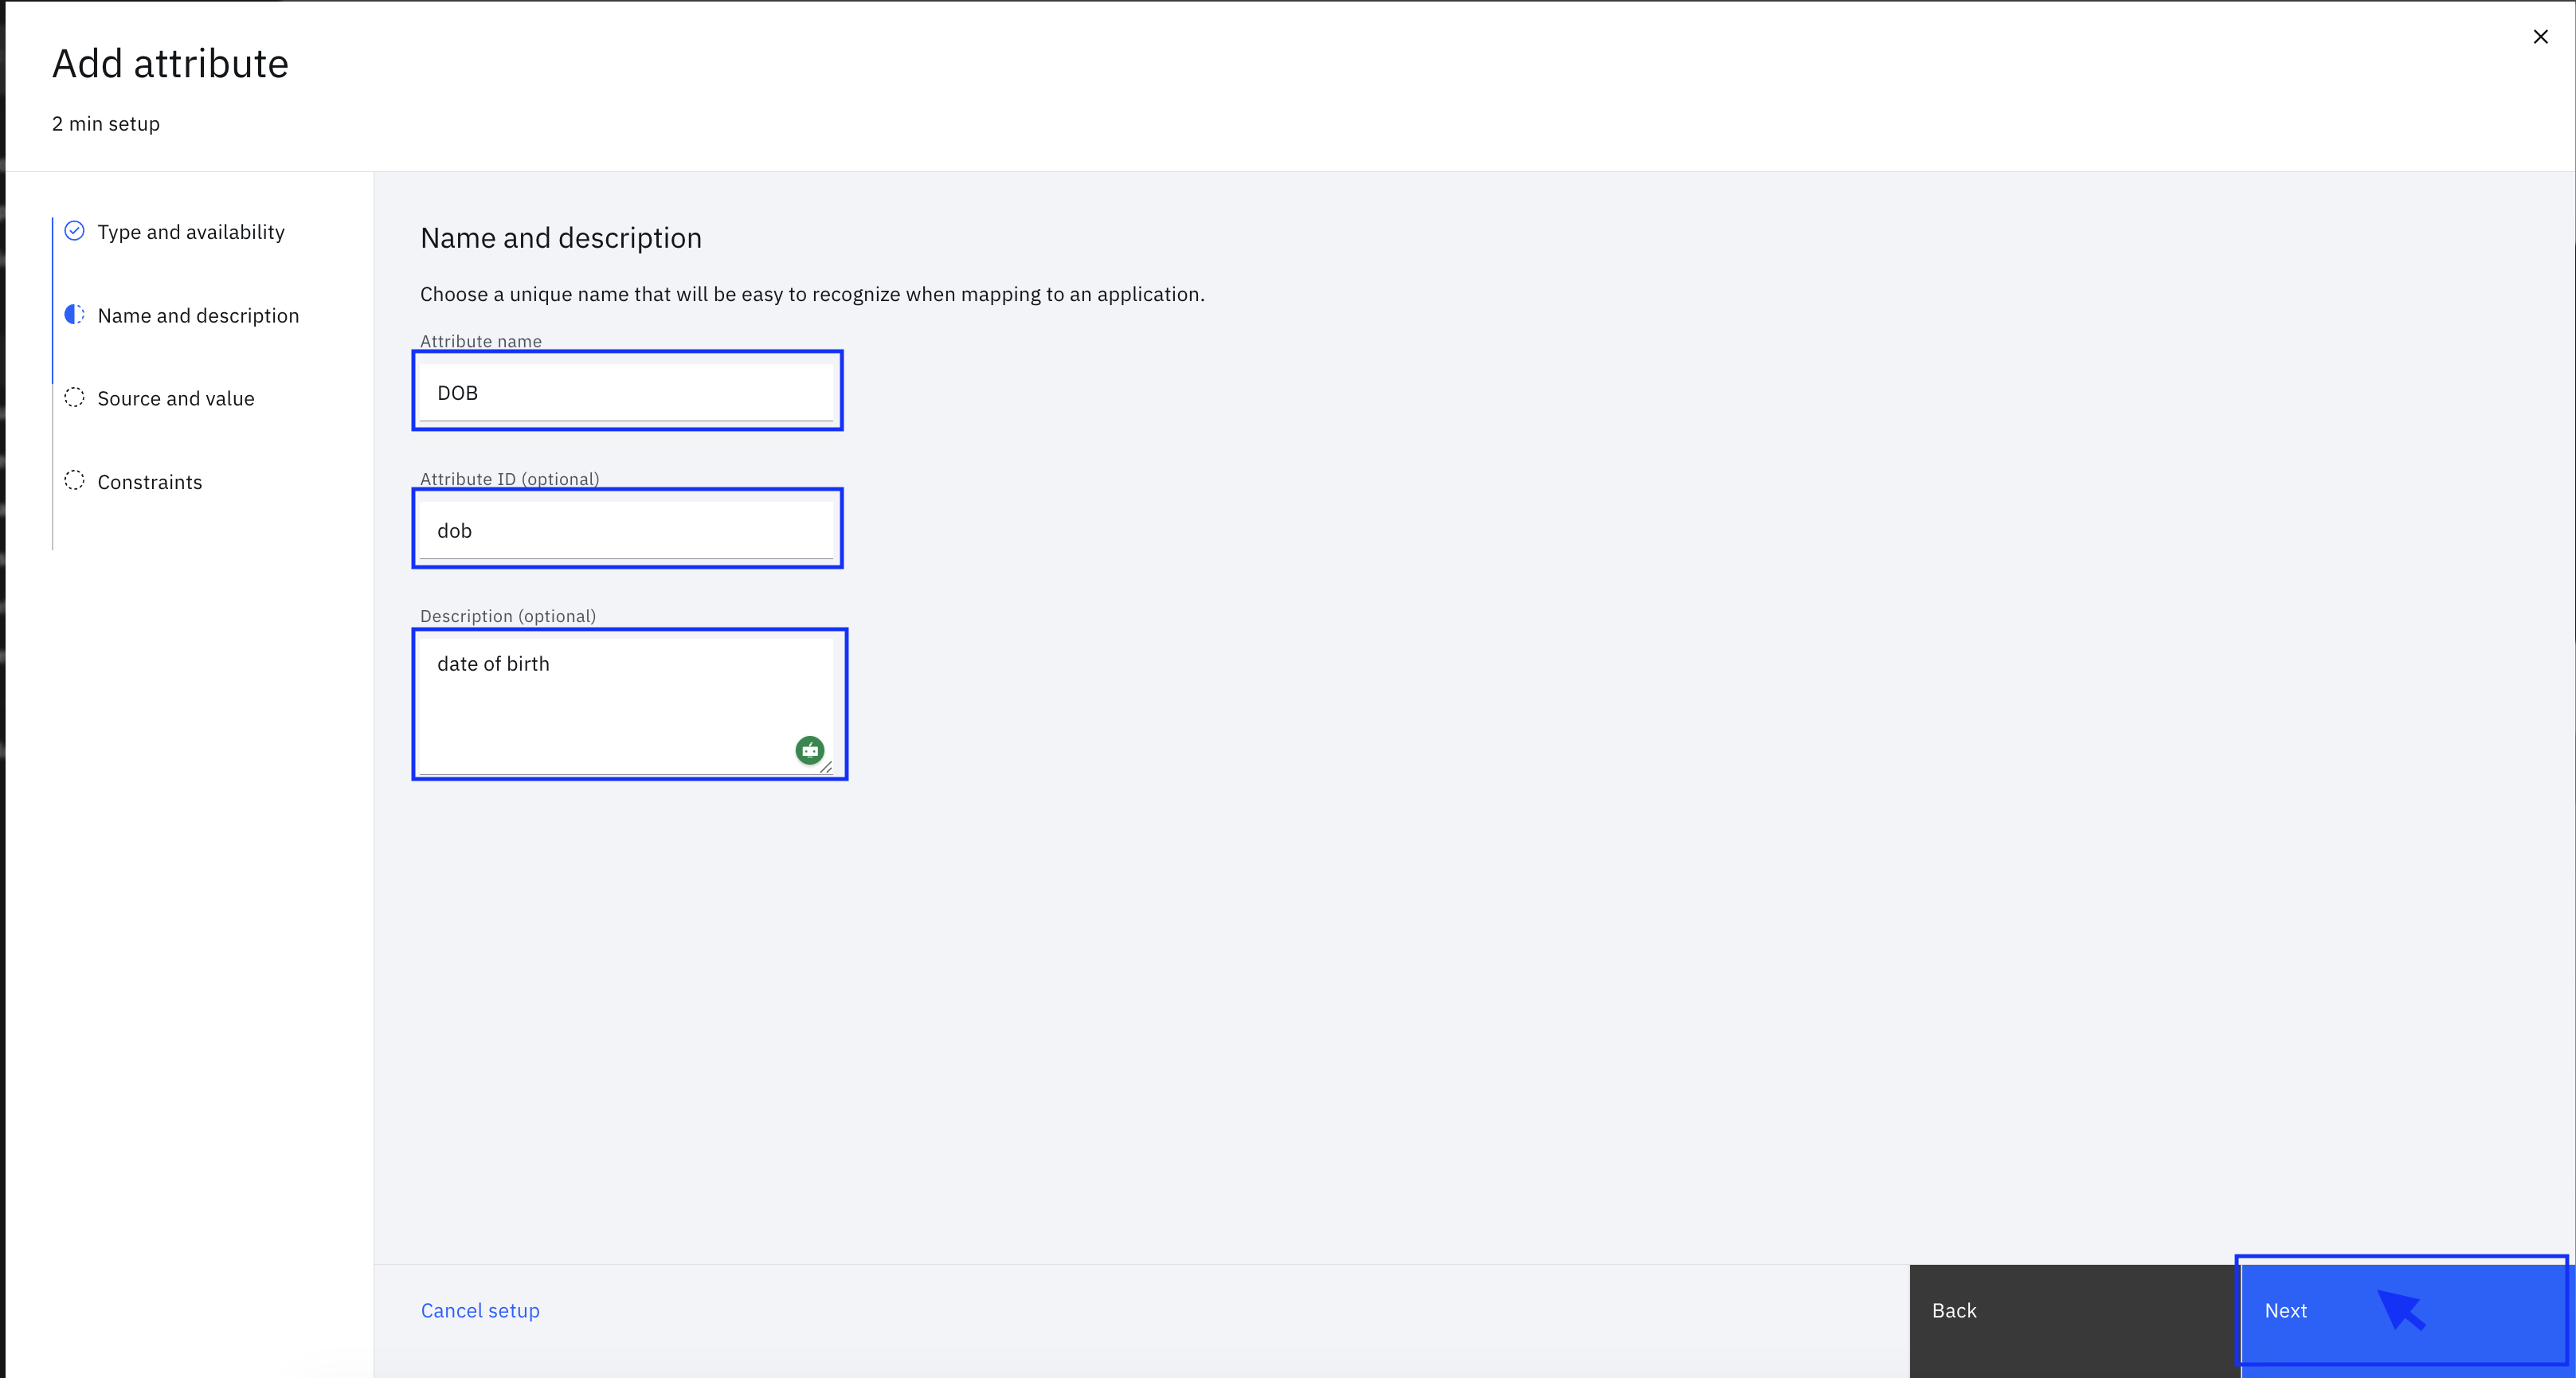
Provide the attribute details:
- Attribute name: DOB
- Attribute ID: dob
- Description: "Date of birth"
Click Next:
-
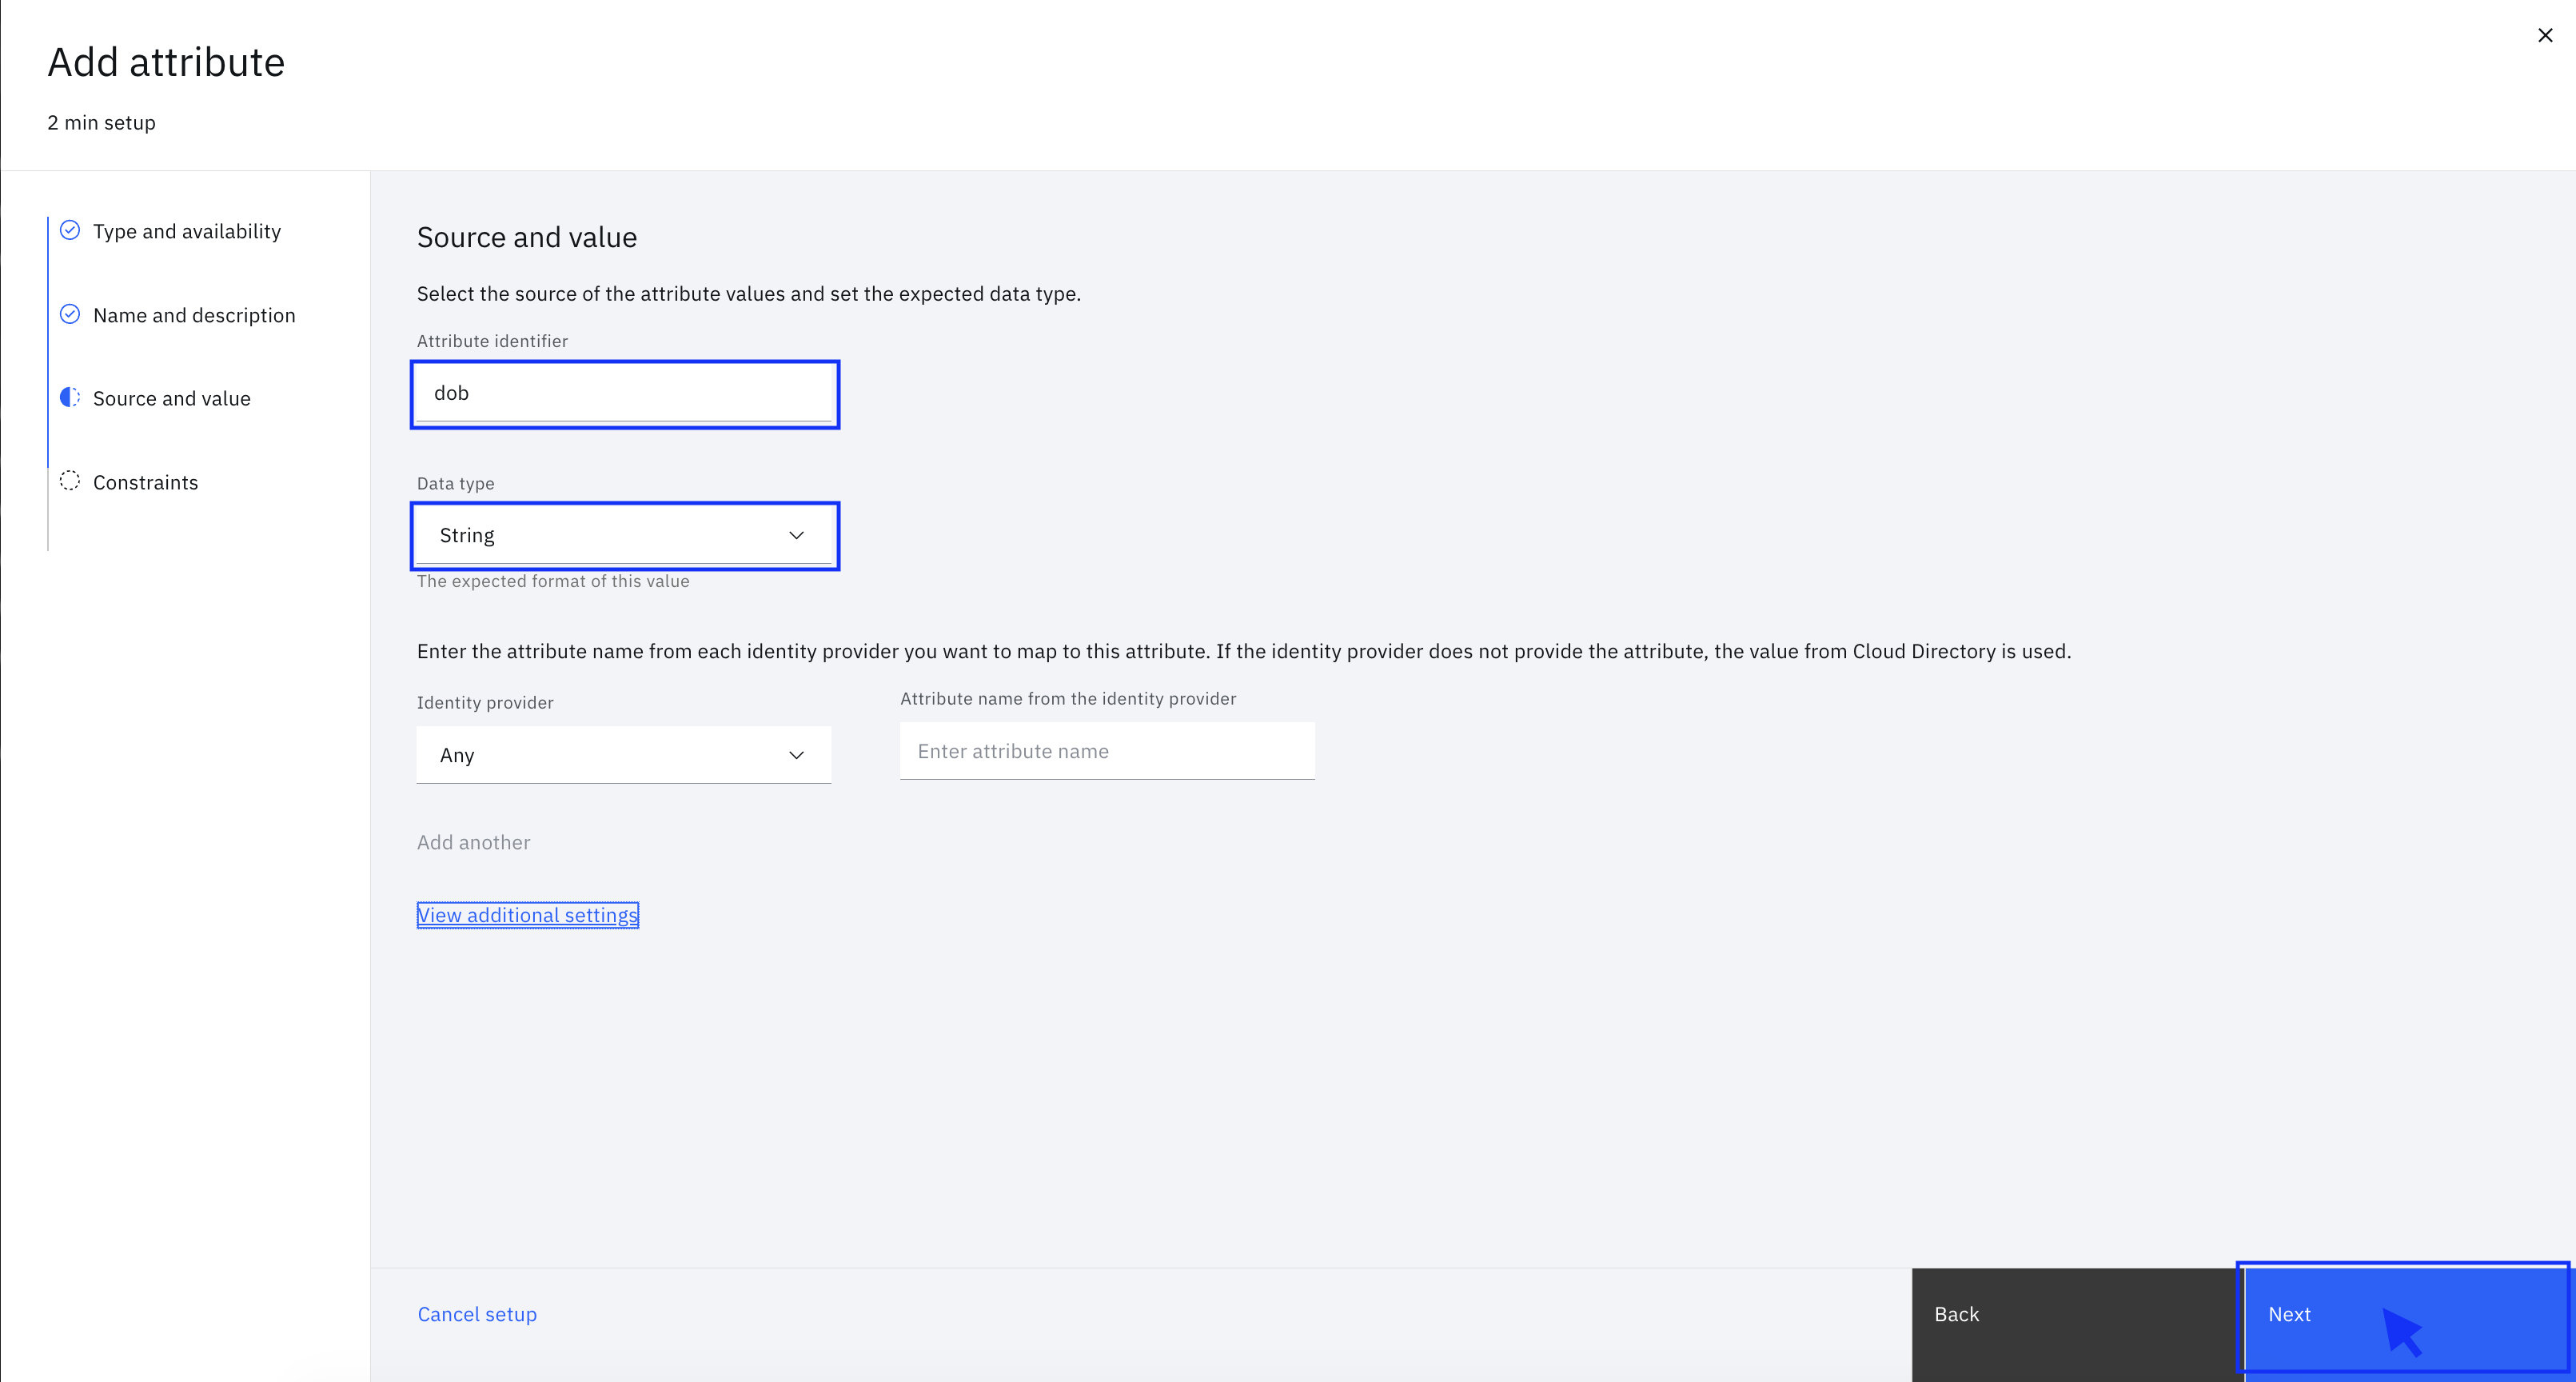
Configure the attribute type:
- Attribute identifier: dob
- Data type: String
- Can specify mapping if needed (optional)
- In "View additional settings", you can also add transformation rules (optional)
Click Next:
-
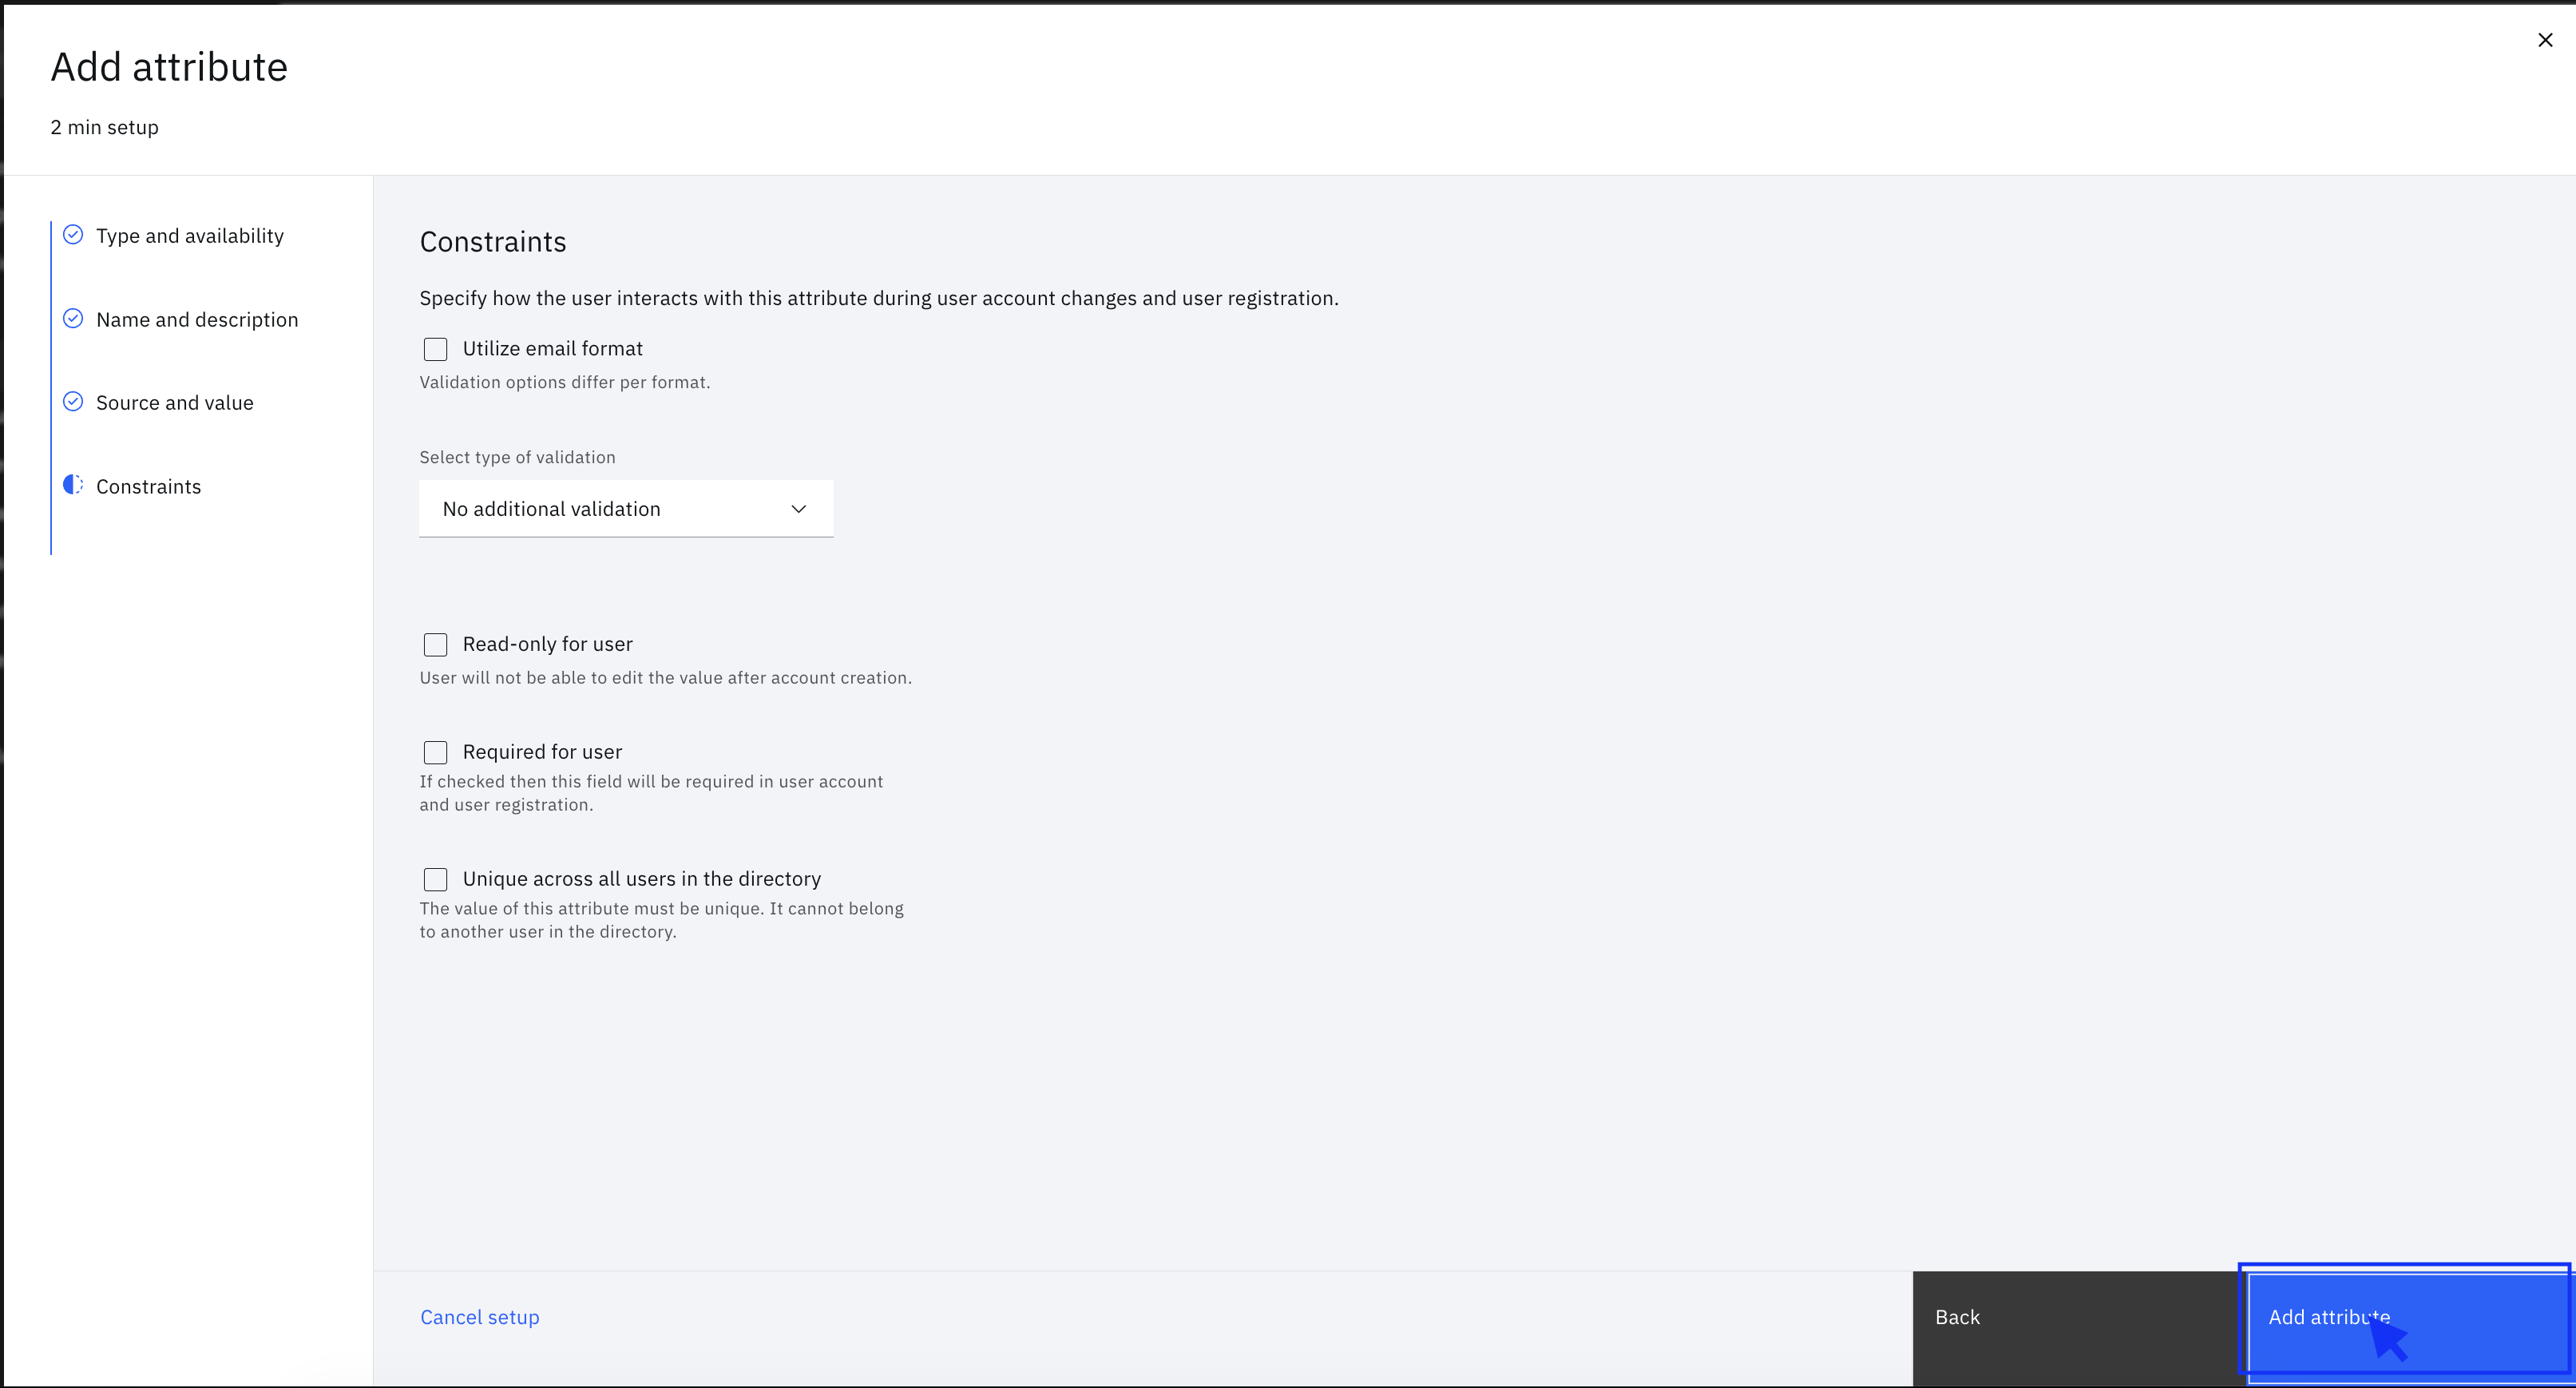
Add validations if needed, then click Add attribute:
Creating Additional DigiLocker Attributes
Repeat the preceding steps to create the following attributes:
DigiLocker Timestamp Attribute:
- Attribute name: DigiLocker Timestamp
- Attribute ID: digilockerTimestamp
- Data type: String
- Validation: Read-only for user
DigiLocker ID Attribute:
- Attribute name: DigiLocker ID
- Attribute ID: digilockerId
- Data type: String
- Validation: Read-only for user, unique across all users in the directory
DigiLocker State Attribute:
- Attribute name: DigiLocker State
- Attribute ID: digilockerStatus
- Data type: String
- Validation: Read-only for user
Step 3: Configuring the User Forms
NoteThe current article provides the steps to create a single user form with specific fields to demonstrate the basic registration flow. The flow can be expanded to include more attributes and forms, based on the individual needs of registration.
-
Log in to the IBM Verify administration console.
-
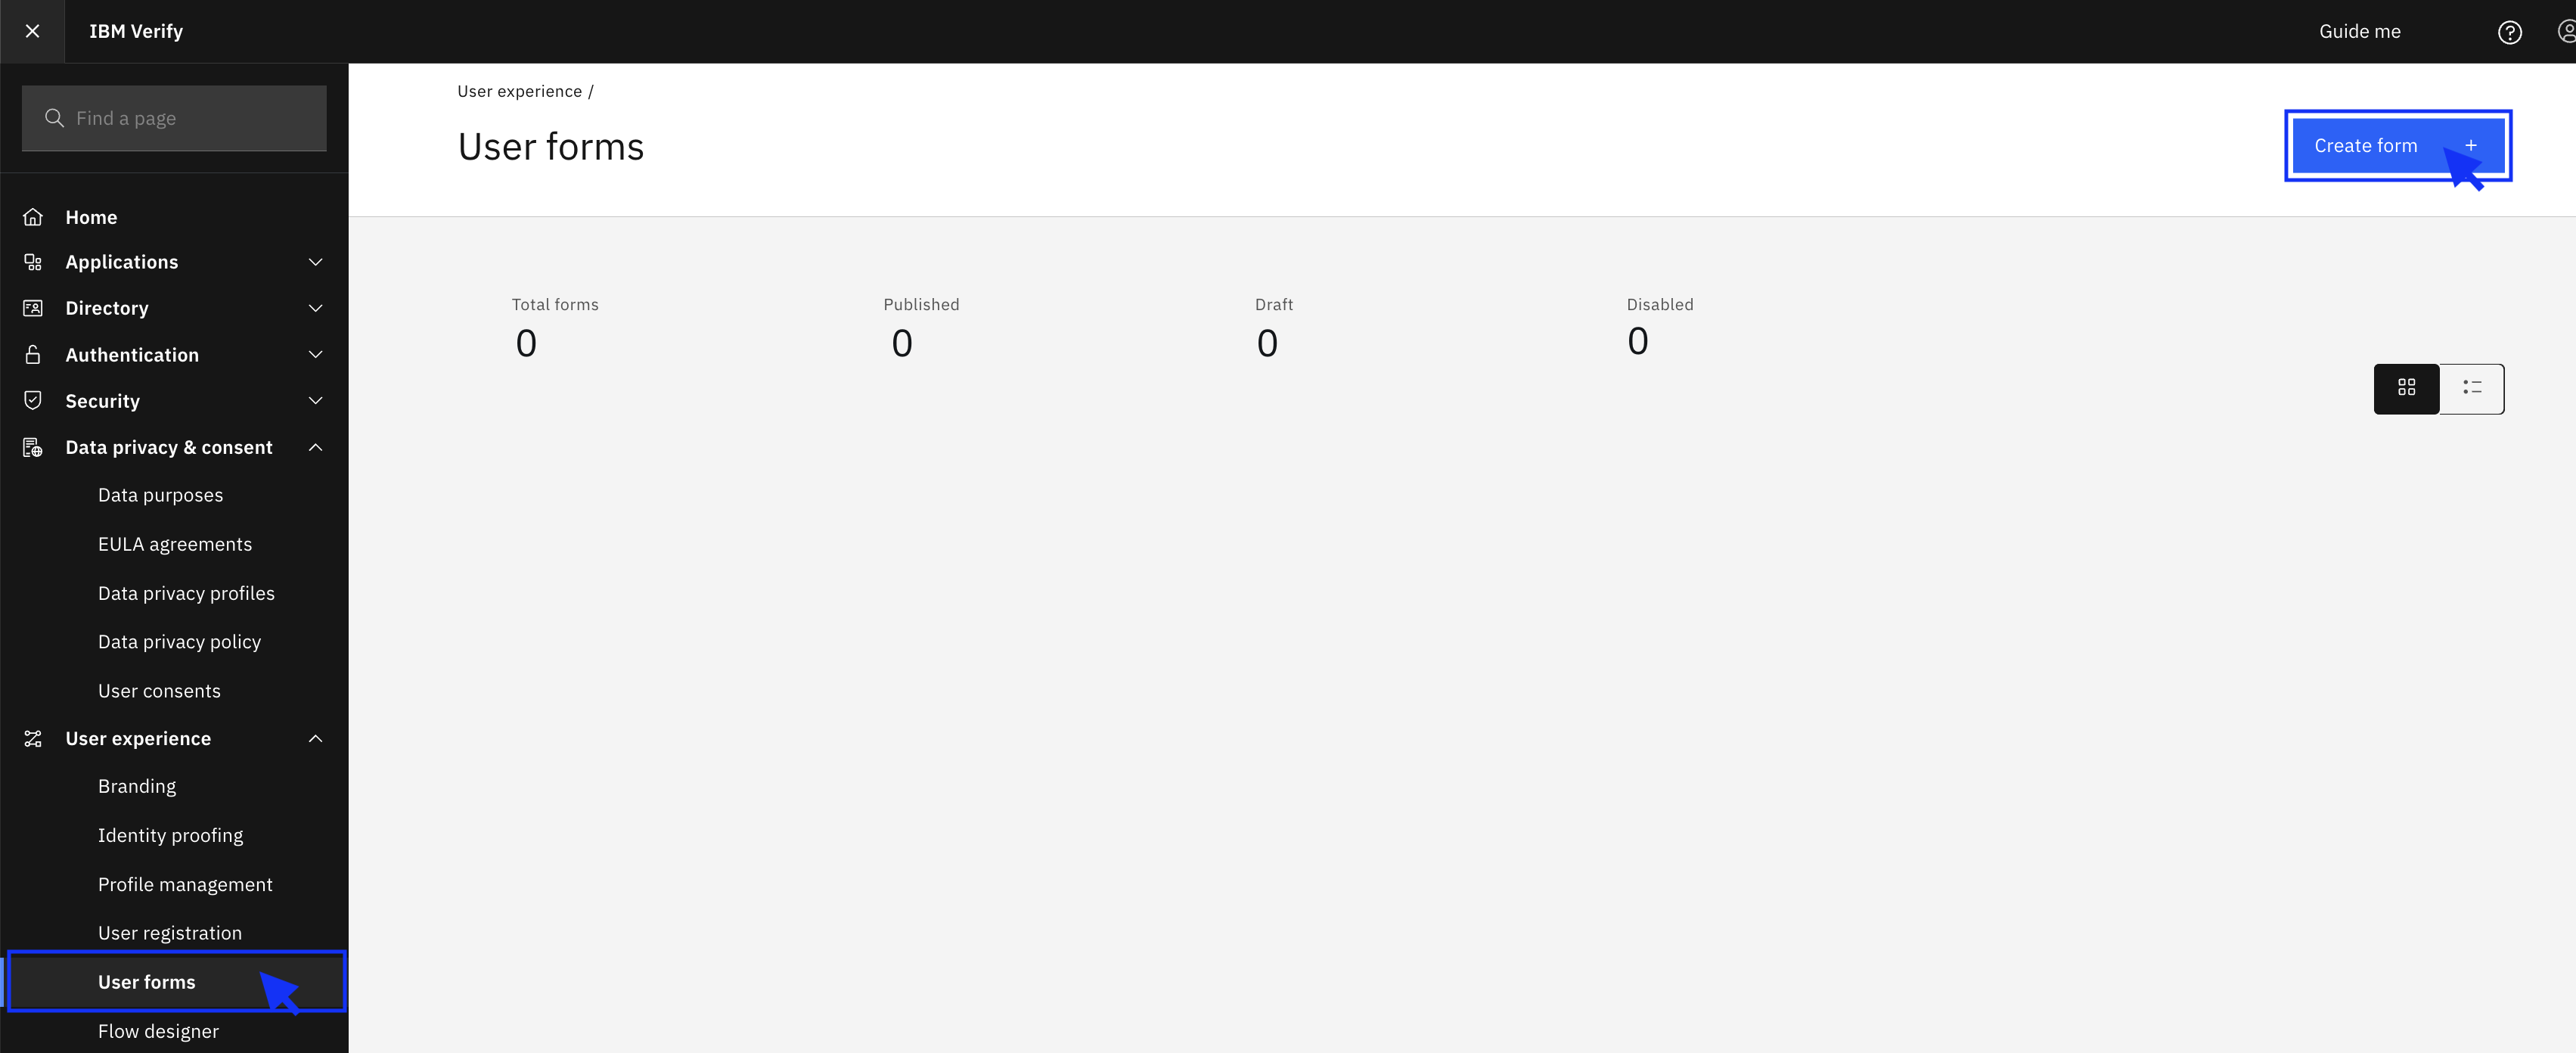
Navigate to User experience > User forms > Create form:
-
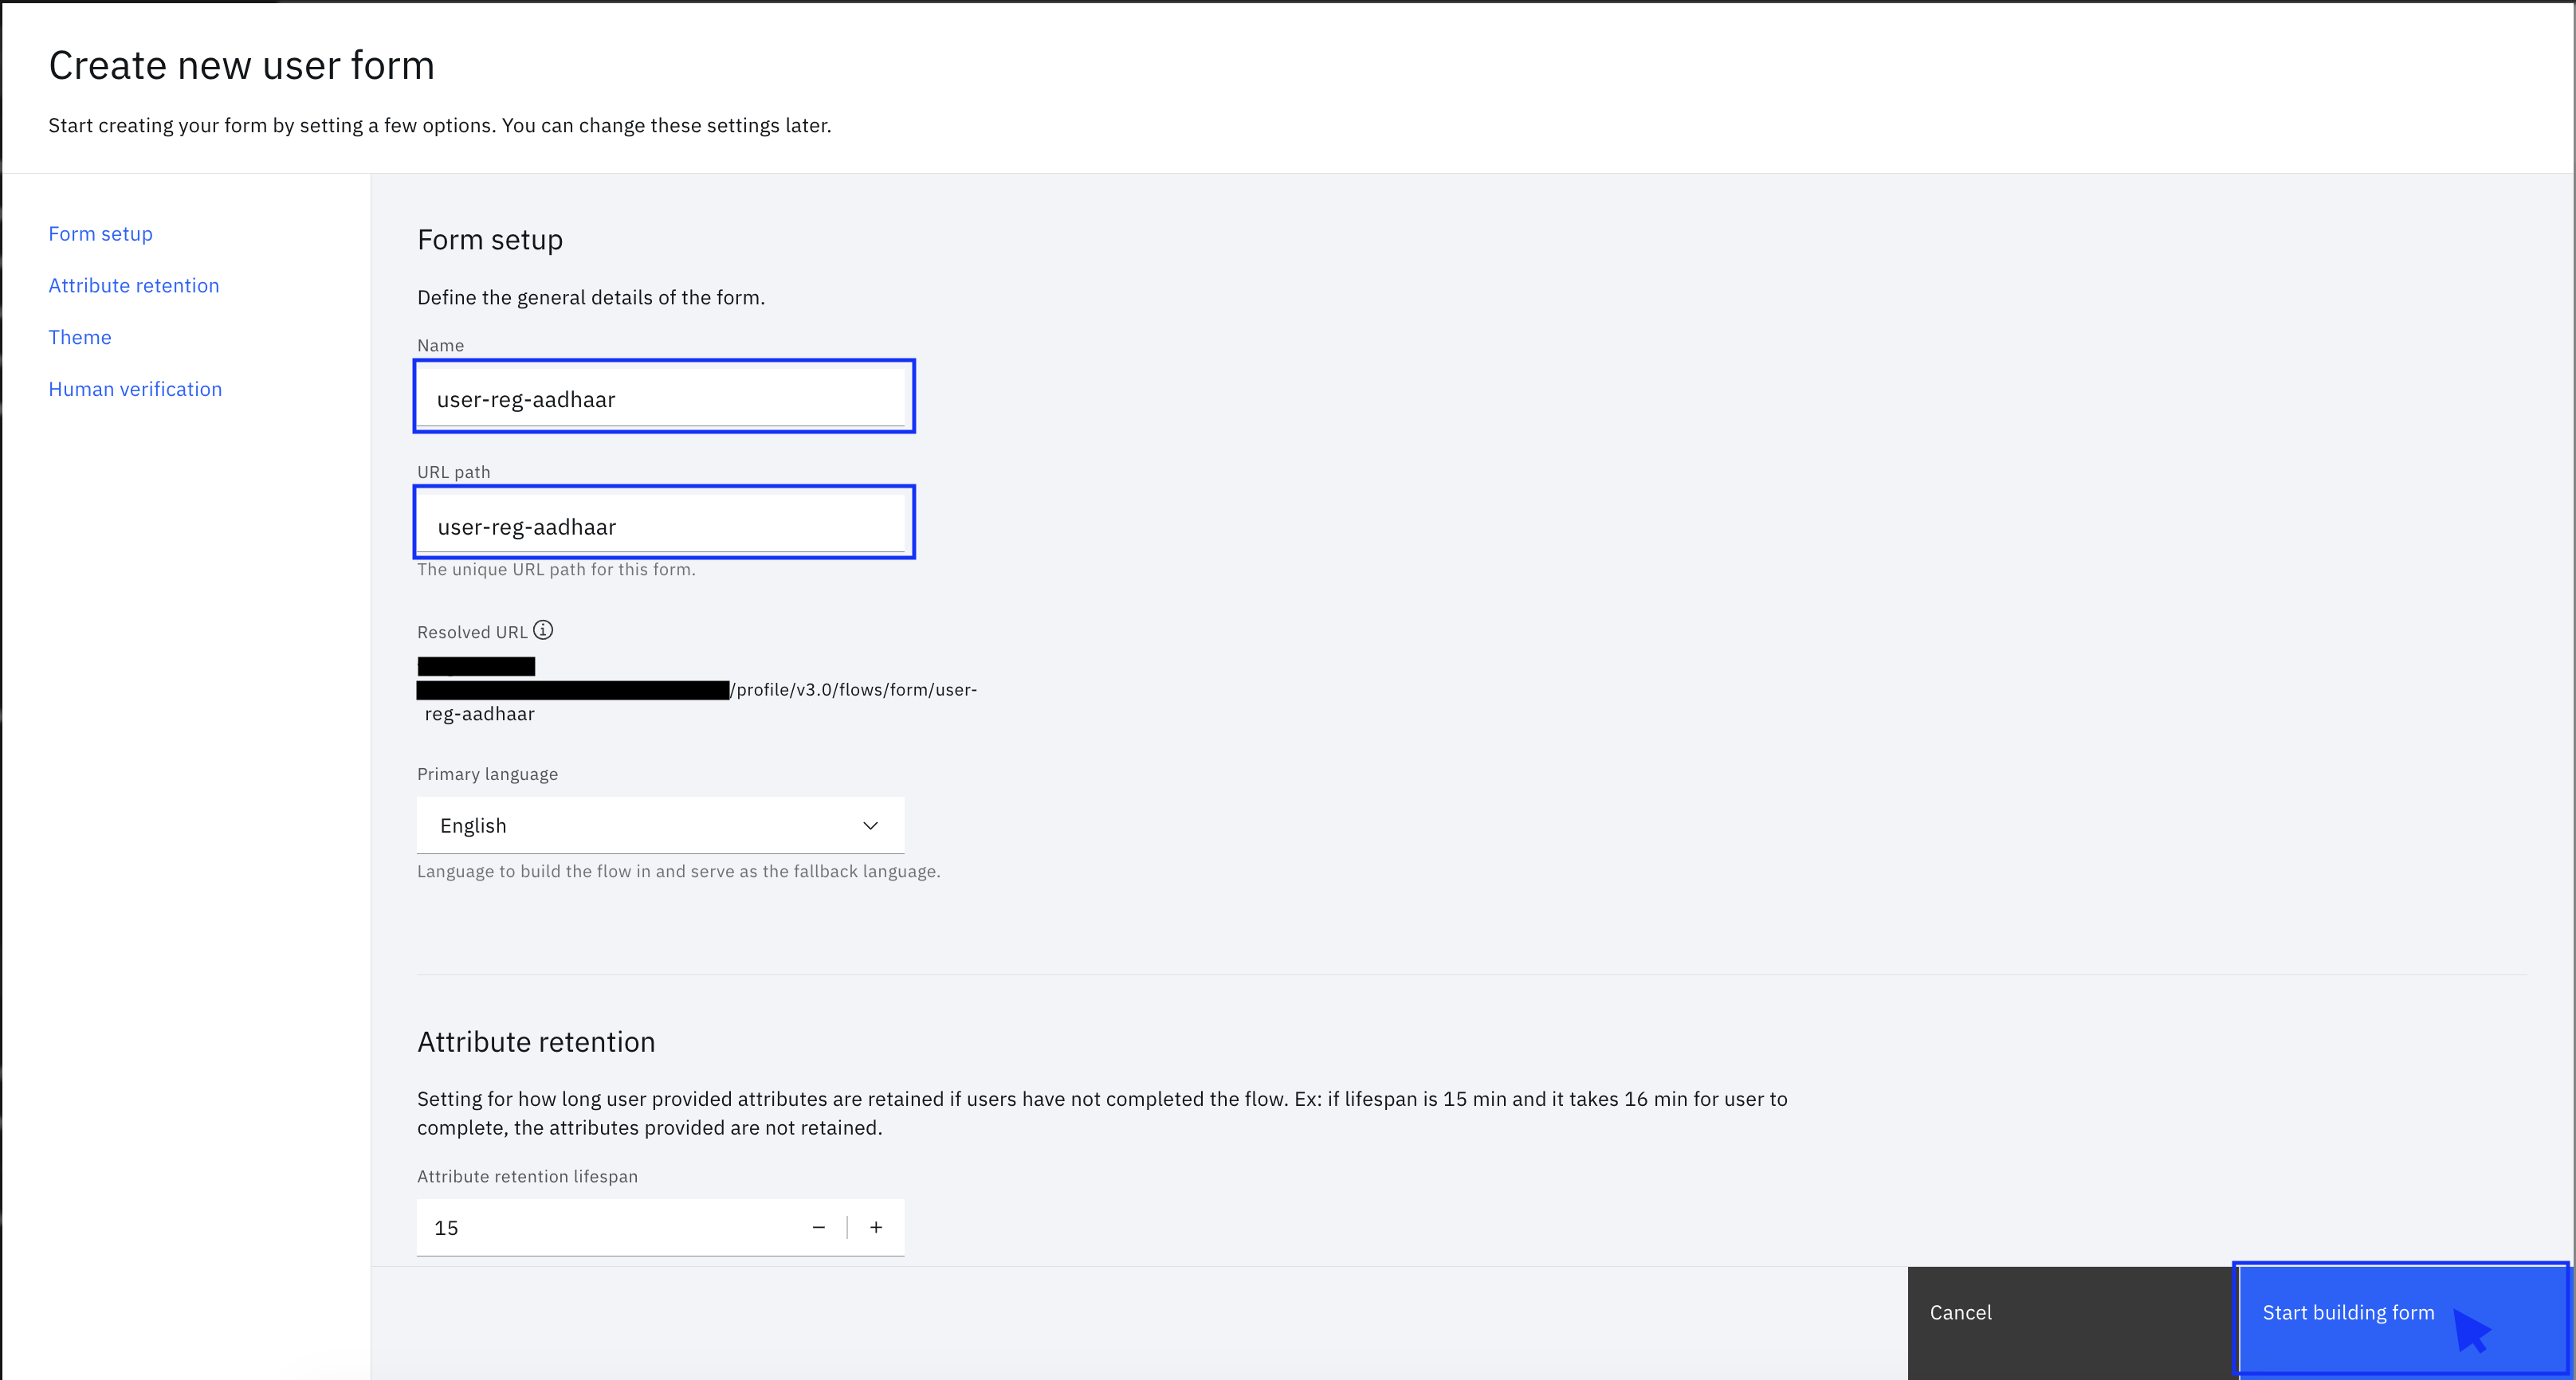
Enter a form name, for example, user-reg-aadhaar. You can also customize settings such as Primary language, Session management, Theme, and Human Verification.
-
Click Start building form:
-
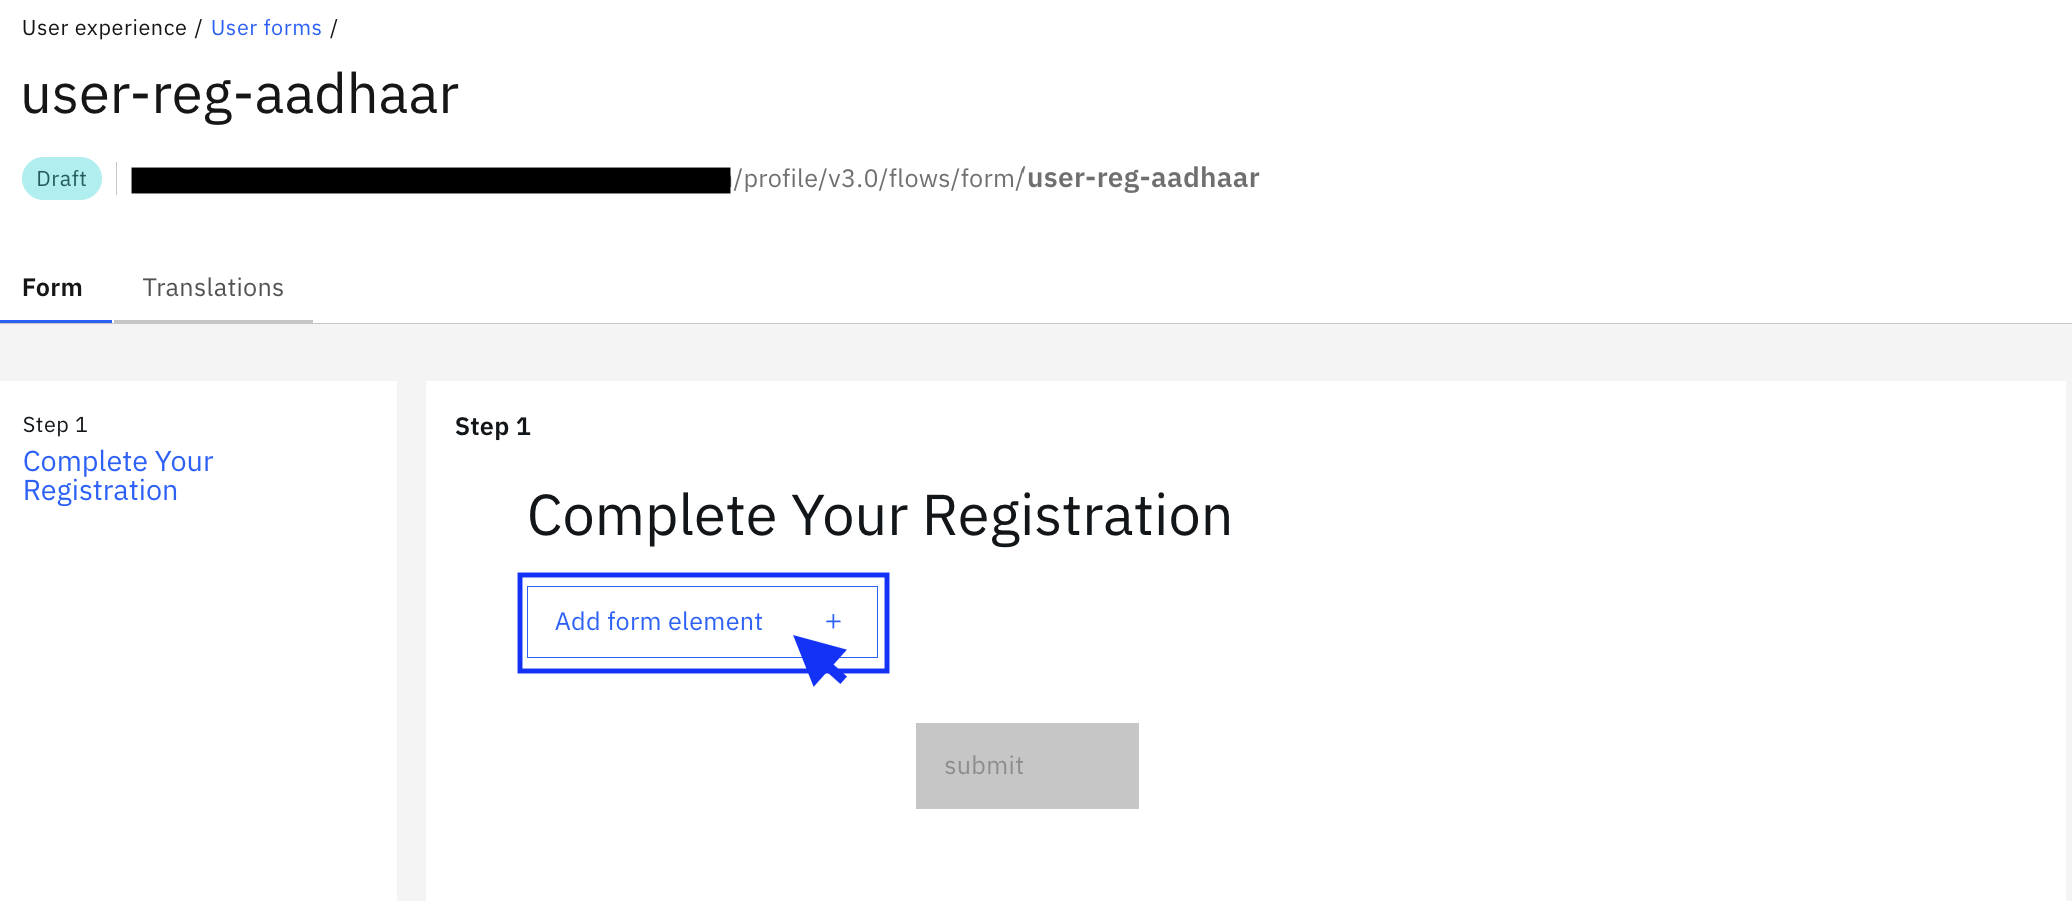
Clear all default elements and click Add form element:
Adding Full Name Field
-
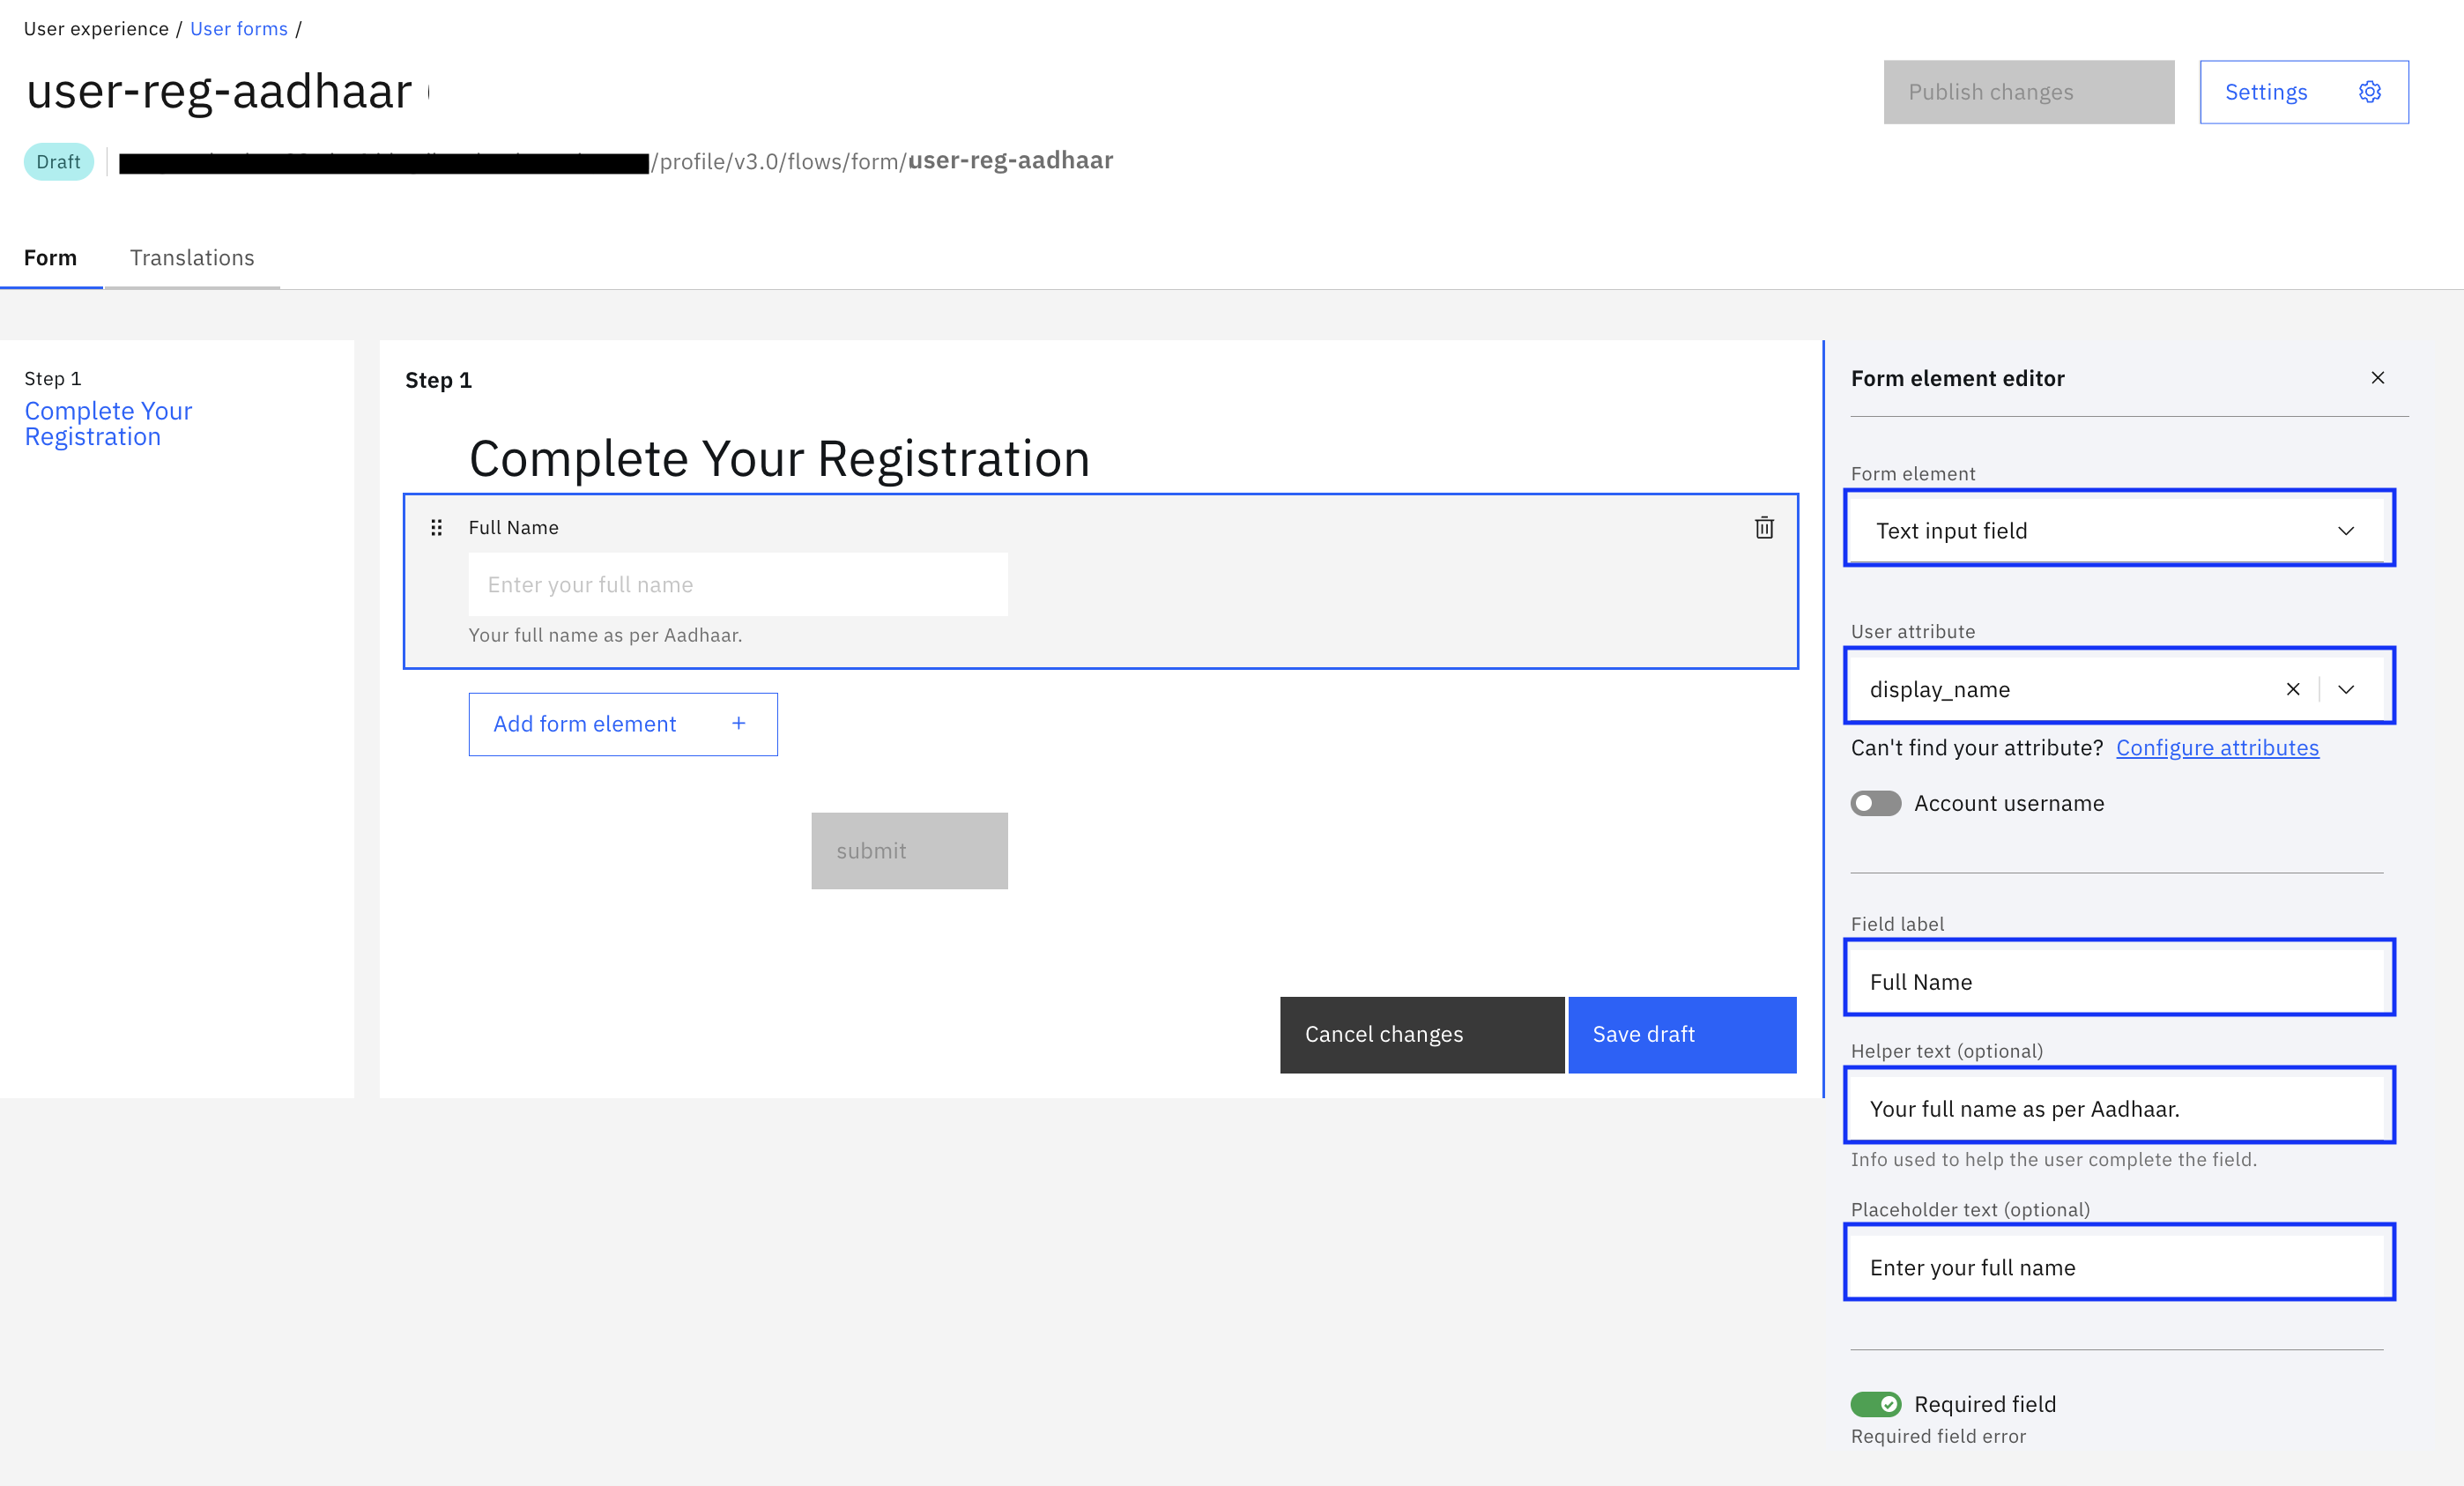
Add an element to collect the full name with the following configuration:
- Form element: Text input field
- User attribute: display_name
- Field label: Full Name
- Helper text: Your full name as per Aadhaar.
- Placeholder text: Enter your full name
- Required field: Enabled
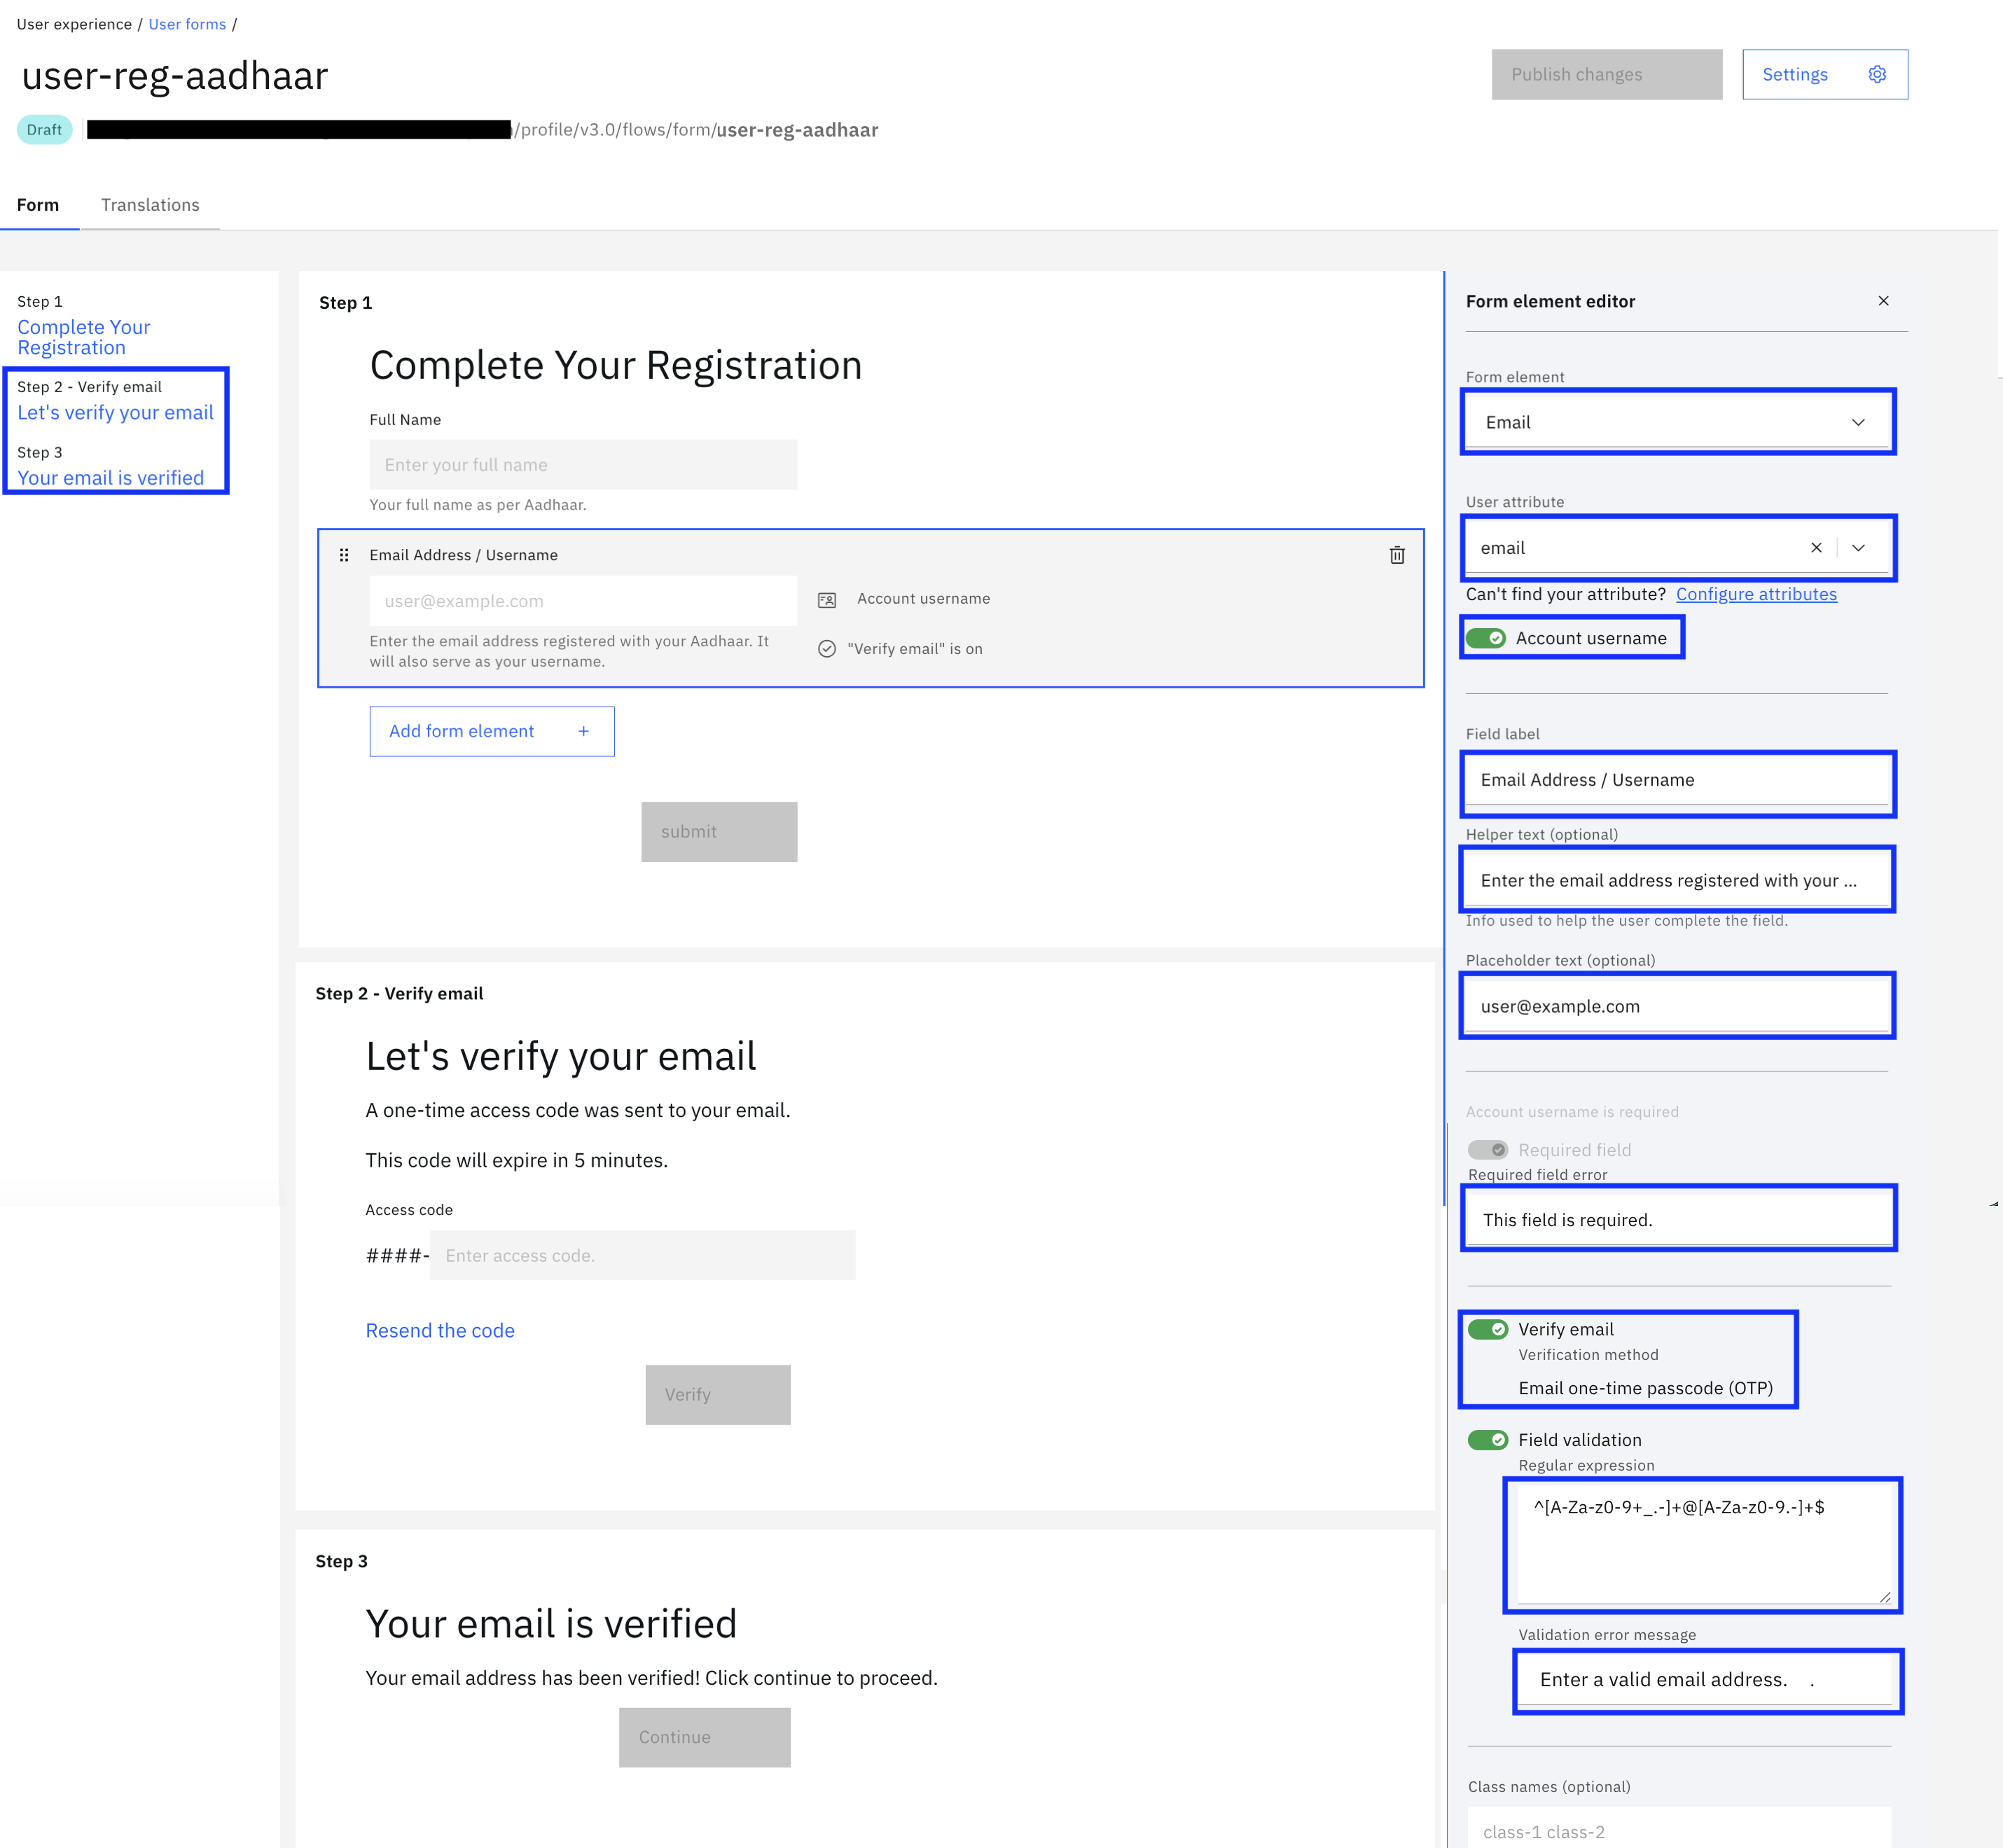
Adding Email Address Field
-
Add an element to collect the email address with the following configuration:
- Form element: Email
- User attribute: email
- Account username: Enabled
- Field label: Email Address / Username
- Helper text: Enter the email address registered with your Aadhaar. It will also serve as your username.
- Placeholder text: [email protected]
- Required field: Enabled
- Required field error: This field is required.
- Verify email: Enabled (this creates 2 additional steps: "Let's verify your email" and "Email verified")
- Verification method: Email one-time passcode (OTP)
- Field validation (regex):
^[A-Za-z0-9+_.-]+@[A-Za-z0-9.-]+$- This regex validates standard email format: alphanumeric characters, plus signs, underscores, periods, and hyphens before the @ symbol, followed by a domain name
- Validation error message: Enter a valid email address.
Adding Mobile Number Field
-
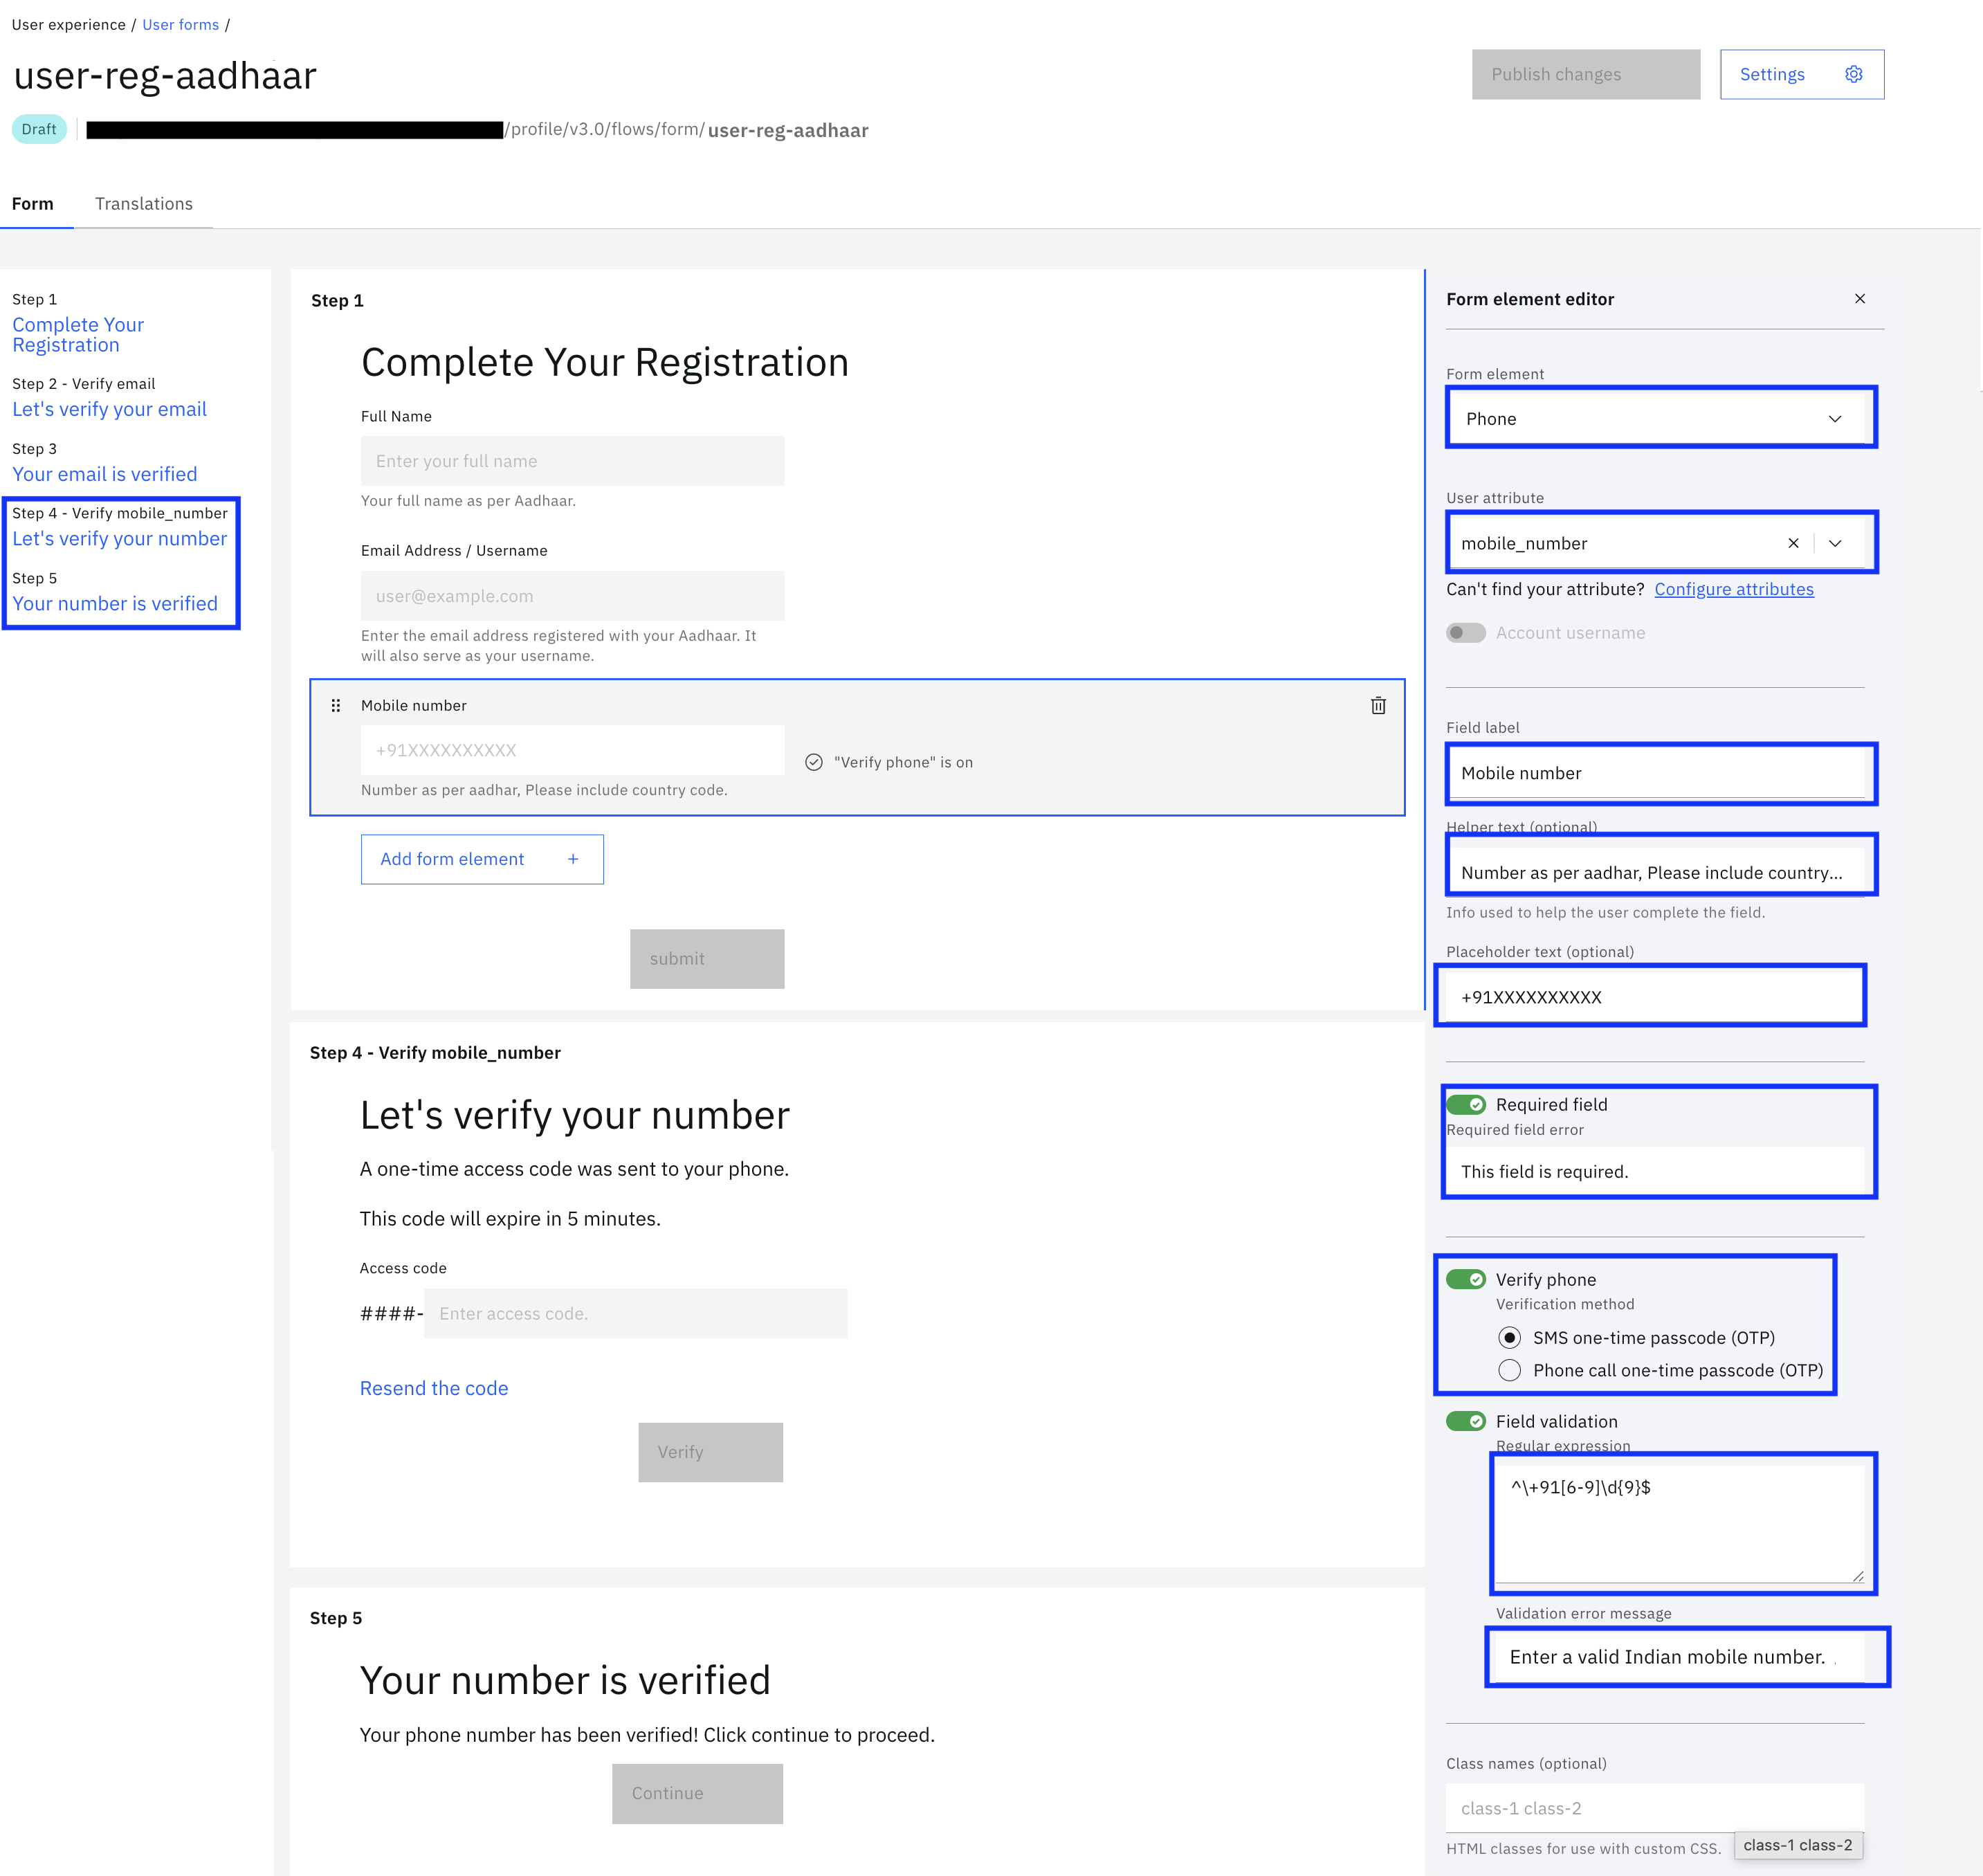
Add an element to collect the mobile number with the following configuration:
- Form element: Phone
- User attribute: mobile_number
- Account username: Disabled
- Field label: Mobile number
- Helper text: Number as per Aadhaar. Include country code.
- Placeholder text: +91XXXXXXXXXX
- Required field: Enabled
- Required field error: This field is required.
- Verify phone: Enabled (this creates 2 additional steps: "Let's verify your phone" and "Phone verified")
- Verification method: SMS one-time passcode (OTP) (Phone call OTP is also available as an option)
- Field validation (regex):
^\+91[6-9]\d{9}$- This regex validates Indian mobile numbers: starts with +91 (country code), followed by a digit between 6-9 (valid starting digits for Indian mobile numbers), and exactly 9 more digits
- Validation error message: Enter a valid Indian mobile number.
Adding Date of Birth Field
-
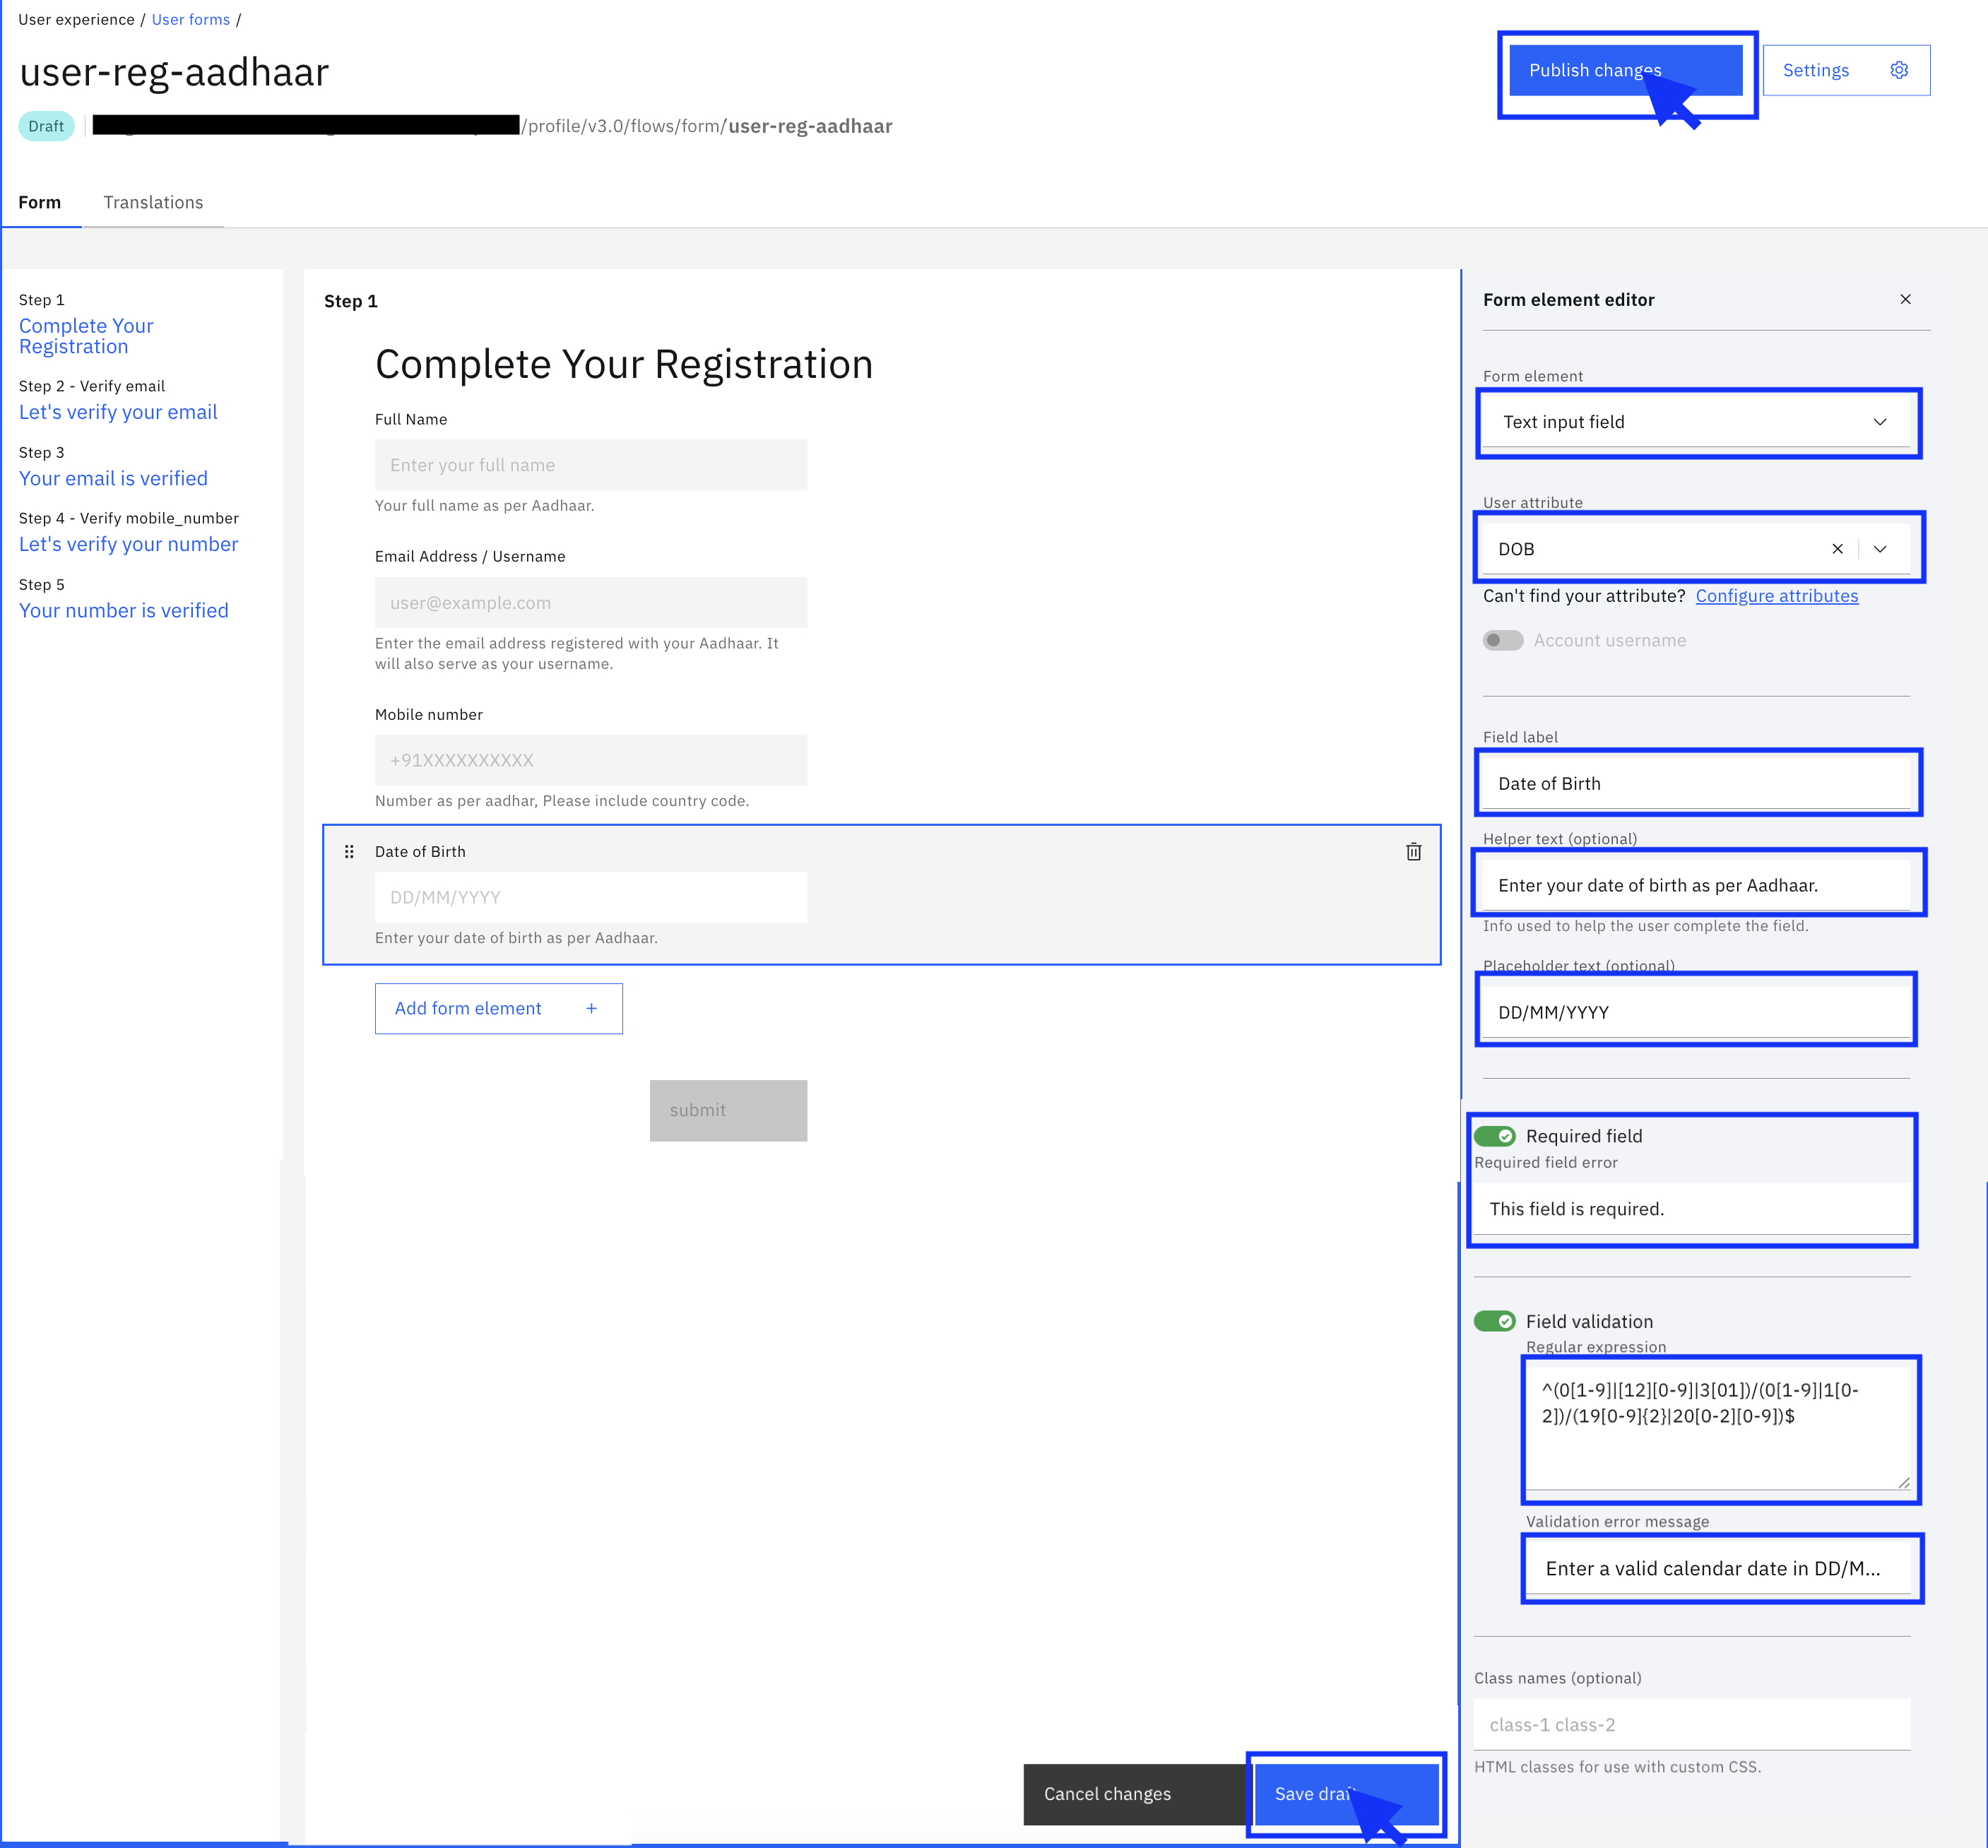
Add an element to collect the date of birth with the following configuration:
- Form element: Text input field
- User attribute: DOB
- Account username: Disabled
- Field label: Date of Birth
- Helper text: Enter your date of birth as per Aadhaar.
- Placeholder text: DD/MM/YYYY
- Required field: Enabled
- Required field error: This field is required.
- Field validation: Enabled
- Field validation (regex):
^(0[1-9]|[12][0-9]|3[01])/(0[1-9]|1[0-2])/((19|20)[0-9]{2})$- This regex validates dates in DD/MM/YYYY format: day (01-31), month (01-12), and year (1900-2099)
- Validation error message: Enter a valid calendar date in DD/MM/YYYY format.
-
Click Save draft and then click Publish to make the form available for use.
NoteThis step completed the user form needed for Aadhaar-based registration with identity proofing. Other settings can be customized such as branding, displayed text for collecting user attributes, other fields for validation, and more.
Step 4: Import and Setup Workflow
i. Import Workflow
-
Log in to the IBM Verify administration console.
-
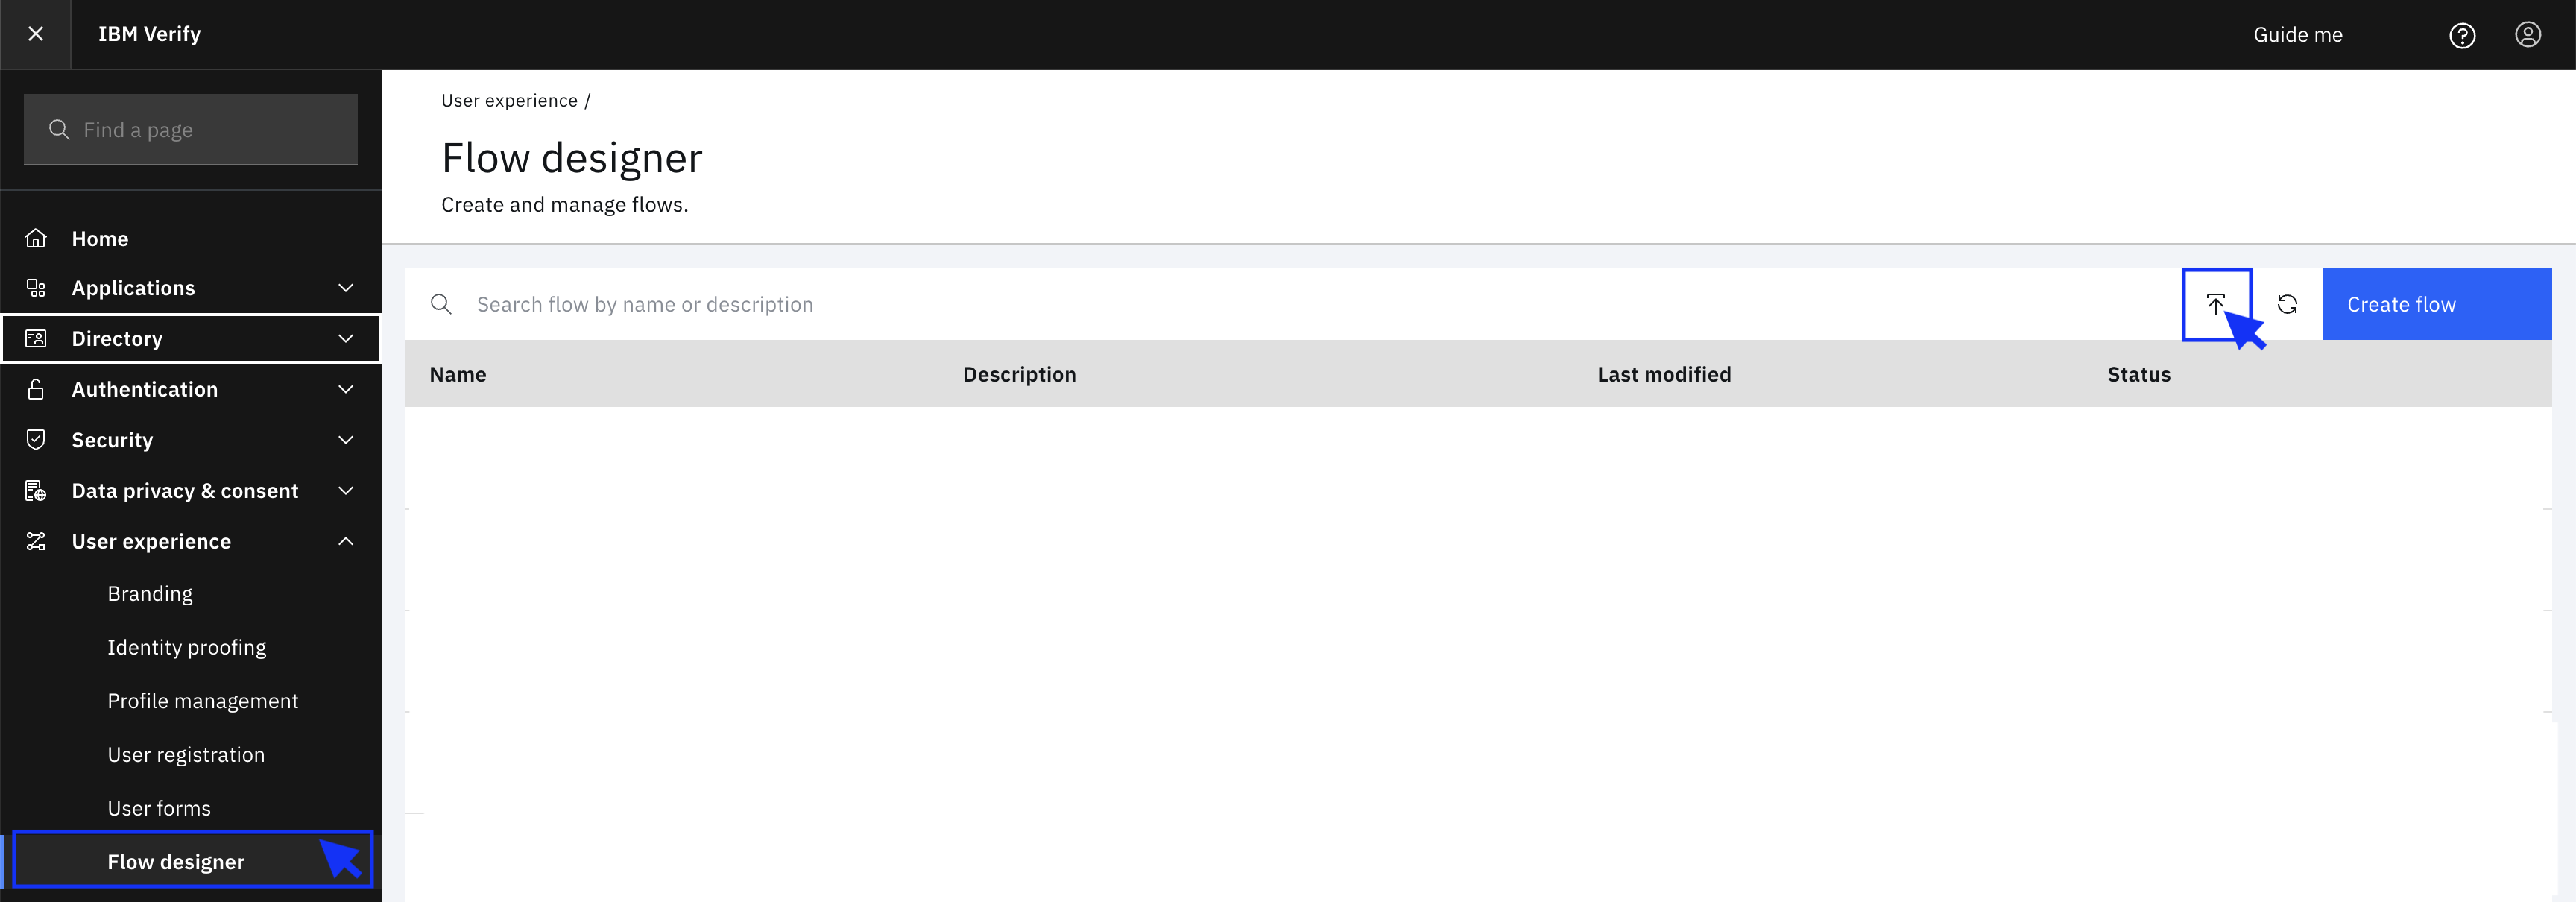
Navigate to User experience > Flow designer.
-
Click the Import icon next to the Create flow button:
-
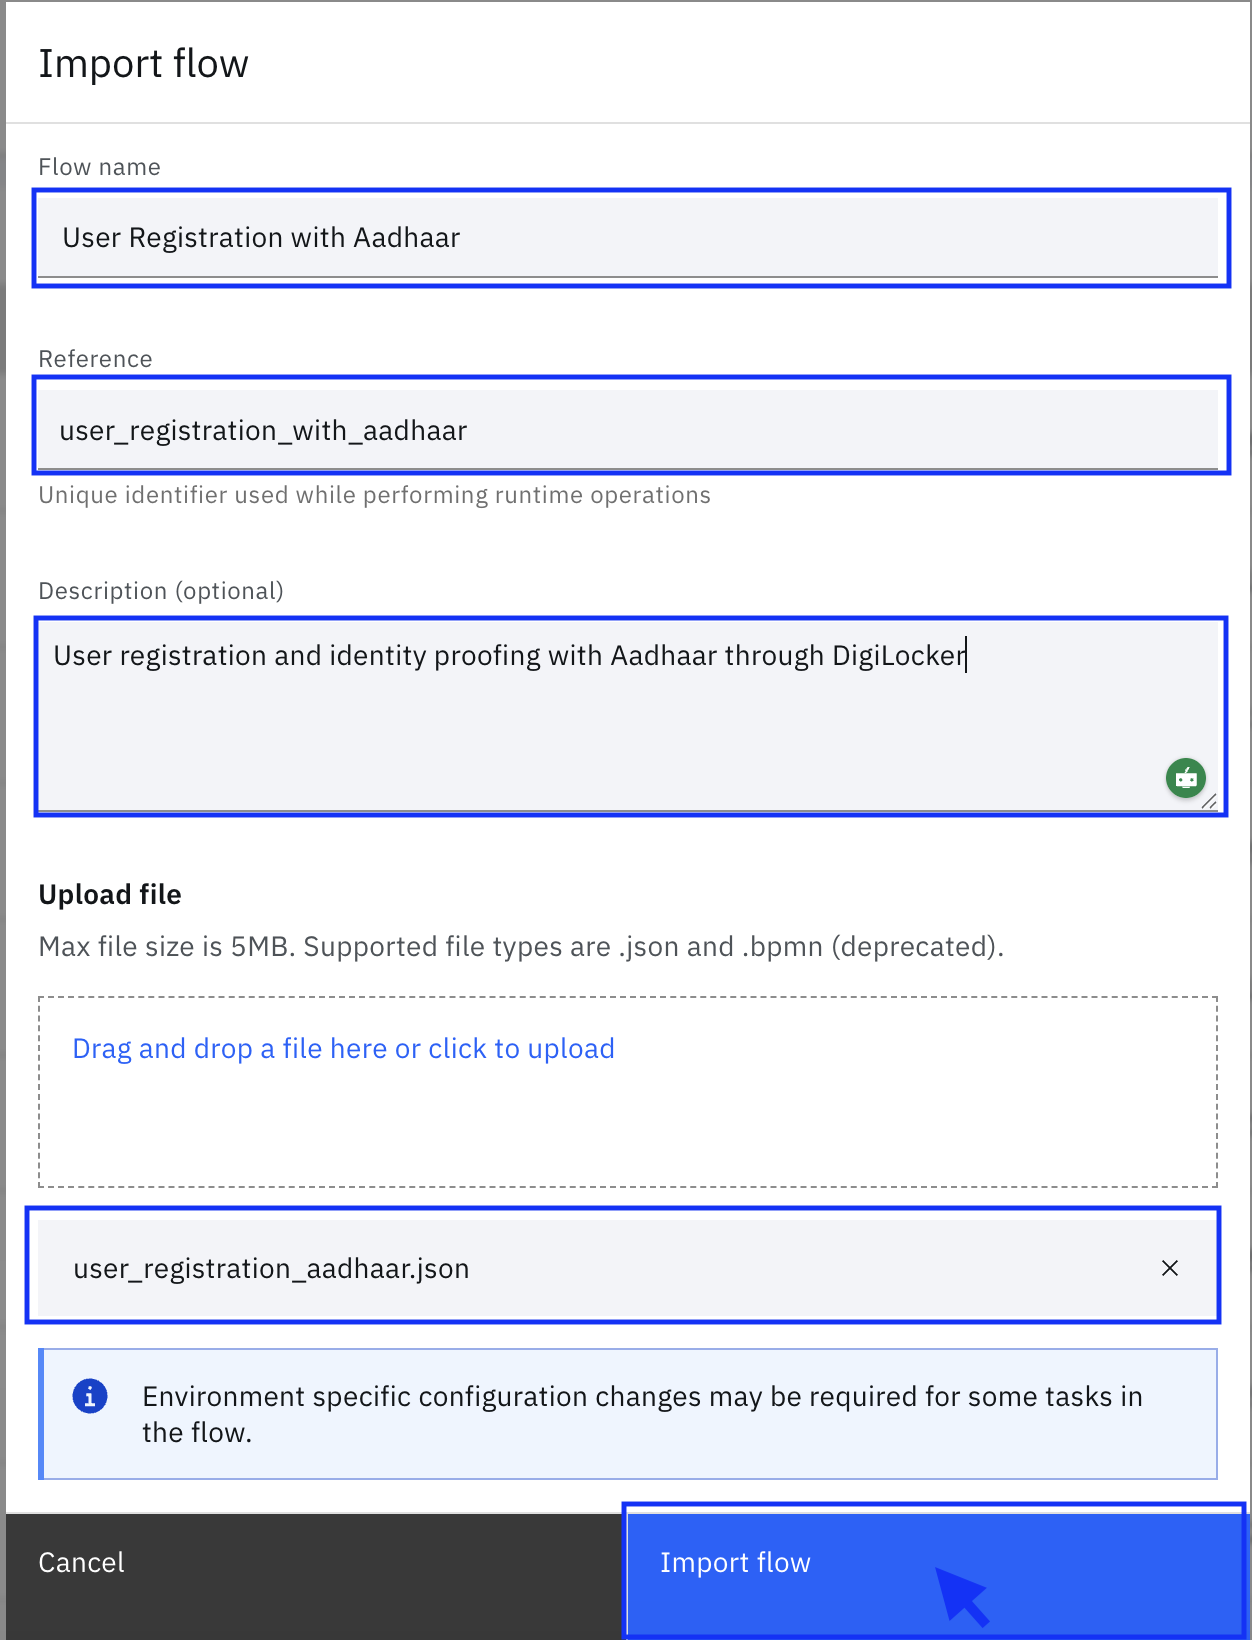
Upload the flow file:
user_registration_with_aadhaar.jsonNoteGet the
user_registration_with_aadhaar.jsonfile from the GitHub repository: verify-saas-resources -
Provide flow metadata:
- Name: User Registration with Aadhaar
- Description: User registration and identity proofing with Aadhaar through DigiLocker
- Reference: (auto-generated or custom)
-
Click Import flow:
-
The flow is imported in Draft mode:
ii. Configure Flow Components
After importing the flow, you need to configure the following components:
Reference MaterialsFor detailed information on modifying flow components and CELx functions, refer to:
A. User Registration Form Configuration
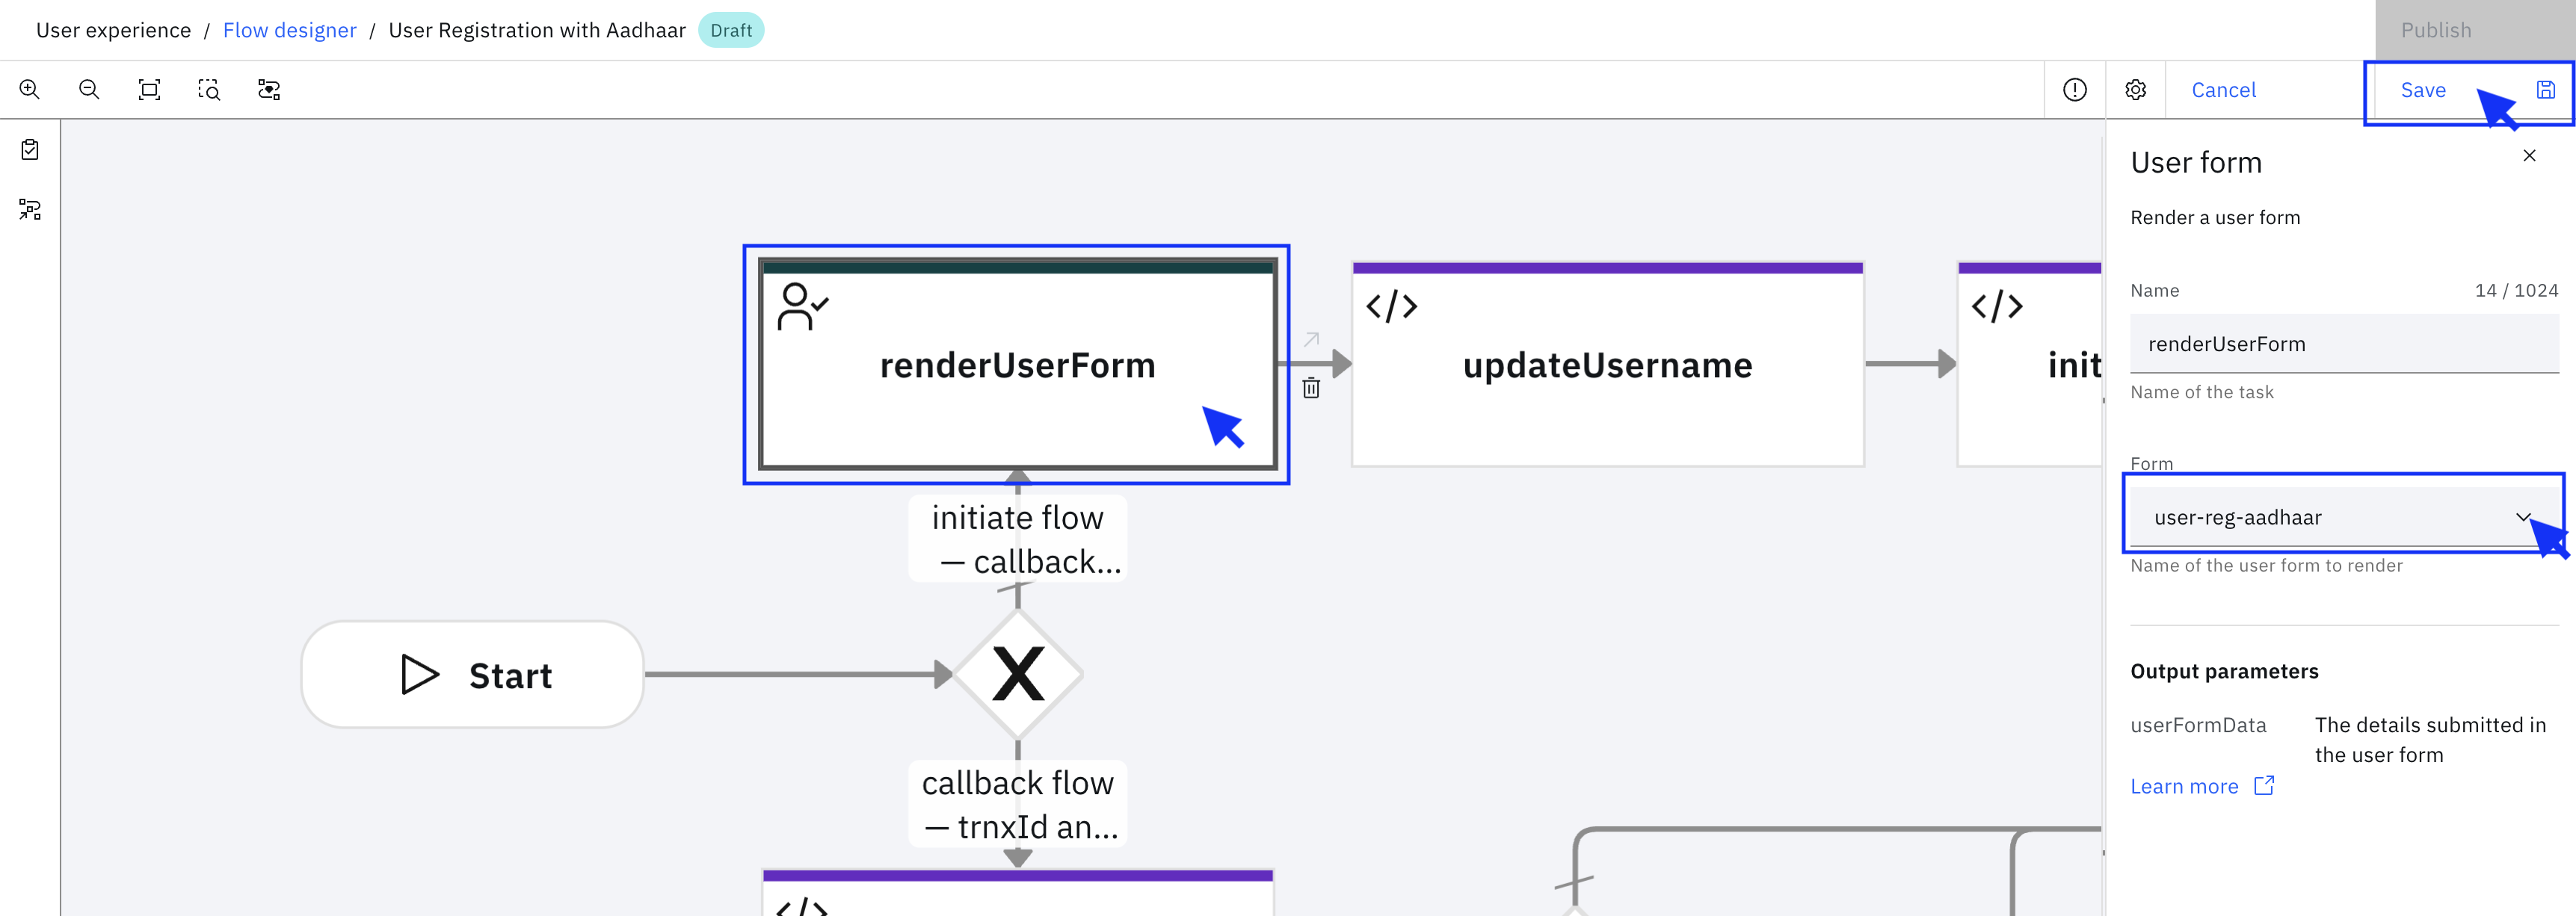
-
Click the "renderUserForm" (User form task).
-
In the side panel, navigate to the Form field and select the form you created in Step 3 (Configuring the user forms).
-
Click Save to save your changes.
B. Initialize Authentication Session Configuration
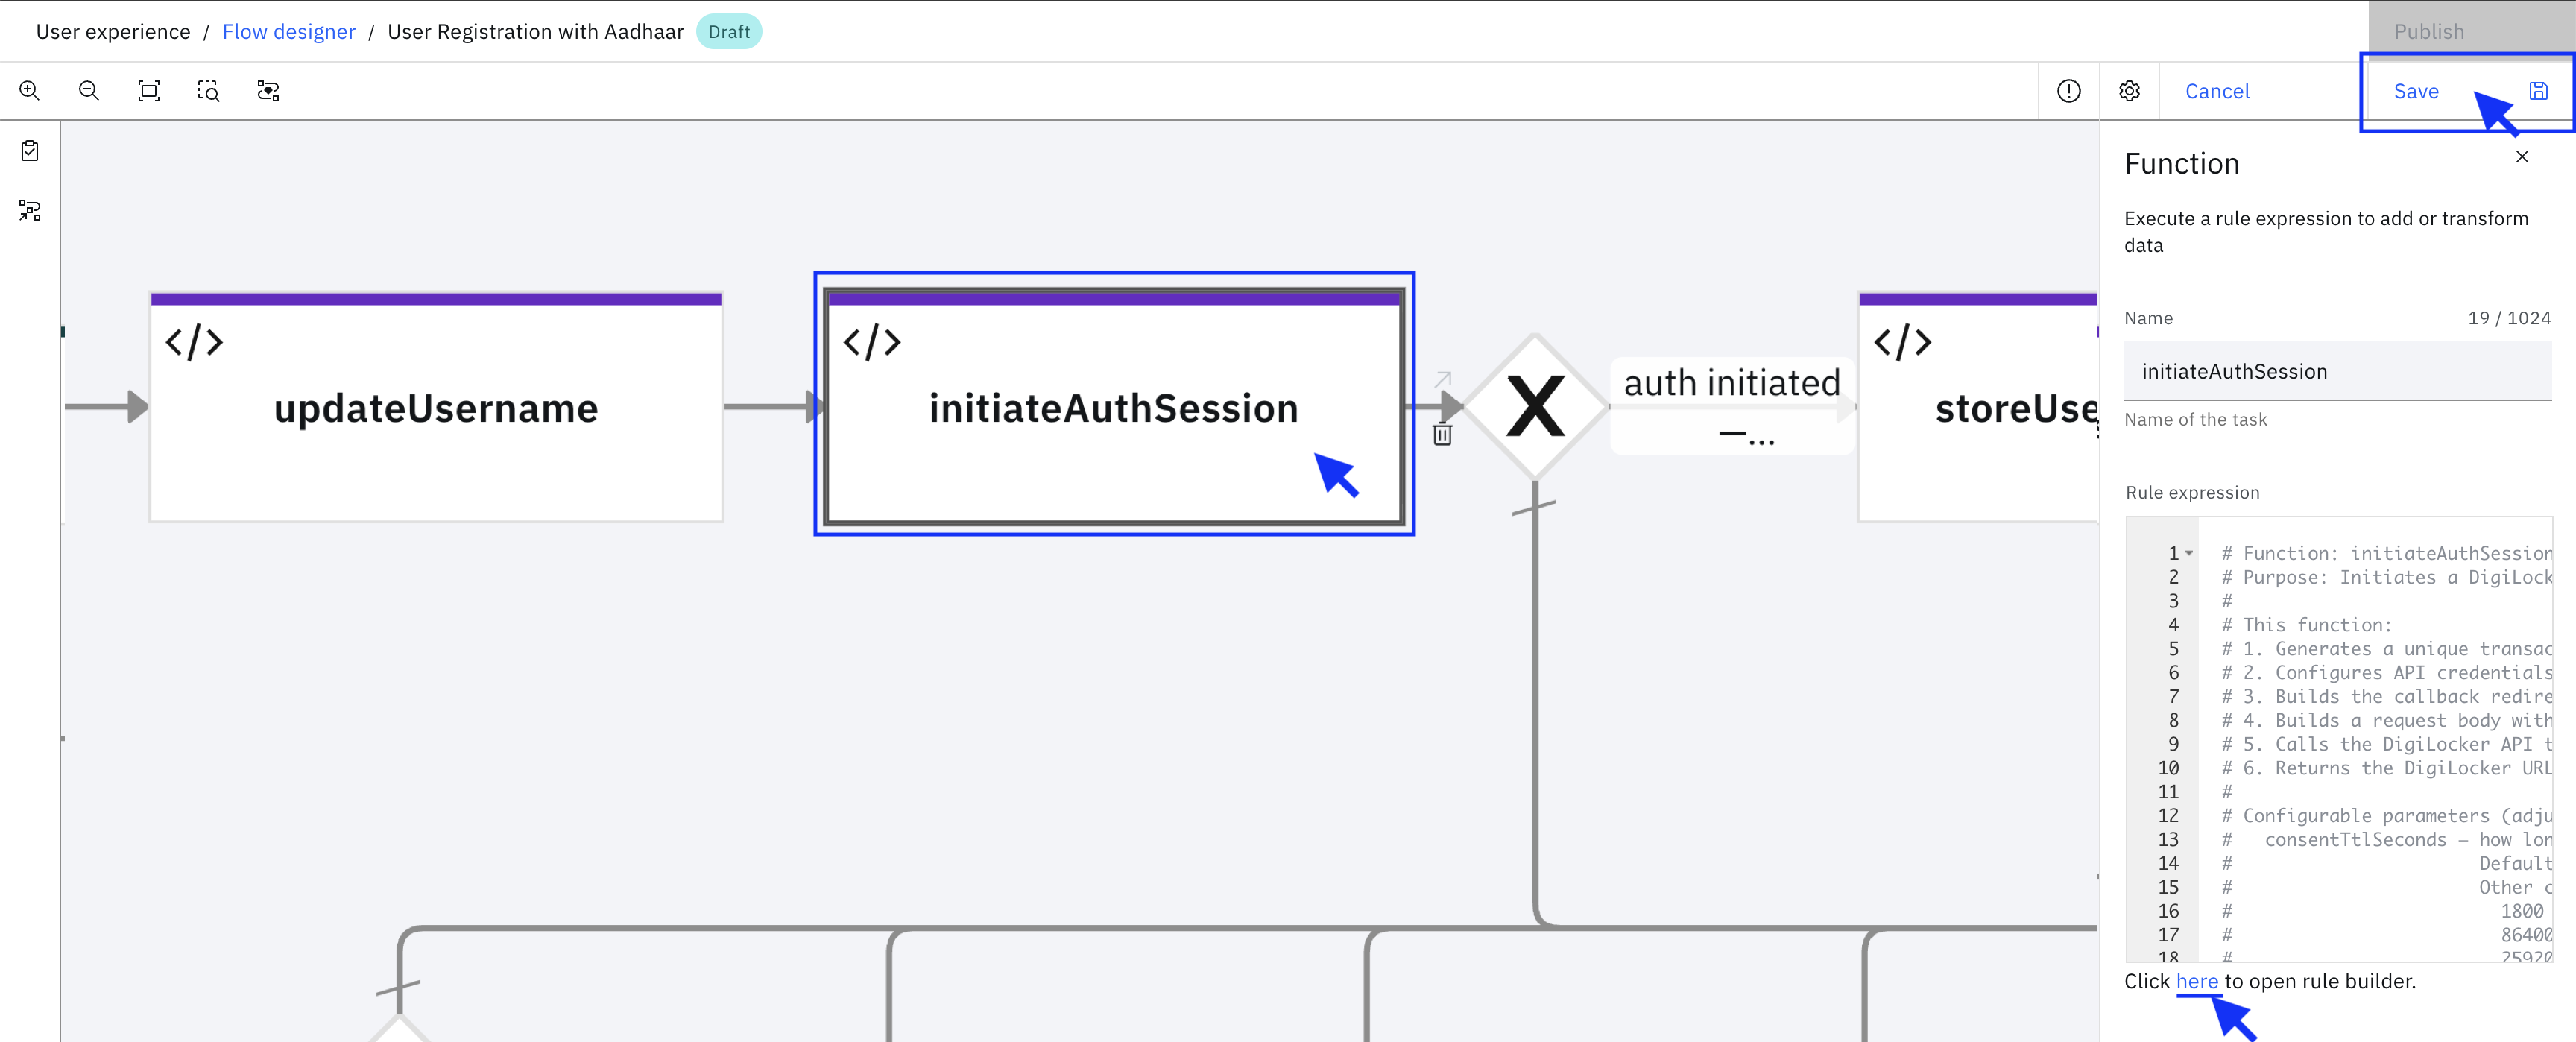
-
Click the "initiateAuthSession" (Function task).
-
In the side panel, navigate to the Rule expression field.
-
Open the Rule builder and edit the CELx (Common Expression Language extended) code:
-
Update the following placeholder fields in the CELx code:
<api_creds>: Your API aggregator authorization code<api_base_url>: API aggregator base URL<logo_url>: Your company logo URL<fav_icon_url>: Your favicon URL<support_email>: Your support email address<company_name>: Your company name
NoteYou can modify the CELx code to add or remove parameters from the initialization call based on your specific API requirements.
- Click Save to save your changes.
C. Evaluate Authentication Scope and Errors Configuration
-
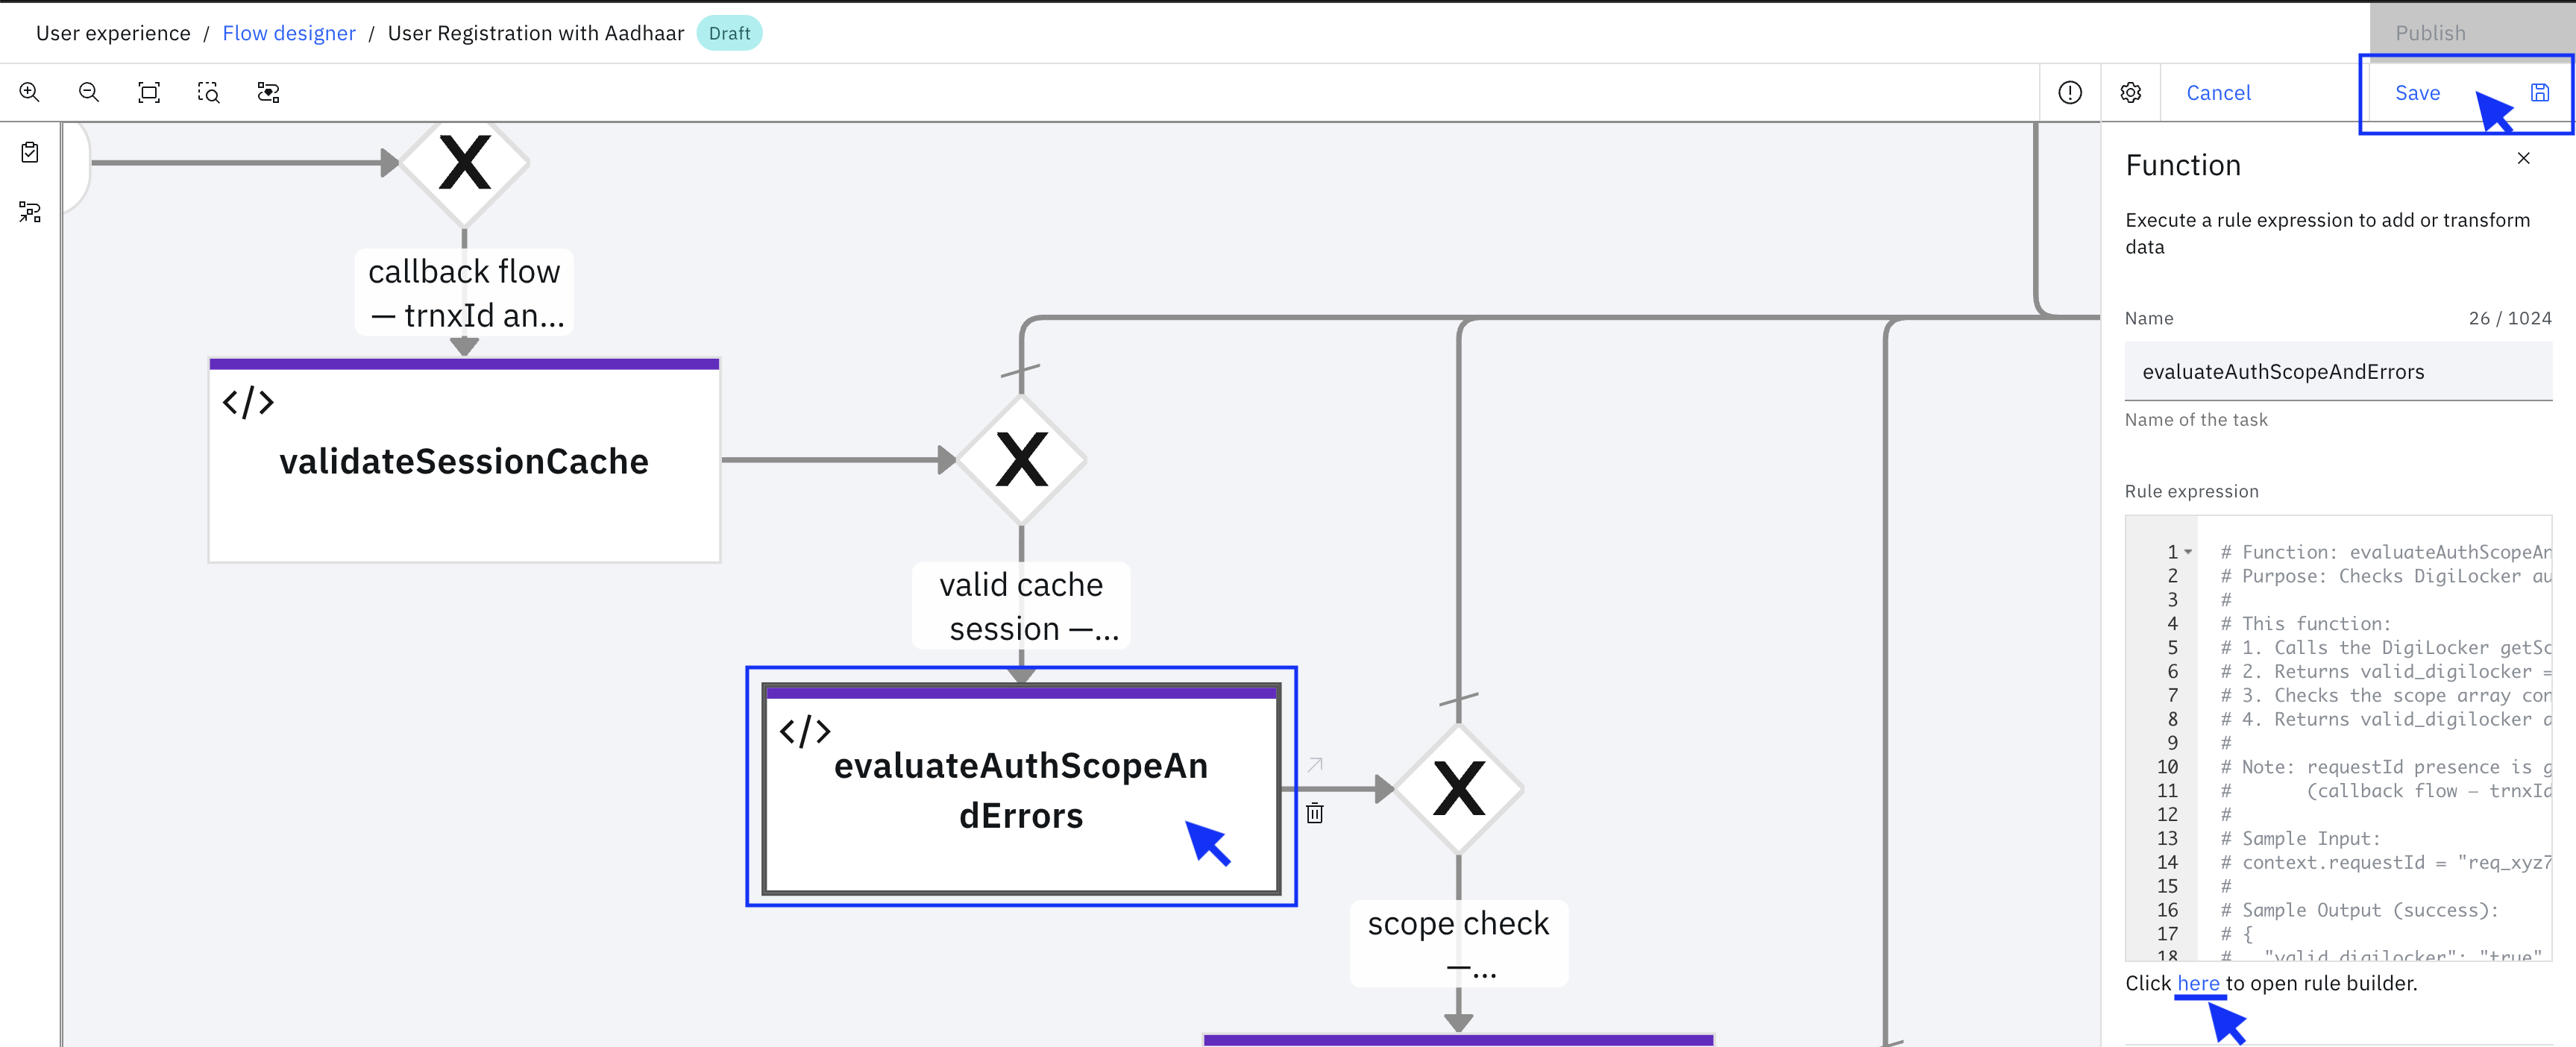
Click the "evaluateAuthScopeAndErrors" (Function task).
-
In the side panel, navigate to the Rule expression field.
-
Open the Rule builder and edit the CELx (Common Expression Language extended) code:
-
Update the following placeholder fields in the CELx code:
<api_creds>: Your API aggregator authorization code<api_base_url>: API aggregator base URL
-
Click Save to save your changes.
D. Fetch Identity Provider Data Configuration
-
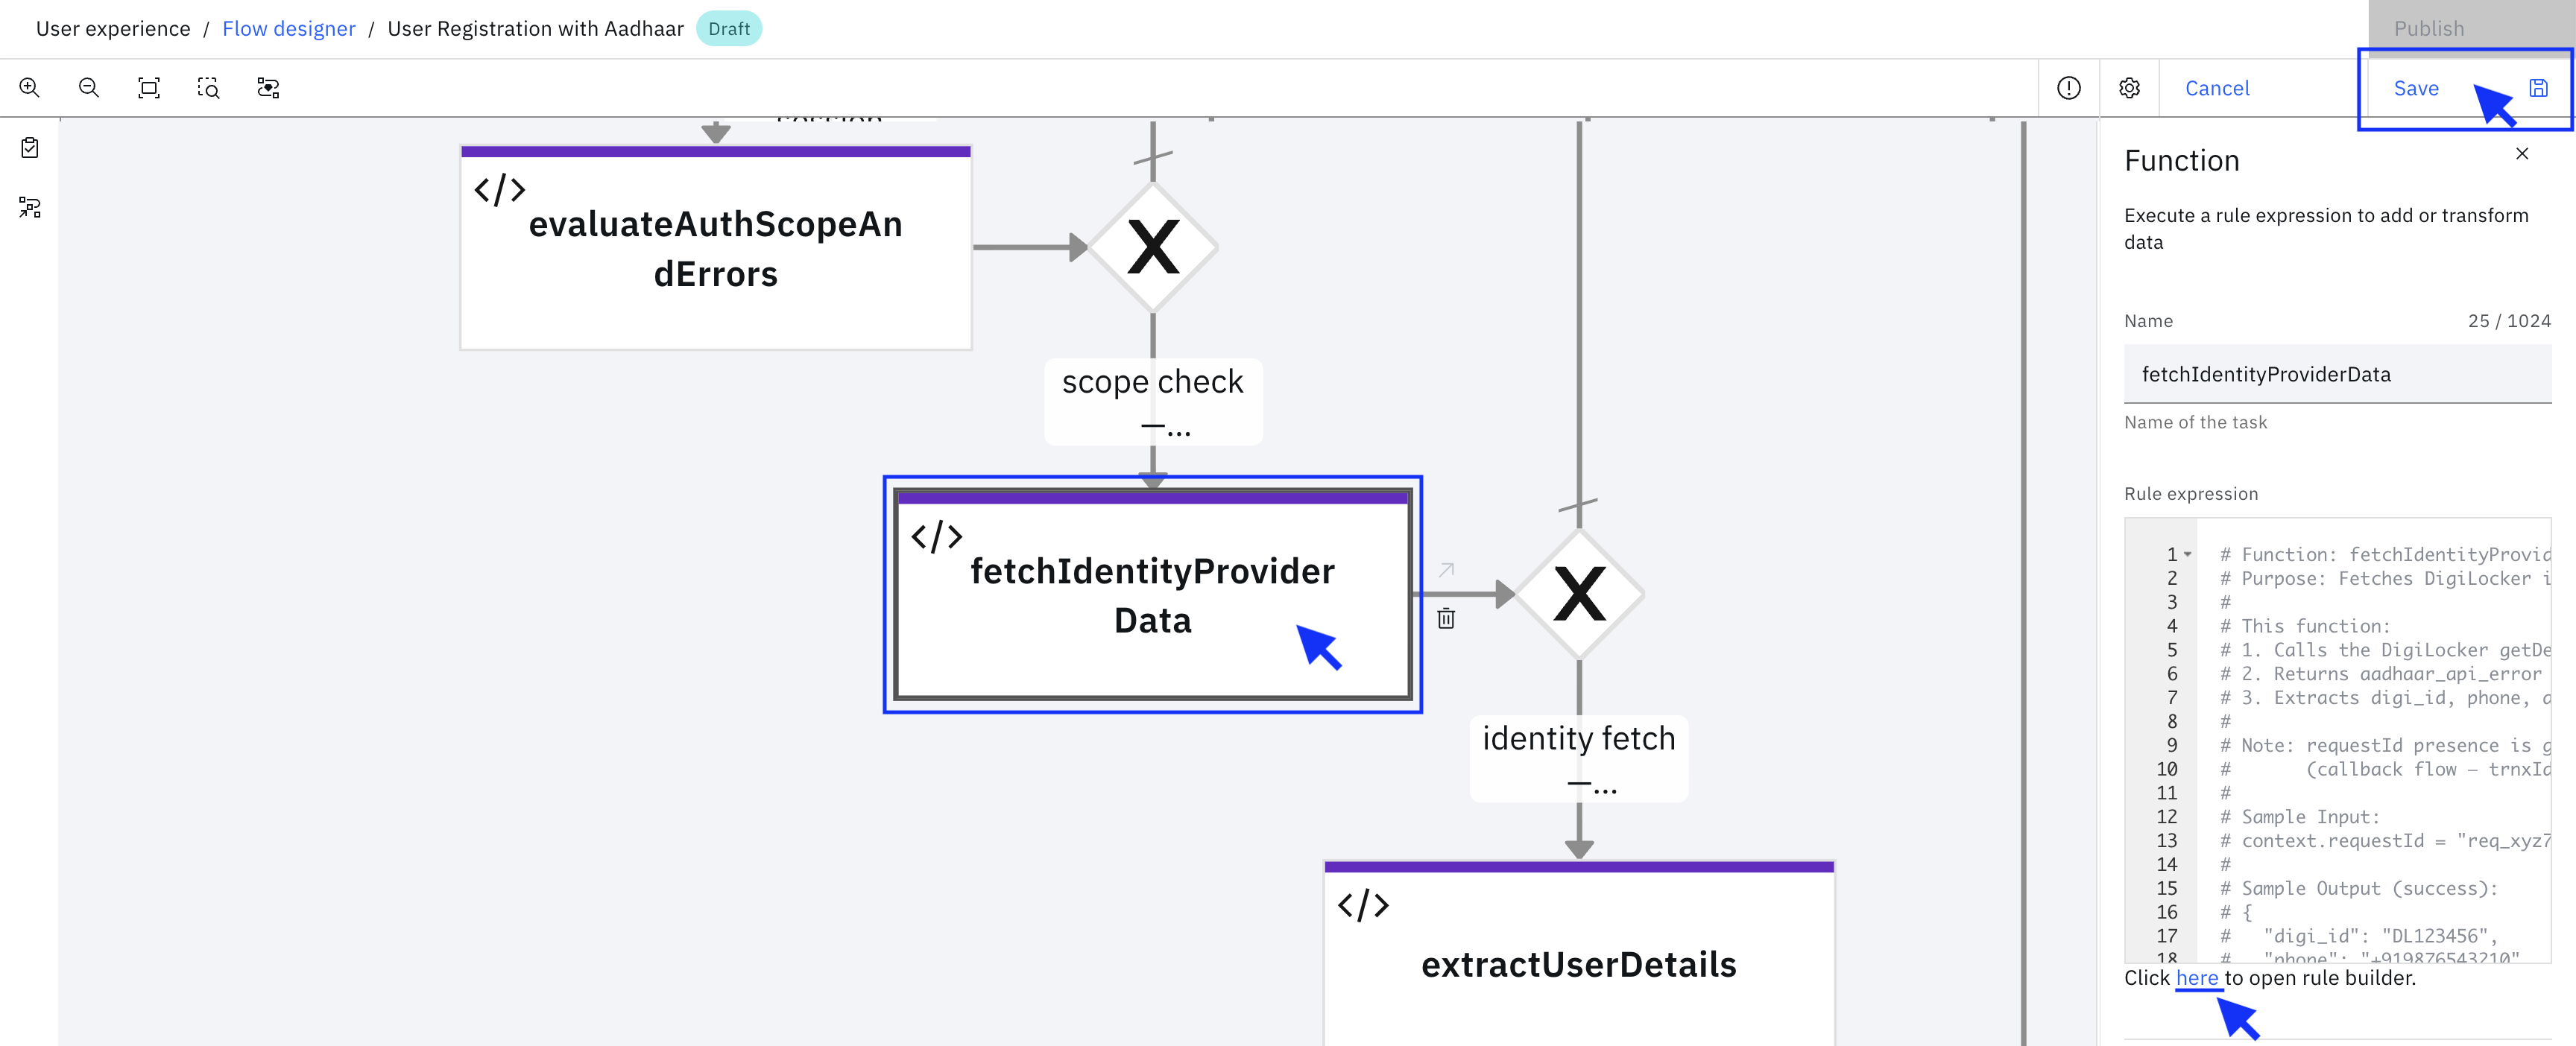
Click the "fetchIdentityProviderData" (Function task).
-
In the side panel, navigate to the Rule expression field.
-
Open the Rule builder and edit the CELx (Common Expression Language extended) code:
-
Update the following placeholder fields in the CELx code:
<api_creds>: Your API aggregator authorization code<api_base_url>: API aggregator base URL
-
Click Save to save your changes.
E. Fetch Aadhaar Data Configuration
-
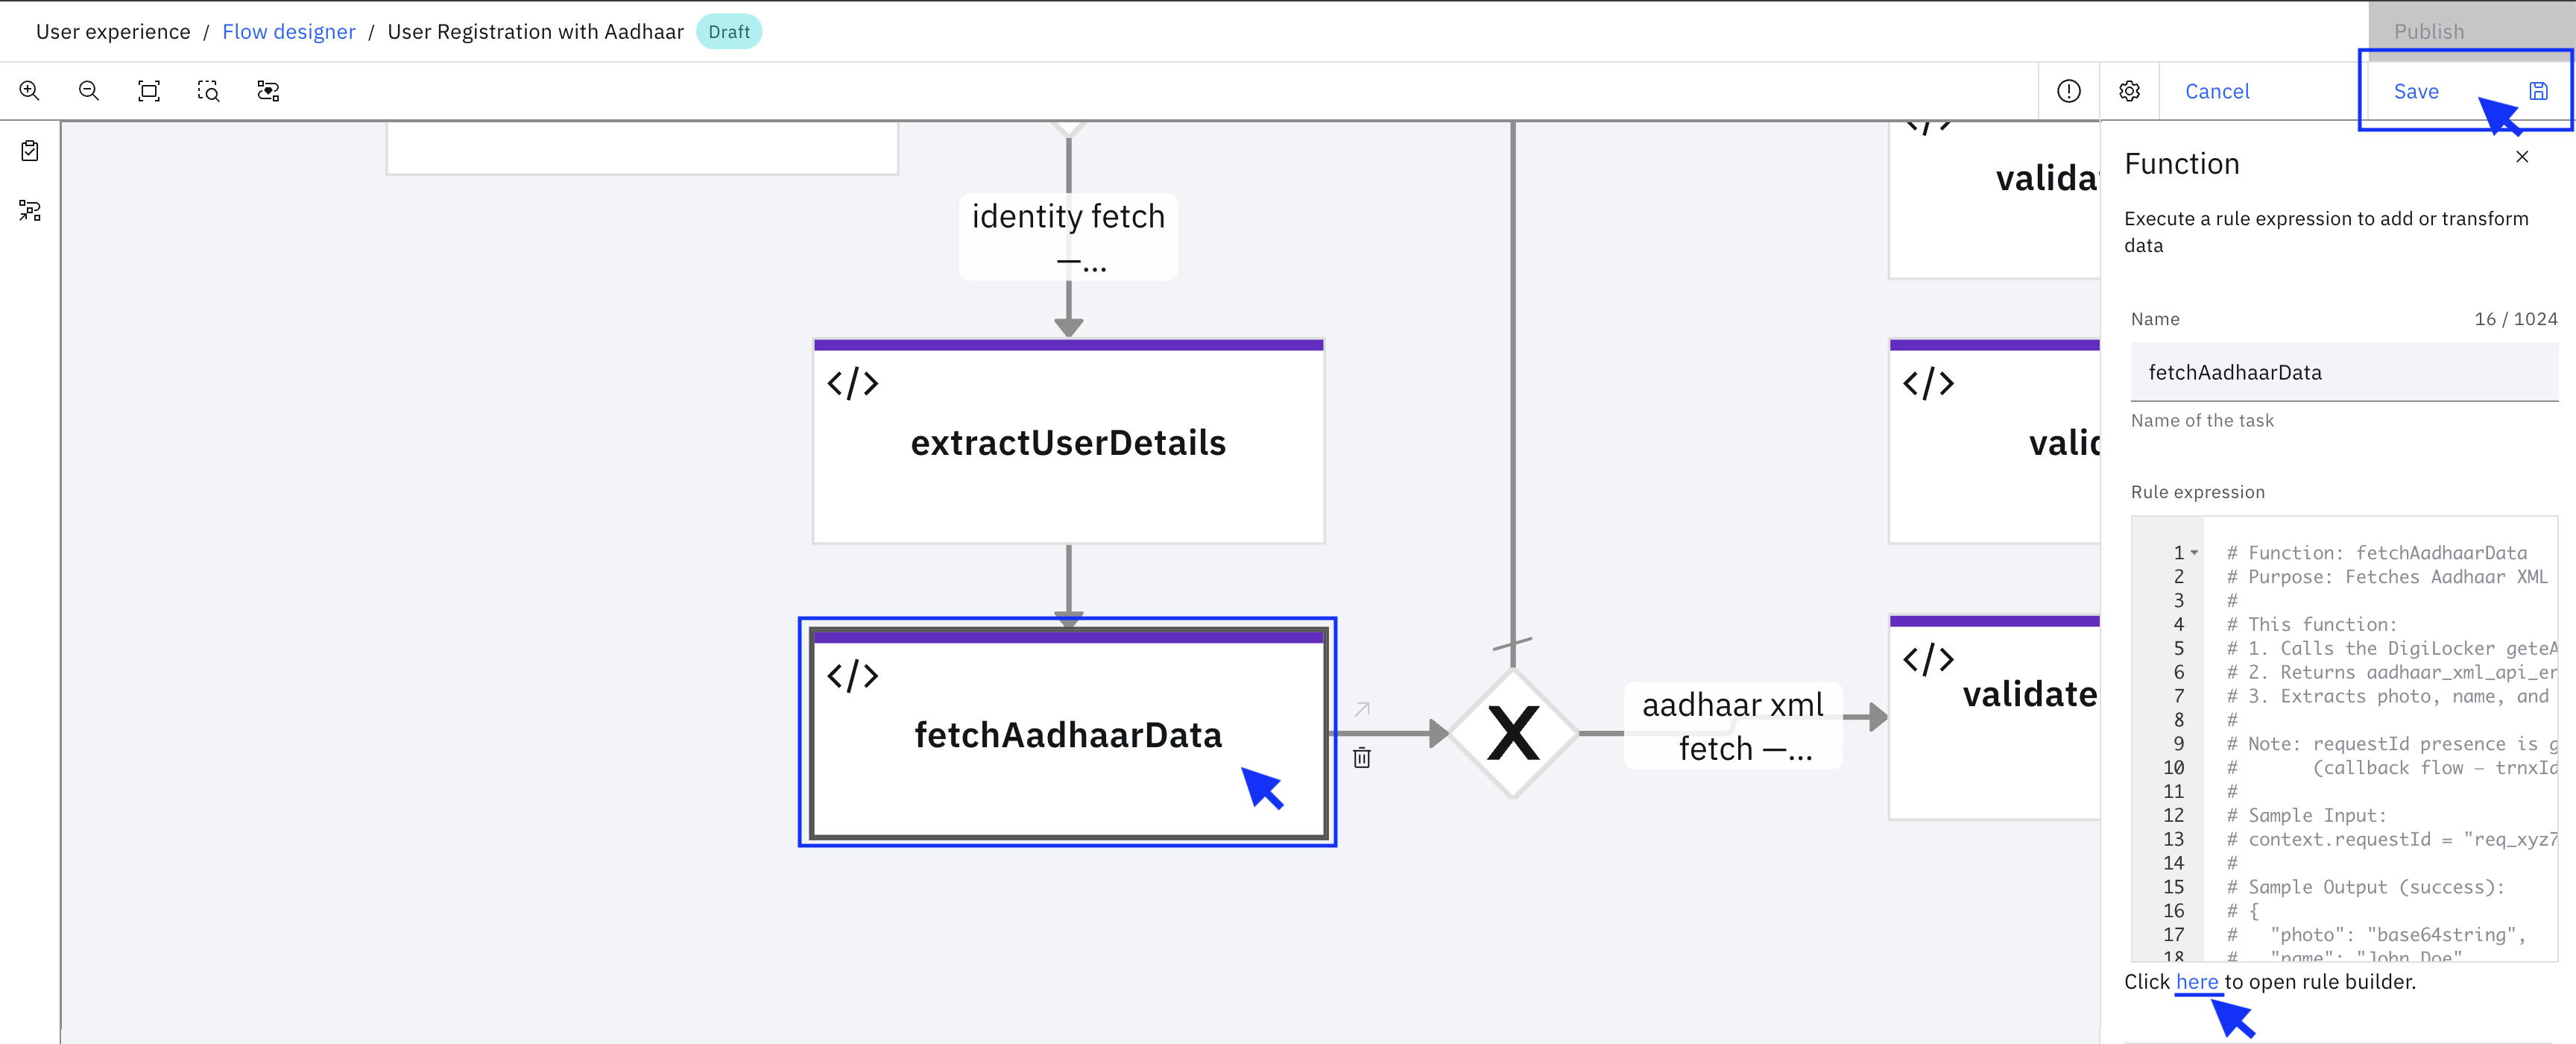
Click the "fetchAadhaarData" (Function task).
-
In the side panel, navigate to the Rule expression field.
-
Open the Rule builder and edit the CELx (Common Expression Language extended) code:
-
Update the following placeholder fields in the CELx code:
<api_creds>: Your API aggregator authorization code<api_base_url>: API aggregator base URL
-
Click Save to save your changes.
F. Consent Page Configuration
-
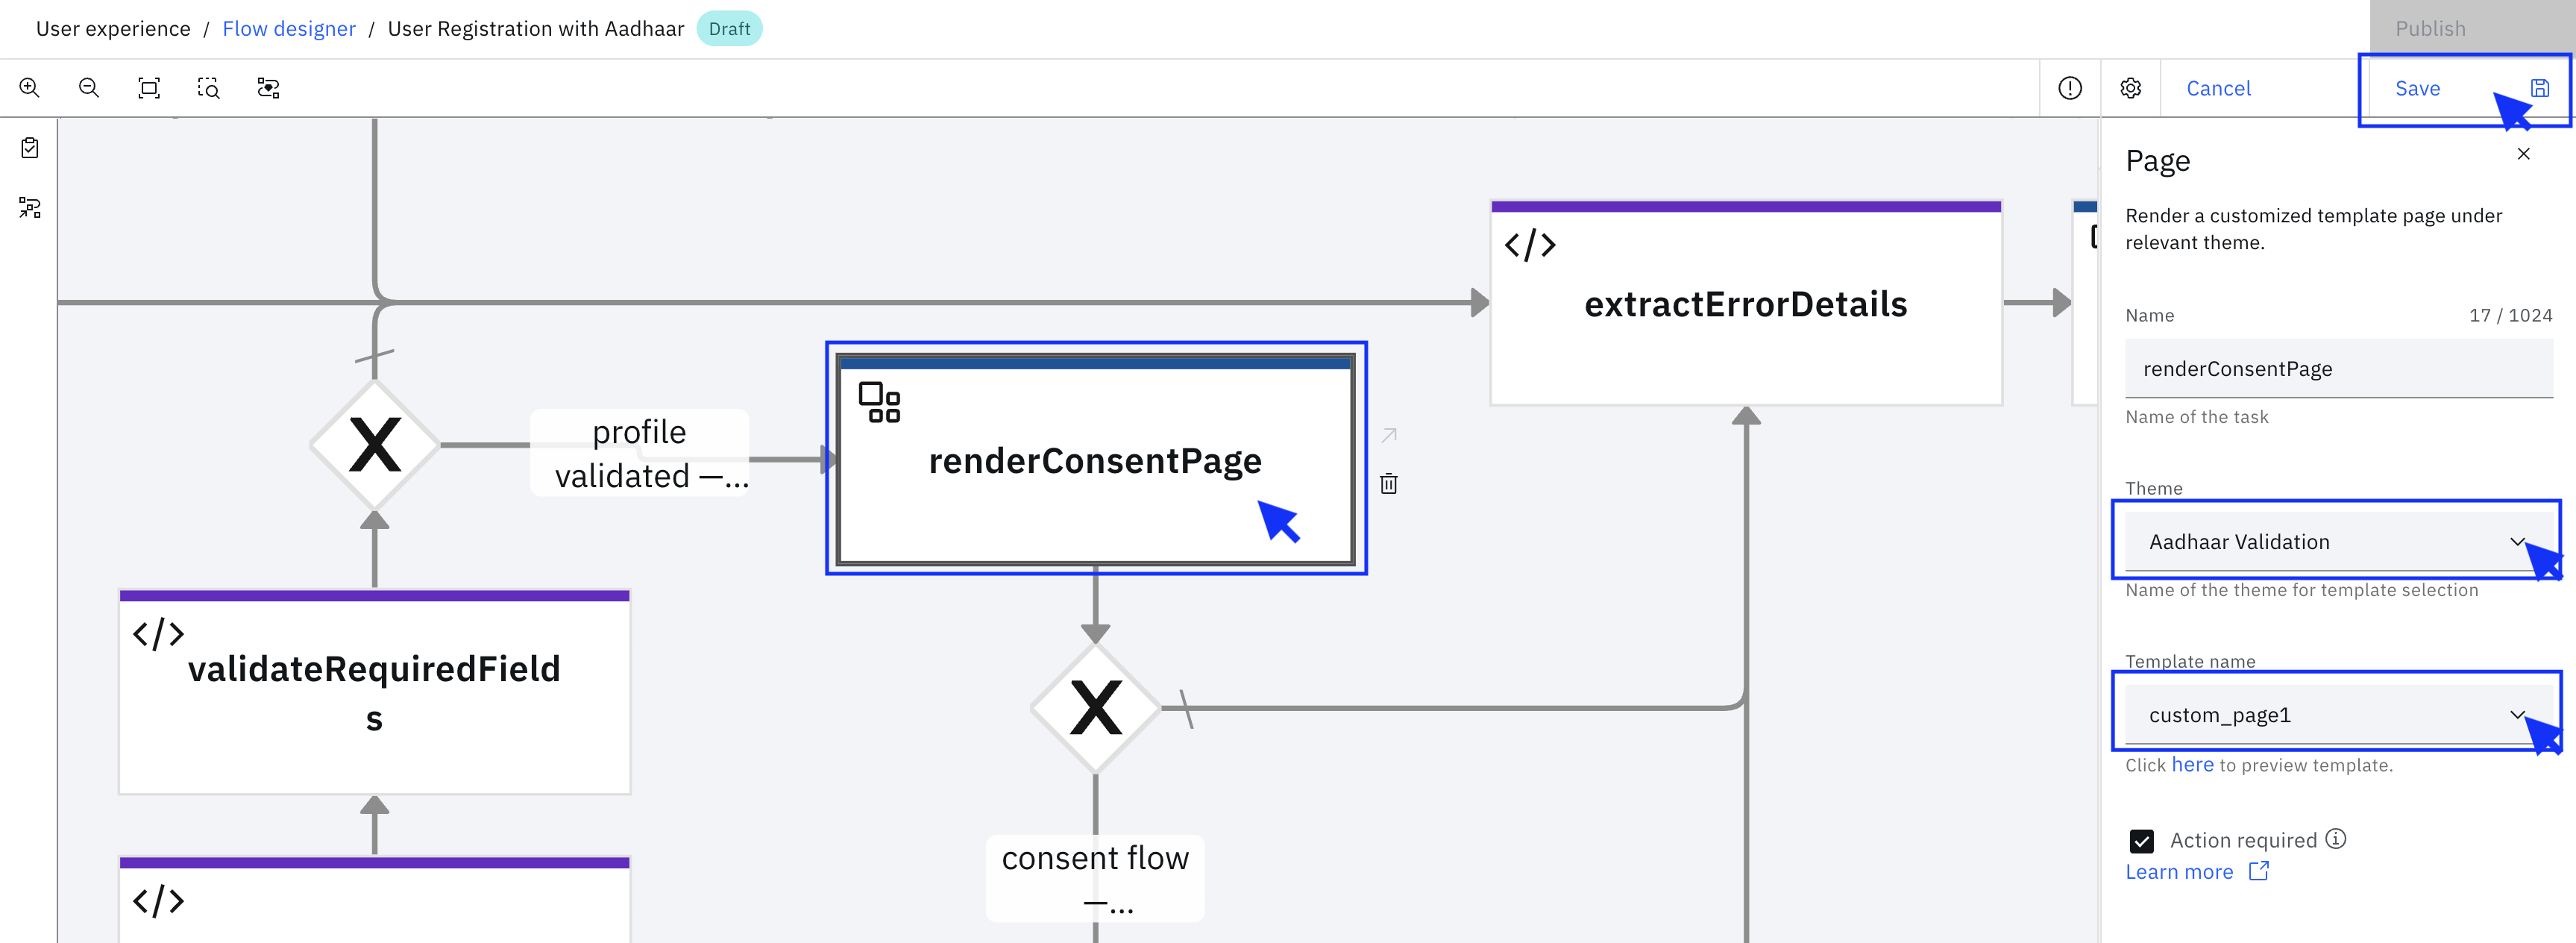
Click the "renderConsentPage" (Page task).
-
Select the Theme which was created before: Aadhaar Validation.
-
Select the Template name which was uploaded: custom_page1.
-
Click Save to save your changes.
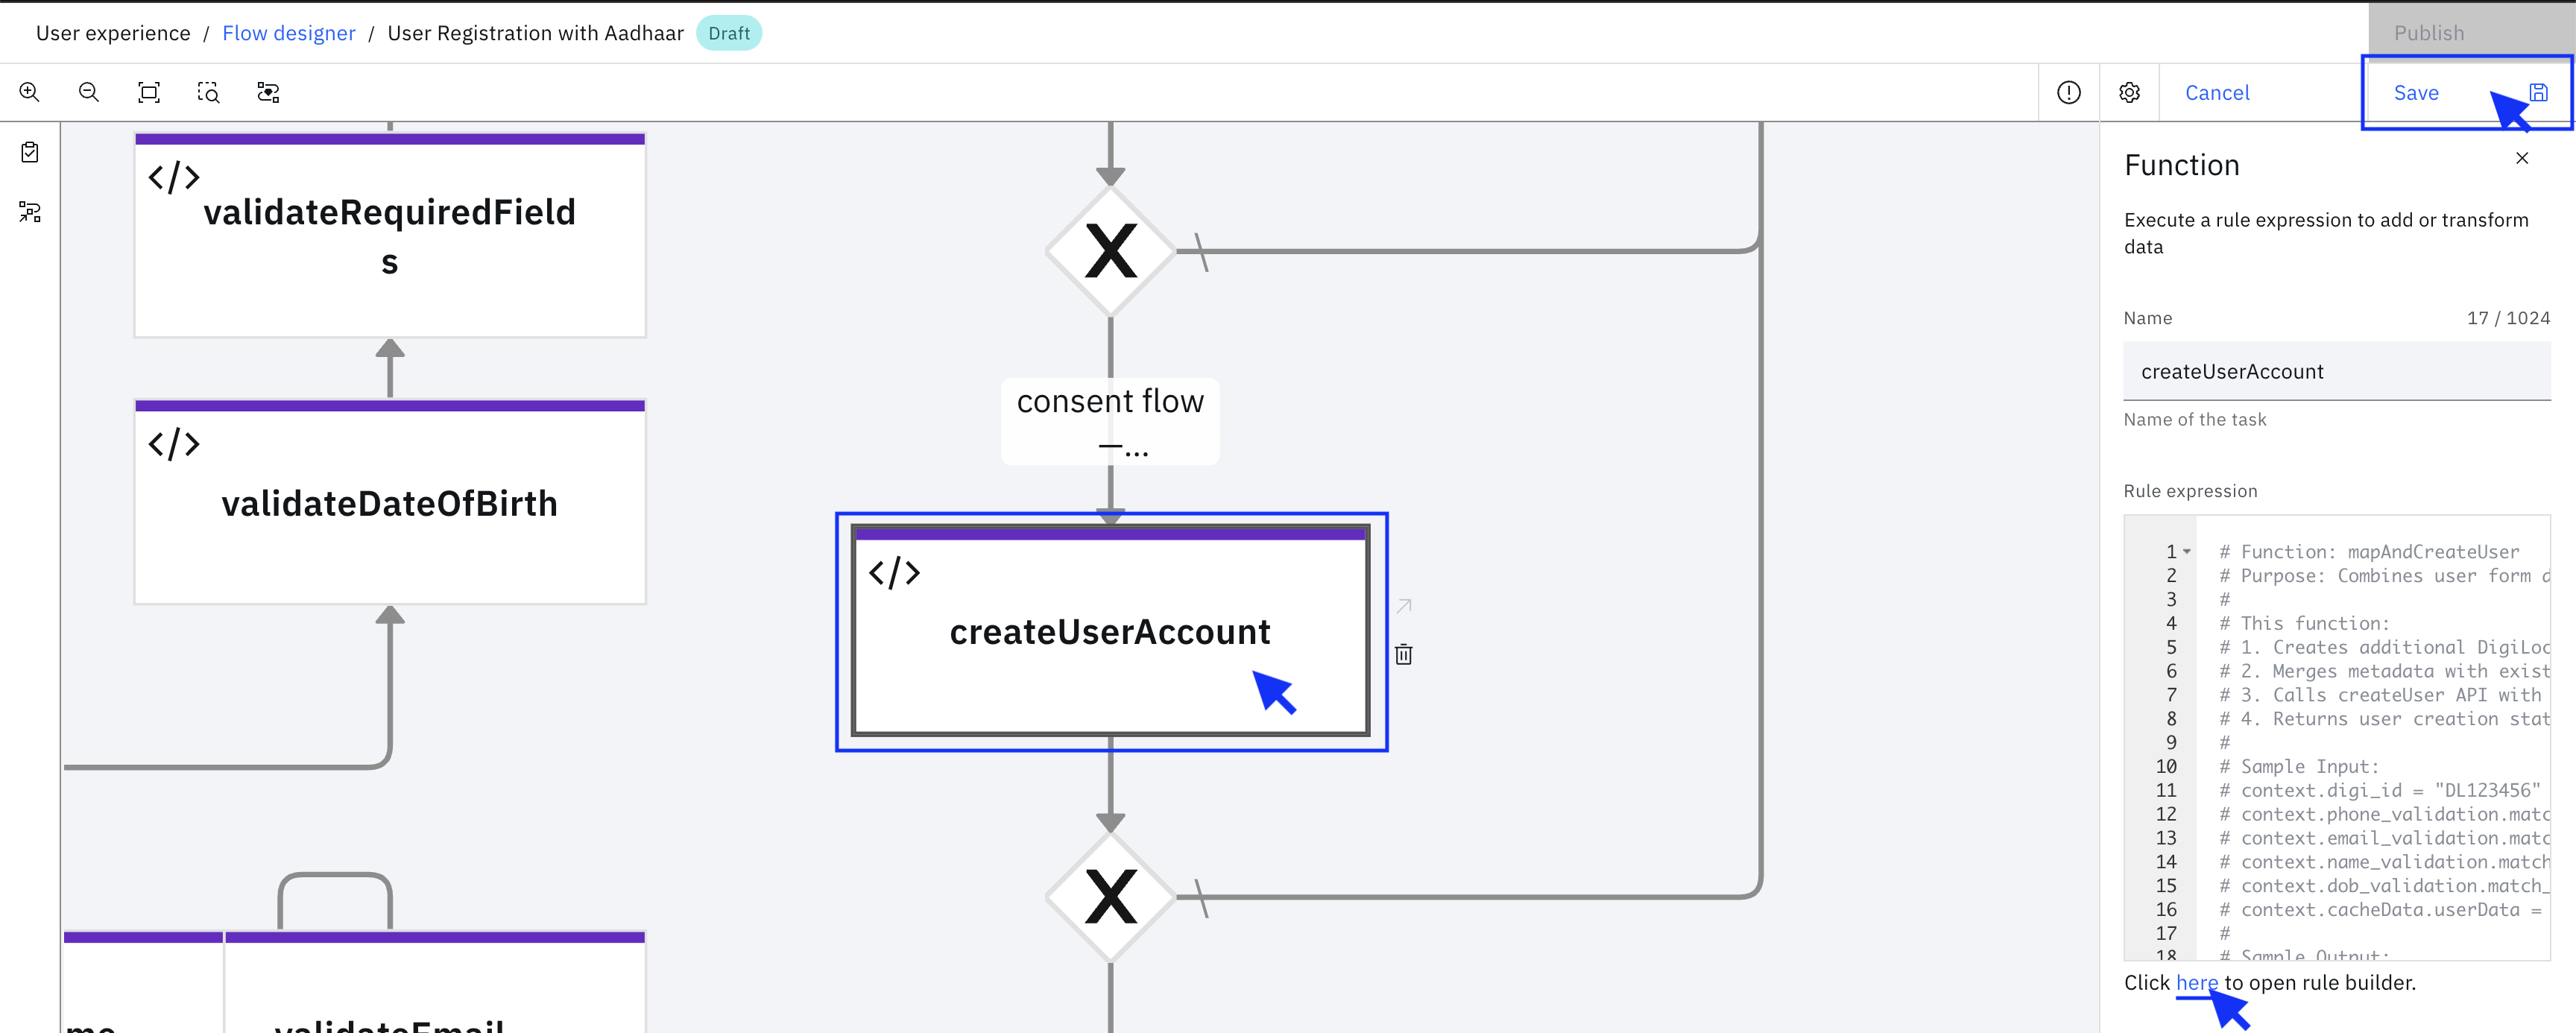
G. Create User Account Configuration
-
Click the "createUserAccount" (Function task).
-
In the side panel, navigate to the Rule expression field.
-
Open the Rule builder and edit the CELx (Common Expression Language extended) code:
-
Update the following placeholder field in the CELx code:
app_login_link := "https://<app-login-link>": Replace<app-login-link>with your application's login URL
-
Click Save to save your changes.
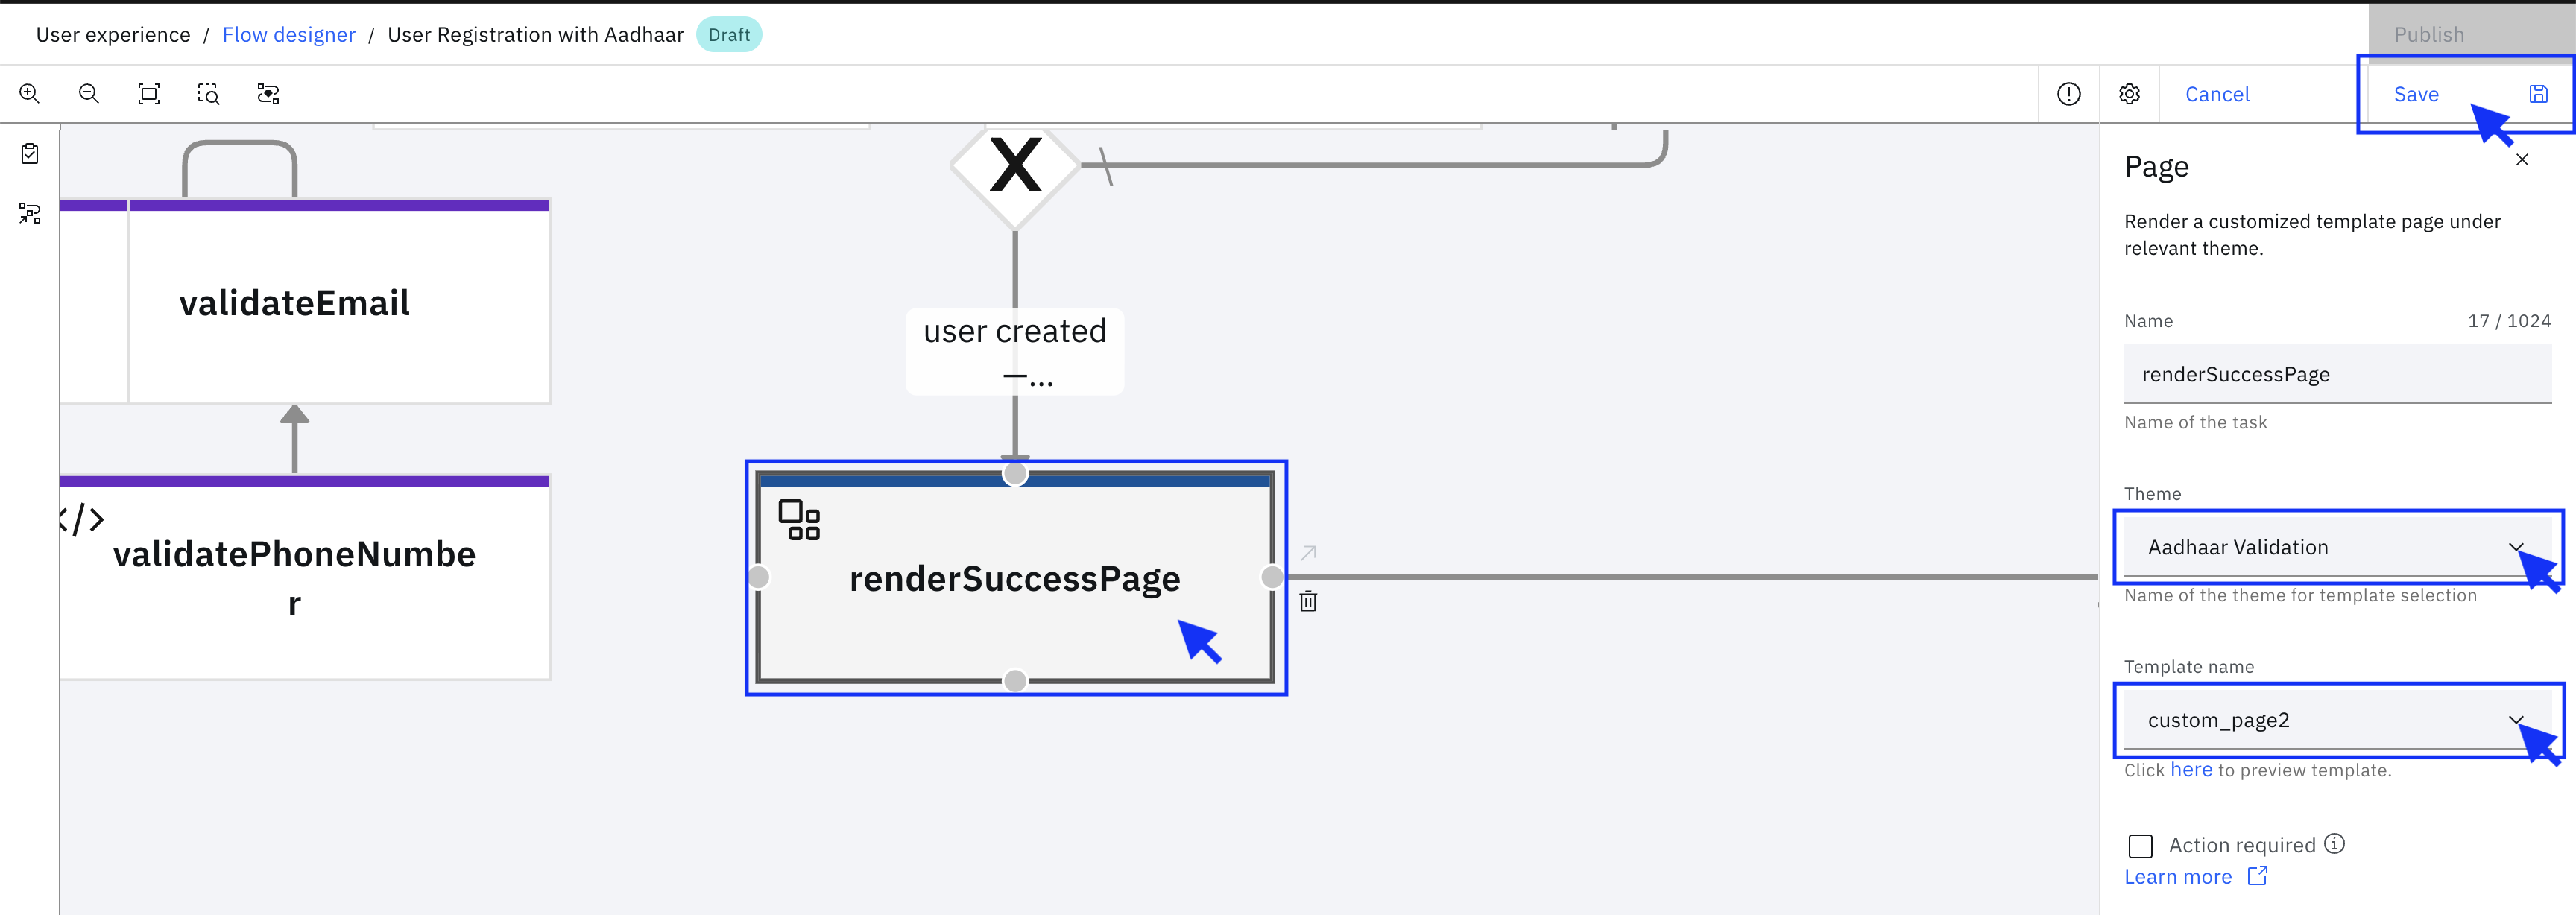
H. Success Page Configuration
-
Click the "renderSuccessPage" (Page task).
-
Select the Theme which was created before: Aadhaar Validation.
-
Select the Template name which was uploaded: custom_page2.
-
Click Save to save your changes.
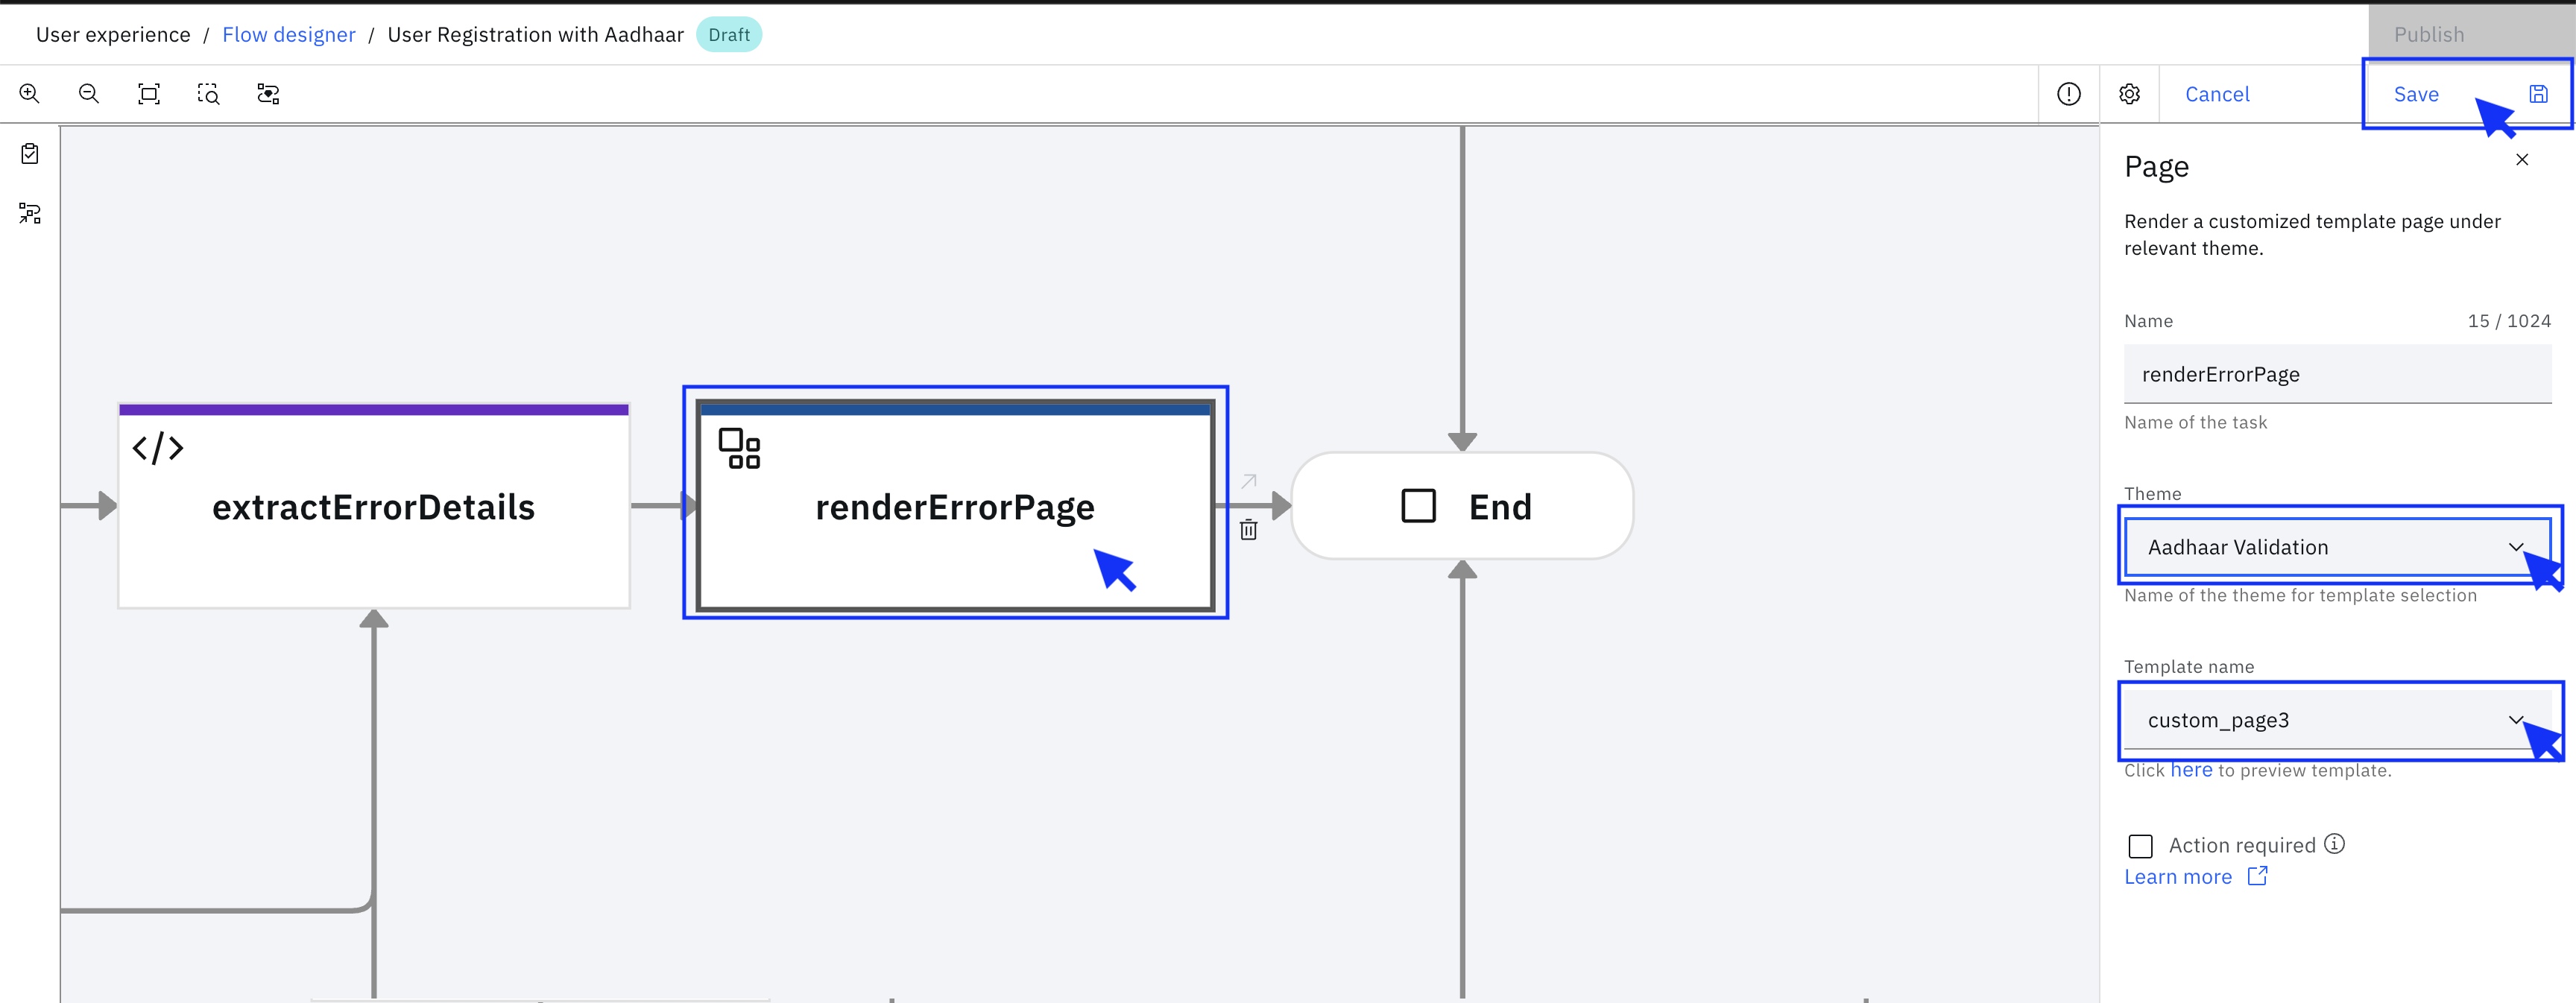
I. Error Page Configuration
-
Click the "renderErrorPage" (Page task).
-
Select the Theme which was created before: Aadhaar Validation.
-
Select the Template name which was uploaded: custom_page3.
-
Click Save to save your changes.
iii. Publish the Flow
-
After completing all configurations, click Publish to make the flow active and available for use.

-
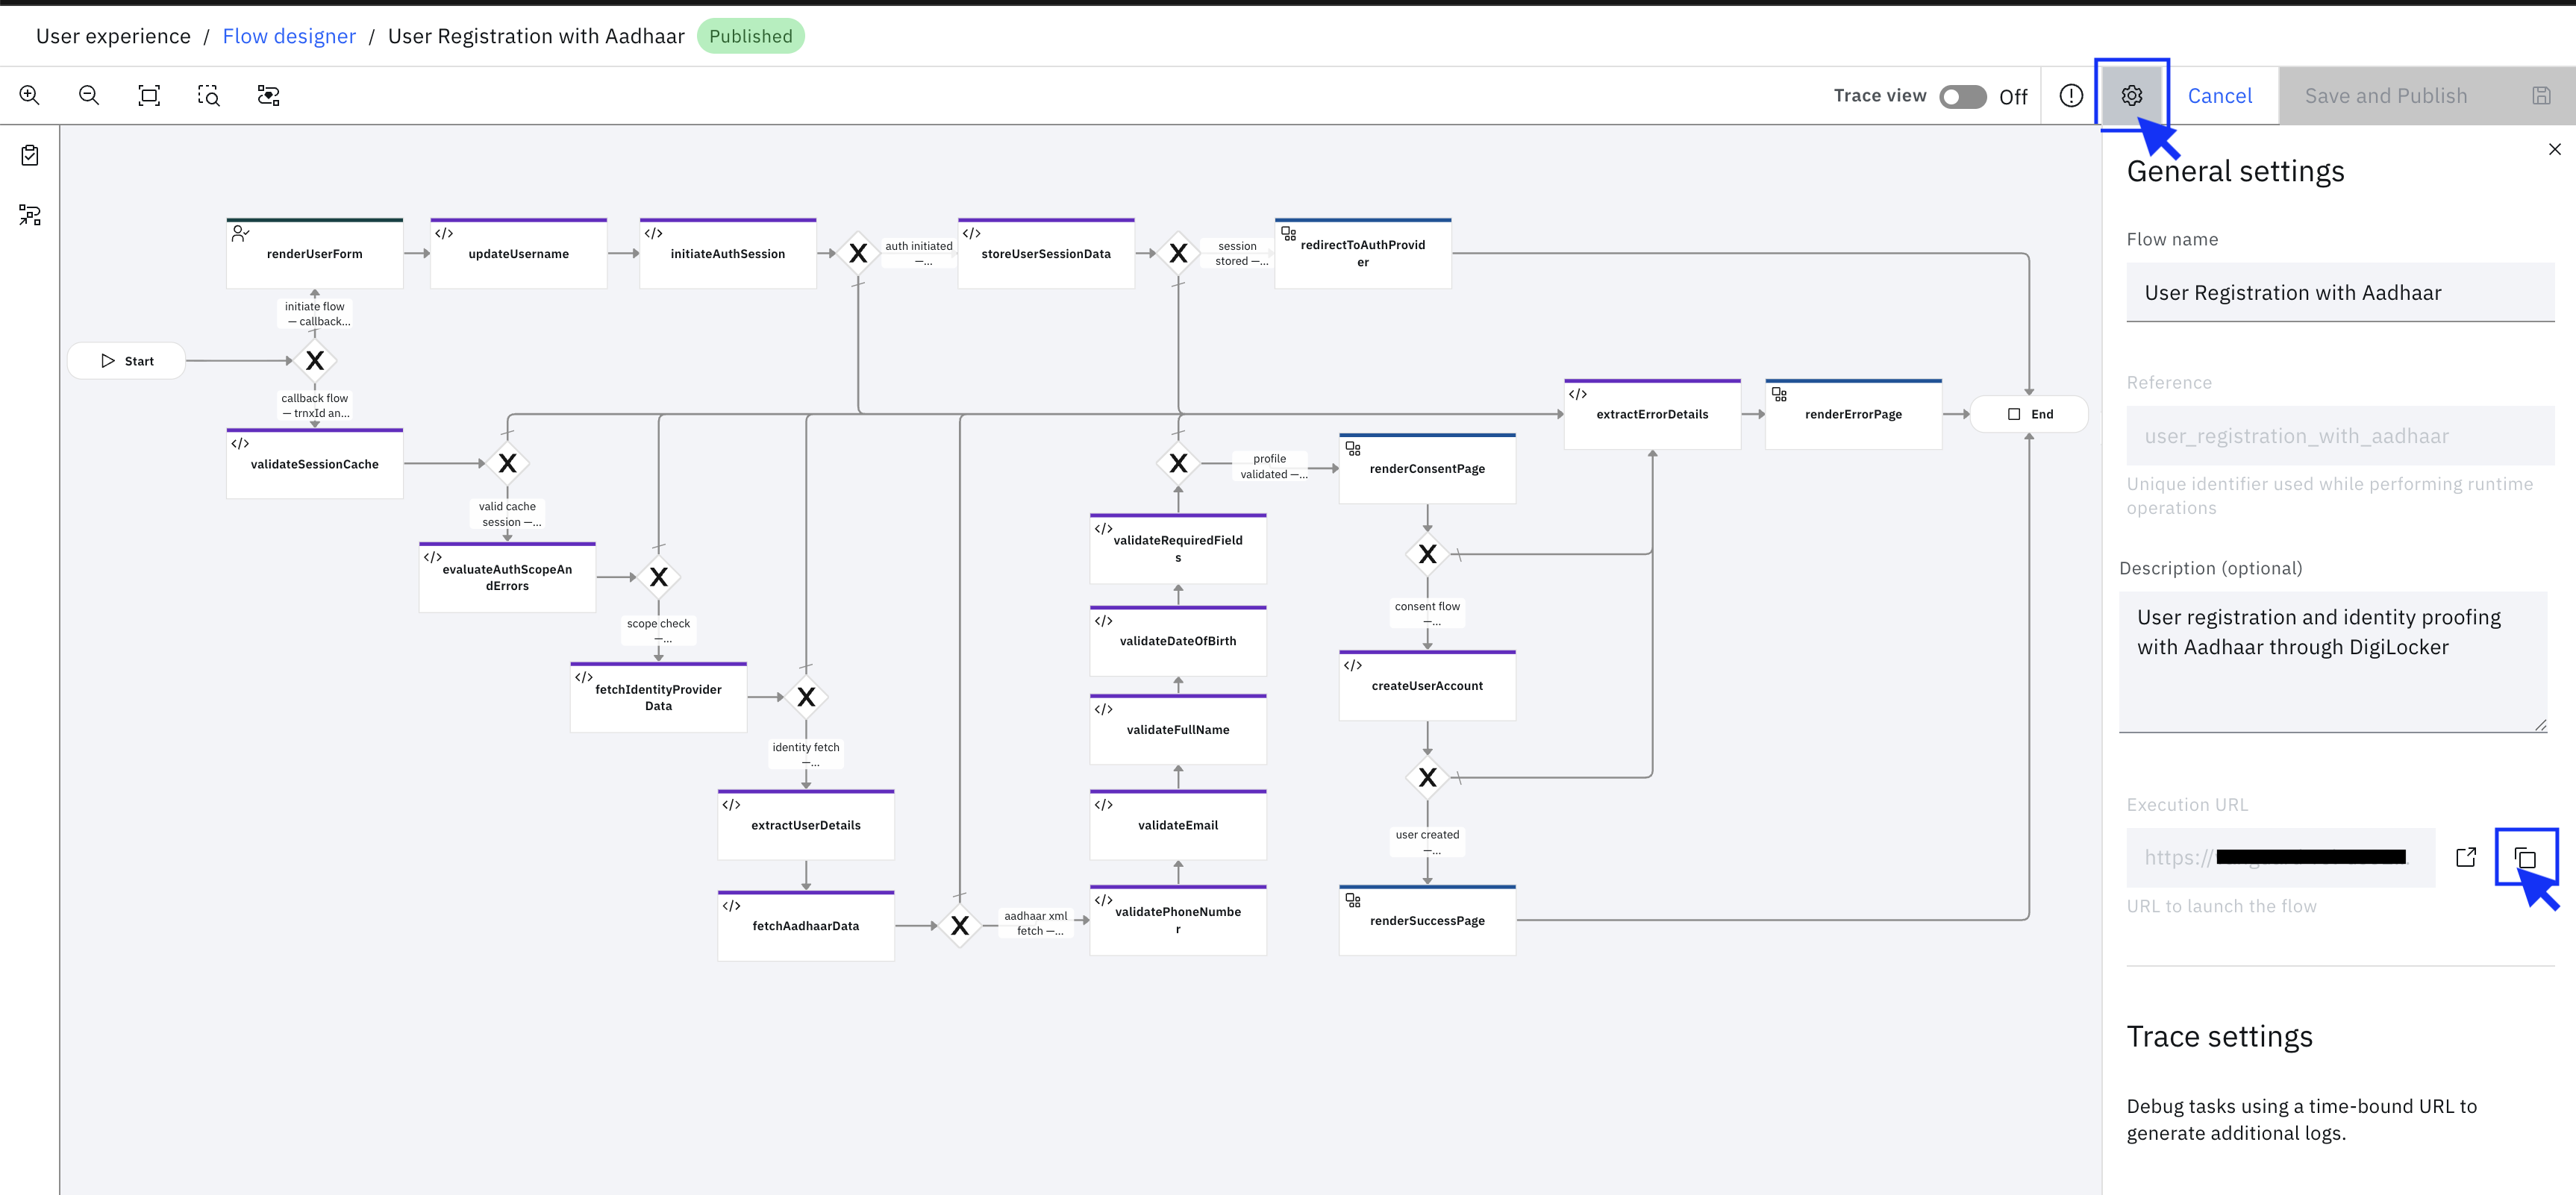
After the flow is published, click the ⚙️ Settings icon and the following is displayed:
- The execution URL - Copy this URL as it is required for launching the flow
- The flow layout
Step 5: Running the Flow
NoteTypically, the prescribed flow is triggered as part of user registration; however, it is recommended to run the end-to-end flow before it is enabled for generic usage.
You can run the flow explicitly with the flow execution URL.
Testing the Flow
-
Open the Execution URL in a browser.
-
Complete the user registration form with your details.
-
You are redirected to MeriPehchaan for Aadhaar OTP-based authentication.
-
Enter your Aadhaar-linked mobile number. UIDAI sends a one-time passcode (OTP) to that number. Enter the OTP to authenticate, then consent to share your DigiLocker data with the service.
-
You are redirected back to the flow, which:
- Validates your DigiLocker data
- Fetches your Aadhaar information
- Cross-validates all data points
- Displays a consent page with validation results
-
Review the validation results and provide final consent.
-
If all validations pass, your account gets created and a success page is displayed.
Integration with Your Application
To integrate this flow into your application:
- Embed the flow: Use the execution URL as an iframe or redirect users to it.
- Handle callbacks: Configure your application to handle the redirect after successful registration.
- Execution URL Configuration: The execution URL is needed for launching the flow from your application.
Summary
This flow demonstrates how IBM Verify seamlessly integrates with India's Aadhaar ecosystem to enable secure, government-verified user registration. By leveraging Aadhaar-based identity proofing through DigiLocker and MeriPehchaan, organizations can implement robust identity verification while maintaining user privacy and regulatory compliance.
The flow showcases IBM Verify's flexibility in integrating with external identity verification systems, custom user forms, data validation workflows, and secure user account creation with verified identity information. This approach is particularly valuable for CIAM implementations in India where Aadhaar-based verification is essential for regulatory compliance and fraud prevention.
Vishesh S Amin, IBM Security
Updated about 1 month ago