Hybrid Azure AD Join
Introduction
This document provides instructions on how to configure Hybrid Azure AD join by using IBM® Verify as the Identity Provider.
The following Prerequisites must be met before configuration:
- Azure AD with administrator access.
- Windows AD server e.g. Windows Server 2019 Datacenter edition, installed with Azure AD Connect.
- Windows 10 device domain joined to Windows AD domain.
- Windows device with Powershell and Microsoft Online Services Module installed.
- IBM Verify domain with administrator access.
Complete the following tasks:
- Azure Active Directory
- Configure a federated Azure AD Domain.
- On-premise Microsoft® Active Directory
- Setup the On-premise Active Directory.
- Setup Azure AD Connect.
- Enable Kerberos Authentication.
- IBM Verify
- Configure Microsoft 365 application (WS-Federation).
Configure a federated Azure AD domain
Refer to the Microsoft 365 WS-Federation single sign-on (SSO) configure guide with the following steps:
- Open IBM Verify Admin portal.
- Click
Applications. - Create a new Microsoft 365 application or select an existing Microsoft 365 application.
- Click the
Sign-ontab, and selectWS-Federationas the Sign-on method.
The guide is displayed on the right panel.
Configure On-premise Active Directory
Note: The following instructions are based on a fresh installed Windows Server 2019 Datacenter edition with the latest updates installed.
Add Active Directory Role to Windows Server
- From the
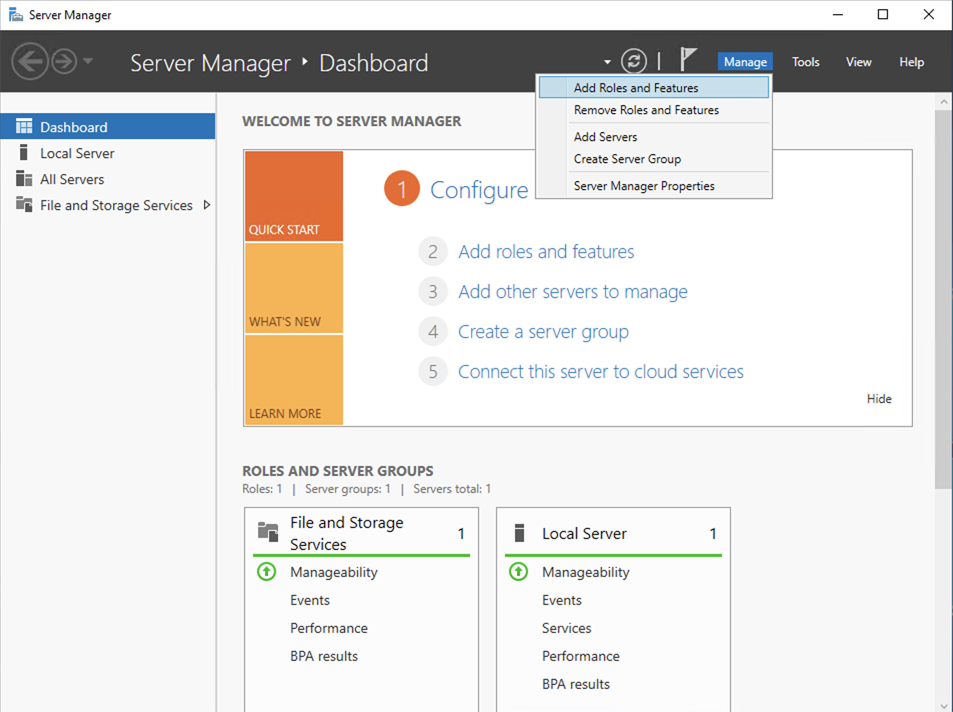
Server Manager, clickManageand selectAdd Roles and Featuresfrom dropdown to launchAdd Roles and Features Wizard.
- In the
Add Roles and Features Wizard, clickNext. - In the
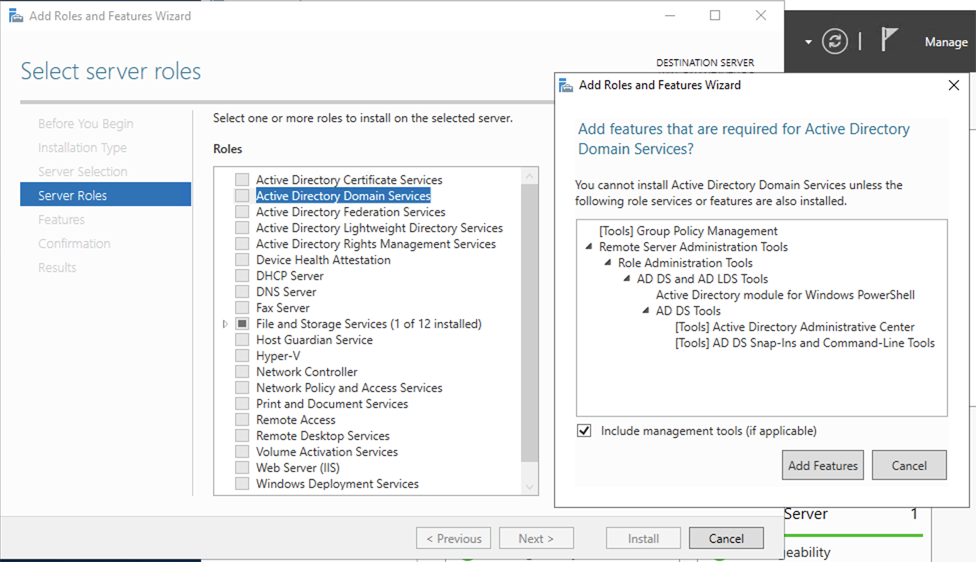
Select server Roleswindow, select theActive Directory Domain Servicescheckbox and clickAdd Featuresin the pop-up window.
- In the
Select featureswindow, clickNext. - In the
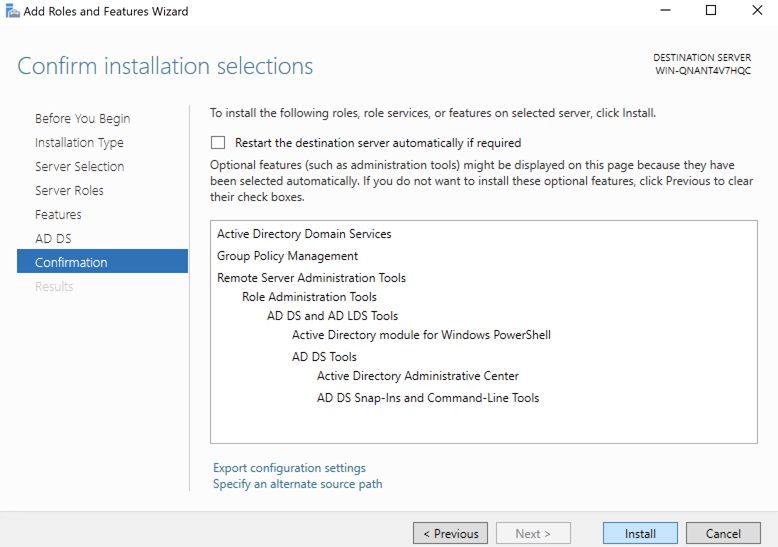
Confirmationpage, clickInstall.
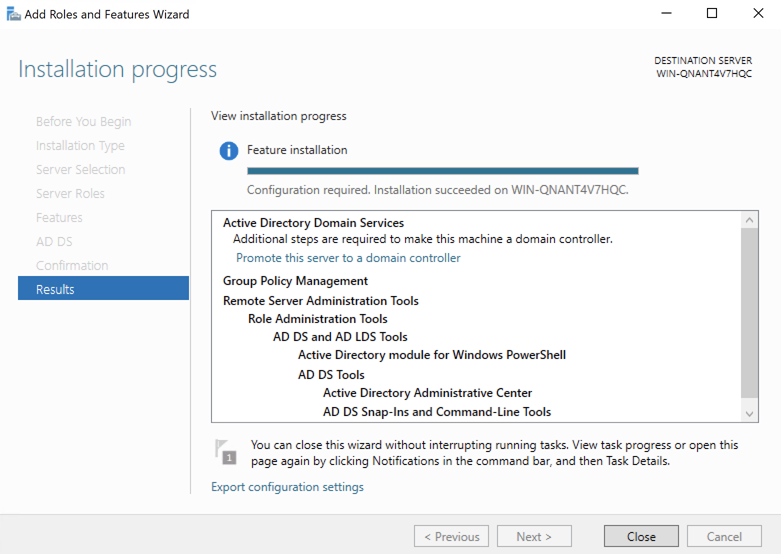
- After the installation is complete, close the
Add Roles and Features Wizard.
Configure Active Directory
- From the
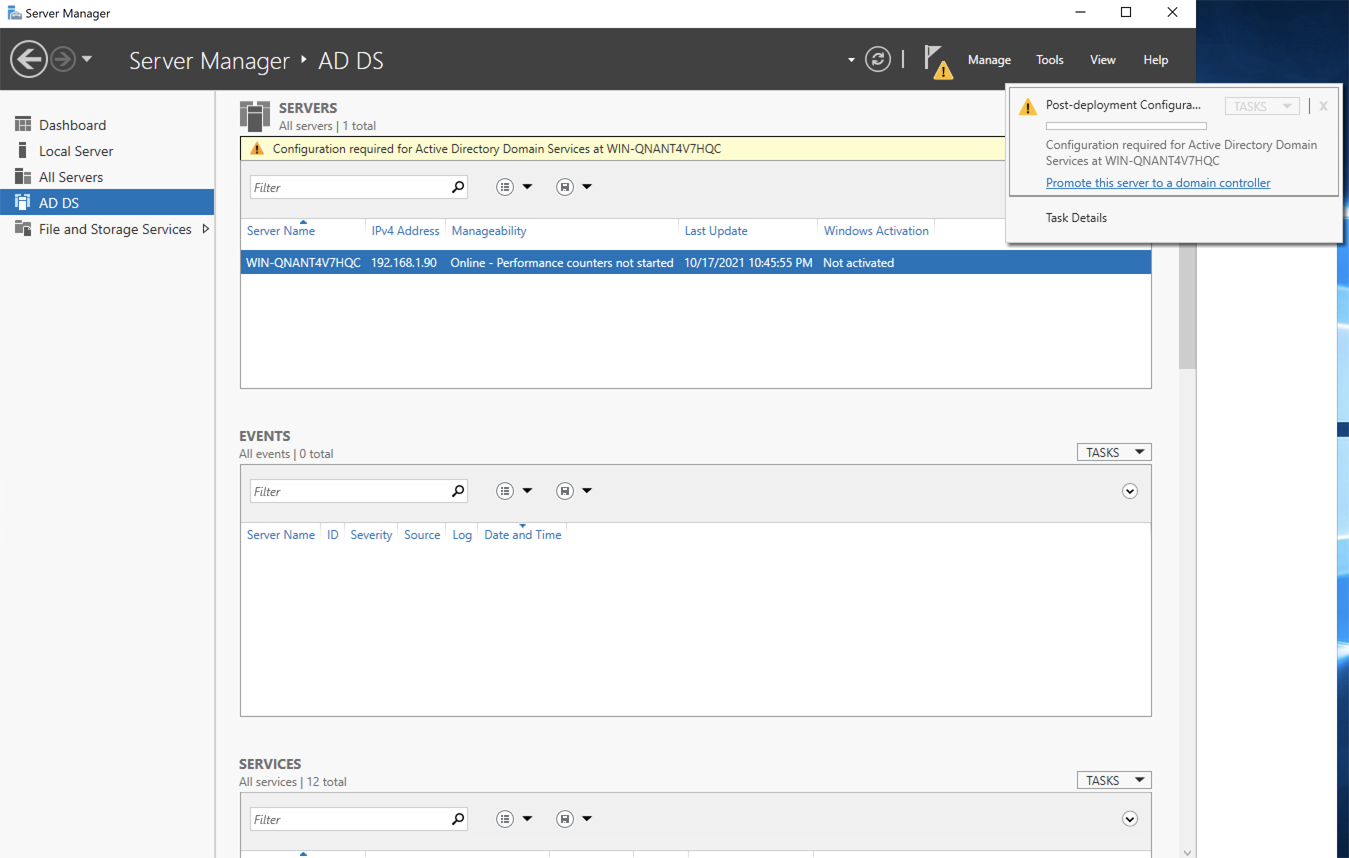
Server Manager, click the notification icon and selectPromote this server to a domain controller.
- In the
Active Directory Domain Services Configuration Wizard, underDeployment Configuration, selectAdd a new forestand specify the domain name.
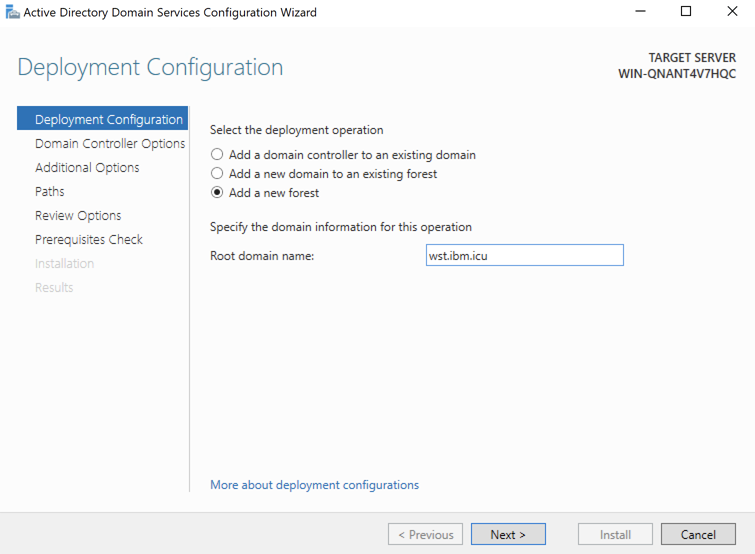
The domain name is the one that is used in Configure a federated Azure AD domain.
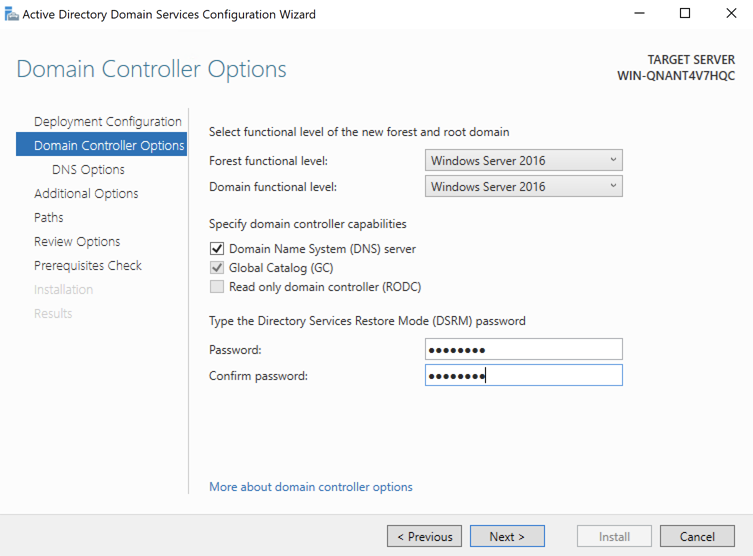
3. In the Domain Controller Options window, use the default options and specify a Directory Service Restore Mode (DSRM) password. Click Next to proceed.
- In the
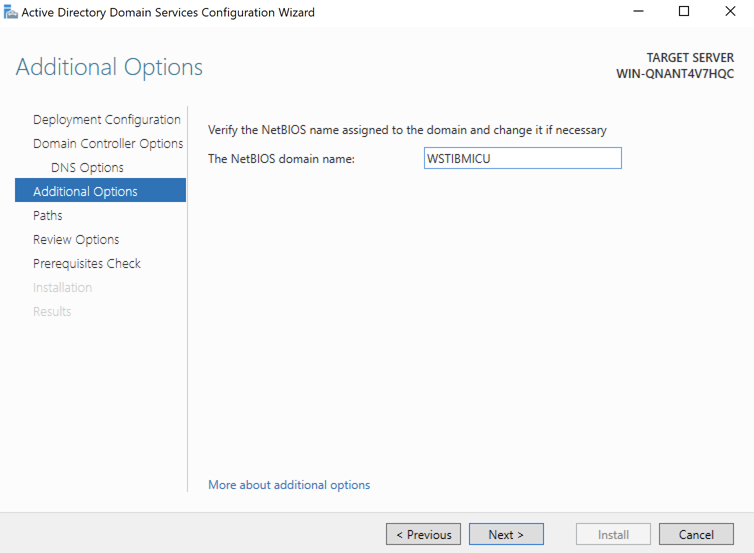
Additional Optionswindow, change the NetBIOS domain name if necessary.
- Click
Nextfor the rest of the windows. - In the
Installationwindow, clickInstall. The Windows Server restarts automatically after the installation is completed. If it does not restart automatically, restart it manually.
Test join to the On-premise Active Directory from a Windows 10 device (Optional)
Creating a new domain user for domain join
- From
Administrative Tools, openActive Directory Users and Computersand expand your domain. - Right-click
Usersand selectNew>User.
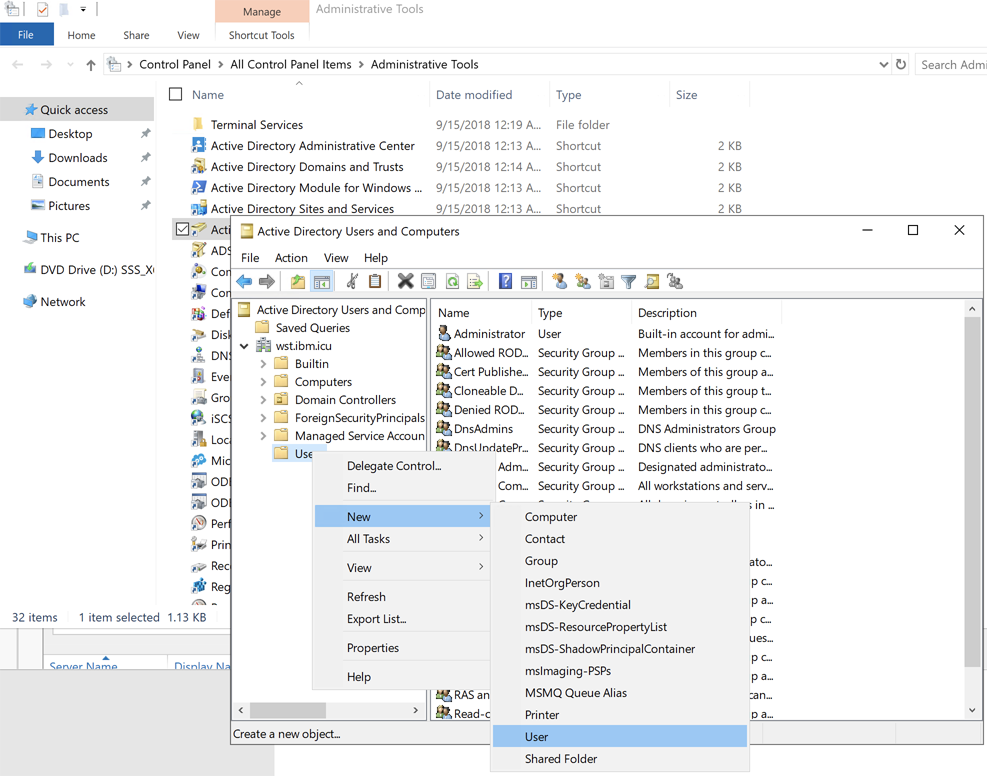
- Specify the required information to create the user.
Join the Windows Domain
Note:
- Windows 10 Home Edition does not support domain join, use Windows 10 Professional or Enterprise or Educational edition.
- The Windows AD configured in Configure On-premise Active Directory must be used as a DNS of Windows 10 device. Change the Windows 10 device network configure accordingly.
-
Sign in to the Windows 10 device.
-
Open
Settings, selectAccounts>Access work or school. -
Click
Connect. -
Select
Join this device to a local Active Directory domain.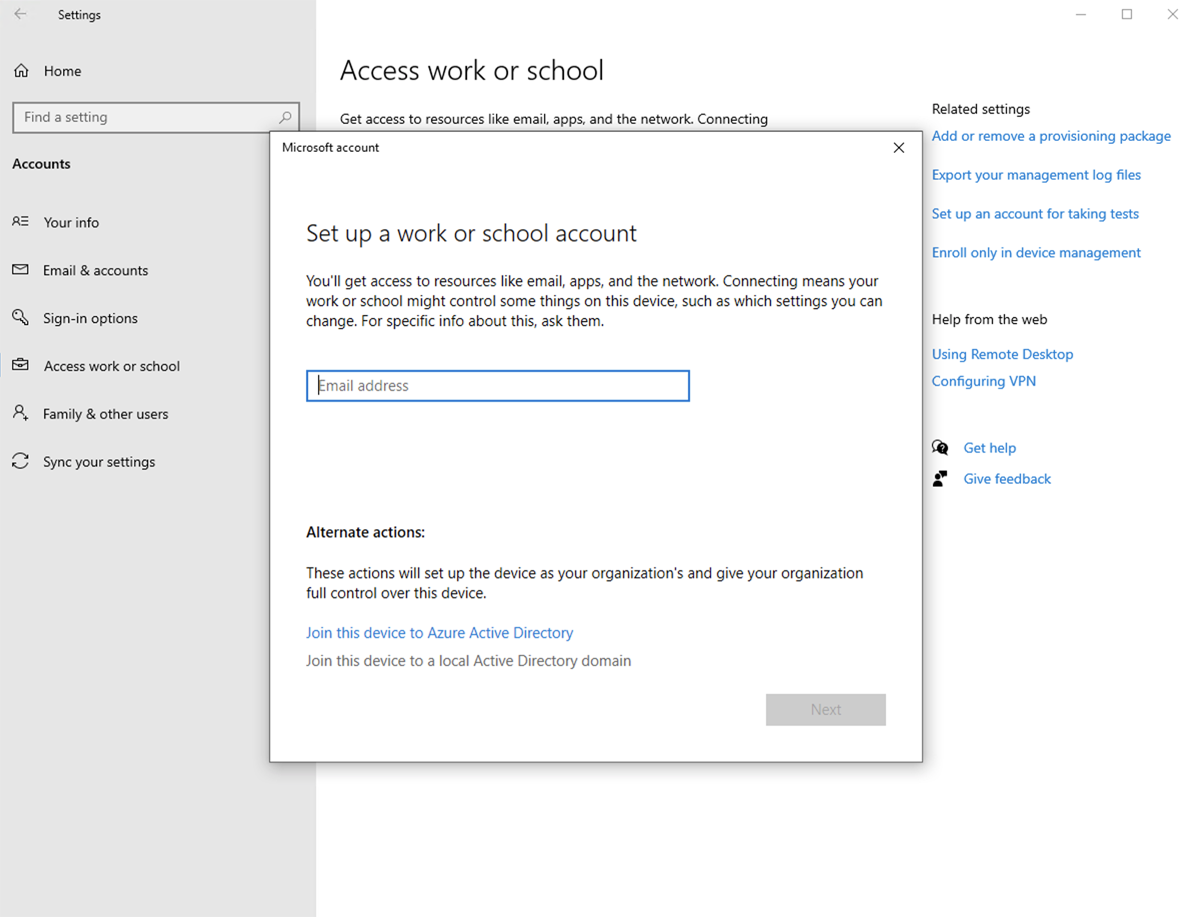
-
Enter the Domain name you have configured in Configure AD.
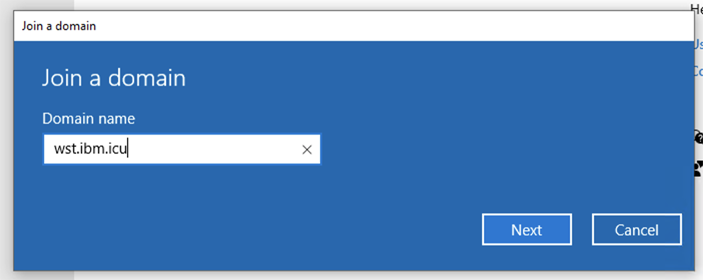
-
Enter the credentials from Create a new domain user for domain join and click
OK.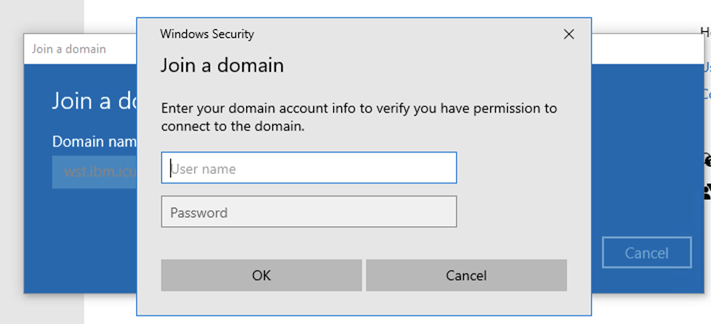
-
Click
NextorSkip -
Click
Restart now.
-
-
Verify that the Windows 10 device is part of the domain after restarting.
-
The following screen appears after restarting. The domain name is the NetBIOS domain name.
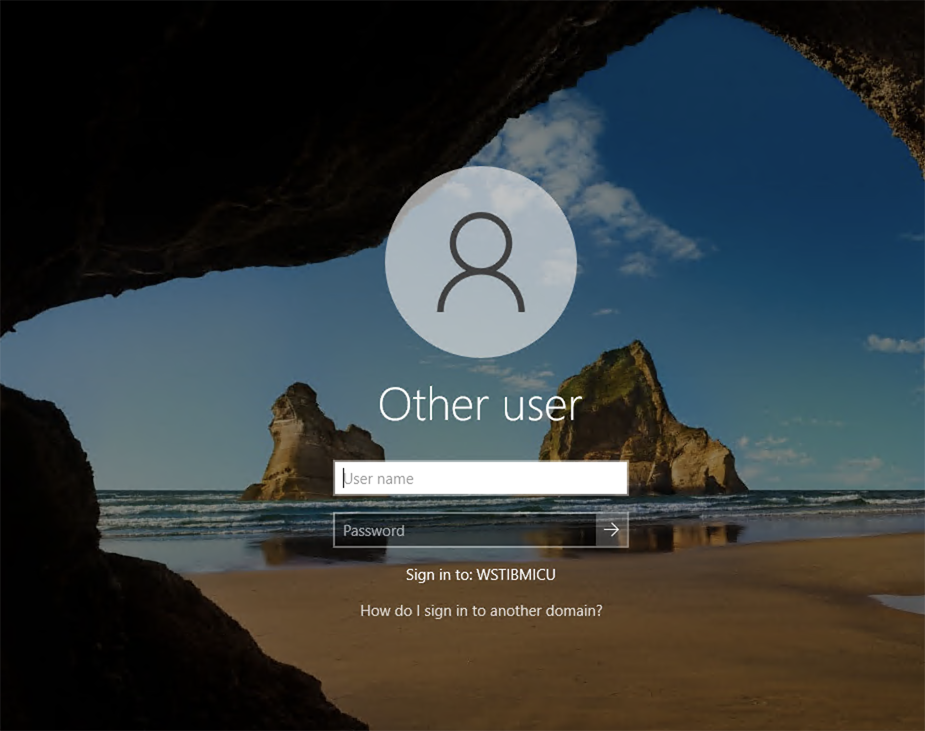
-
Ensure that the sign in to Windows with the domain user is successful.
-
Installing and Configuring Azure AD Connect on the On-premise Active Directory
Installing Azure AD Connect
- Download the Azure AD Connect installer from https://www.microsoft.com/en-us/download/details.aspx?id=47594.
- Double-click the installer to start the installation.
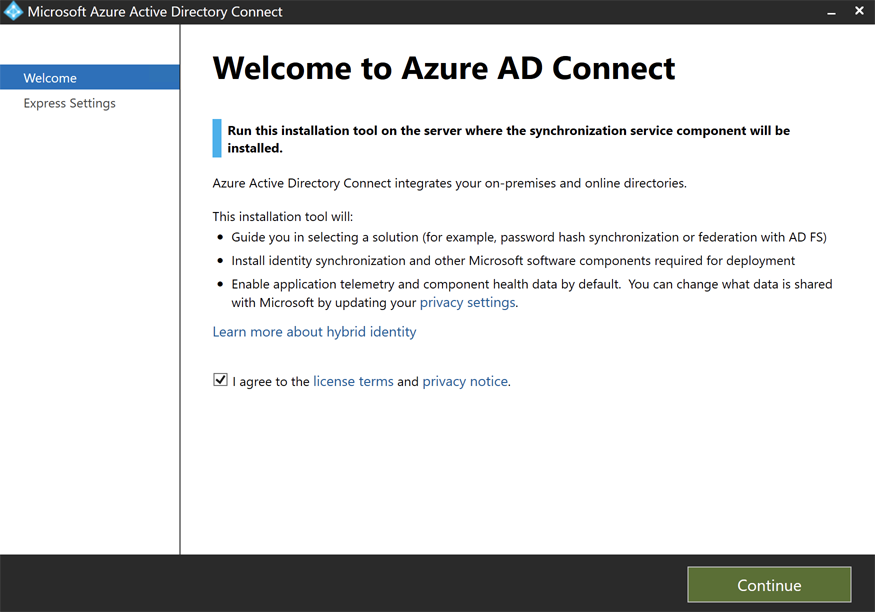
- In the Welcome window, agree to the license terms and privacy notice.
- Click
Continue.
- In the
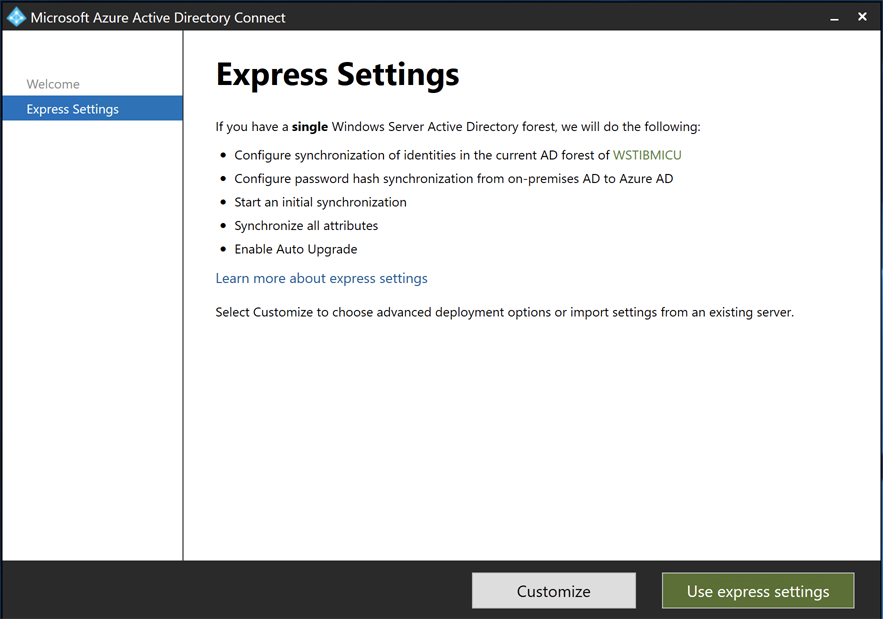
Express Settingswindow, clickCustomize.
- In the
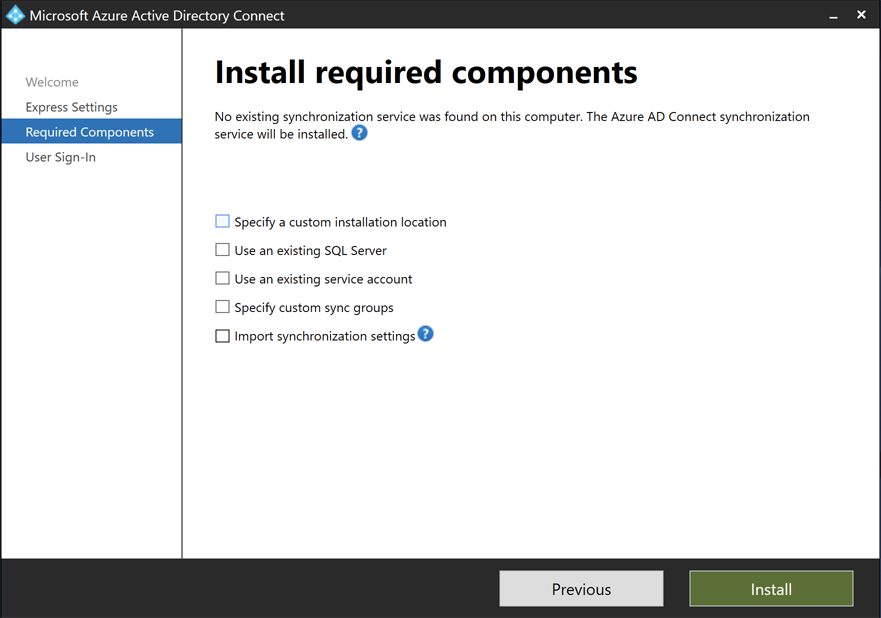
Required Componentswindow, clickInstallwithout selecting any options.
-
Wait for the installation of the optional components to complete.
-
Configure Azure AD Connect:
-
In the
User Sign-inwindow, selectDo not configure.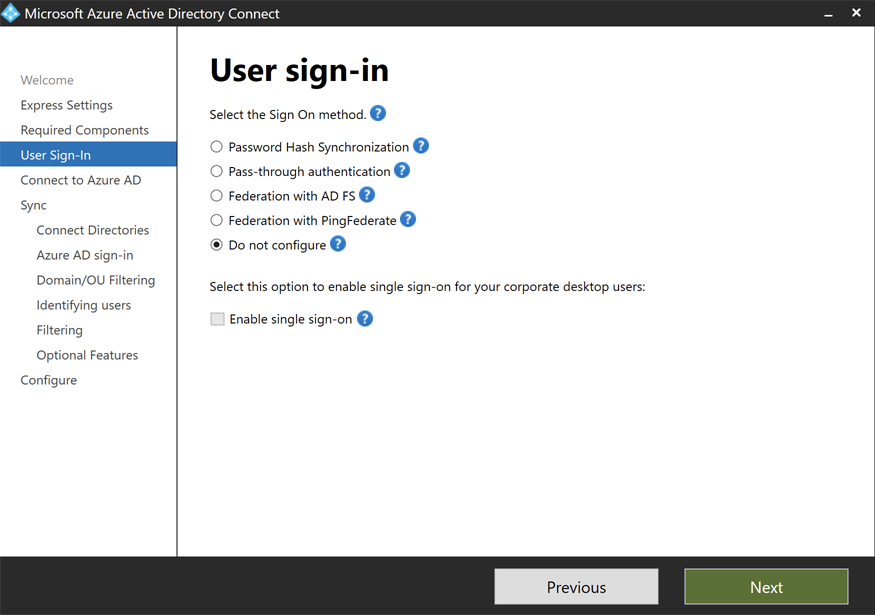
-
In the
Connect to Azure ADwindow, specify your AAD Admin login credential.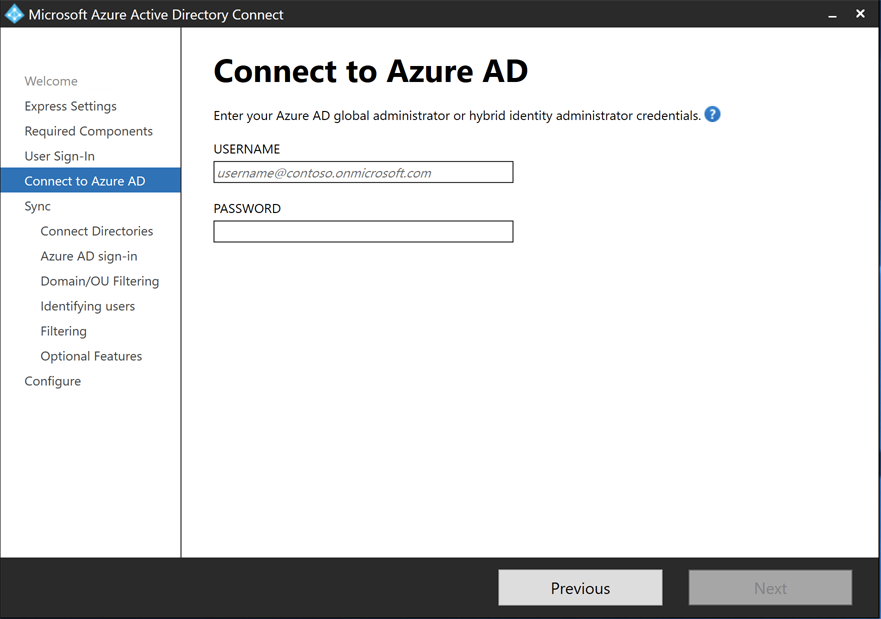
-
Click
Sync>Connect Directories, select the On-premise Active Directory domain name for the FOREST, and clickAdd Directory. -
Select
Create new AD accountand specify the On-premise Active Directory domain Admin (The Windows AD Server administrator user) credential at the popup windows.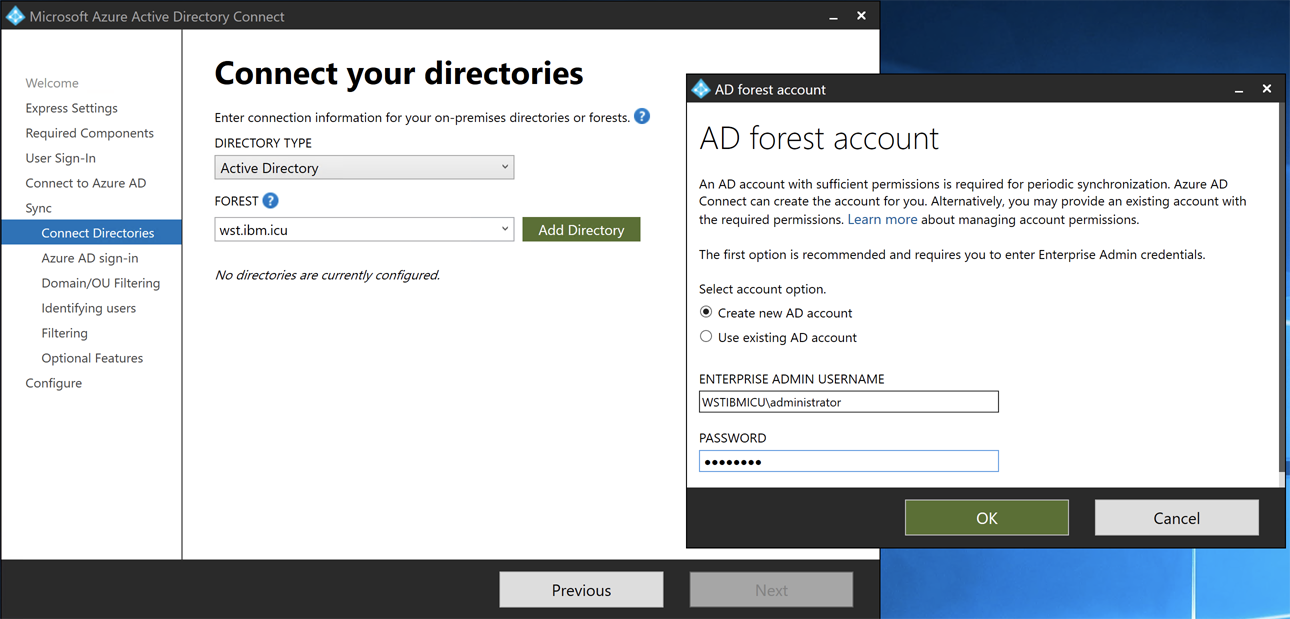
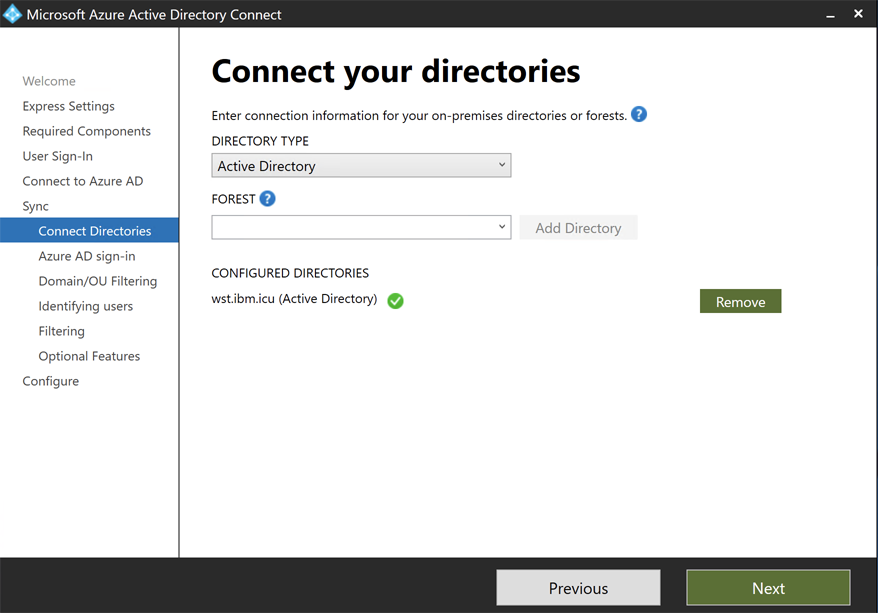
-
-
Do not change the remaining options and click
Nextfor the rest of the pages. -
Click
Install.
Configuring Azure AD Connect for hybrid Azure AD join
- Launch Azure AD Connect by double-clicking the desktop icon.
- In the
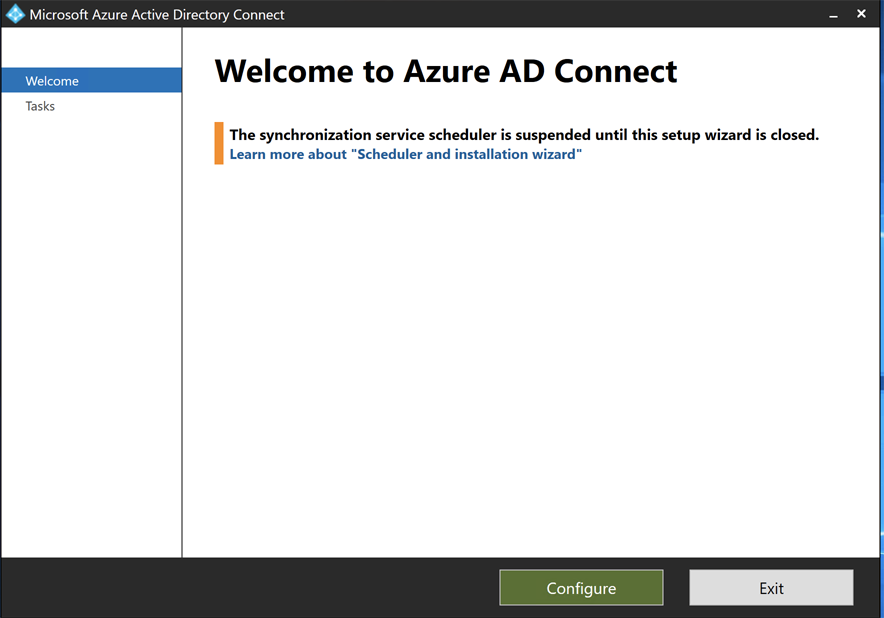
Welcomewindow, clickConfigure.
- In the
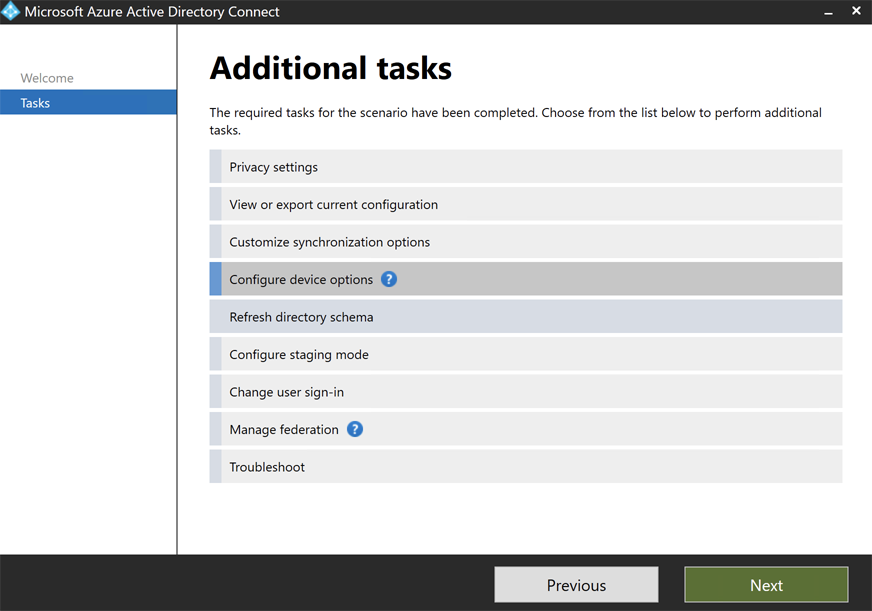
Taskswindow, selectConfigure device optionsand clickNext.
- In the
Overviewwindow, clickNext. - In the
Connect to Azure ADpage, enter the AzureAD Admin credential. - In the
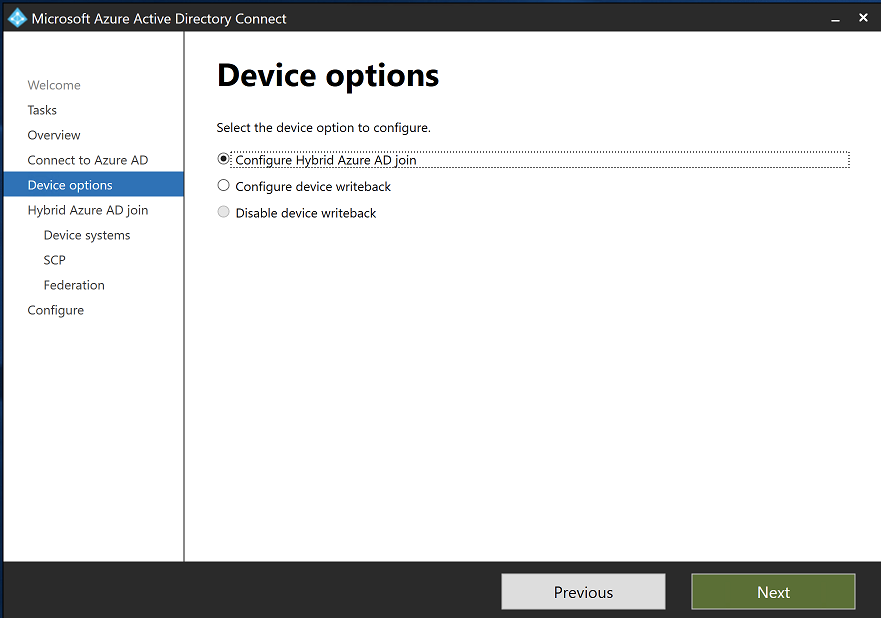
Device optionswindow, selectConfigure Hybrid Azure AD joinand clickNext.
- In the
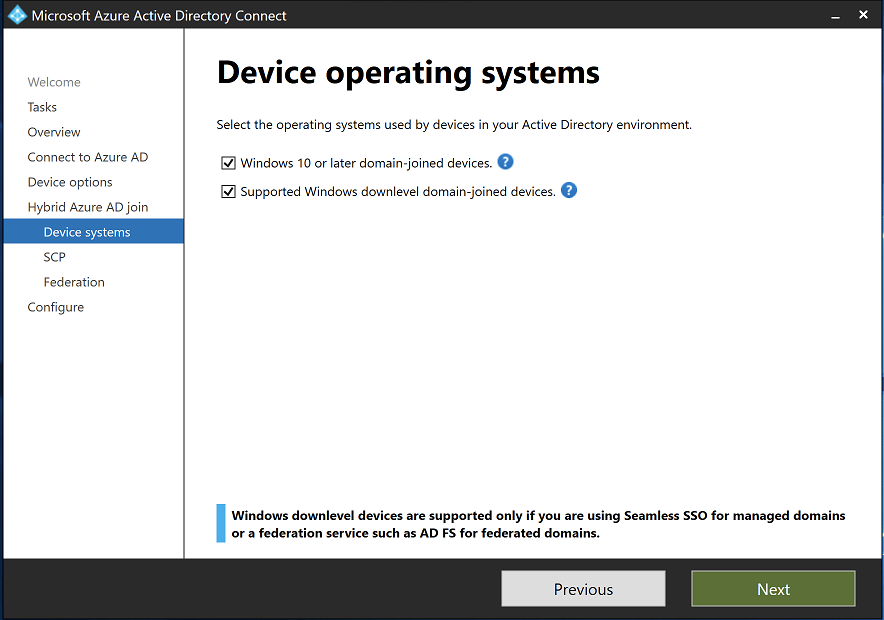
Device systemswindow, select both options and clickNext.
- In the
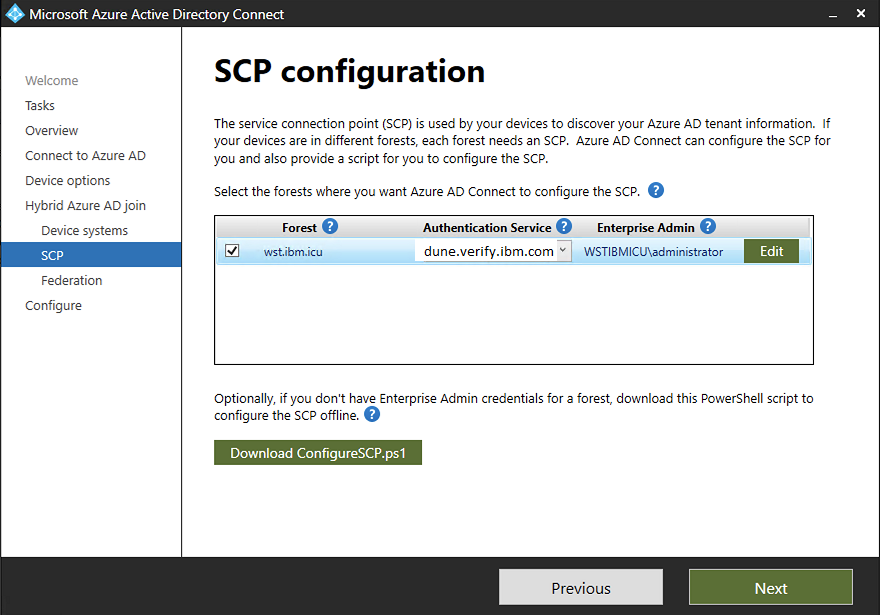
SCPwindow, select the checkbox next to the domain name. - Select the IBM Verify tenant name for
Authentication Serviceand clickAdd. - Specify the On-premise Active Directory domain Admin (The Windows AD Server administrator user) credential and click
Next.
- Click
Nextfor the rest of the pages and clickConfigure. - Click
Exitafter the configuration is completed.
Configuring Controlled validation of hybrid Azure AD join
Refer to this Microsoft document Controlled validation of hybrid Azure AD join.
Clearing the SCP from AD
Configuring client-side registry setting for SCP
See Configure client-side registry setting for SCP.
Skip the remaining part of this Microsoft document Controlled validation of hybrid Azure AD join.
Validating Hybrid Azure AD Join on an On-premise Active Directory domain joined Windows 10 device (Optional)
Join to the On-premise Active Directory Domain
Refer to Test join to the On-premise Active Directory from a Windows 10 device (Optional) section to join a Windows 10 device to local AD domain.
Wait for the Windows 10 device status become Hybrid Azure AD Joined
It can take up to 30 minutes to synchronize the newly On-premise Active Directory Domain joined Windows 10 device to Azure AD.
It might take another 30 minutes or more for the device to complete Hybrid Azure AD join after it is synchronized to Azure AD.
Note: Try rebooting the Windows 10 device and sign-in again if Hybrid Azure AD join is not fully completed after a long time.
-
Check Windows 10 device Hybrid AAD join status by using command line
dsregcmd /statuson the Windows 10 device:-
After On-premise Active Directory Domain join, before Hybrid Azure AD join is fully completed, the device state is:
AzureADJoined: NO
DomainJoined: YES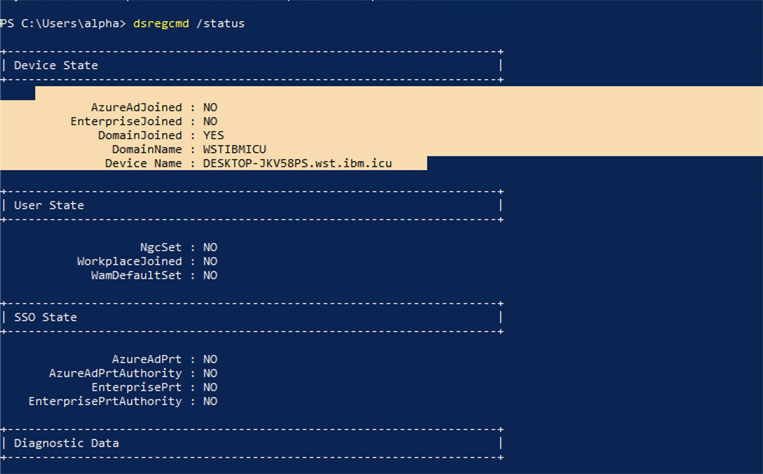
-
After Hybrid Azure AD join is fully completed, the device state is:
AzureADJoined: YES
DomainJoined: YES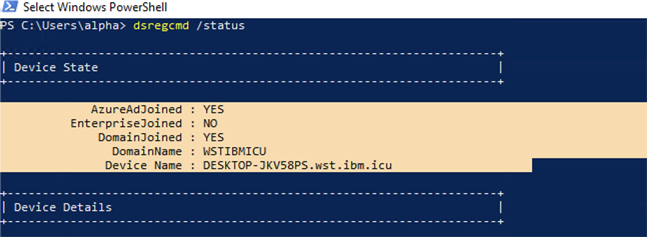
-
-
Check Windows 10 device Hybrid Azure AD join status in the Azure portal:
After the On-premise Active Directory Domain joined device is synchronized to AAD, the device appears inAzure portal-Azure Active Directory-Devices.-
Before Hybrid Azure AD join is fully completed, the device state
Registeredcolumn isPending.
-
After Hybrid Azure AD join is fully completed, the device state
Registeredcolumn is date and time on which Hybrid AAD join is fully completed.
-
Configuring Service Principal Name (SPN) and Keytab file to enable Kerberos Authentication
Creating a Service Account User on Windows AD Server
Refer to Create a new domain user for domain join section on how to create a new domain user.

When you are creating a password for the service account, uncheck User must change password at next logon and check Password never expires.
Enabling Kerberos AES encryption for the Service Account User (Optional)
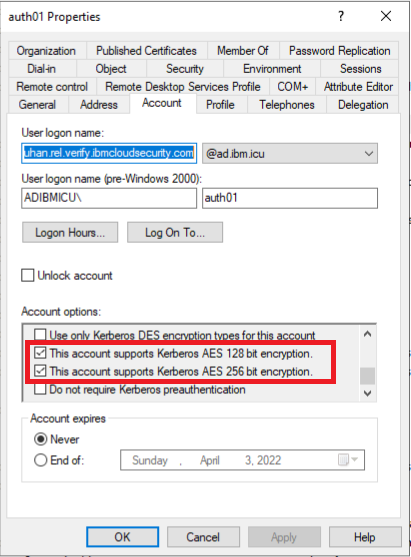
- Right-click the newly created Service Account User and select
Properties. - On the
Accounttab, inAccount optionsselectThis account supports Kerberos AES 128 bit encryption.and/orThis account supports Kerberos AES 256 bit encryption.
- Click
OKto save the change.
Finding out the DNS A record of the IBM Verify tenant hostname
The DNS A record of the IBM Verify tenant hostname must be used to configure the Service Principal Name (SPN) and create the Kerberos keytab file.
Refer to Linux / MacOS or Windows to find out the DNS A record.
Linux / MacOS
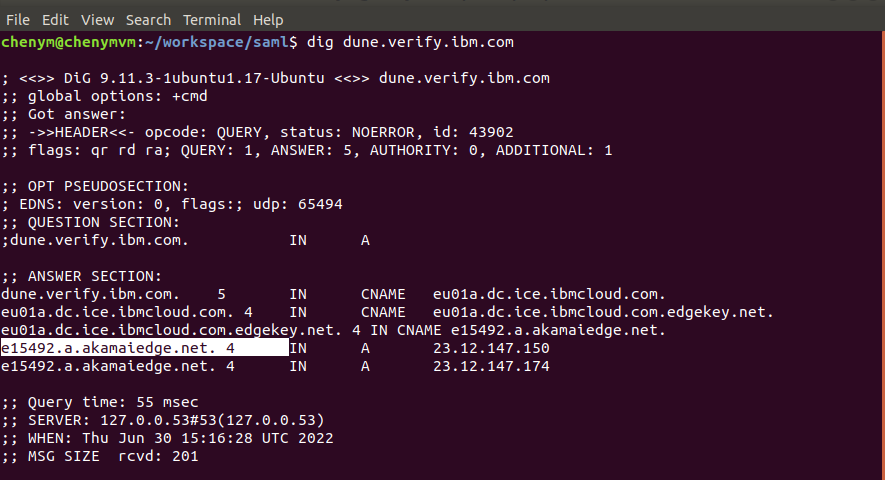
- Open terminal and execute the following command:
dig <ISVTenentHostName> - From the output, under the
;; ANSWER SECTION:section, there are lines in this format<FQDN>. 4 IN A <IP>, where the<FQDN>is the DNS A record for the IBM Verify tenant hostname.
Note: Remove the '.' (dot) at the end of the DNS A record.
Windows
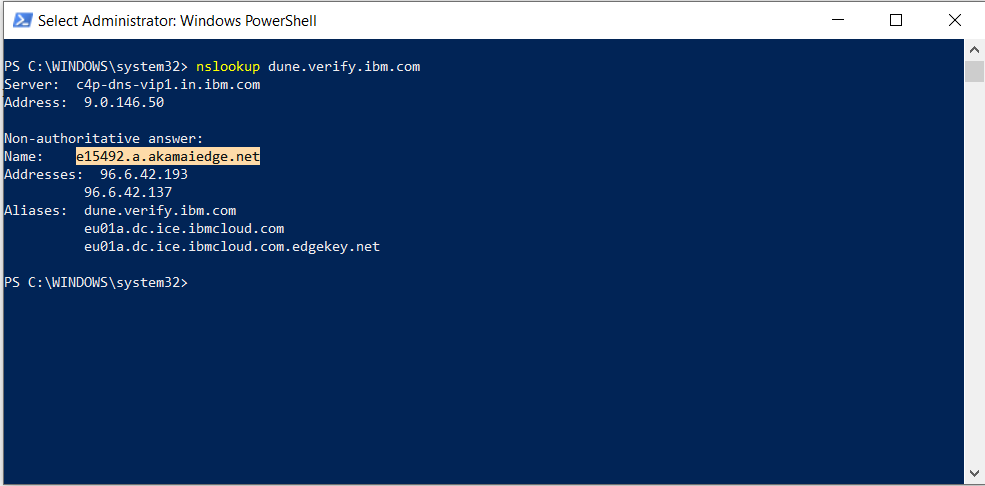
- Open PowerShell and execute the following command:
nslookup <ISVTenentHostName>.
Note: In the command line, a '.' (dot) must be appended after the IBM Verify Tenant Hostname without space. - From the output, under
Non-authoritative answer:, there is a line starts withName:, the value afterName:is the DNS A record for the IBM Verify tenant hostname.
Configuring Service Principal Name (SPN)
Open PowerShell and execute the following command to configure an SPN for the service account.
The SPN must be set to IBM Verify WSFed app configure.
setspn -S HTTP/<ISVTenantHostName_DNS_A_RECORD> <ServiceAccountName>
(Optional) Verify the Service Account has the required servicePrincipalName attribute with a valid value. Enter the following command:
setspn -L <ServiceAccountName>

6.4 Configuring the Keytab file
Open a PowerShell console, and run the following command to configure the Keytab file.
The Keytab file is the must be uploaded to IBM Verify WSFed app configure.
NOTE: Use uppercase for DOMAINNAME.
ktpass /out <FullPathToKeytabFile> /princ HTTP/<ISVTenantHostName_DNS_A_RECORD@DOMAINNAME> /mapuser <ServiceAccountName> /pass <ServiceAccountNamePassword> /pType KRB5_NT_PRINCIPAL
If encryption is needed, additional parameters can be appended to the end of the command:
- For AES128: append
/crypto AES128-SHA1. - For AES256: append
/crypto AES256-SHA1.
Refer to Microsoft document ktpass forktpasscommand details.

Optional Step: Configure keytab file to contain multiple SPNs.
Pre-condition: an existing keytab file contains one or more SPNs.
To add a SPN for the ServiceAccount into the existing keytab file, run the following command:
ktpass /in <FullPathToOriginalKeytabFile> /out <FullPathToNewKeytabFile> /princ HTTP/<ISVTenantHostName_DNS_A_RECORD@DOMAINNAME> /mapuser <ServiceAccountName> /pass <ServiceAccountNamePassword> /pType KRB5_NT_PRINCIPAL
If /in and /out are the same file, the existing keytab file is overwritten.
Configuring IBM Verify tenant URL to Intranet zone using Group Policy Object
-
Open the
Group Policy Management. -
Edit the
Client Side SCPgroup policy object that is created in Configure client-side registry setting for SCP.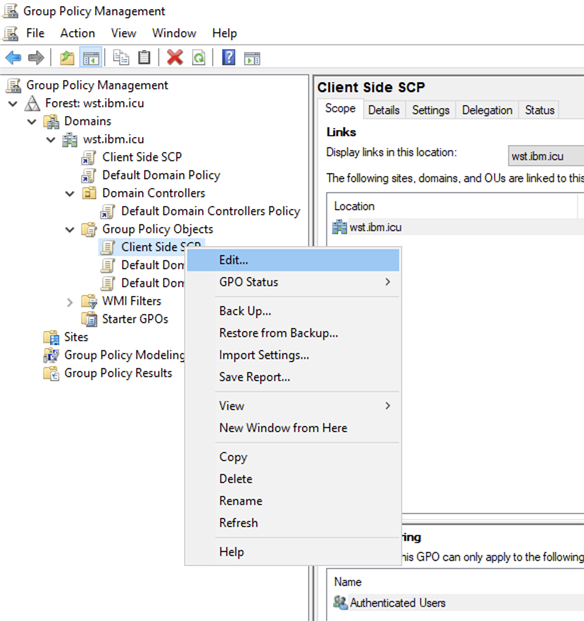
-
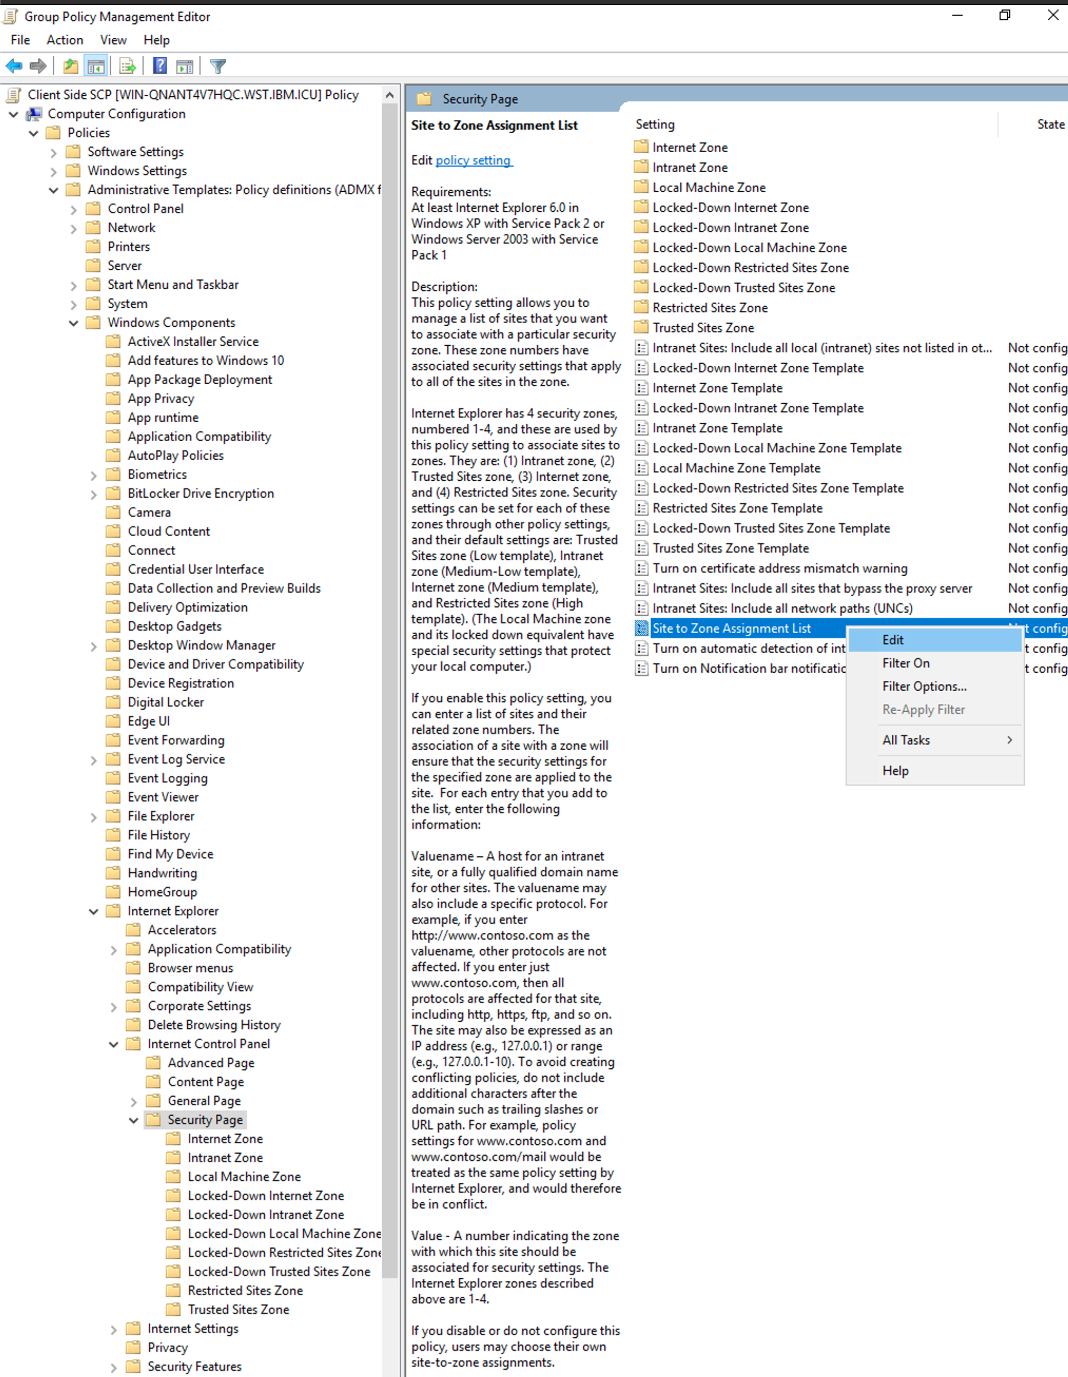
Select
Policies>Administrative Templates>Windows Components>Internet Explorer>Internet Control Panel>Security Page. -
Edit
Site to Zone Assignment List.
- Enable the policy and click
ShowunderOptions.
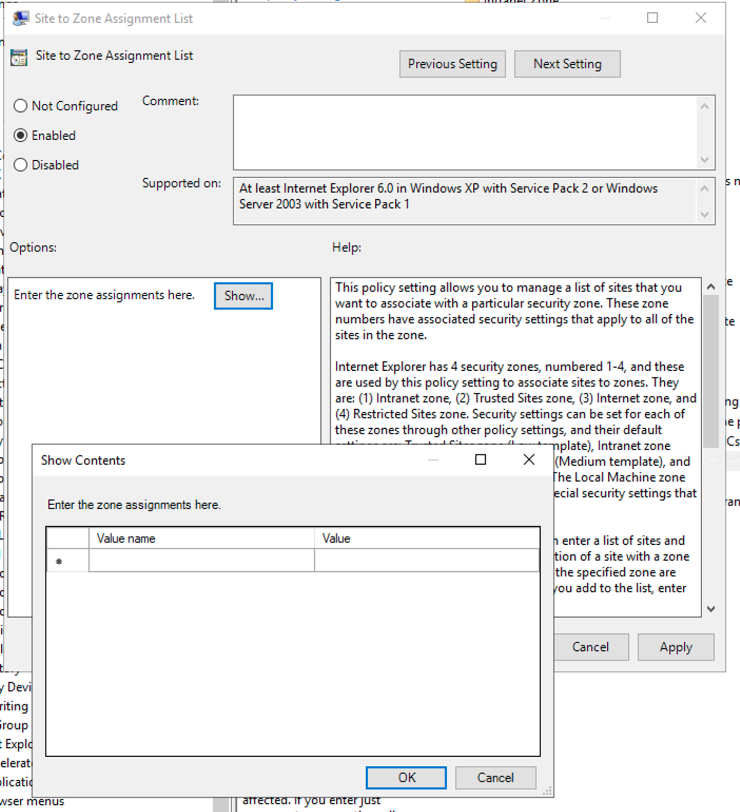
- Enter the IBM Verify tenant URL to
Value name(the URL shall start withhttps://), enter 1 toValue.
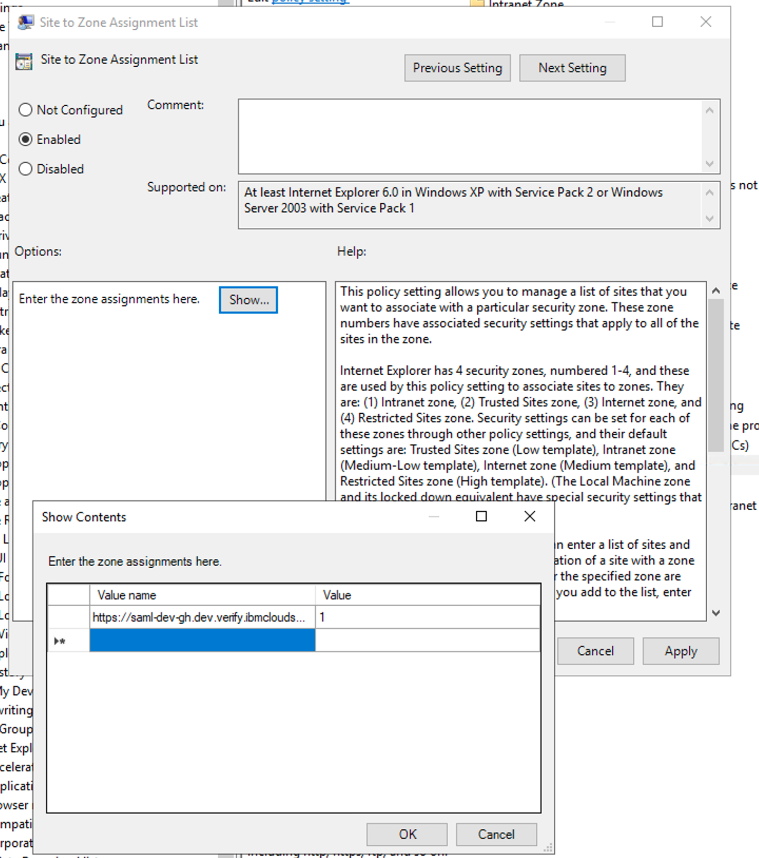
- Save and close. Ensure that the
Client Side SCPgroup policy object is linked to the domain.
This should have already been completed in Configure client-side registry setting for SCP.
Enabling Kerberos authentication for IBM Verify Microsoft 365 application (WS-Federation)
Kerberos authentication can be enabled by using either IBM Verify WebUI or API.
- Refer to Using WebUI to enable Kerberos authentication using WebUI.
- Refer to Using API (curl) to enable Kerberos authentication using API.
Using WebUI
If there is an existing Microsoft 365 application (WS-Federation), refer to Update an existing Microsoft 365 application (WS-Federation).
Otherwise, refer to Create new Microsoft 365 application (WS-Federation).
Update an existing Microsoft 365 application (WS-Federation)
- Login to the IBM Verify Admin portal.
- Click
Applications. - Find the Microsoft 365 application to update from the list and click the gear icon on the right of the row to change the application settings.
- Click the
Sign-ontab. Ensure that theSign-on methodisWS-Federation. - At the
Upload keytab filesection, clickSelect keytab fileand select the keytab file to use. - At the
Service principal namessection, enter the SPN to use. - If the
Federate multiple domains for Microsoft 365is checked, multiple SPNs can be added.
Note: Ensure that the keytab file contains all the SPNs. - Click
Save. The sha256 checksum of the uploaded keytab file is displayed after saving.
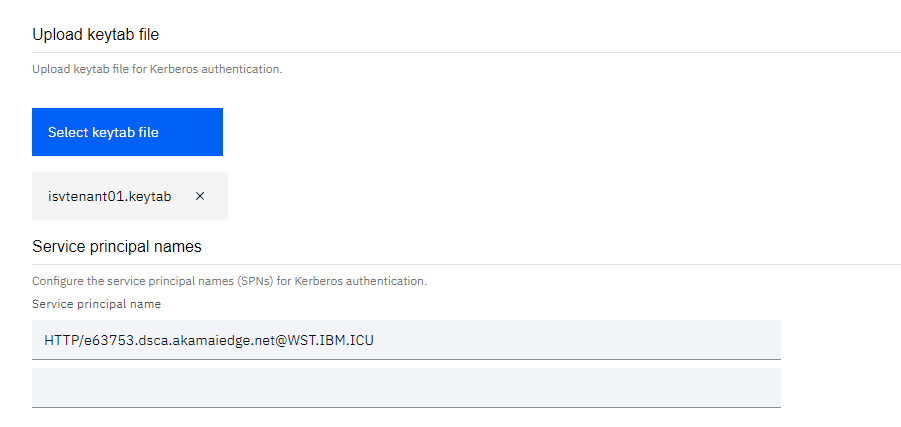
Create new Microsoft 365 application (WS-Federation)
- Login to the IBM Verify Admin portal.
- Click
Applications. - Click
Add application. - Select
Microsoft 365from theSelect Application Typelist and clickAdd application. - Fill in the information on
Generaltab. - Click the
Sign-ontab and selectWS-FederationforSign-on method.Provider IDandWS-Federation end point of the applicationare not changed. Ensure that the correct certificate is selected forSignature Certificate. - Select the attribute to be used for
Name identifierunderSAML subject. - Select the attributes to be used for
UPNandImmutableIDunderAttribute mappings. Additional attribute mappings can be added here if needed. - Click
Select keytab fileand select the keytab file to use. - In the
Service principal namessection, enter the SPN to use. - If
Federate multiple domains for Microsoft 365is checked, multiple SPNs can be added.
Note: make sure the keytab file contains all the SPNs. - Click
Savebutton at the bottom right of the page. - Configure the
Access TypeatEntitlementstab. - Click
Save.
Provisioning on-premises Microsoft Active Directory users into IBM Verify
Refer to Active Directory provisioning.
Validating Kerberos authentication by enabling OneDrive Silent Configuration (Optional)
OneDrive silent configure can be used to verify if Kerberos authentication is correctly configured.
For more information, see:
- https://docs.microsoft.com/en-us/onedrive/use-group-policy
- https://docs.microsoft.com/en-us/onedrive/use-group-policy#silently-sign-in-users-to-the-onedrive-sync-app-with-their-windows-credentials
Obtaining the OneDrive Administrative Template and install it to the Windows AD server
Refer to https://docs.microsoft.com/en-us/onedrive/use-group-policy to obtain the OneDrive Administrator Template files, and copy them to the Windows AD server.
- Open File Explorer, specify
\\<domainName>\SYSVOL\<domainName>\Policiesin the address bar. - Right-click and create a folder
PolicyDefinitions.
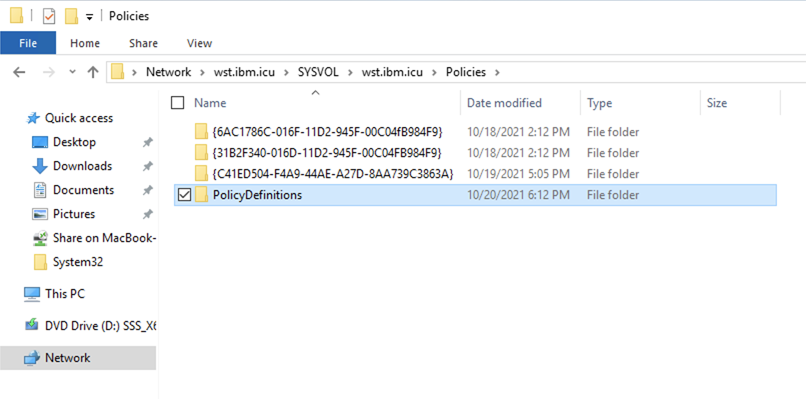
- Open
PolicyDefinitionsfolder and copy the OneDrive Administrator Template files intoPolicyDefinitions.
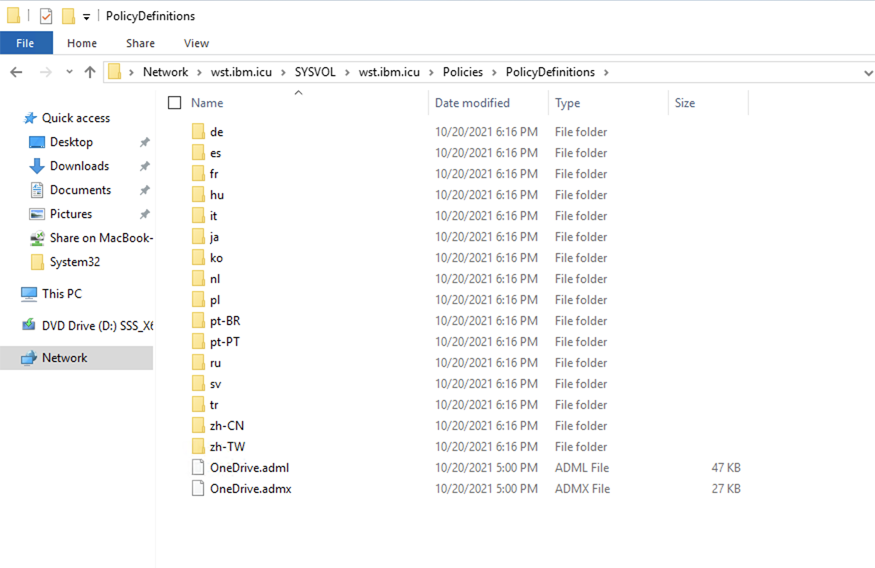
- Create a
enfolder underPolicyDefinitions. - Copy
OneDrive.admlinto theenfolder.
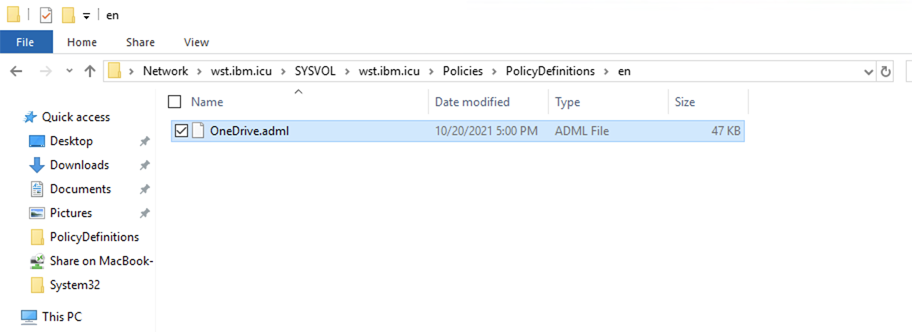
Configuring Group Policy Object to Enable OneDrive Silent Configuration
- Open the
Group Policy Management. - Right-click
Group Policy Objectand selectNew.
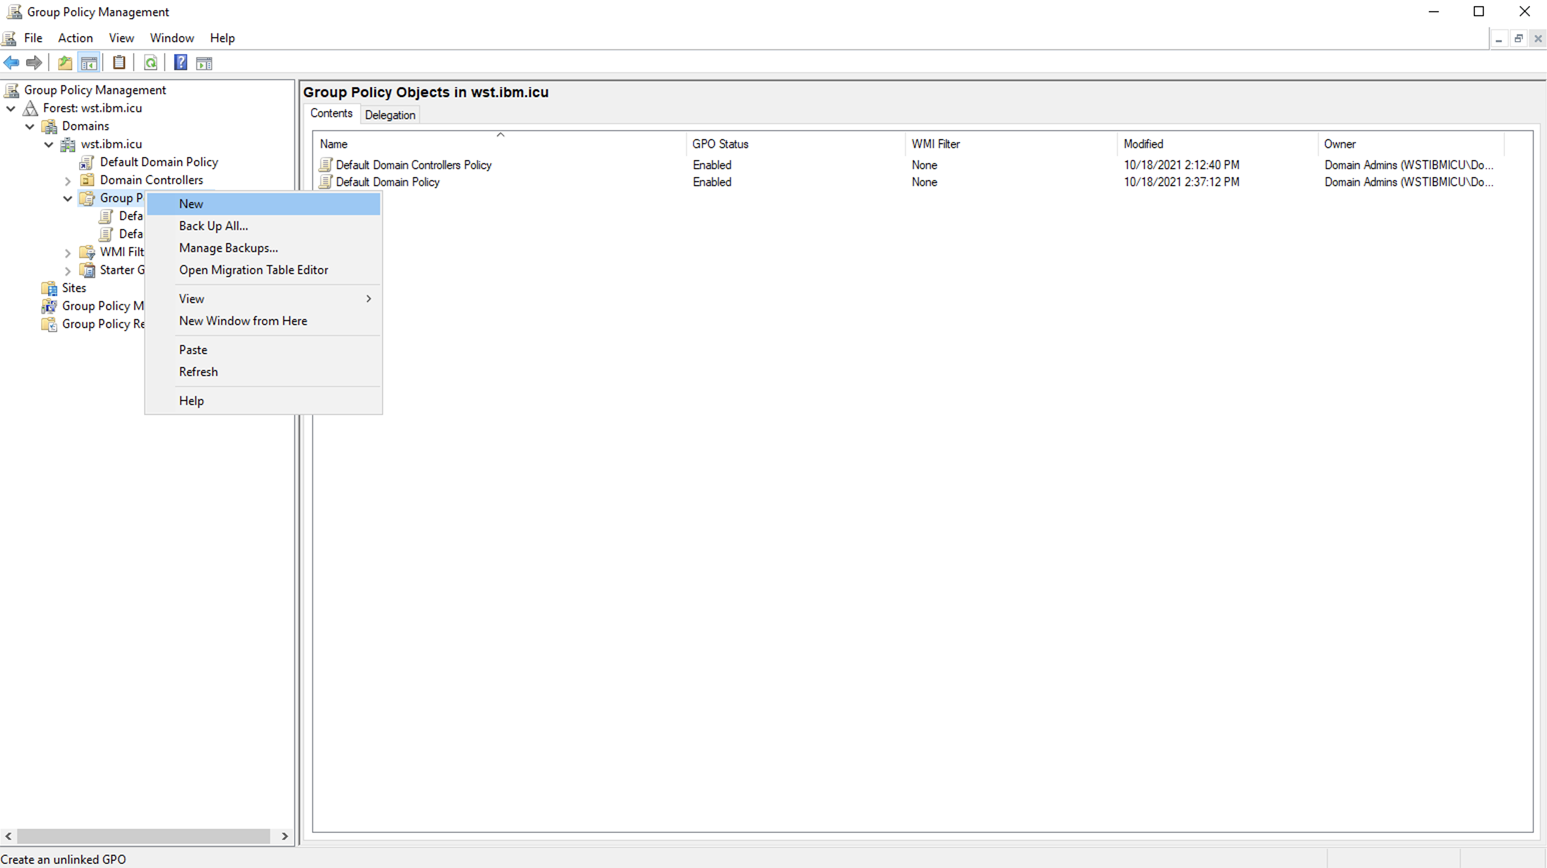
- Name it
OneDrive Silent Config.
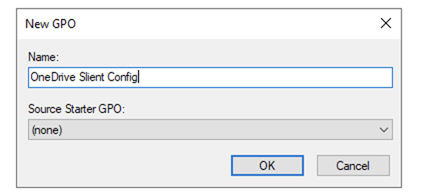
- Edit the
OneDrive Silent Configgroup policy object.
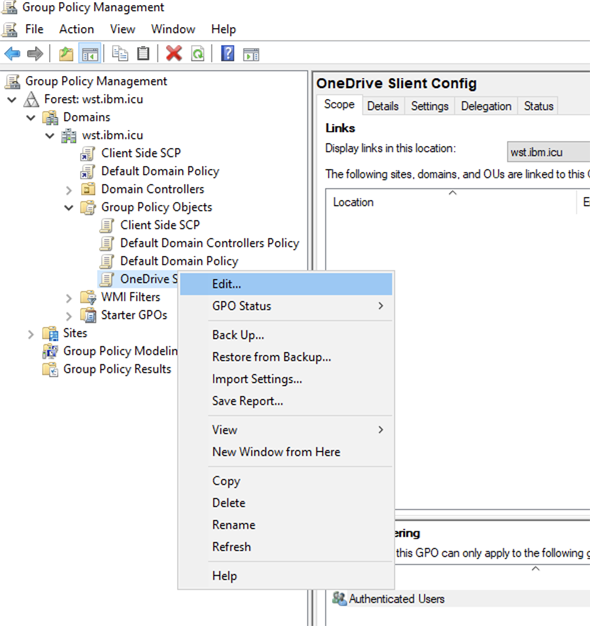
- Select
Policies>Administrative Templates>OneDrive, change policySilently sign in users to the OneDrive sync app with their Windows credentialstoEnabled.
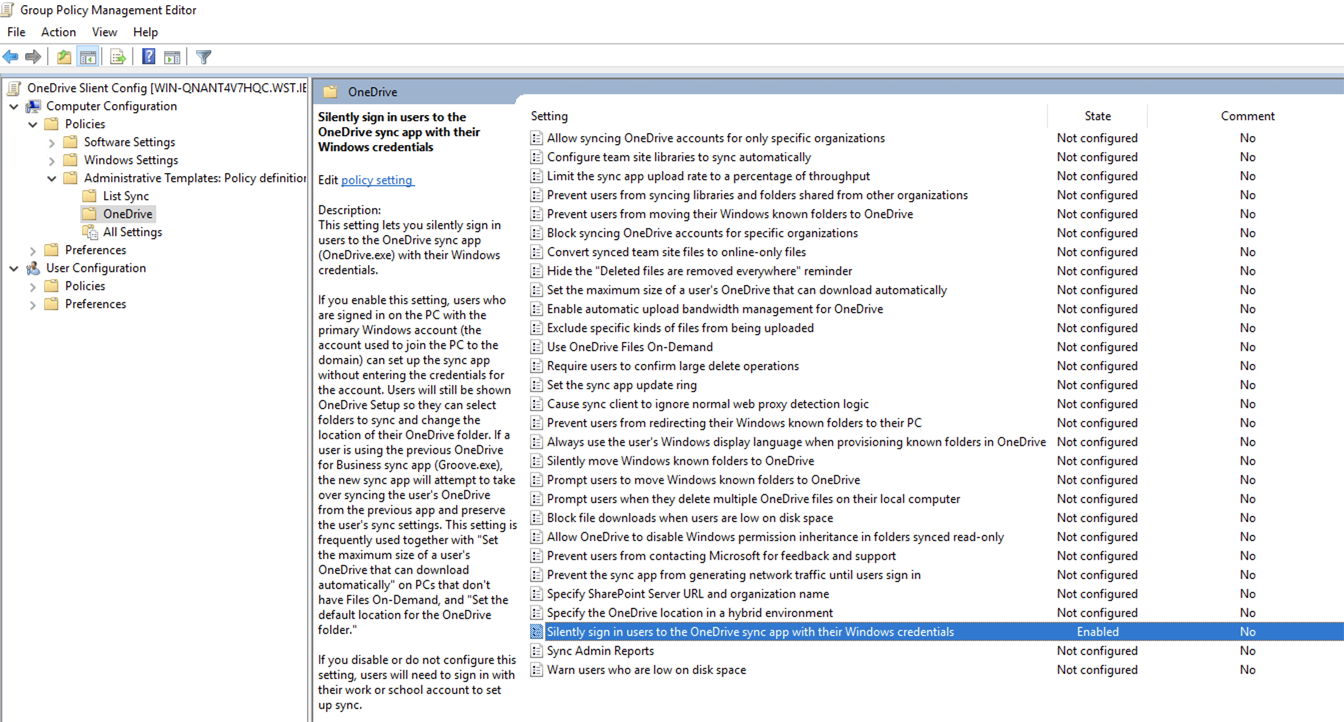
- Save and close.
- Link the
OneDrive Silent Configgroup policy object to the domain.
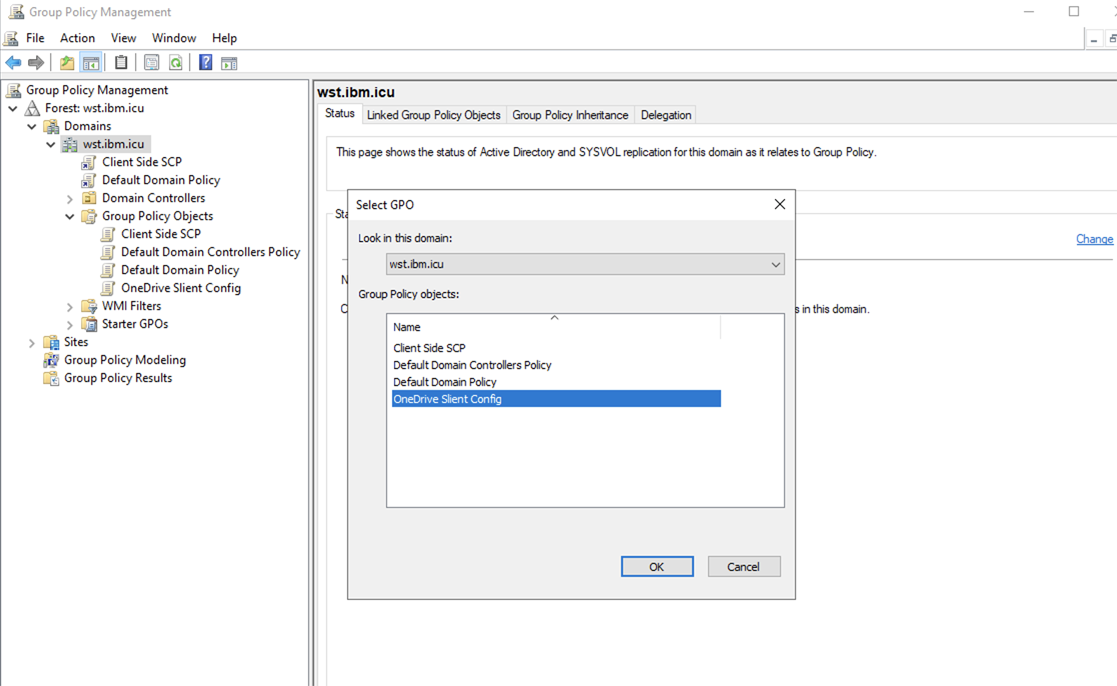
Validating OneDrive Silent Configuration is enabled on a Windows 10 device
Ensure that the Windows 10 device is On-premise Active Directory Domain joined.
A reboot of the Windows 10 device might be required in order to obtain the latest Group Policy from the Windows AD server.
Login the Windows 10 device as a domain user. There is a notification from OneDrive if the Kerberos authentication configure is correct.
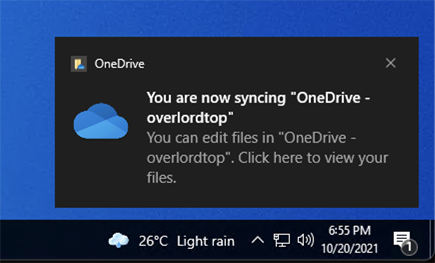
The name displayed on the OneDrive notification is the AzureAD tenant name.
Updated 7 months ago
