Salesforce provisioning
Introduction
IBM® Verify supports out-of-box provisioning and account synchronization for many applications such as Salesforce®. This section will provide insight on configuration and supported operations with Salesforce® Developer Edition instance.
There are some constraints with Salesforce® Developer Edition and the IBM® Verify provisioning implementation that will have an impact on provisioning / de-provisioning use cases:
- The Salesforce license only allows two active users to have the Force.com – Free User profile. You can have any number of users in the Chatter Free User profile.
- Salesforce does not allow users to be deleted. They can be suspended (not active) and that frees up any licenses held.
- A Salesforce application in IBM® Verify can only associate provisioning with one profile.
- When IBM® Verify de-provisions a user it removes the active flag.
- You can’t re-provision a user with a different profile – the provisioning fails if the user already exists in Salesforce.
- If a provisioning fails, you do not see the application tile on the IBM® Verify launchpad.
Hence we will configure Salesforce® application to use Chatter as the user profile (which is free and unlimited)
IBM® Verify setup
Make sure that below users are available in IBM® Verify
- Jessica Bretton (jessica@.ice.ibmcloud.com) as end user having membership to Sales group
- Jacob Admin (jacob@.ice.ibmcloud.com) as System Administrator
Salesforce application has entitlement for Sales group and Jacob user.
Configure Salesforce for Provisioning
In order to allow user provisioning, need to create a self-signed certificate and then configure Salesforce® for remote access.
Create a Self-Signed Certificate
We need a self-signed certificate for the connection between IBM® Verify tenant and Salesforce® tenant.
Use any tool to create the self-signed certificate. The following steps uses OpenSSL on Linux or Mac. Any other suitable tool can also be used.
- Open a terminal session
- Run the following openssl command to create a self-signed cert
xxxxx-host@localhost ~ % openssl req -x509 -sha256 -nodes -days 365 -newkey rsa:2048 -keyout privateKey.key -out certificate.crt
Generating a 2048 bit RSA private key
.....................................................................+++
..........................................................+++

writing new private key to 'privateKey.key'
-----
You are about to be asked to enter information that will be incorporated
into your certificate request.
What you are about to enter is what is called a Distinguished Name or a DN.
There are quite a few fields but you can leave some blank
For some fields there will be a default value,
If you enter '.', the field will be left blank.

Country Name (2 letter code) []:AU
State or Province Name (full name) []:Victoria
Locality Name (eg, city) []:Melbourne
Organization Name (eg, company) []:IBM
Organizational Unit Name (eg, section) []:
Common Name (eg, fully qualified host name) []:
Email Address []:[email protected]
xxxxx-host@localhost ~ % ls -lt
total 448
-rw-r--r--    1 cubit-host  staff    1224  8 Jan 17:17 certificate.crt
-rw-r--r--    1 cubit-host  staff    1704  8 Jan 17:17 privateKey.key
xxxxx-host@localhost ~ %
Creating a Connected App in Salesforce®
Salesforce® needs to know IBM® Verify as a secure application. This is done by defining a Connected App in the Salesforce® admin UI.
- Login to Salesforce® as a administrative account
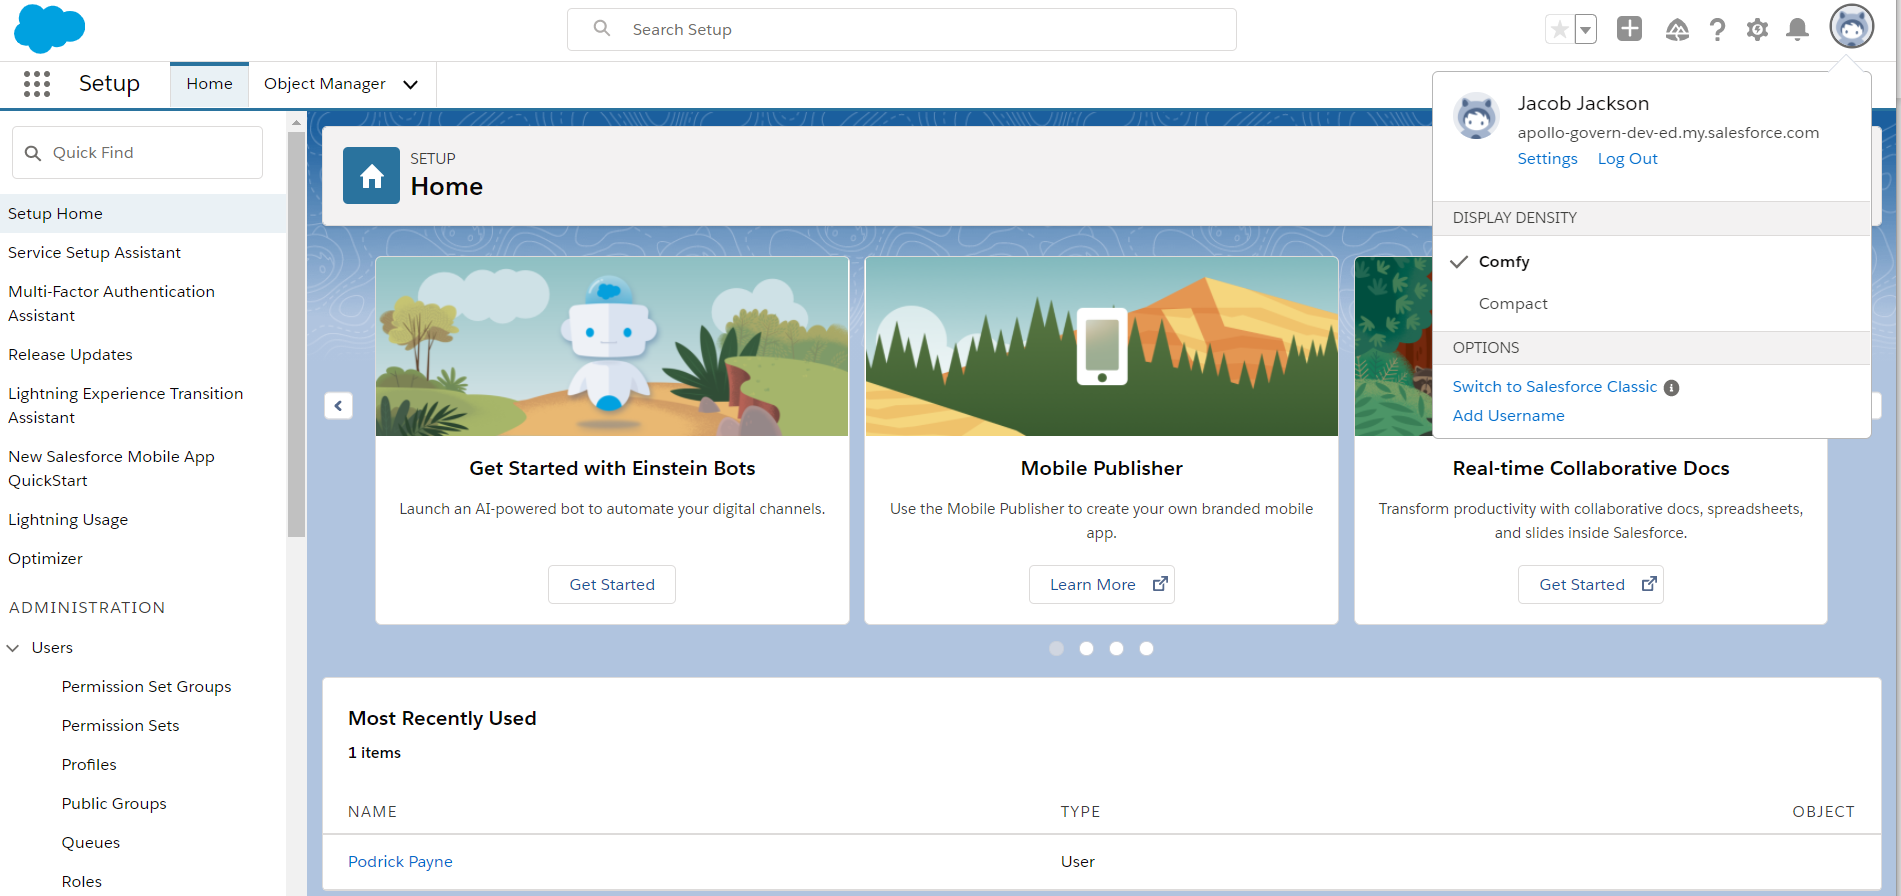
The default view should be the Lightning UI as per the screen shot above. If you have an older Salesforce tenant, you may land in the Classic UI. The following steps will assume you are in the Lightning UI. If in Classic, change to Lightning.
- Click Configuration icon, click it and click Setup

- Look down the menu on the left of the page, find the PLATFORM TOOLS heading, and expand the Apps section
- Click the App Manager menu item
- Click the New Connected App button on the top right

- Under the Basic Information section for the New Connected App, enter the following:
- Connected App Name: can be anything, something like IBM Verify Tenant
- API Name: hit tab and it will be filled based on the name
- Contact Email: a valid email (such as the email you associate with the Verify tenant)
- Under the API (Enable OAuth Settings) section select the Enable OAuth Settings checkbox
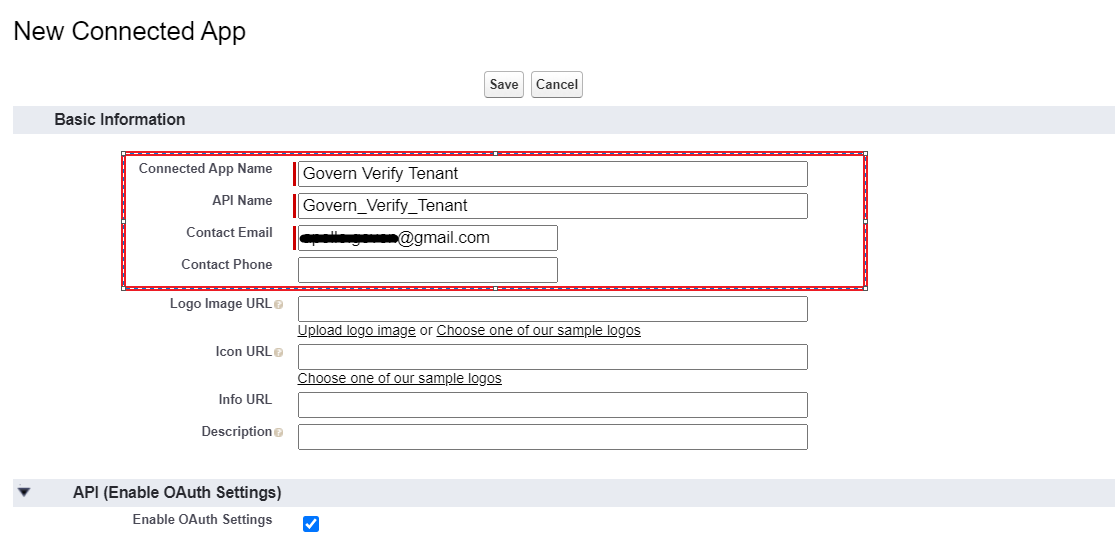
- This will expend the API (Enable OAuth Settings) section
- In the expanded API (Enable OAuth Settings) section, set Callback URL to https://login.salesforce.com/services/oauth2/callback
- Select the Use digital signatures checkbox
- Browse to and select the certificate file you created earlier (e.g. certificate.crt)
- In the Selected OAuth Scopes select the following scopes and Add (right arrow button) them:
- Access and manage your data (api)
- Perform requests on your behalf at any time (refresh_token, offline_access)
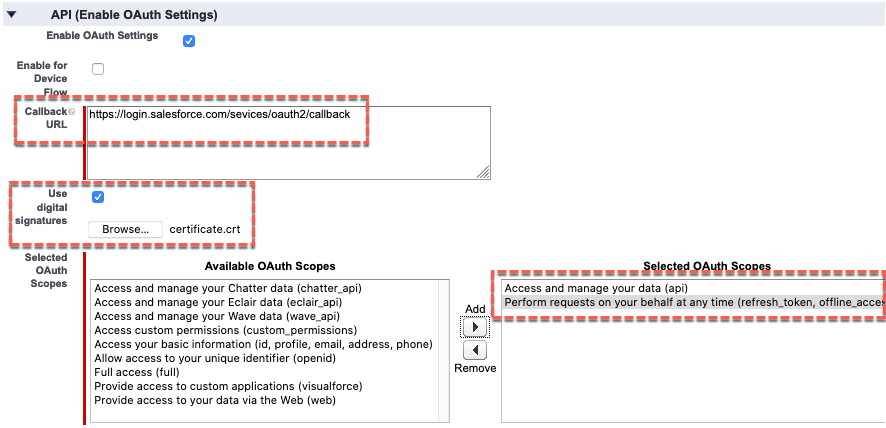
-
Scroll to the bottom of the page and click the Save button
-
Click the Continue button

This shows you the new Connected App.
- Click the Manage button
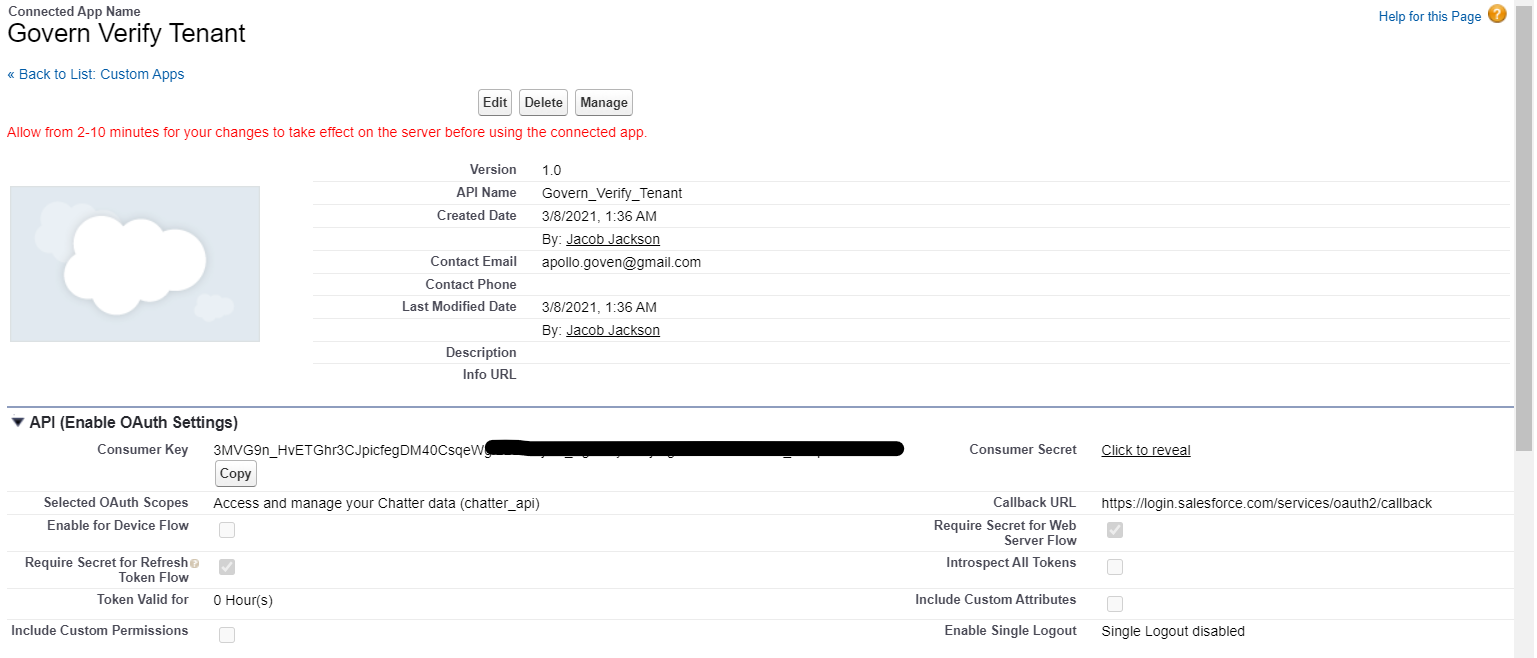
- On the next page click the Edit Policies button
- In the OAuth Policies section specify the following
- Permitted Users: Admin approved users are pre-authorized (and click OK on the warning message)
- IP Relaxation: Relax IP restrictions

- Scroll to the bottom and click the Save button to return to the Connected App Detail page
- Scroll down to the Profiles section and click the Manage Profiles button
- Select the System Administrator checkbox and click the Save button

- Navigate back to the main app page: go to the left menu and click on PLATFORM TOOLS > Apps > App Manager
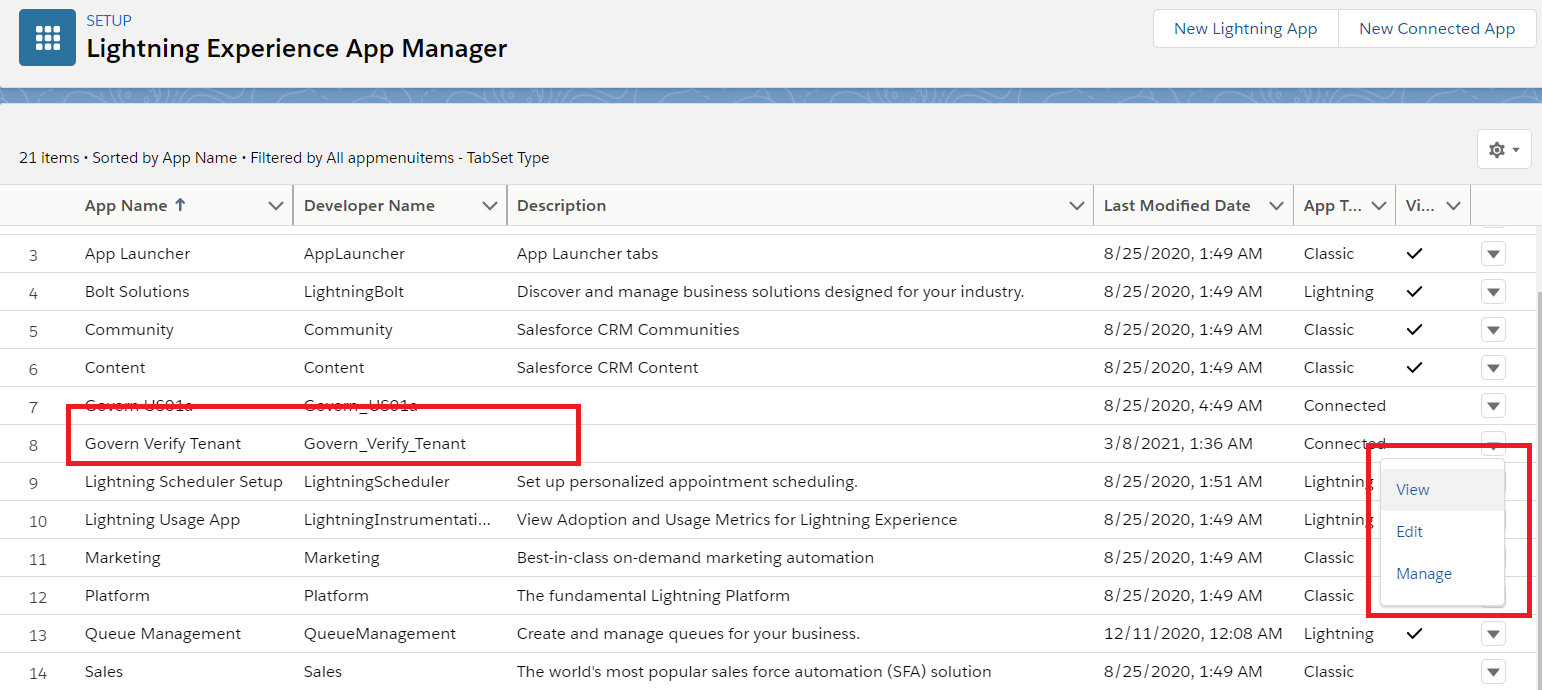
- Find your new app, and use the pulldown list on the right to click View
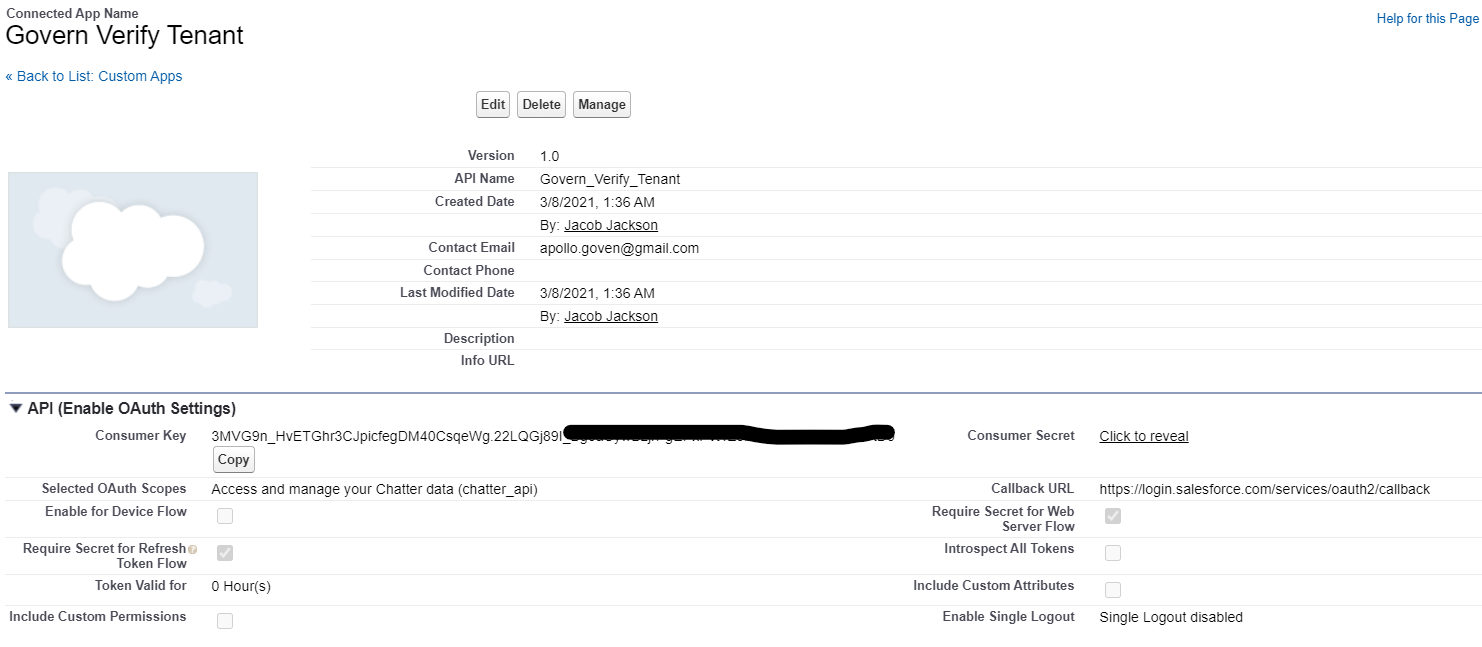
Copy the Consumer Key (for client_id) which will be required to configure the Salesforce app in IBM® Verify.
Get the Salesforce® Chatter user profile Id
One of the attributes that must be provisioned with a new Salesforce® account (user) is the key of the profile the user will belong to. As mentioned earlier this could be Force.com (licence restricted) or Chatter (license free). We will setup an attribute that can be passed with the new user attributes to represent the profile.
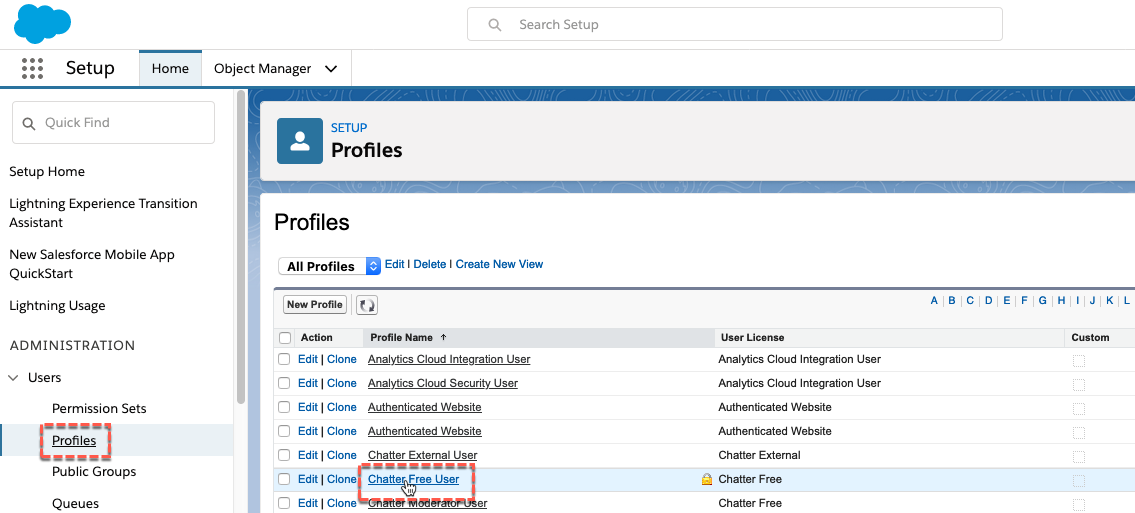
- In the Salesforce admin UI, go to ADMINISTRATION > Users > Profiles
-
Click on the Chatter Free User profile
Look at the URL in the browser address bar (like https://.lightning.force.com//lightning/setup/EnhancedProfiles/page?address=%2F00e2v000003wJth). The last part after the %2F will be the profile id (e.g. 00e2v000003wJth). -
Make a note of this id (or copy it into your clipboard)
Configure Salesforce application
Add user profile attribute
- Login to IBM® Verify as tenant admin (Jacob)
- Navigate to Configuration > Attributes tab
- Click the Add attribute button

- On the Name and description page, give the Attribute a name as sf-chatter-profileid and a description
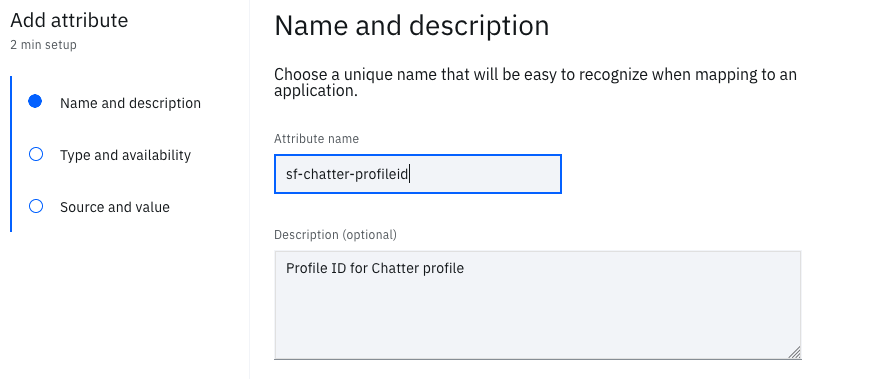
- Click the Next button
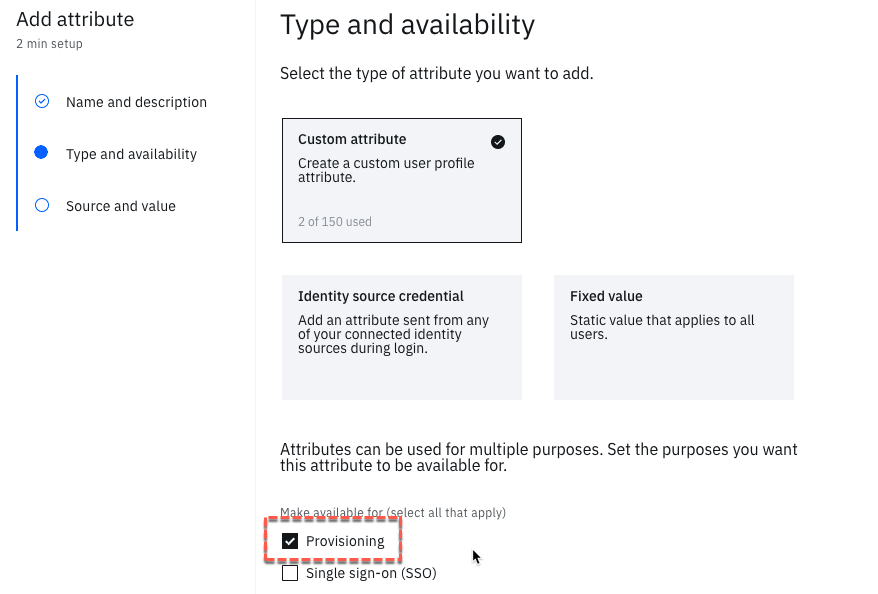
- On the Type and availability page, click the Custom attribute tile
- When the selection list appears, select Provisioning
- Click the Next button
- On the Source and value page, remove the hyphens from the Attribute identifier

-
Click the View additional settings link
-
In the Default value (optional) field, paste in the profile id from above (e.g. 00e2v000003wJth)
This is the most important thing to get right. If you get the wrong value provisioning won’t work. -
In the Apply transformation (optional) field, select None

- Click the Add attribute button
Newly created attribute will be used in the application provisioning configuration.
Create / Update Salesforce Application
- Login to IBM® Verify as tenant admin (Jacob)
- Navigate to Applications page, click the Add application button

-
On the Select Application Type dialog, enter salesforce into the search box
-
When the Salesforce application is displayed, select it then click the Add application button
-
On the Add Application page leave Salesforce as the Company name and put your Salesforce host name into the Host Name field (e.g. test-dev-ed)
-
Select the Salesforce Chatter, Salesforce Sales Cloud and Salesforce Services Cloud applications
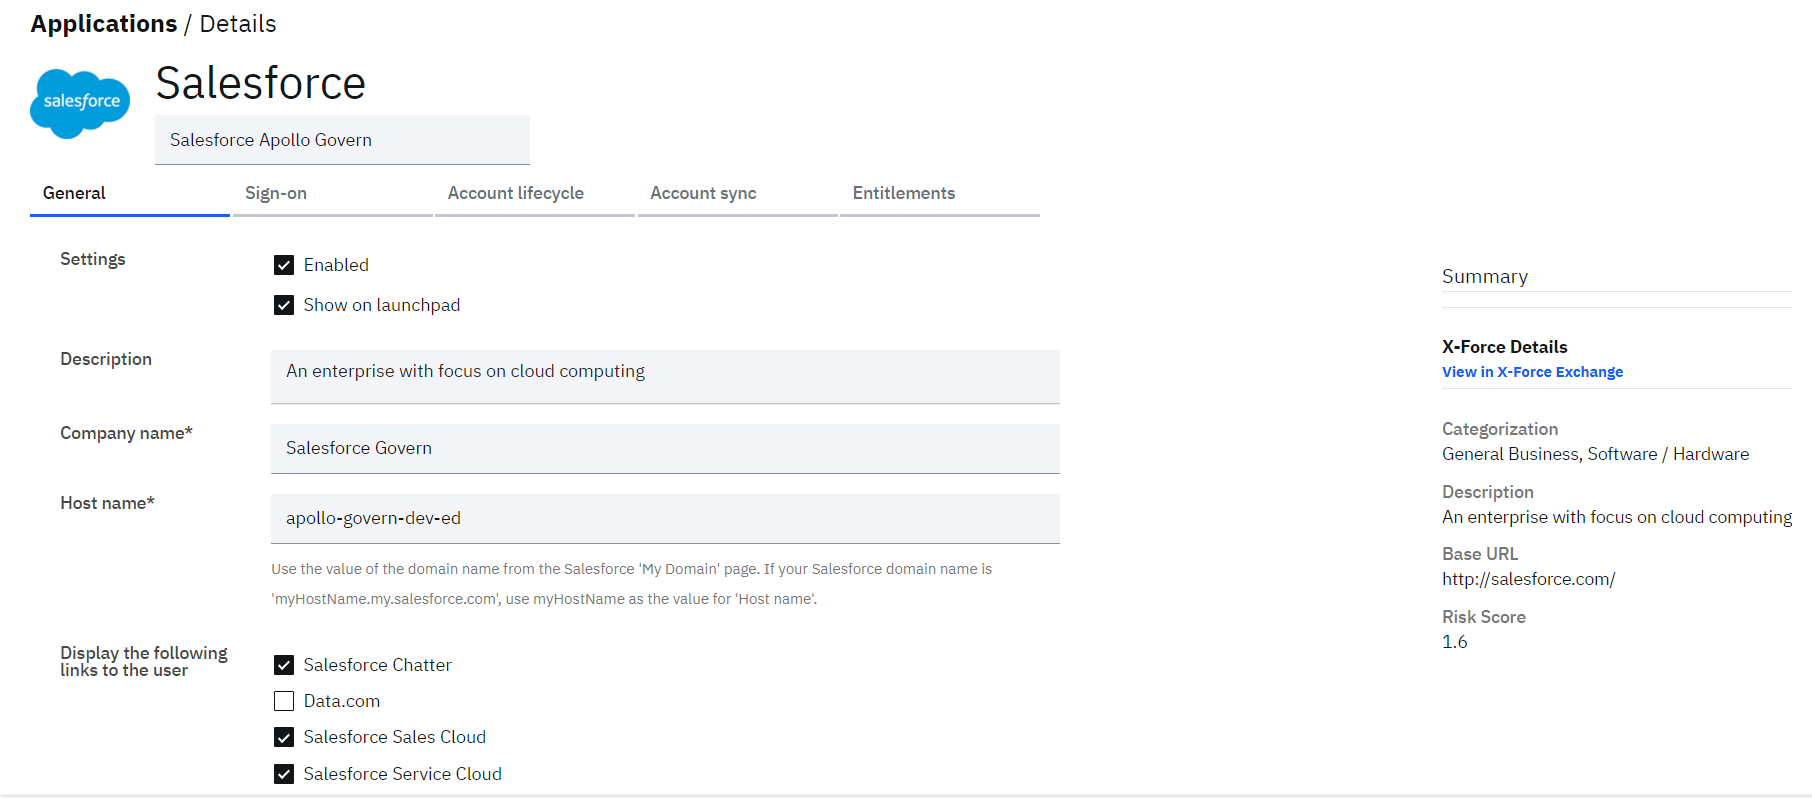
Only Chatter will be used for provisioning as it is the only profile that allows unlimited users. However, to keep the ability to let Jessica access the other Salesforce apps, you need to keep the other two as showing.
Configure Sign-on
• Go back to your Salesforce admin UI (it should still be open from before)
• Use the menu bar on the left to go to SETTINGS > Identity > Single Sign-On Settings
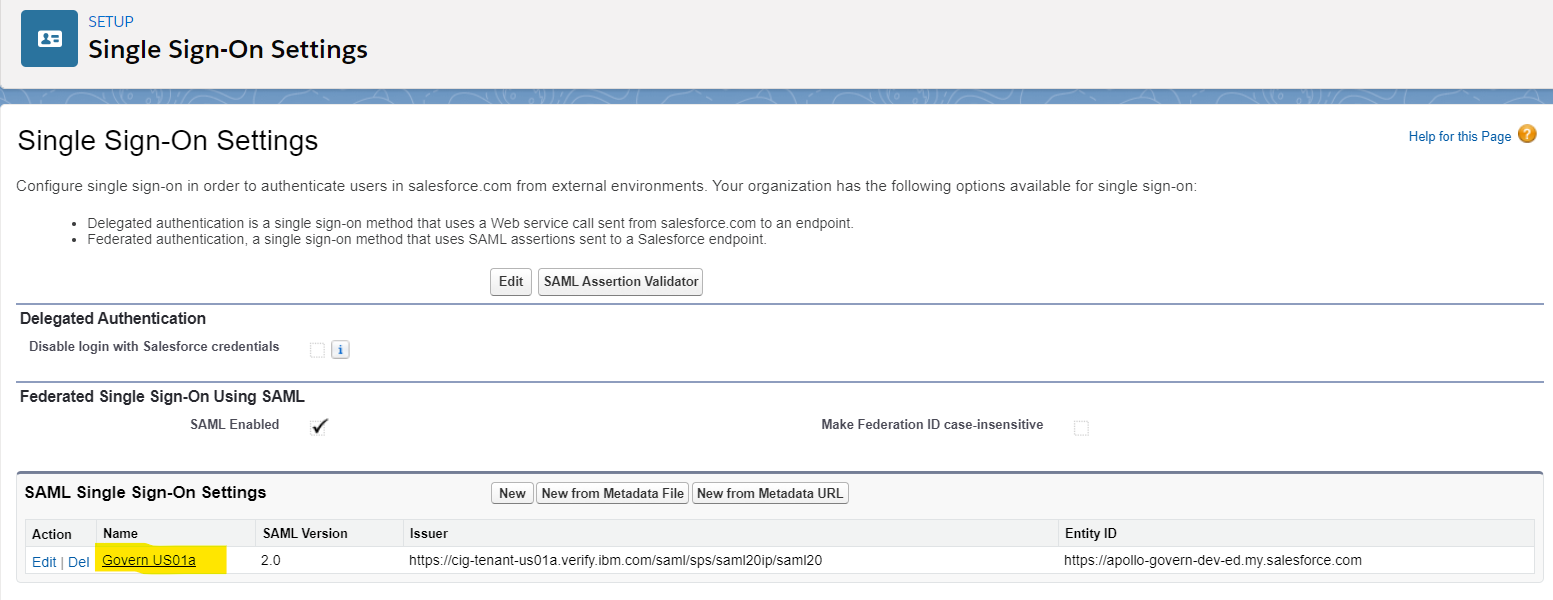
- Click the name of SAML Single Sign-On Settings (created when Single Sign-On is enabled by the administrator)
- Scroll down to the Endpoints section and copy the Login URL
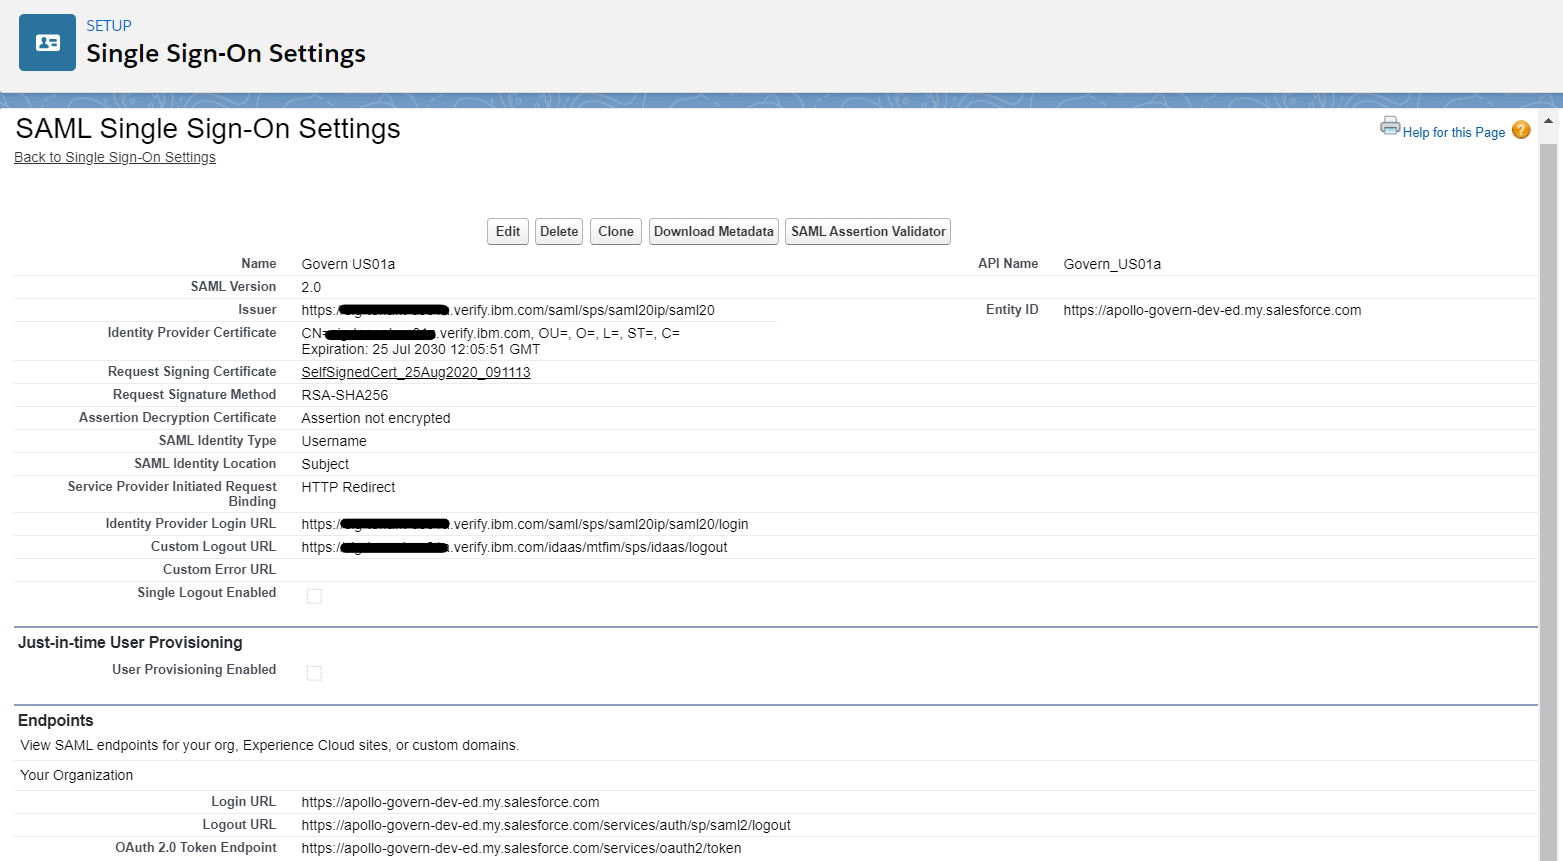
- Go back to the IBM® Verify admin console where Salesforce application is being edited
- Click on the Sign-on tab
- Update the Login URL into the Assertion Consumer Service URL (HTTP-POST)** field
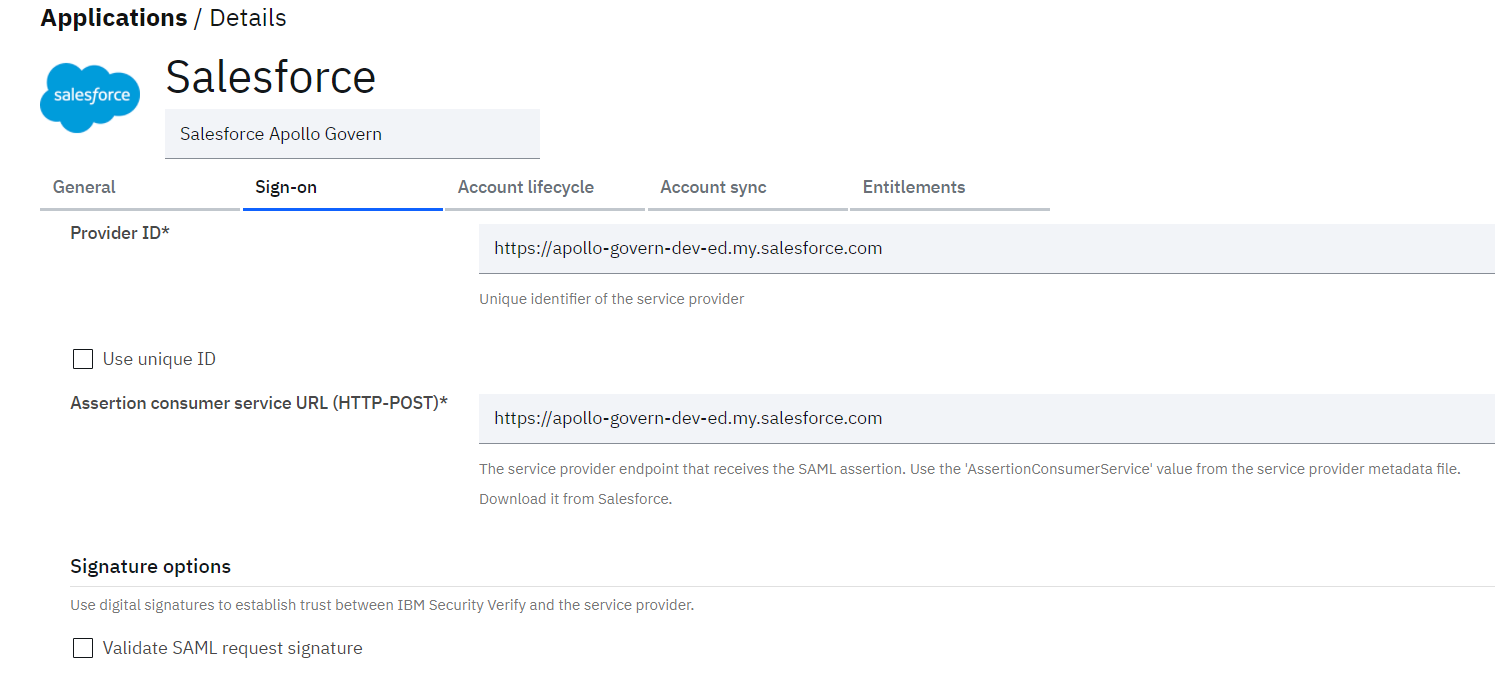
Do NOT click Save yet.
Next, lets define the Account lifecycle properties.
Configure Account lifecycle
- Go to the Account lifecycle tab of Salesforce application
- Enable the provisioning and deprovisioning. As Salesforce does not allow deleting accounts, the only deprovision action is to Suspend the account (and the Grace Period field is disabled).
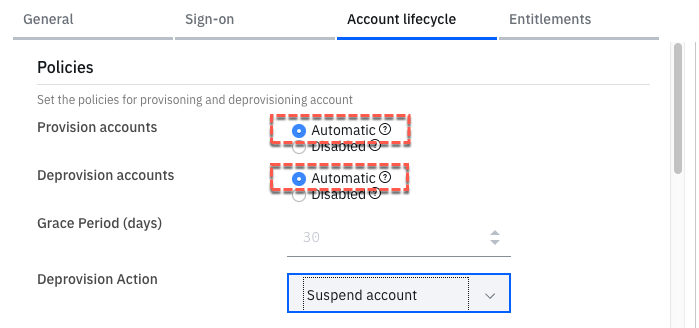
-
Scroll down to the API Authentication section (notice that the Organization URL is pre-filled)
-
Go back to your Salesforce UI, find the newly created Managed Connected App, and copy the Consumer Key value, and past it into the Client ID field
-
In the User Name field put the admin username (jacob@.ice.ibmcloud.com)
-
Go back to your terminal window and copy the contents of the privateKey.key file (e.g. cat the file then select all and copy) and paste them into the JSON tool
xxxxx-host@localhost ~ % cat privateKey.key
-----BEGIN PRIVATE KEY-----
MIIEvAIBADANBgkqhkiG9w0BAQEFAASCBKYwggSiAgEAAoIBAQCfhjIF2omF+K4D
aV+ux0+SrJXRD+/6s8KpCTu08YU0h0bbsbRiZLxt0FMwzWiuEw8QHeDiRH2sPfu+
+jbPJy/sj46a6avEGQLkFukwe/8OBwFaC8EDNL/RjohIhSPzZMxH9BkYYFUgVCqb
+rY9wn8TOWTq4L3M9M0oz5q110AQfDvn1jmY/6yG/6ZjWgWhyJl6ZzzukIzq1oag
3875uWfpYr66389ZlCrBWUtDWSiL2VTOxPhopU73g/edbNlvh4QybDyMaQ0dkR7H
…
Gi+iQzP9ijg8GuB9OaEWFKfjboeTbbeTqvYCbttC+/SNv9+M8pcFODekLawnKwwG
61RWrRpgIII2xZ2AO7Vfa5NFIUj14EA1pxKl+50CgYAtSfTPYkPzymzWfYrJCdJ0
b4QIXRydhdOvZgcqBJ5MzfQ9IffIQPVFHA0+JafgemX3ULV2dyNPEnBZxarTiqmj
8KErxl/pCxL8ccOtgiKlIu0zp+mOB99rX3srbKhpTdwJHhPAsKhYS2M02Y4F21DM
3ntIioK/UOZ/ibgWBcsIVQ==
-----END PRIVATE KEY-----
xxxxx-host@localhost ~ %
Make sure you select everything from the first “–“ in -----BEGIN PRIVATE KEY----- to the last “–“ in the
-----END PRIVATE KEY-----
- Copy the private key into the Private key field (it will get obfuscated but click the Eye icon to see it)
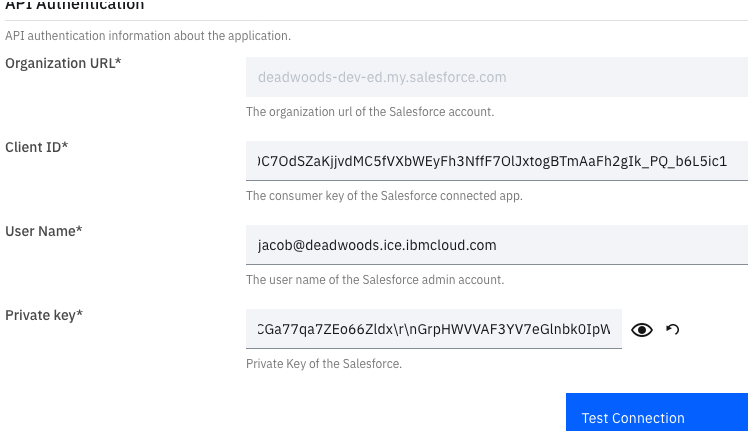
- Click the Test Connection button to confirm the settings
Confirm that connection successful message is shown. If not, recheck if Client ID and Private Key in entered correctly.
- Scroll down to the API Attribute Mappings section and set the following:
- username = preferred_username
- name.givenName = given_name
- name.familyName = family_name
- emails.work = email
- entitlements.Profile = sf-chatter-profileid
Others can be left as it is.
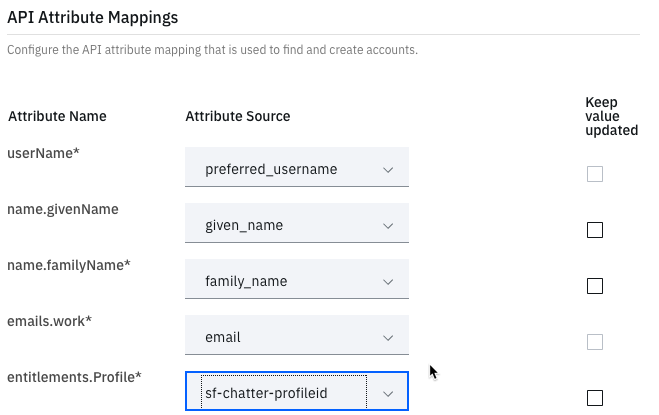
- Click the Save button
Define Adoption policy for account synchronization
As we have successfully tested the connection with Salesforce domain, lets define the adoption policy in order to synchronize the rules from Salesforce with IBM® Verify.
In order to define the adoption policy, click on Account sync tab from the details of Salesforce application.
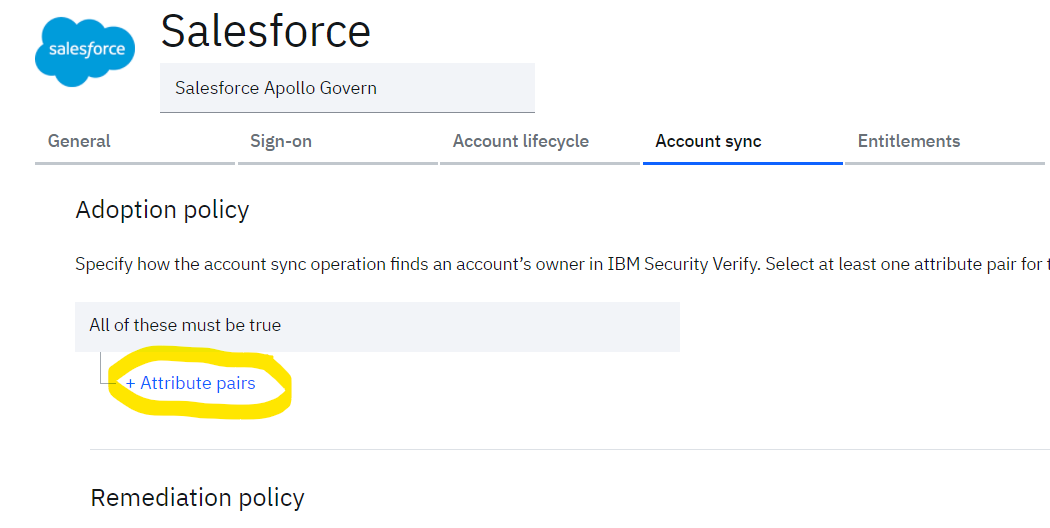
- Click on + Attribute pairs to add the attribute rule to be used to match the users from Salesforce with the existing users in IBM® Verify.
- Define the rules as:
- username = preferred_username
- emails.work = email
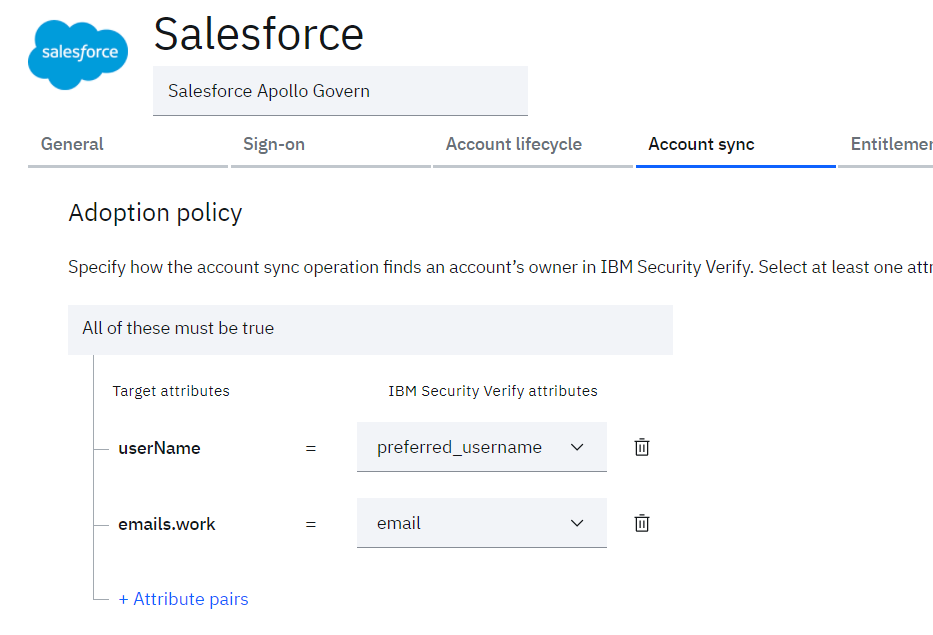
- Click the Save button
Set Owner, Attributes and Entitlements for Application
On successful save, a new tab Entitlements gets exposed.
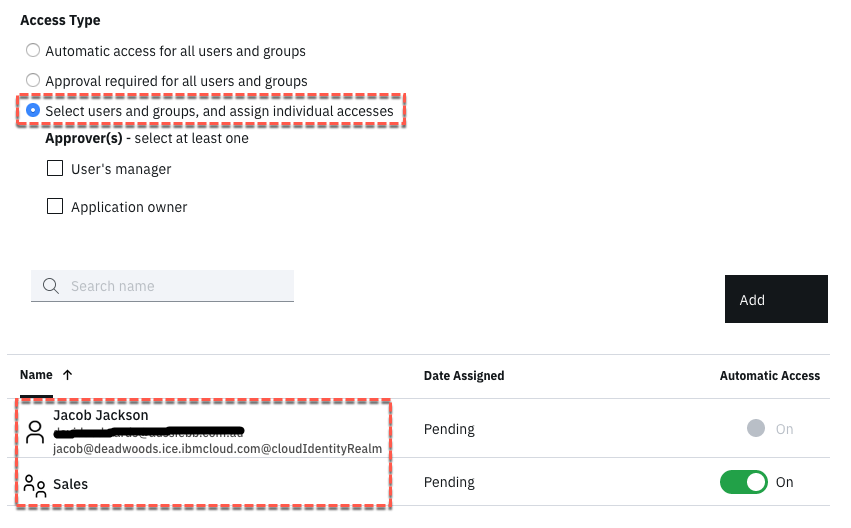
- On the Entitlements tab click the Add button
- On the Select User/Group dialog, search for, select and Add Sales group
- On the Select User/Group dialog, search for, select and Add Jacob user
- Click the OK to close the dialog
-
Click the Save button
-
Go to the General tab for the application
-
Scroll down to the Application owners section and click the Add Owner button
-
Search for and select Jacob, then click the OK button

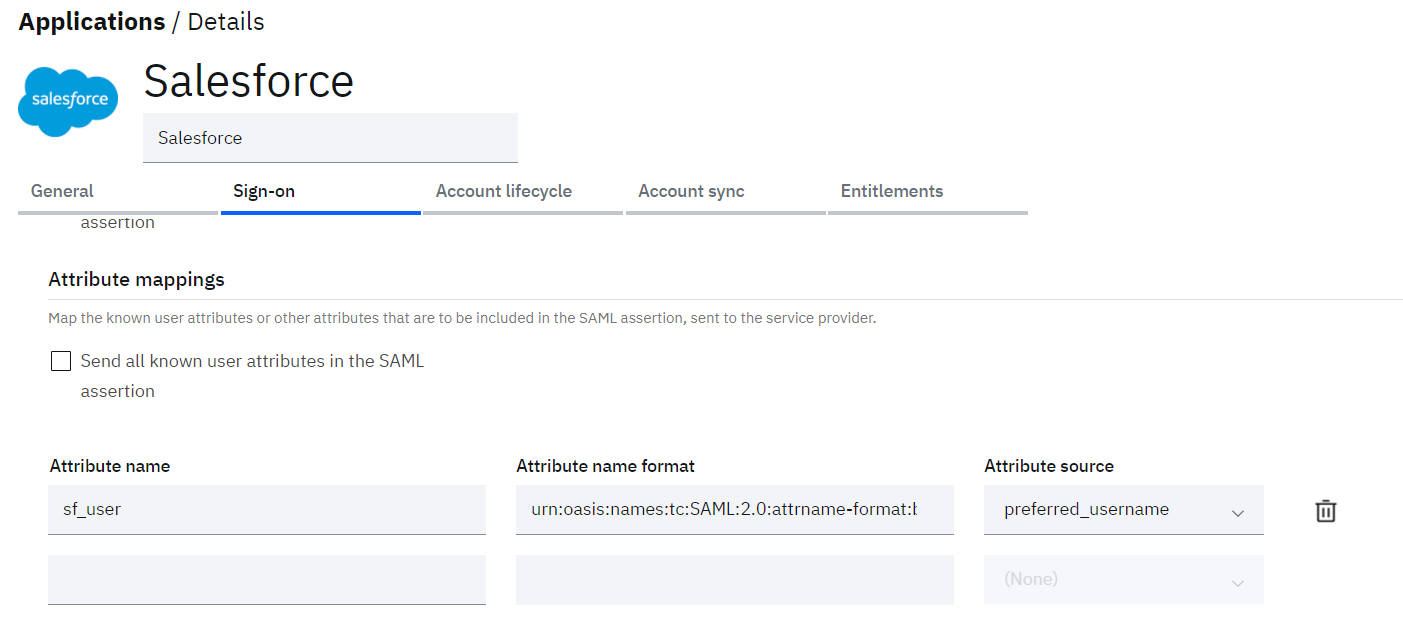
Finally, we need to restore the Sign-on attribute to pass the correct attribute in the SAML assertion:
- Go to the Sign-on tab
- Scroll down to the Attribute Mappings section and enter real_user as the Attribute Name
- For the Attribute Name Format, enter ur in the field and select the urn…SAML2.0…basic from the drop-down box
- For the Attribute Source select preferred_username
- Click the Save button
Testing SSO for Jessica
-
Start a new browser session and open IBM® Verify tenant (e.g. https://<your_tenant>.ice.ibmcloud.com)
-
Login as Jessica
-
Validate Jessica’s launchpad has Salesforce applications as she is member of Sales group as:
- Salesforce Chatter
- Salesforce Sales Cloud
- Salesforce Services Cloud
-
Hover over the Salesforce Chatter tile and click the Launch App button
-
User should be allowed to access Chatter tab in the Salesforce user view.

- Logout of Jessica Bretton in Salesforce and close the tab
Account Synchronization with Salesforce®
After the Salesforce® application is successfully configured, tenant admin can synchronize the Salesforce account data with IBM® Verify.
- Login to IBM® Verify as tenant admin (Jacob)
- From the admin console navigate to Applications
- Select “Accounts” from the three dot action menu against the Salesforce application
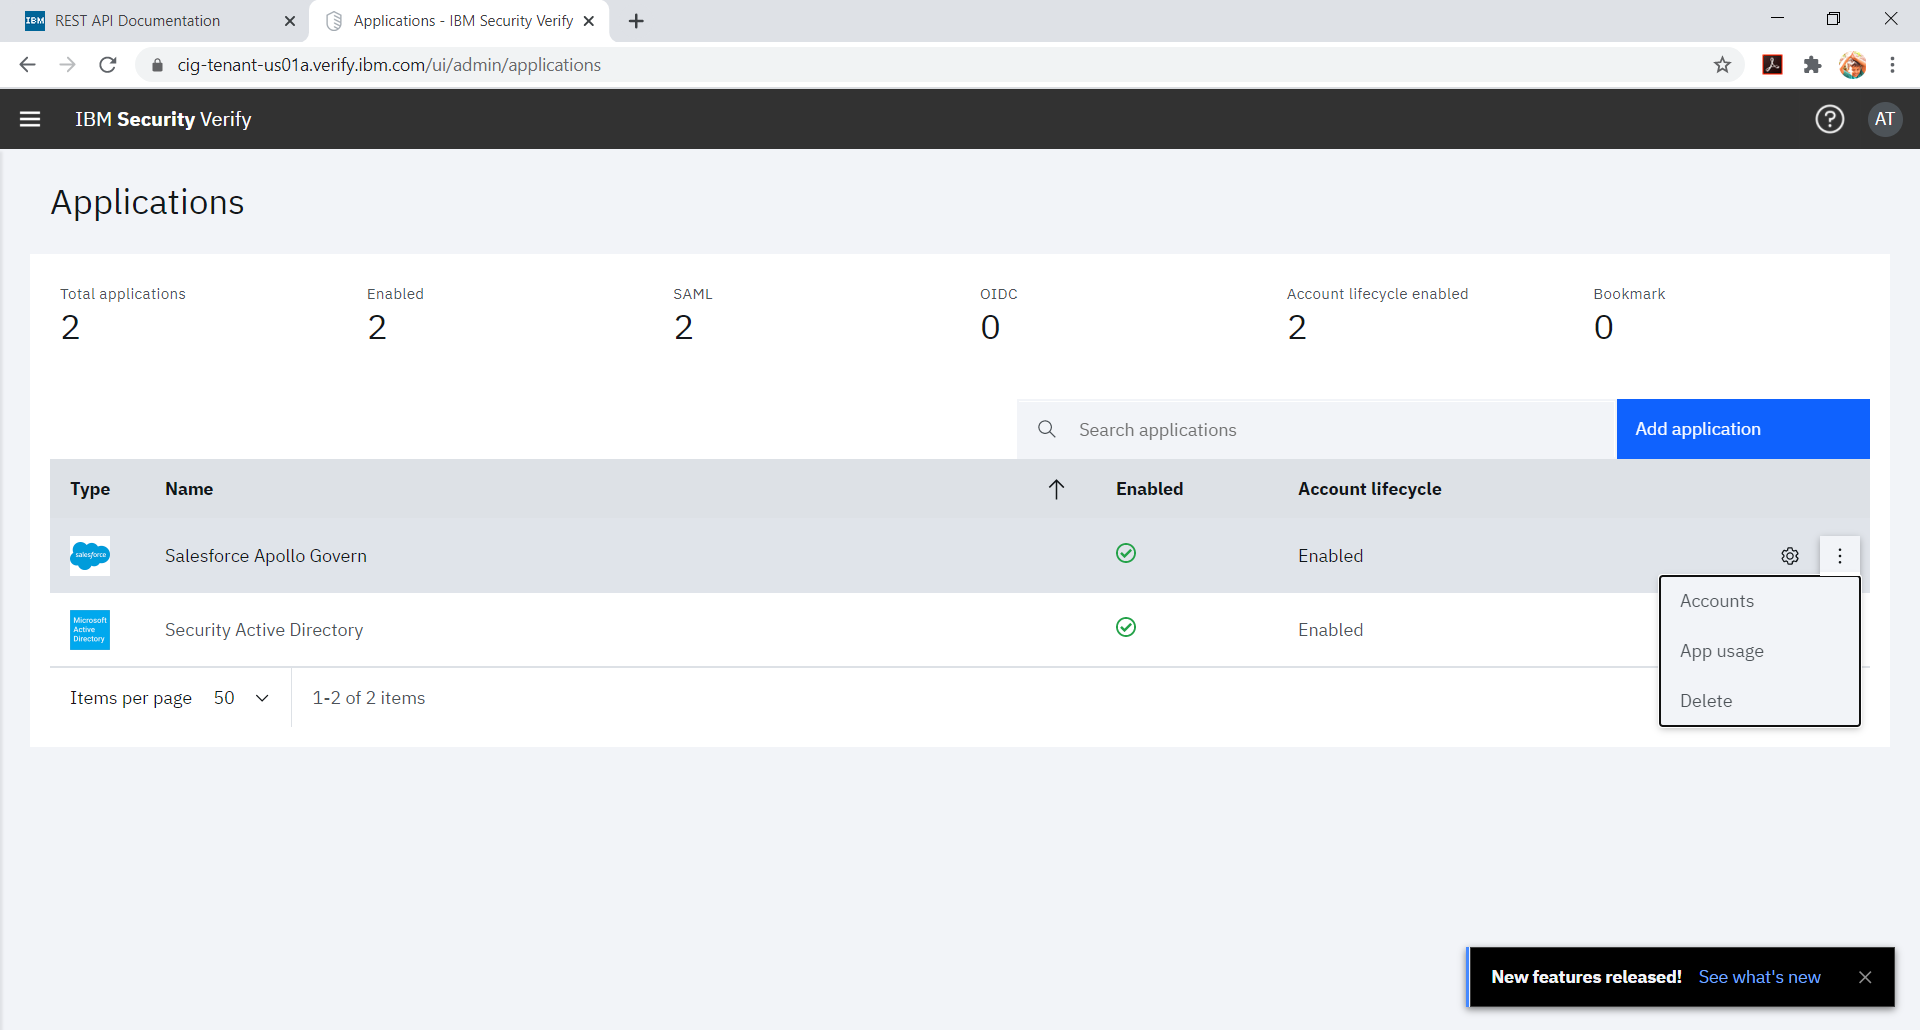
- Click Start account synchronization

- In order to monitor the account synchronization, navigate to the Governance menu and Click on Account sync tab

- Click on the row for which details need to be seen. Right pane will show the summary of various accounts fetched from the Salesforce
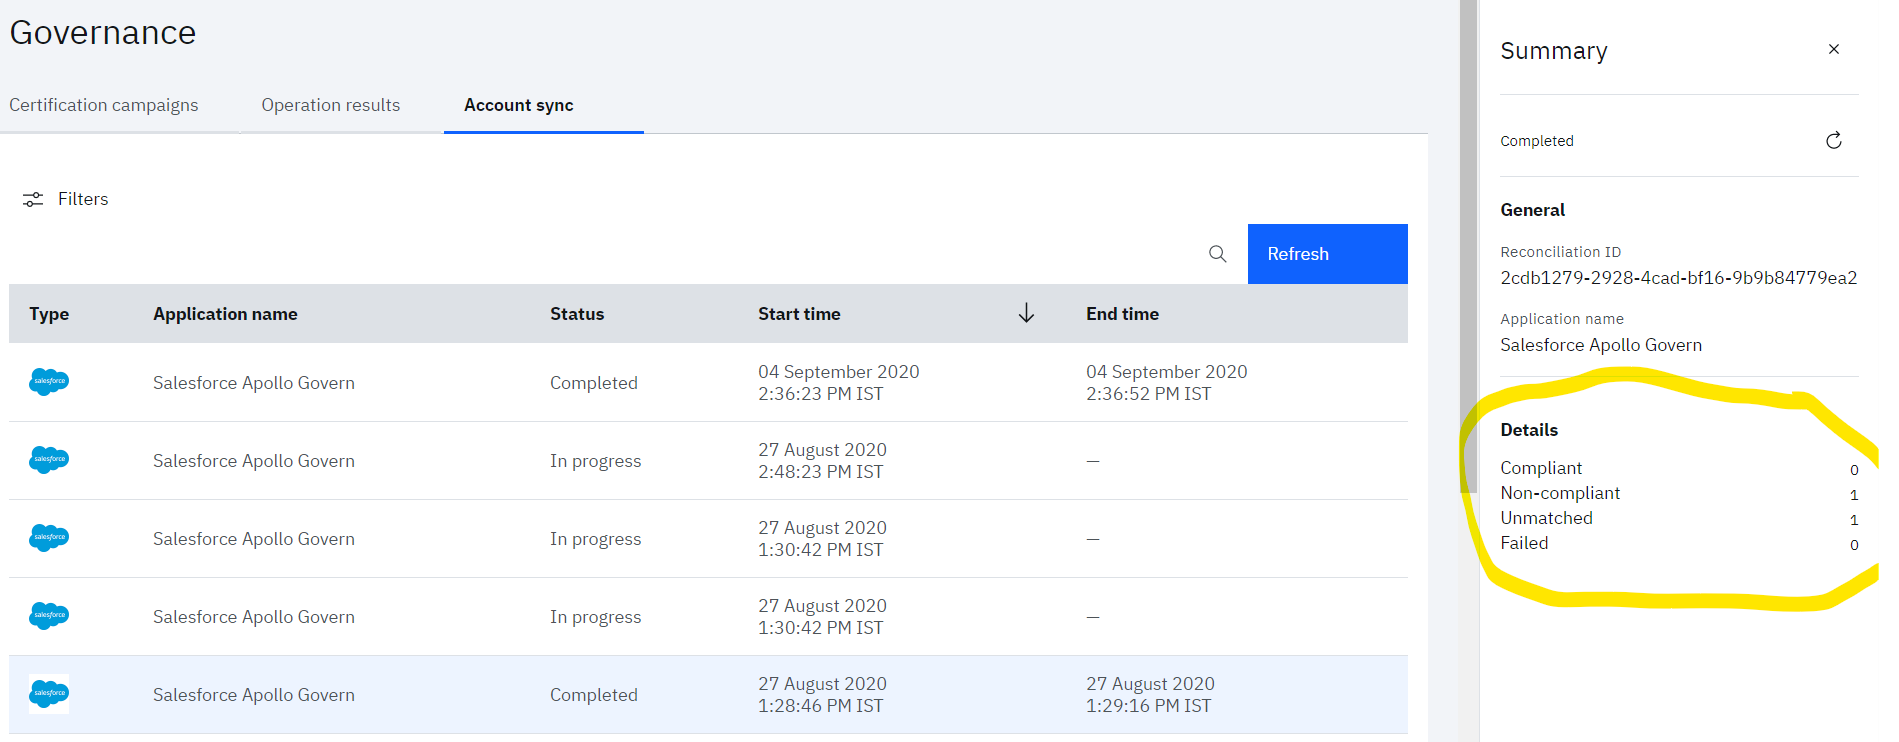
Note that accounts will be matched on the basis on the attributes mapping defined in Adoption policy of application. So, admin need to be careful while defining the attribute mapping.
Provisioning with Salesforce®
Create New User
- Log to IBM® Verify tenant as your administrative user (Jacob)
- Go to Users & groups
- Click the Add user button
- Create a user
You can create any user you like.
For example: - Identity Source = Cloud Directory
- User name = [email protected]
- Given name = Podrick
- Surname = Payne
- Email = a valid real email address
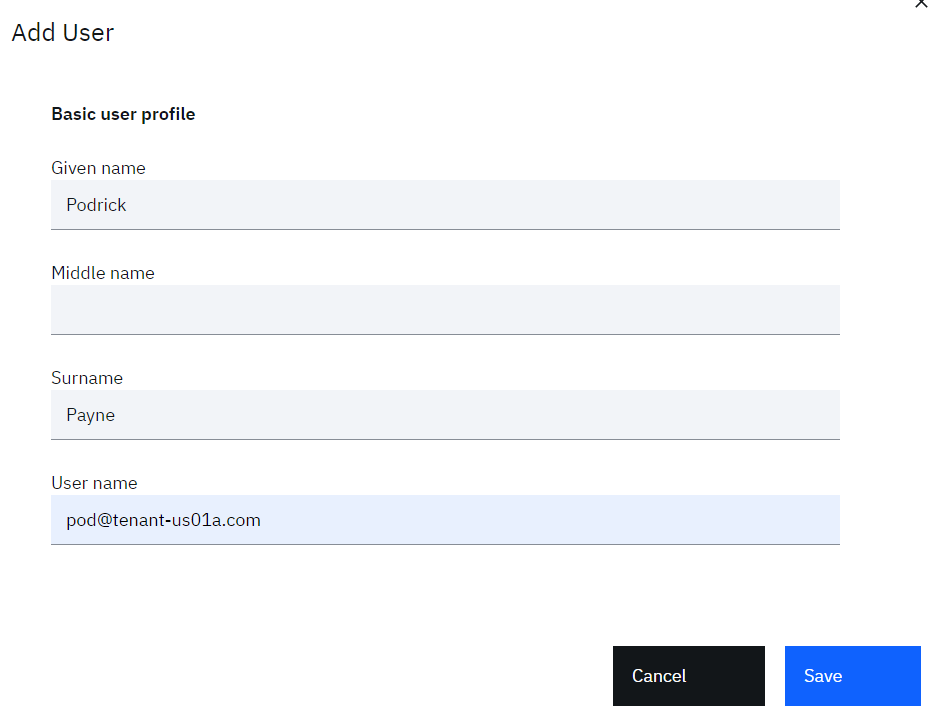
- Click the Save button to create the user

Validate new user login
As the user gets created, temporary password gets delivered to user's email.
- Go to your user's email inbox and look for an email indicating a user has been created
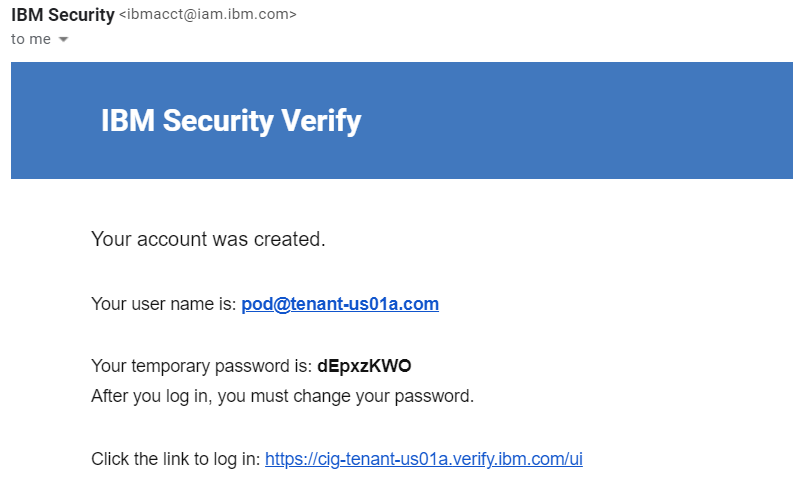
- Open a new browser window or different browser, copy the link in from the email
- Login with the username and password in the email
- When prompted enter a new password (twice) and click the Change Password button
- After new user can login, validate that user launchpad does not have Salesforce account tile.
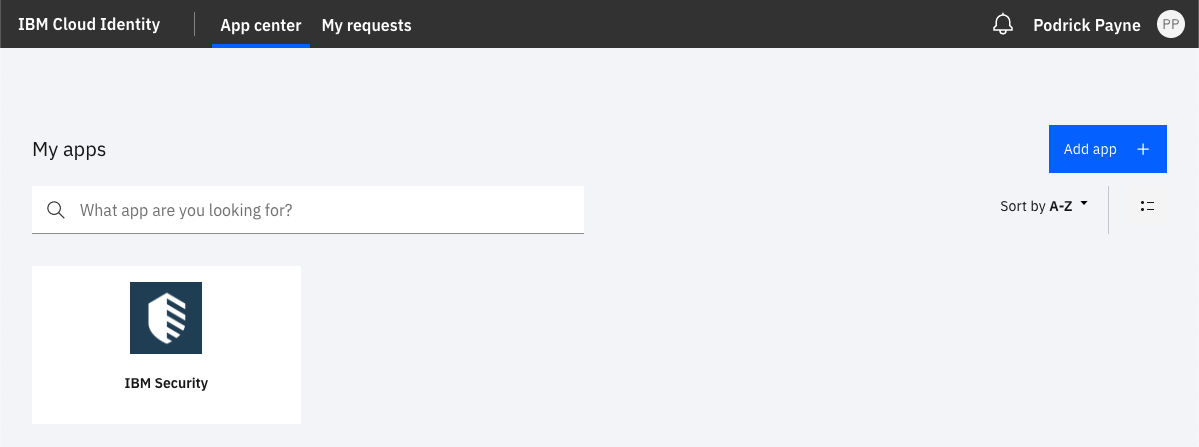
Provisioning Use Case – Grant Access to Sales
Note that we have entitled the “Sales” group with “Automatic access” for the Salesforce application. Now in order to provision new Salesforce account for newly created user, we can make the new user as a member of “Sales” group. This will trigger the automatic provisioning for the Salesforce account.
Add User to Sales Group
- Return to the IBM® Verify admin interface as the admin user (Jacob) – you should still have the window open from before
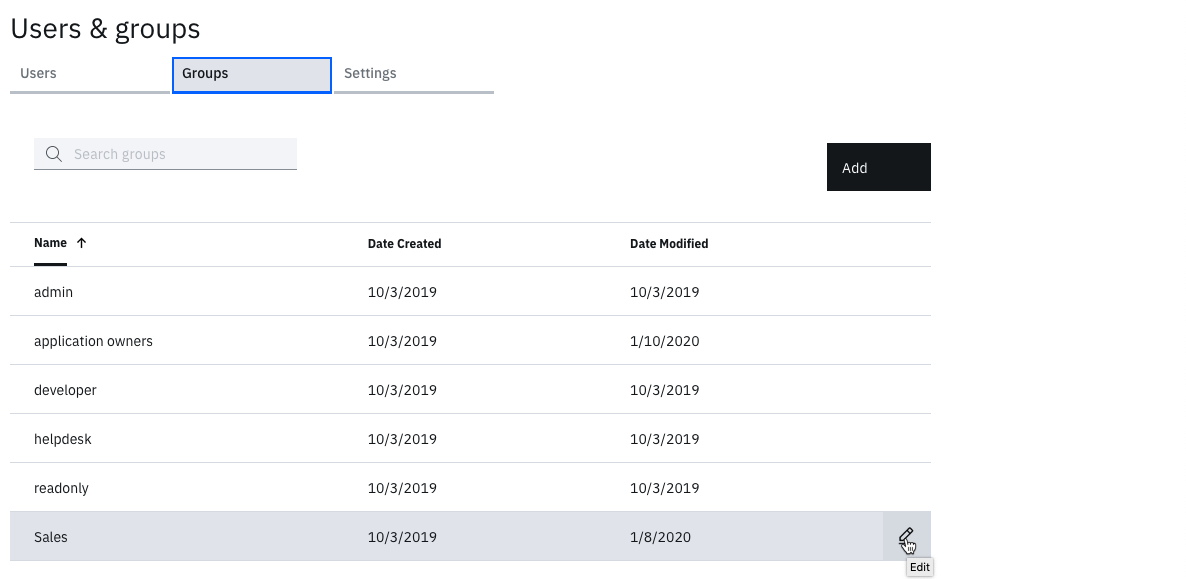
- Still in the Users & groups function, click on the Groups tab
- Hover over the Sales group and click the Edit icon
- Click the Add button beside Group Members
- Search for name of new user which will get listed in the Search results.
- Select it and click Select, this will move the user to Selected users & groups
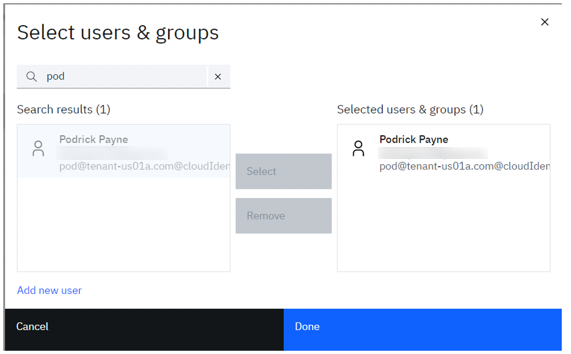
- Click the OK button to add them, then Save on the Edit Group dialog
- Go back to the Users tab, hover over your new user and click the User Details icon on the right
- Confirm the new user is in the Sales group

Check User is in Salesforce
- Go to the Salesforce admin UI (it may still be open from before)
- Go to the left menu and select ADMINISTRATION > Users > Users
- Look for your new user
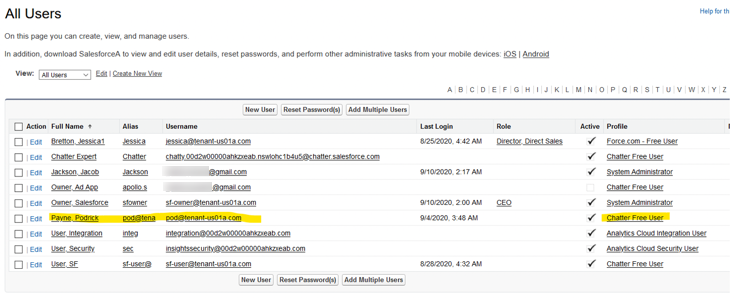
There are two things to check:
- The user has been created in Salesforce and the username is correct, and
- The user has been assigned to the Chatter Free User profile
Validate configuration
If the user does not exist, you should go check the Application lifecycle settings. If you had a successful test connection, then the problem is probably in the attribute mapping. If you don’t see the correct Profile you may have incorrectly collected and stored the profile ID
Test User SSO
- Login to IBM® Verify as new user (Podrick)
- Validate that user is able to see Salesforce tiles on the launchpad as the new user is in the Sales group.
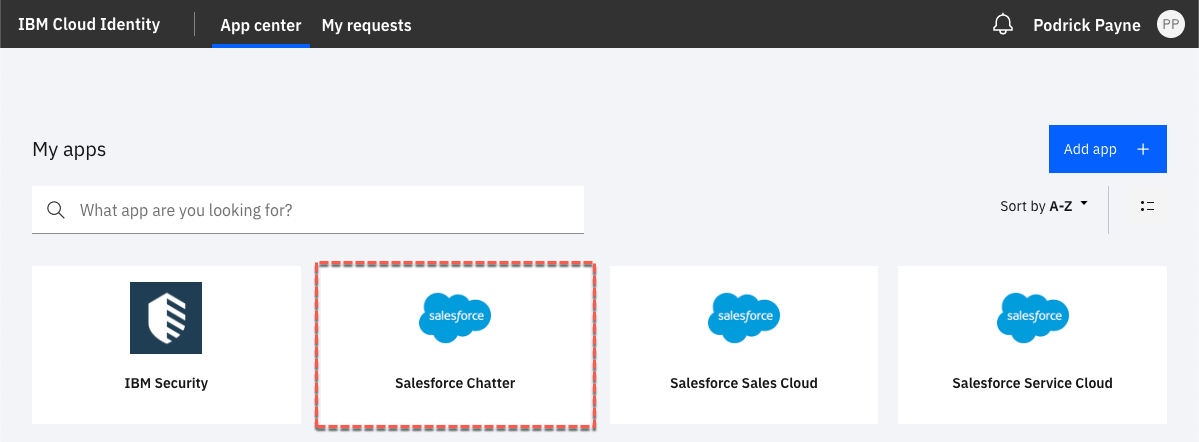
Remember that we are only provisioning access to the Chatter profile. So, the only SSO tile that will work is the Salesforce Chatter.
SSO to other tiles will not work.
- Hover over the Salesforce Chatter icon and click the Launch App button
User will be able to access Salesforce with the Chatter tab selected.
- Click on the Profile icon to confirm you are logged in as the new user

- Logout the user from Salesforce and close the browser tab
De-provisioning with Salesforce®
We will now do the reverse to remove the user from Salesforce (actually Salesforce won’t allow deletion of accounts, so the user will be suspended).
Remove User from Sales Group
- Return to the IBM® Verify admin console as your admin user (Jacob)
- Go to Users & groups
- Go to the Groups tab
- Edit the Sales group
- Select new user and click the Remove button
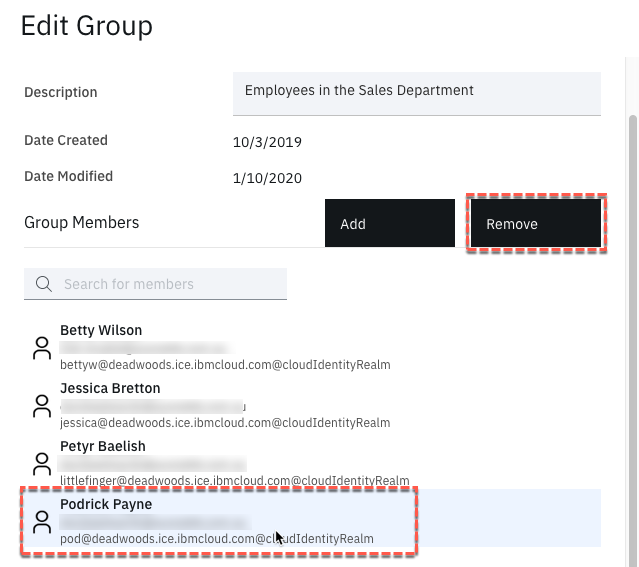
- Click the Save button
- As before, check your new user in the Users tab – you should see they have “no groups”

- Return to the Salesforce admin menu and go to the Users page as before (or refresh if you’re still there)
- Check your new user

The user should still be there but will no longer be active (there’s no tick in the Active column).
Test User SSO
- Login to IBM® Verify as new user (Podrick)
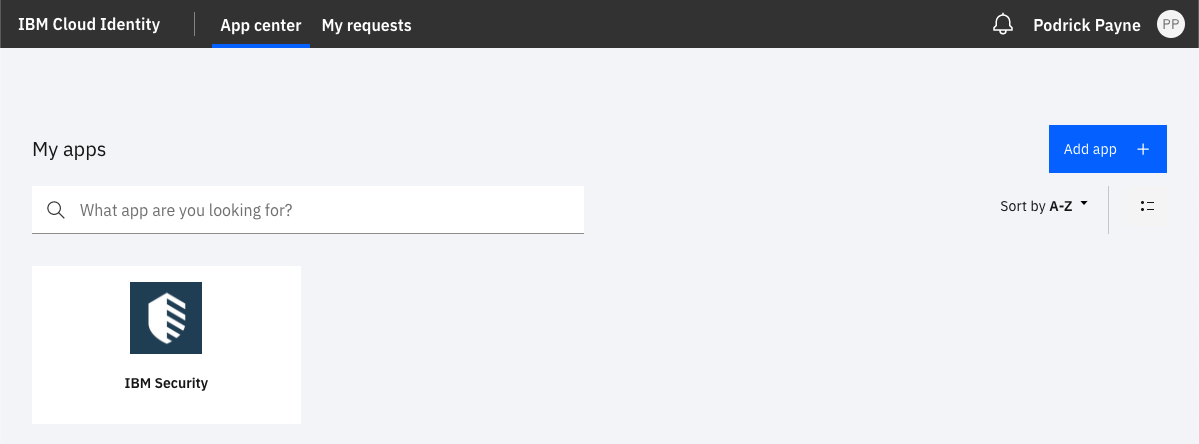
- Validate that Salesforce tiles should be gone as the user has been removed from the Sales group.
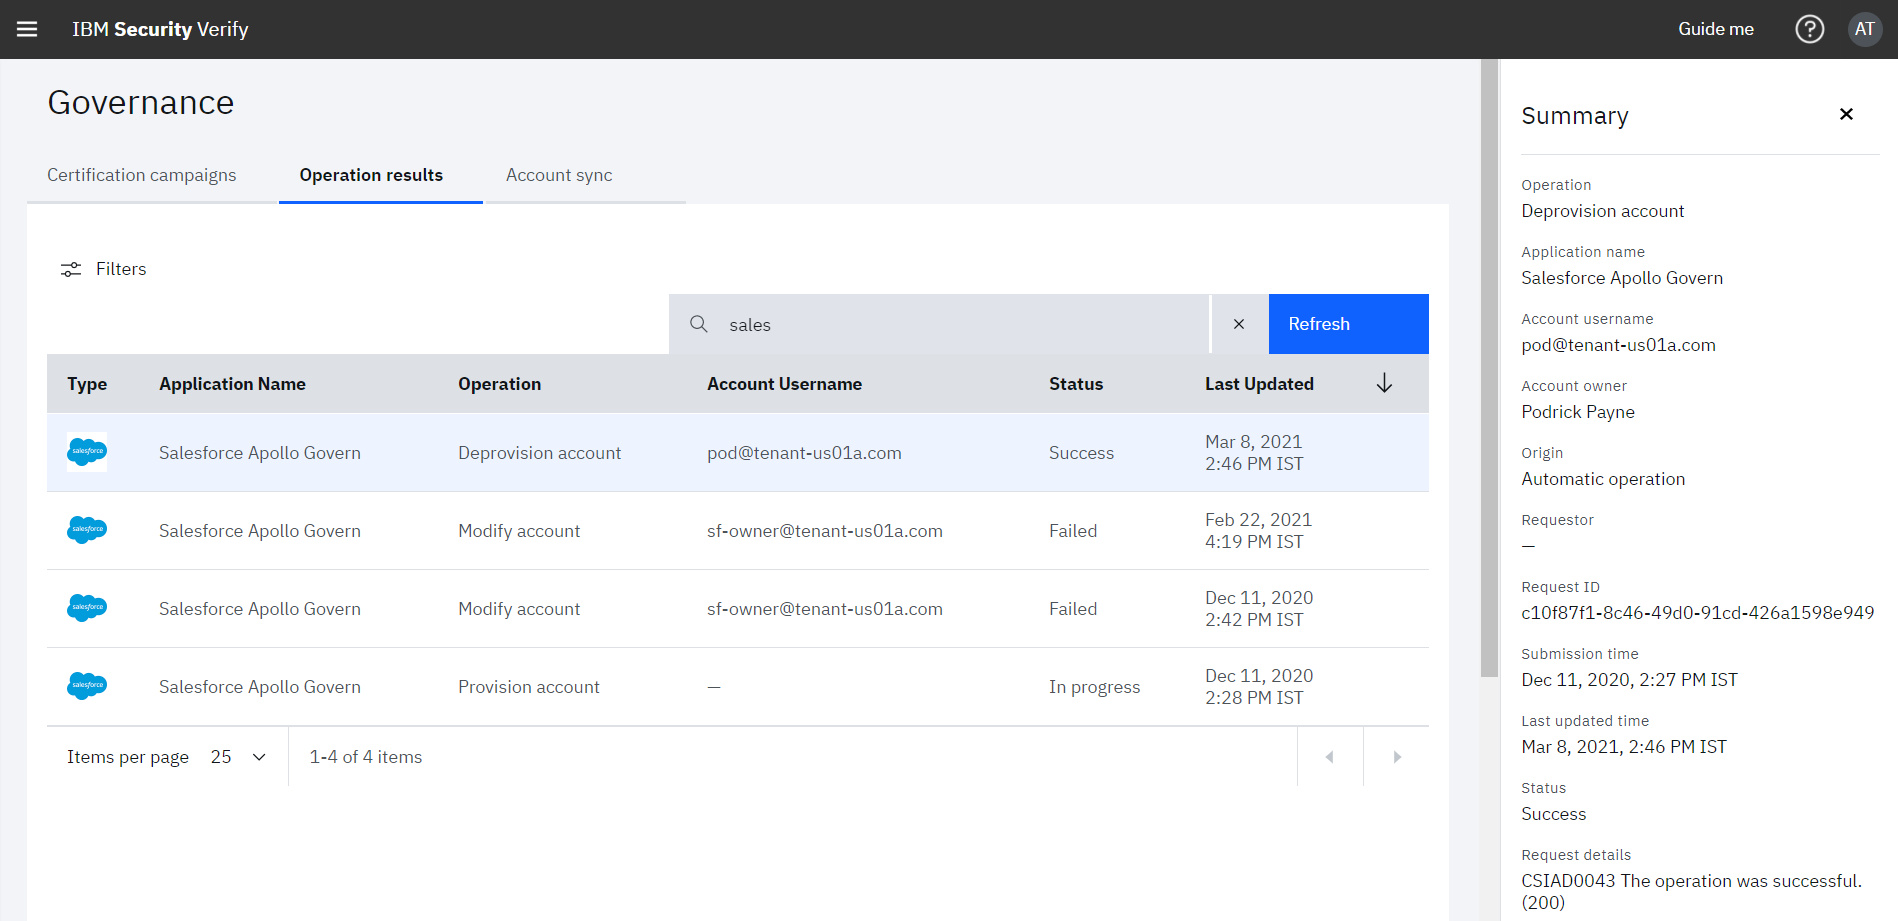
The user de-provisioning task can be monitored by the IBM® Verify admin (Jacob) from Governance > Operation results tab

- When Clicked in the Deprovision account operation, details of task are shown in right pane:
Nilesh Atal, IBM Security
Updated 4 months ago
