Login with username
This article illustrates how an authenticated session can be created using a custom authentication mechanism. Specifically, to keep it simple, the user authenticates with just a valid username. While this is not be a practical option for a production deployment, it introduces the following:
- Custom page to collect the username
- Exchange of the username for a login session
It can be easily extended to add real forms of authentication, such as mobile push-based authentication using the IBM Verify app.
Caution!
This authentication mechanism must never be used as a production-ready flow. It is used here to illustrate the approach that can be taken to build a custom login flow. However, authenticating with a valid username without any additional challenges and safeguards is very weak and must never be used in real-world cases.
Overview of the flow
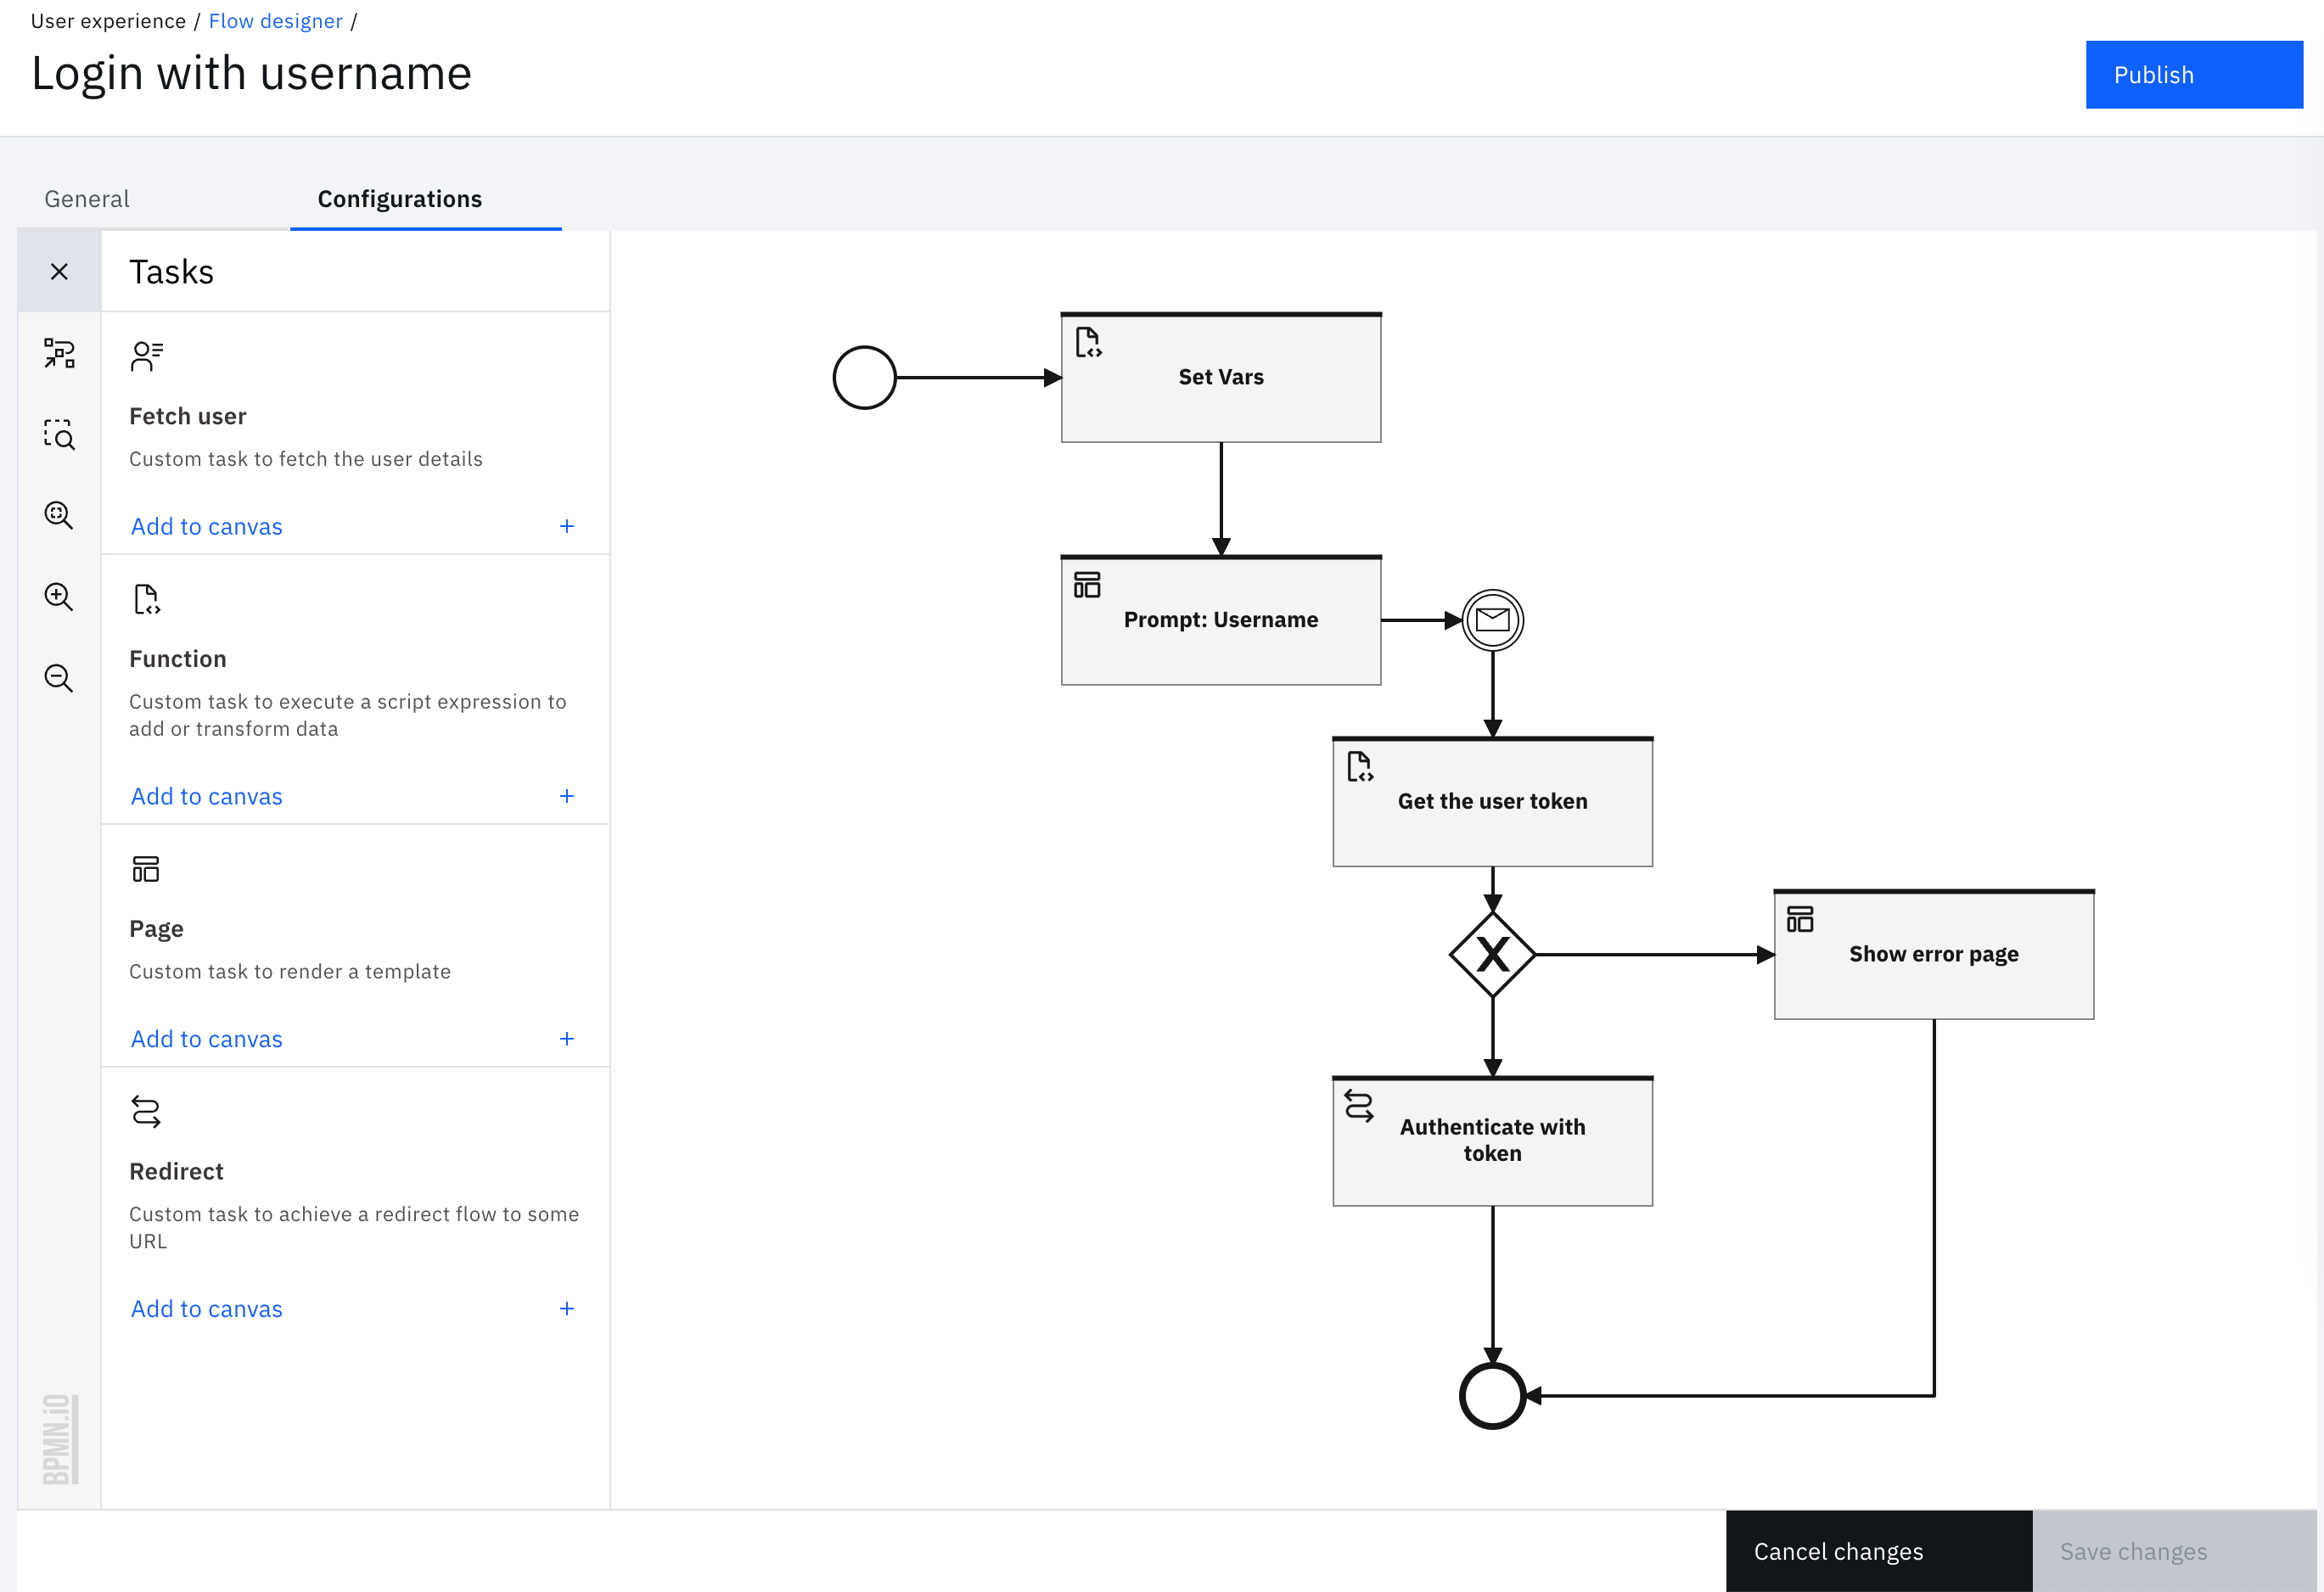
The flow starts with asking the user for the username. This is a simple custom page. The username is used as the "sub" in a JSON Web Token (JWT) and the JWT is used to obtain a user access token using the OAuth 2.0 JWT Bearer grant flow. This token is then exchanged for an authenticated session on the browser using the session API.
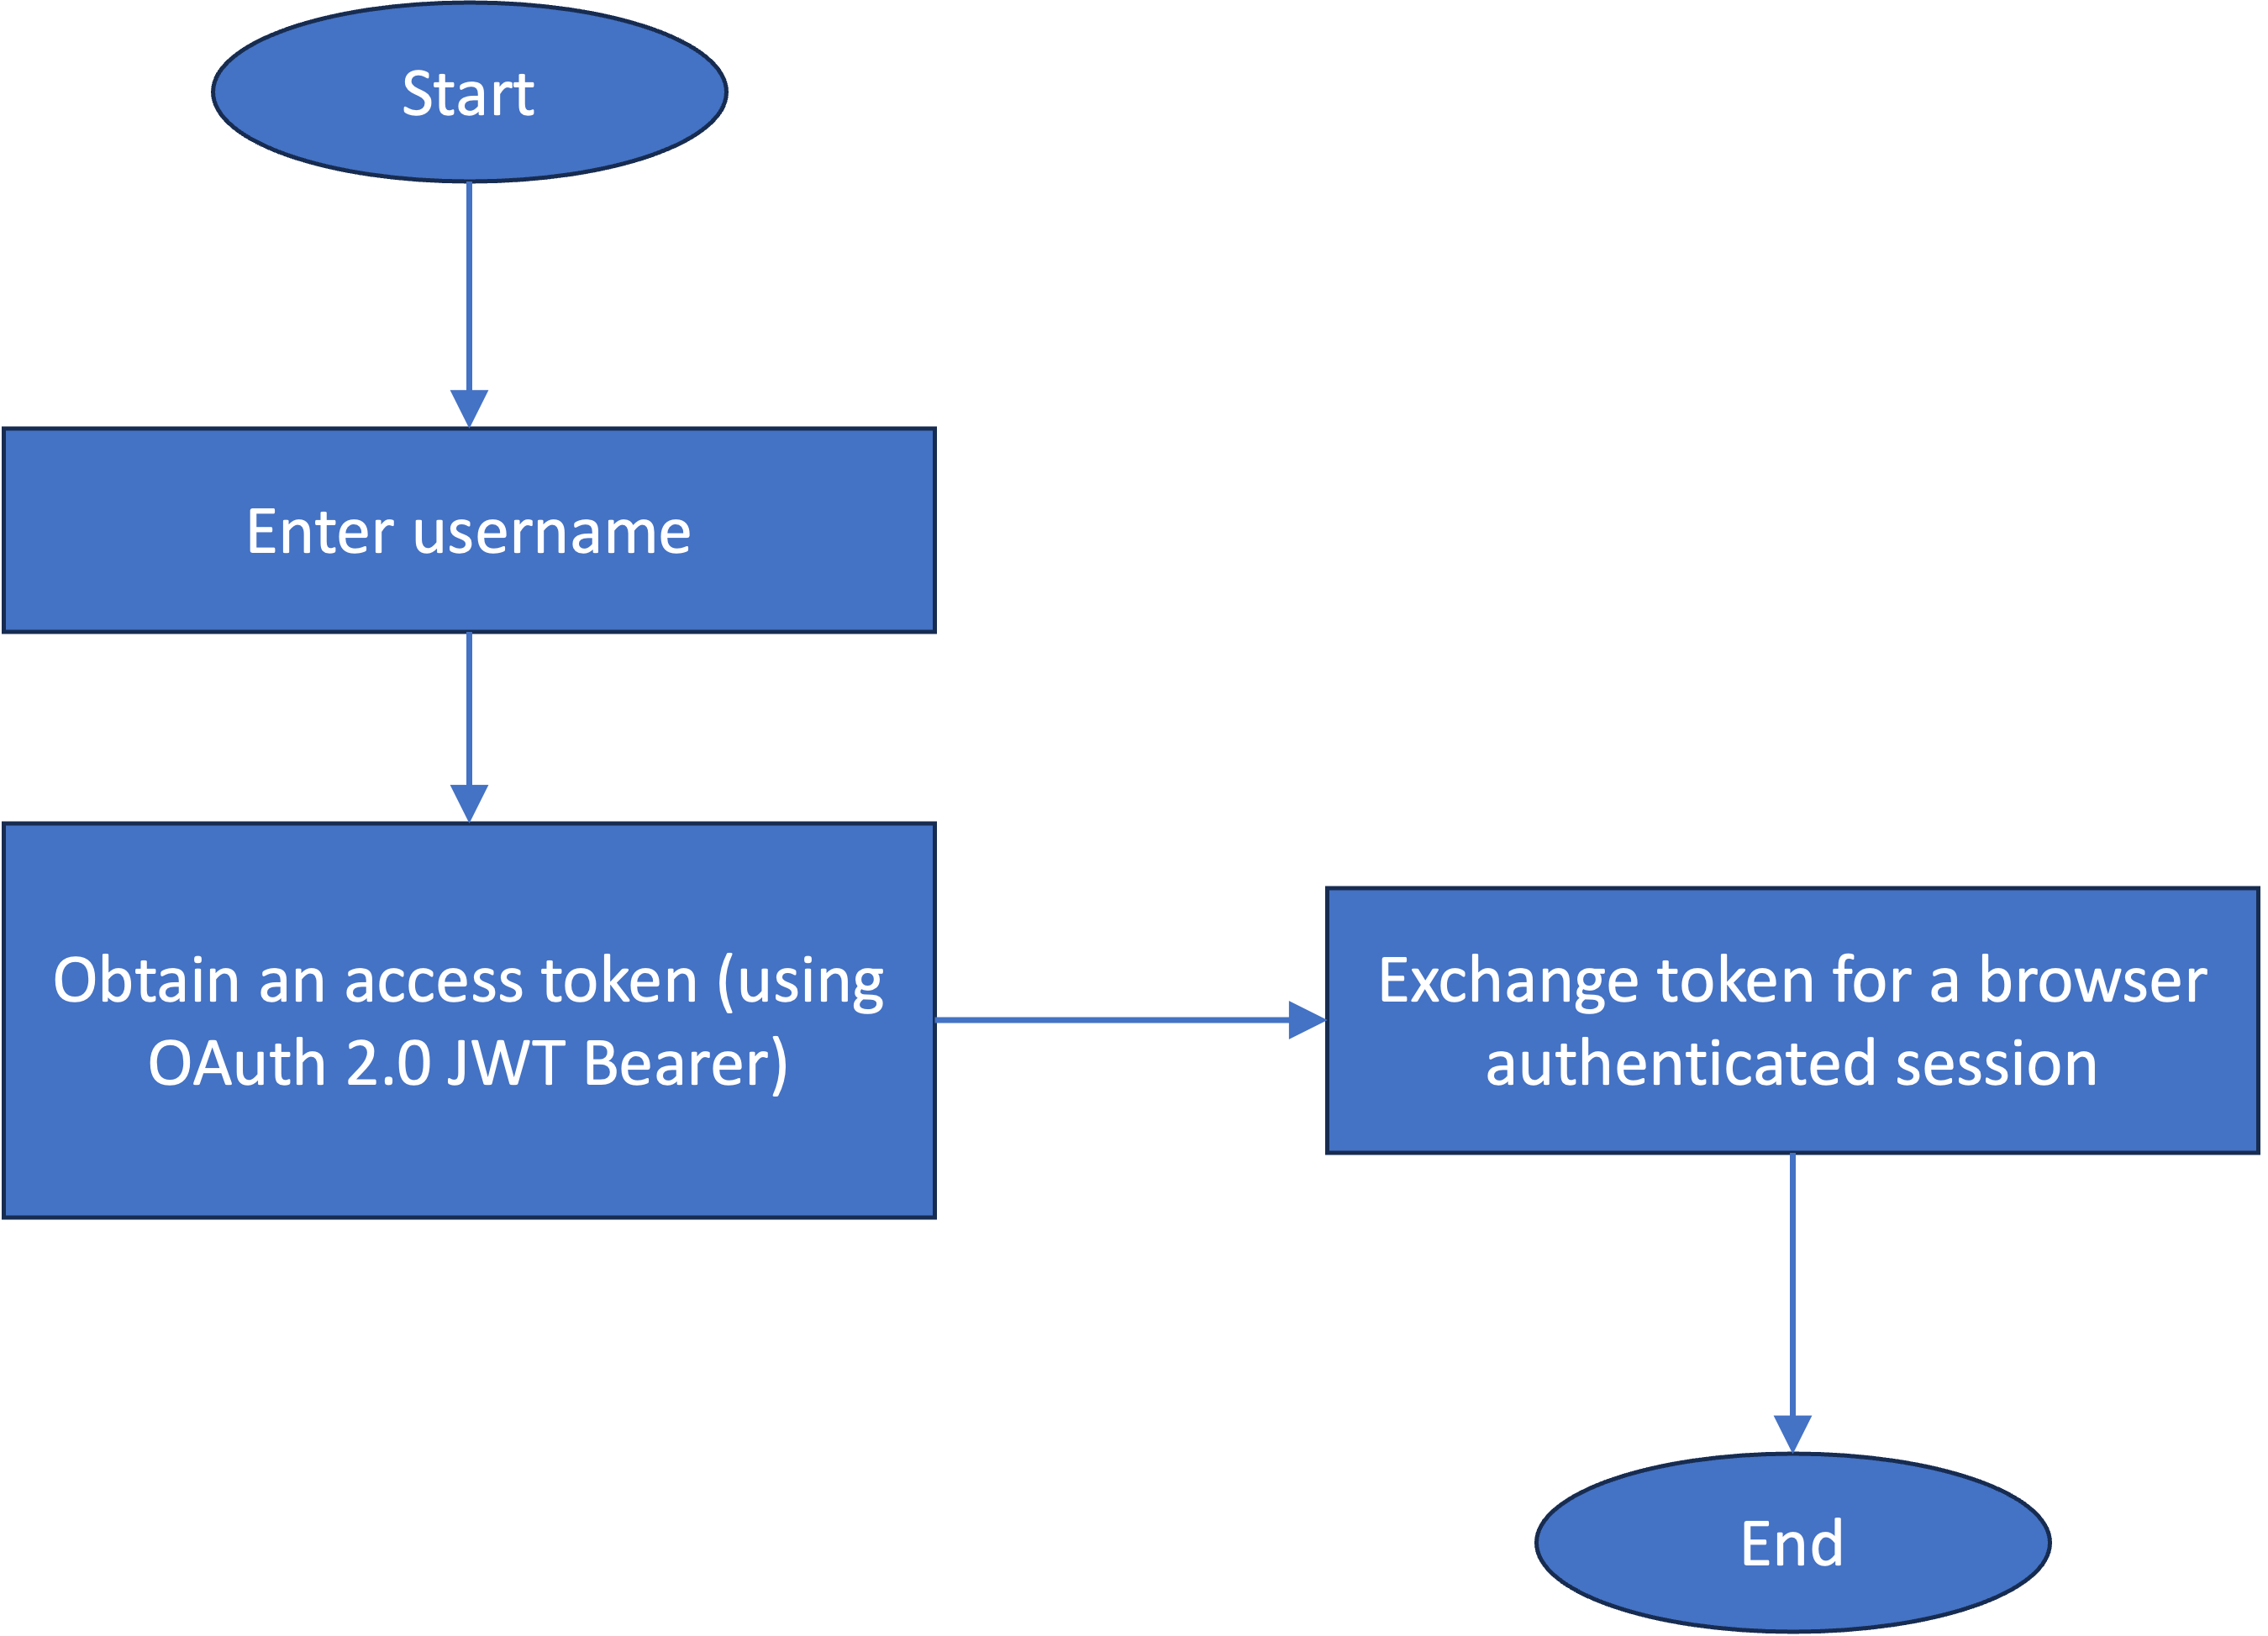
The flow can be enhanced to include authentication mechanism discovery for the user and then trigger more realistic authentication flows using Verify APIs.
Resources
This article makes use of importable file resources that can be found in the authenticate_with_username subdirectory of the verify-saas-resources GitHub repository.
For more information on the GitHub repository that contains supporting resources for example flows, please see the Associated Assets section of the Flow Designer overview page.
Prerequisites
- IBM Verify tenant
- Flow designer enabled in your tenant
- IBM Verify SaaS Resources contents downloaded or cloned to your machine. Refer to the parent page for details on how to achieve this. The folder is referred here-on as
$GIT_REPO.
Installation and configuration
Custom branding theme
This flow presents custom pages and so, a theme needs to be created to prevent affecting the flows using the default theme. There are two customized files:
- custom_page1.html: This requests for the username.
- custom_page2.html: This shows an error in the event that the flow fails.
Login to the IBM Verify admin console and follow the steps as below.
-
On the left-hand side menu, select "User experience" and click on "Branding"
-
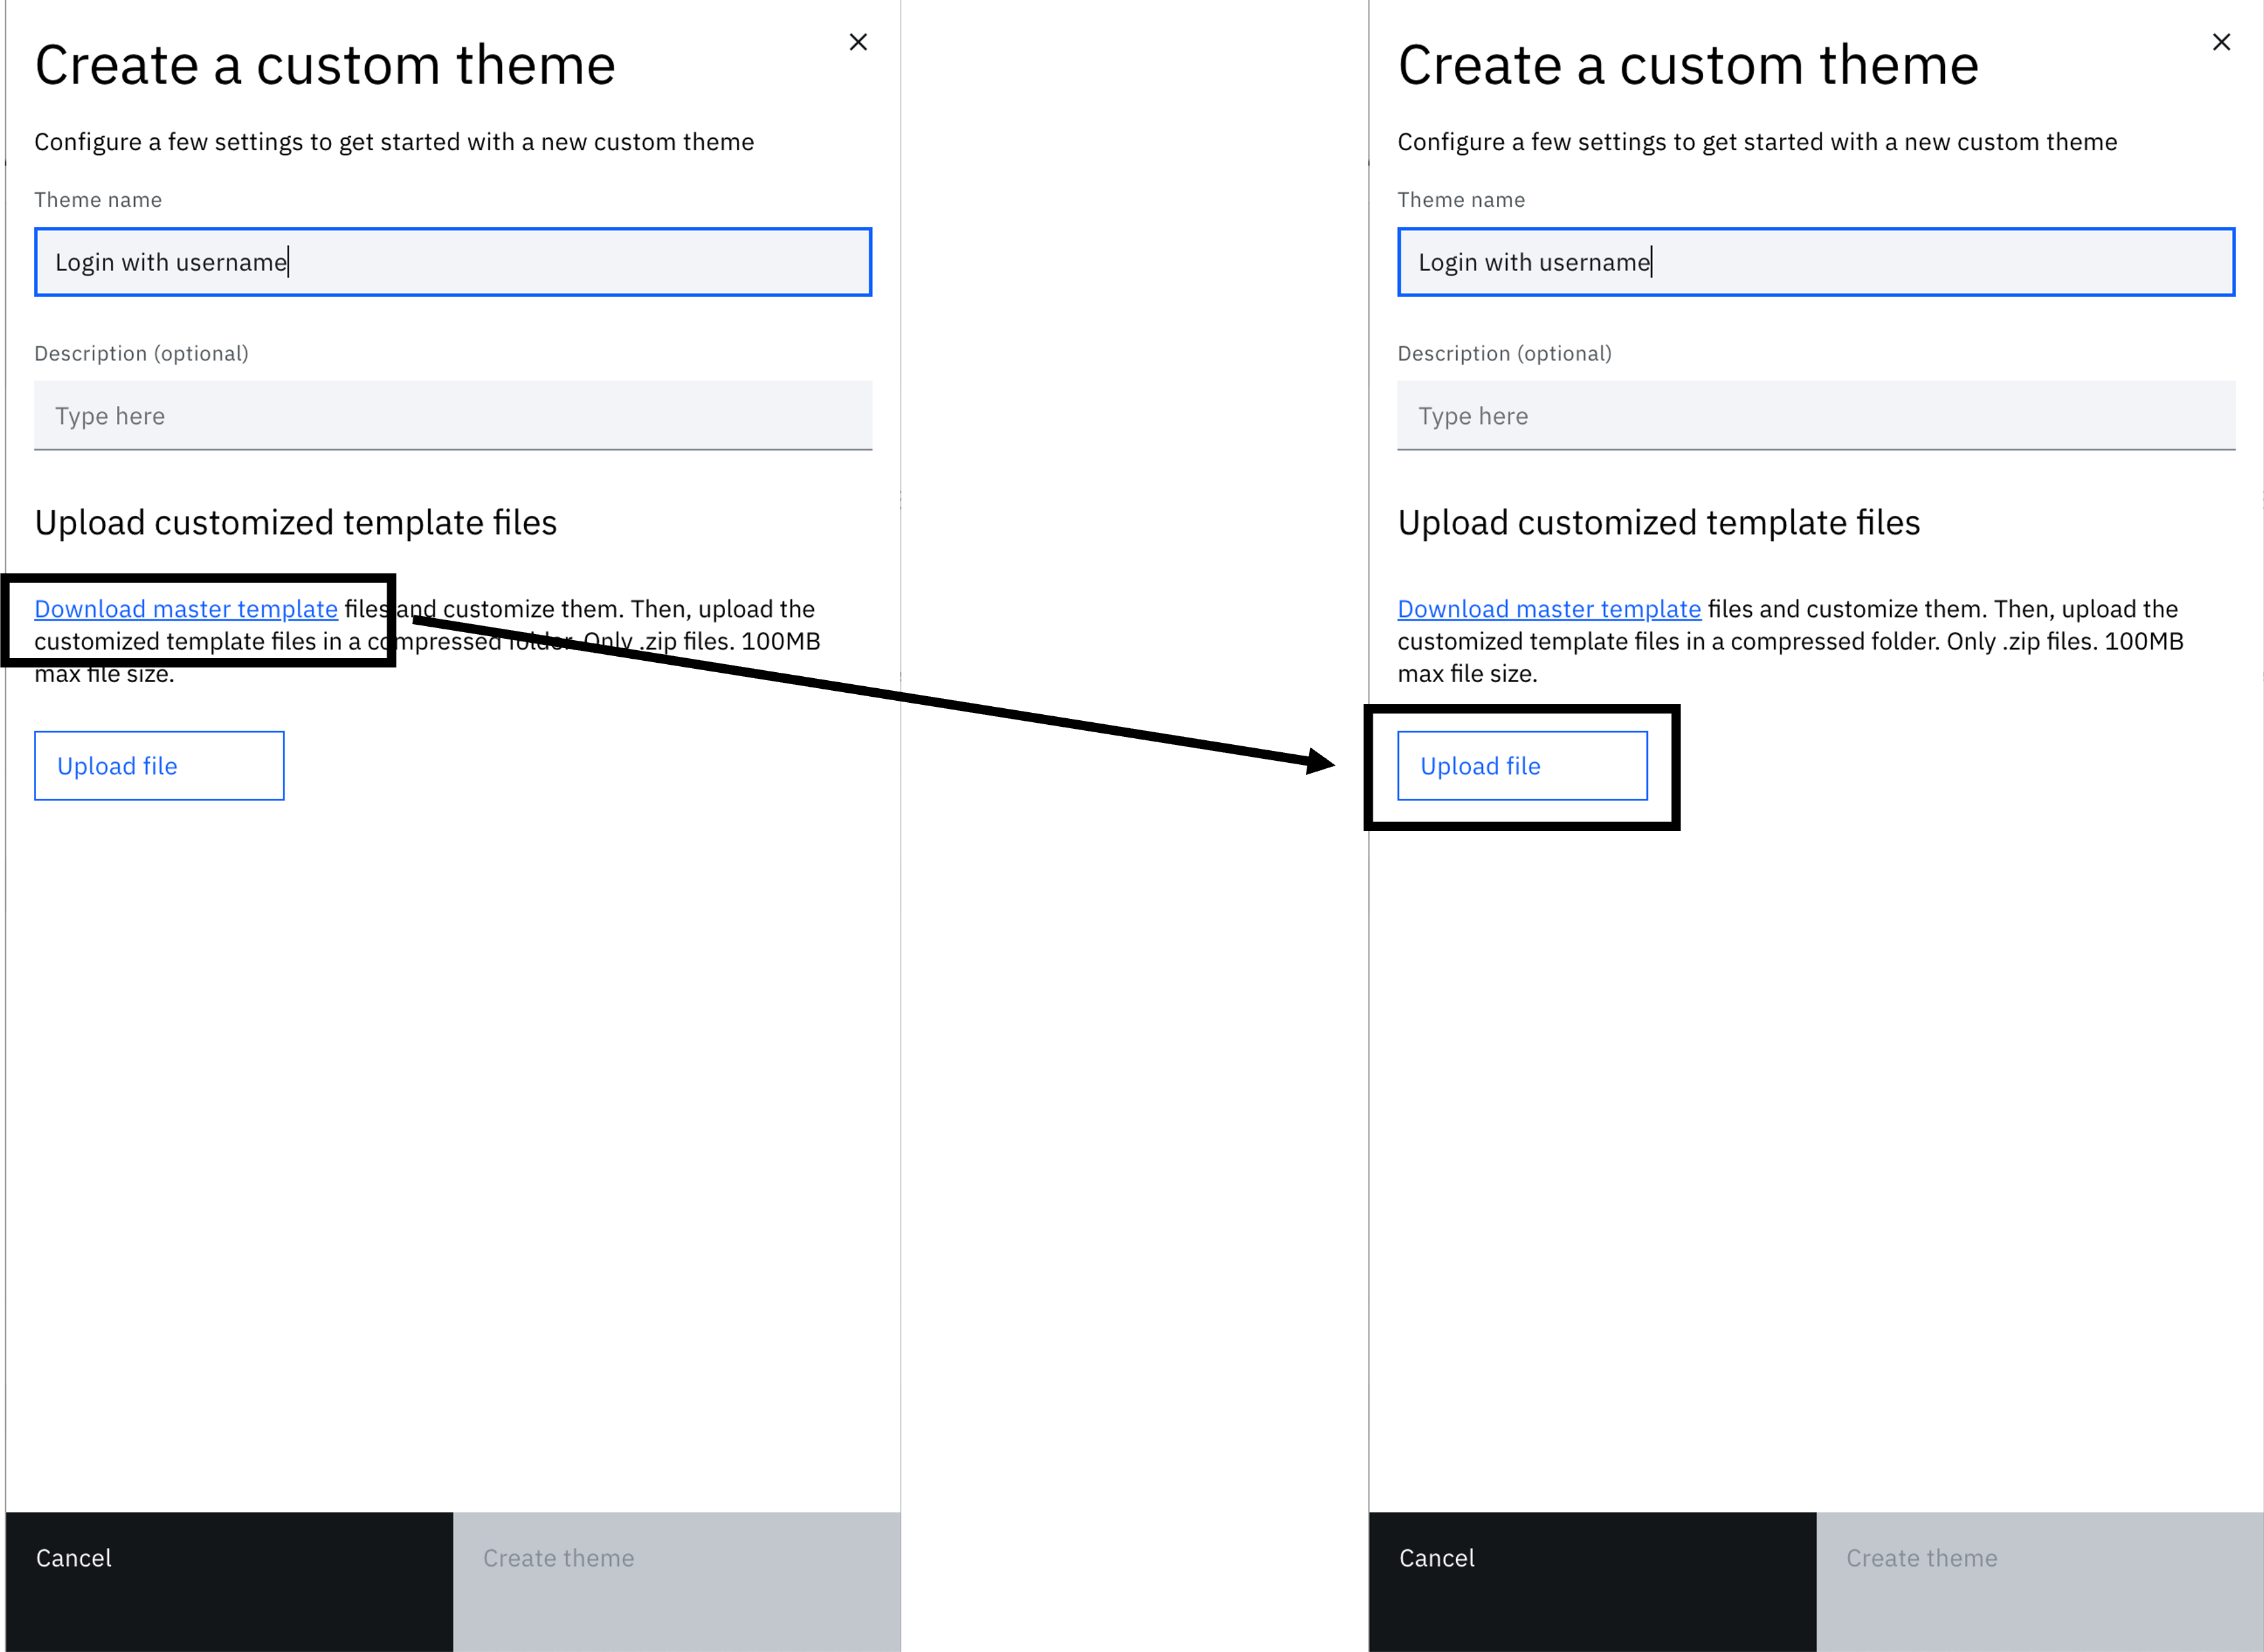
Create a new branding theme called "Login with username". You can follow the steps mentioned here.
-
Click on the theme tile to view the file tree
-
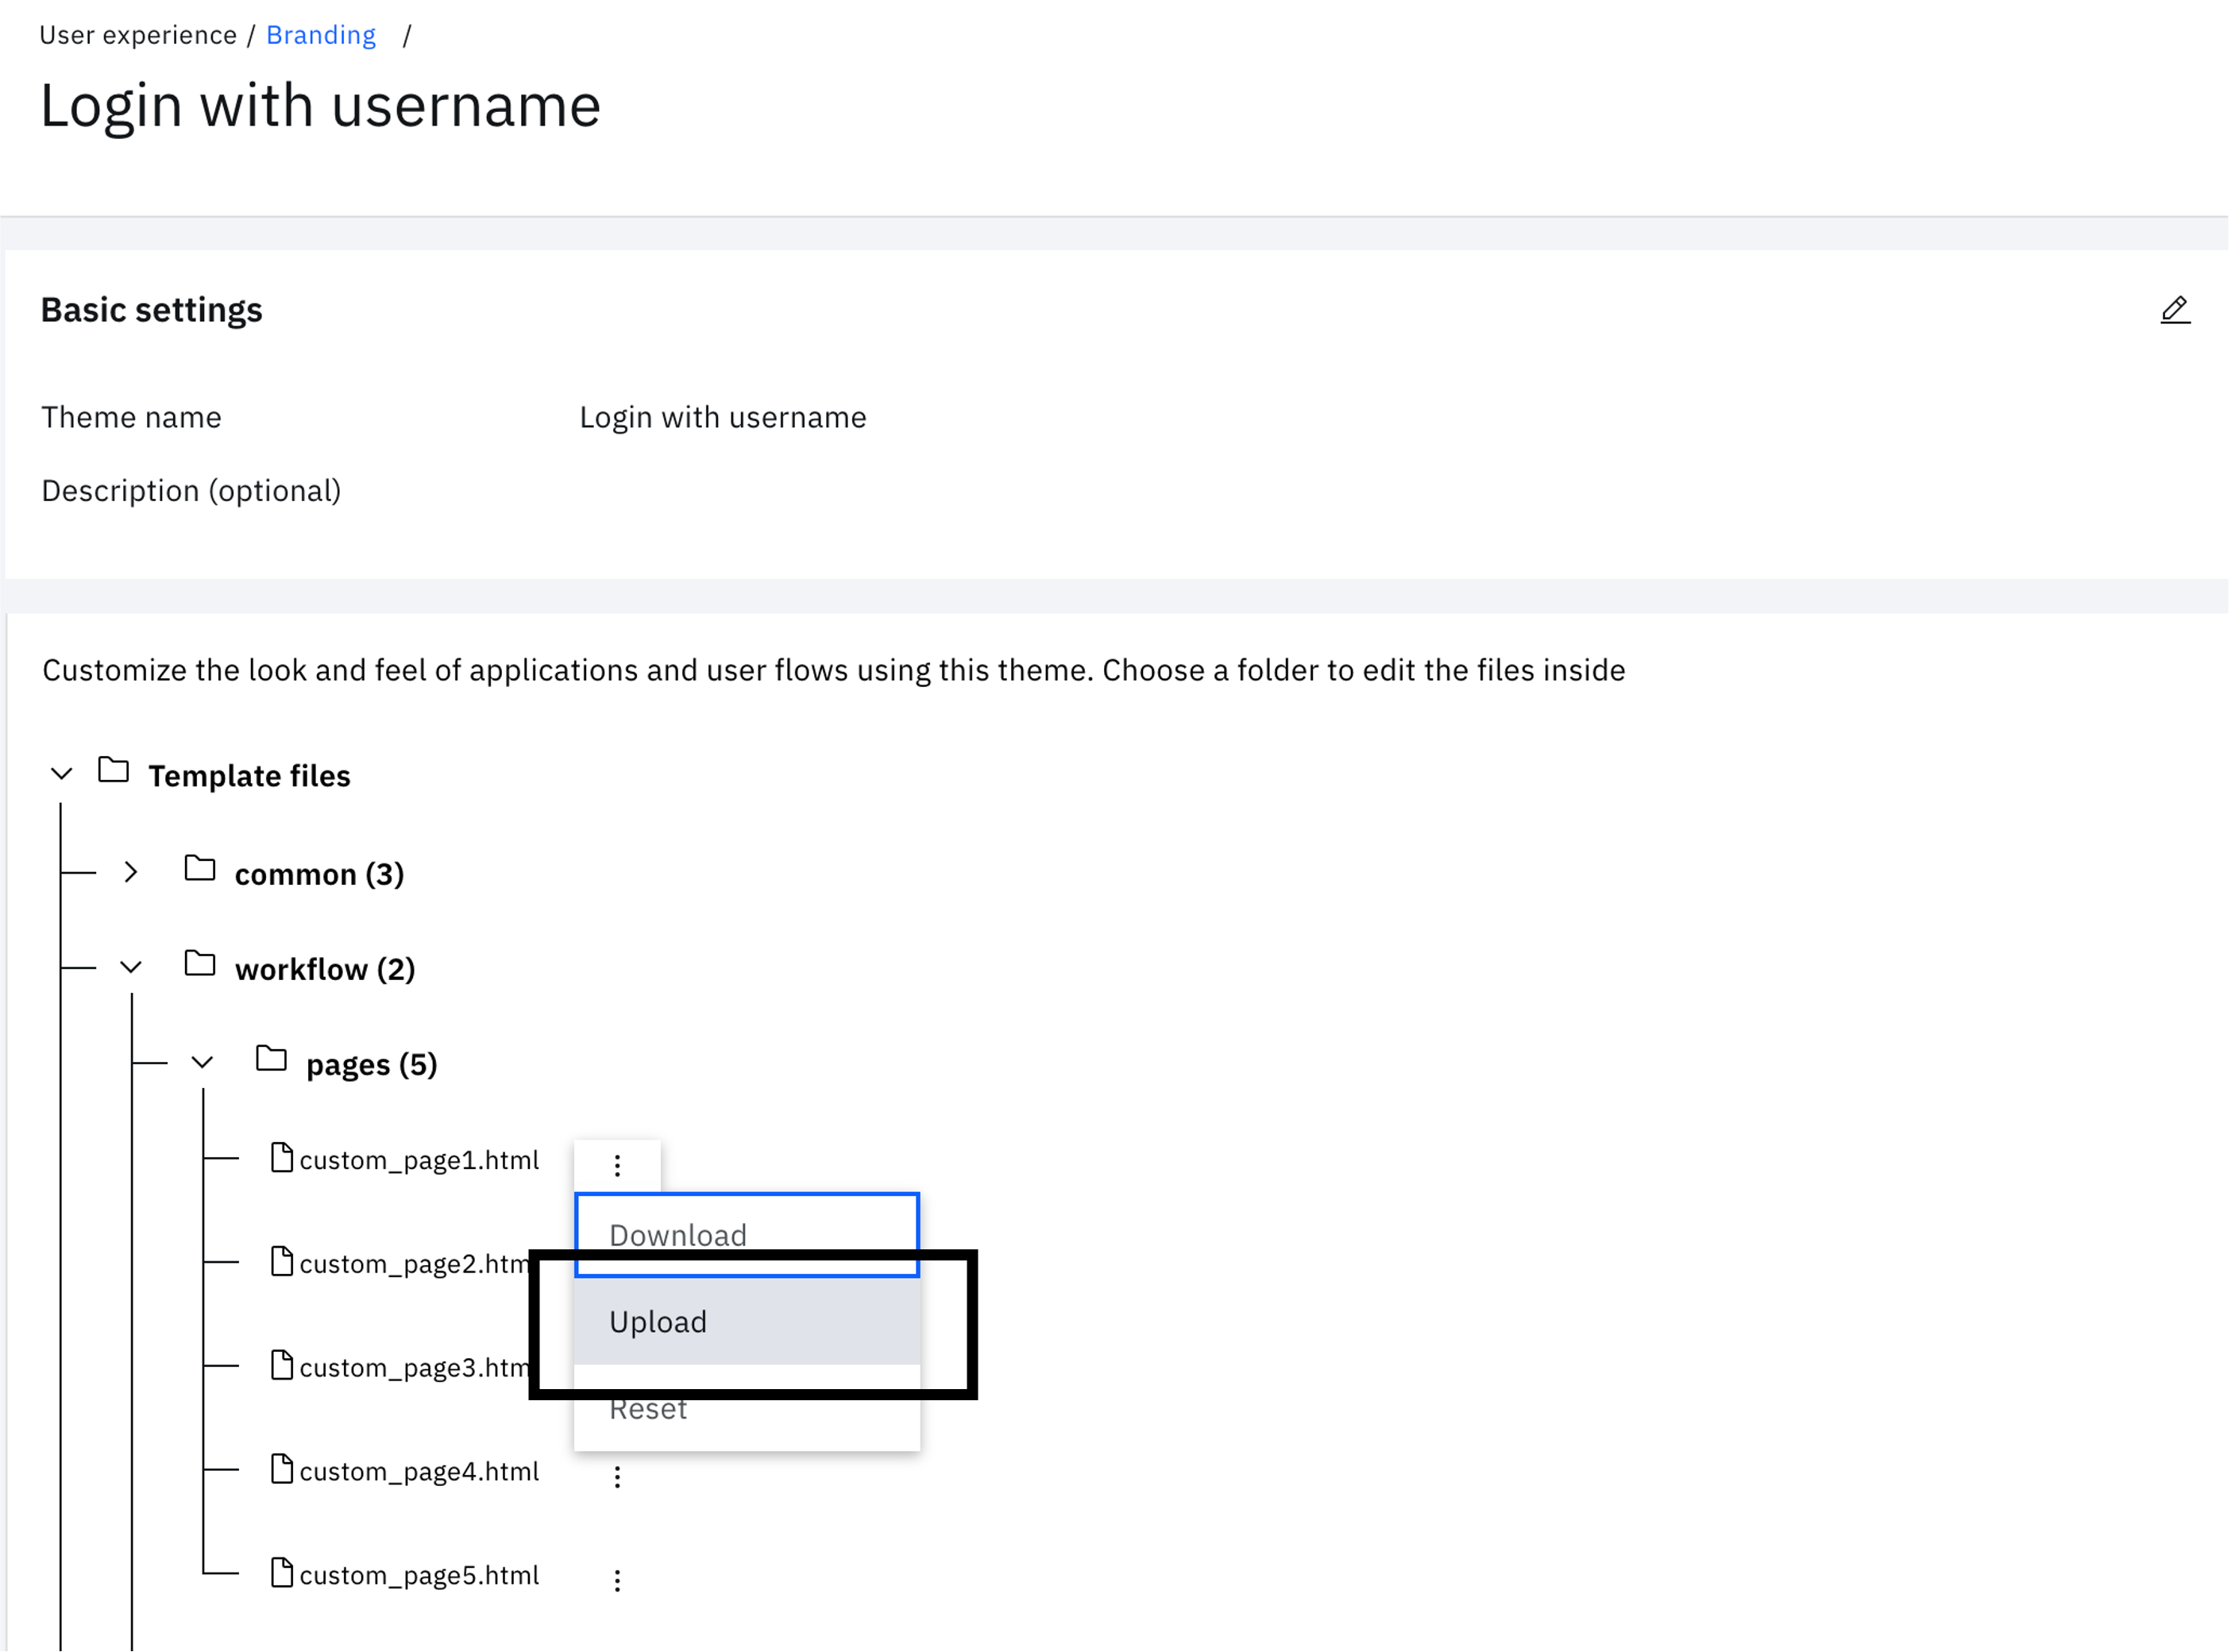
Expand "workflow" > "pages" and click on the three vertical dots next to "custom_page1.html". Click "Upload".
-
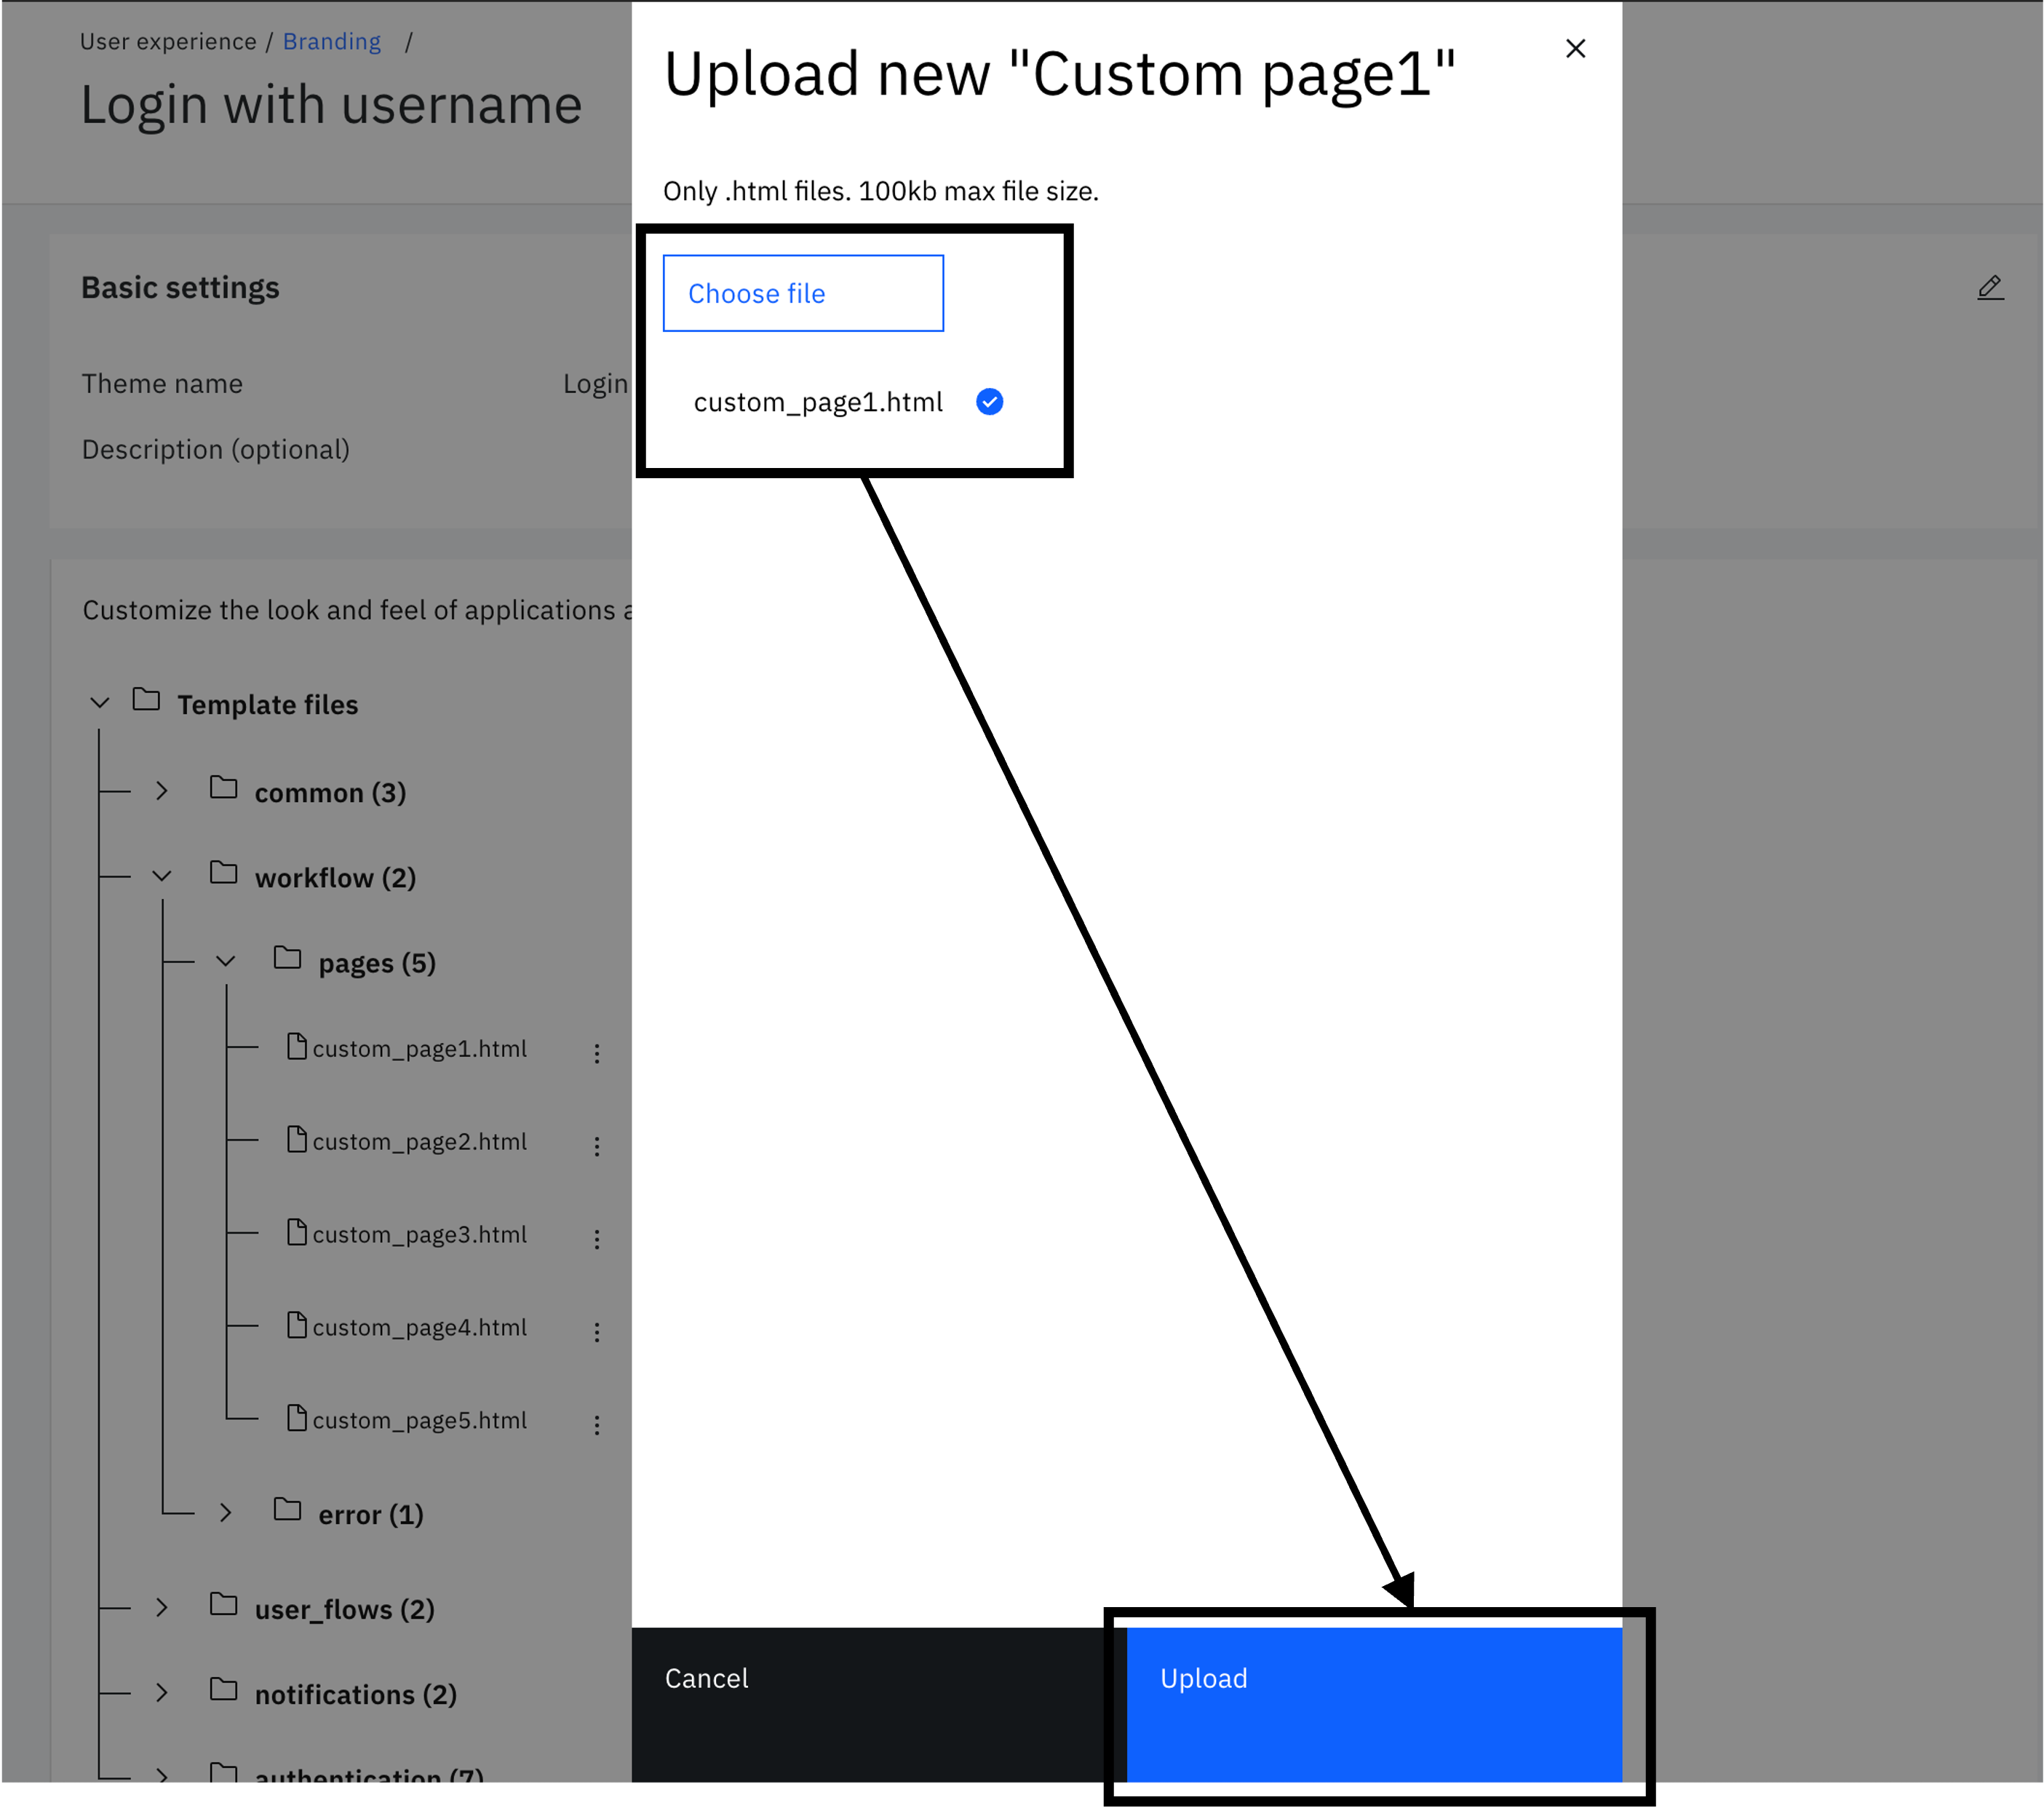
Choose "$GIT_REPO/flows/authenticate_with_username/theme/templates/workflow/pages/default/custom_page1.html" from the local folder. Then click "Upload".
-
Similarly to the earlier step, under "workflow" > "pages", click on the three vertical dots next to "custom_page2.html". Click "Upload".
-
Choose "$GIT_REPO/flows/authenticate_with_username/theme/templates/workflow/pages/default/custom_page2.html" from the local folder. Then click "Upload".
Create OIDC application enabled with OAuth 2.0 JWT Bearer grant flow
The OAuth 2.0 JWT Bearer grant flow is used by the "Login with username" flow to obtain a user access token. This token is subsequently exchanged for an authenticated web browser session.
-
On the left-hand menu, select "Applications" and click on "Applications"
-
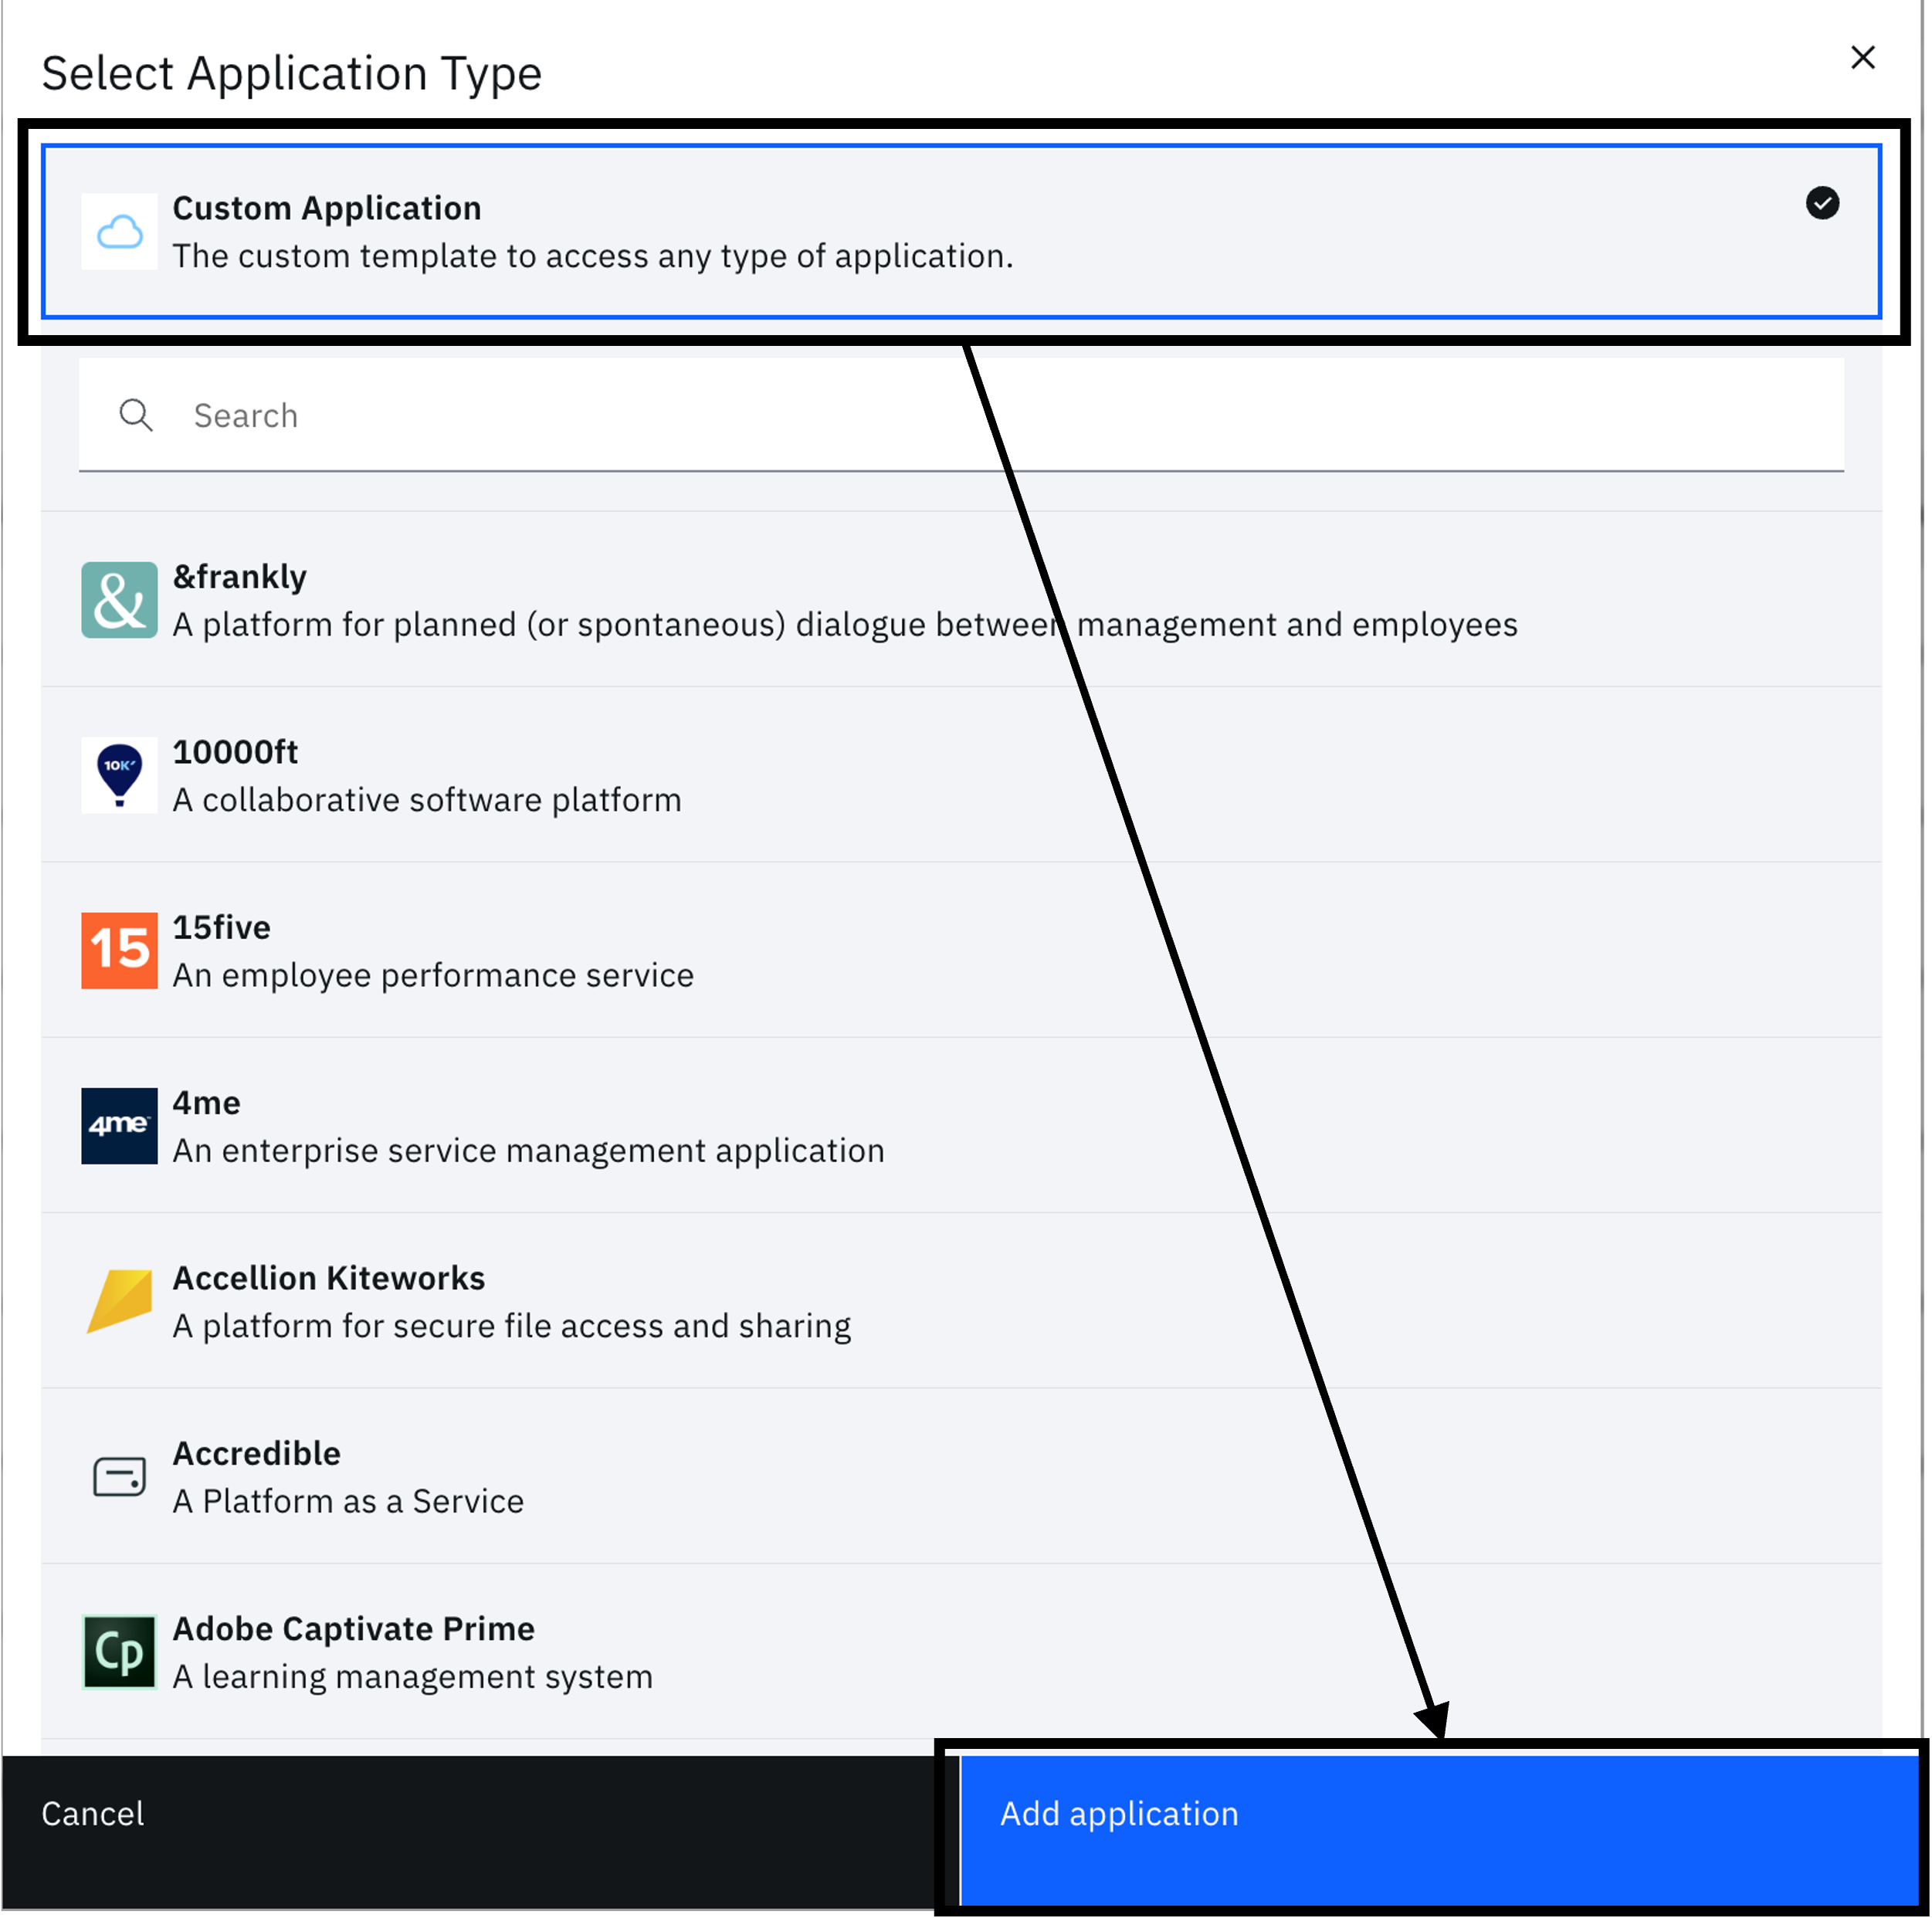
Select "Add an application" to open the application catalog. Select "Custom Application" and click on "Add application".
-
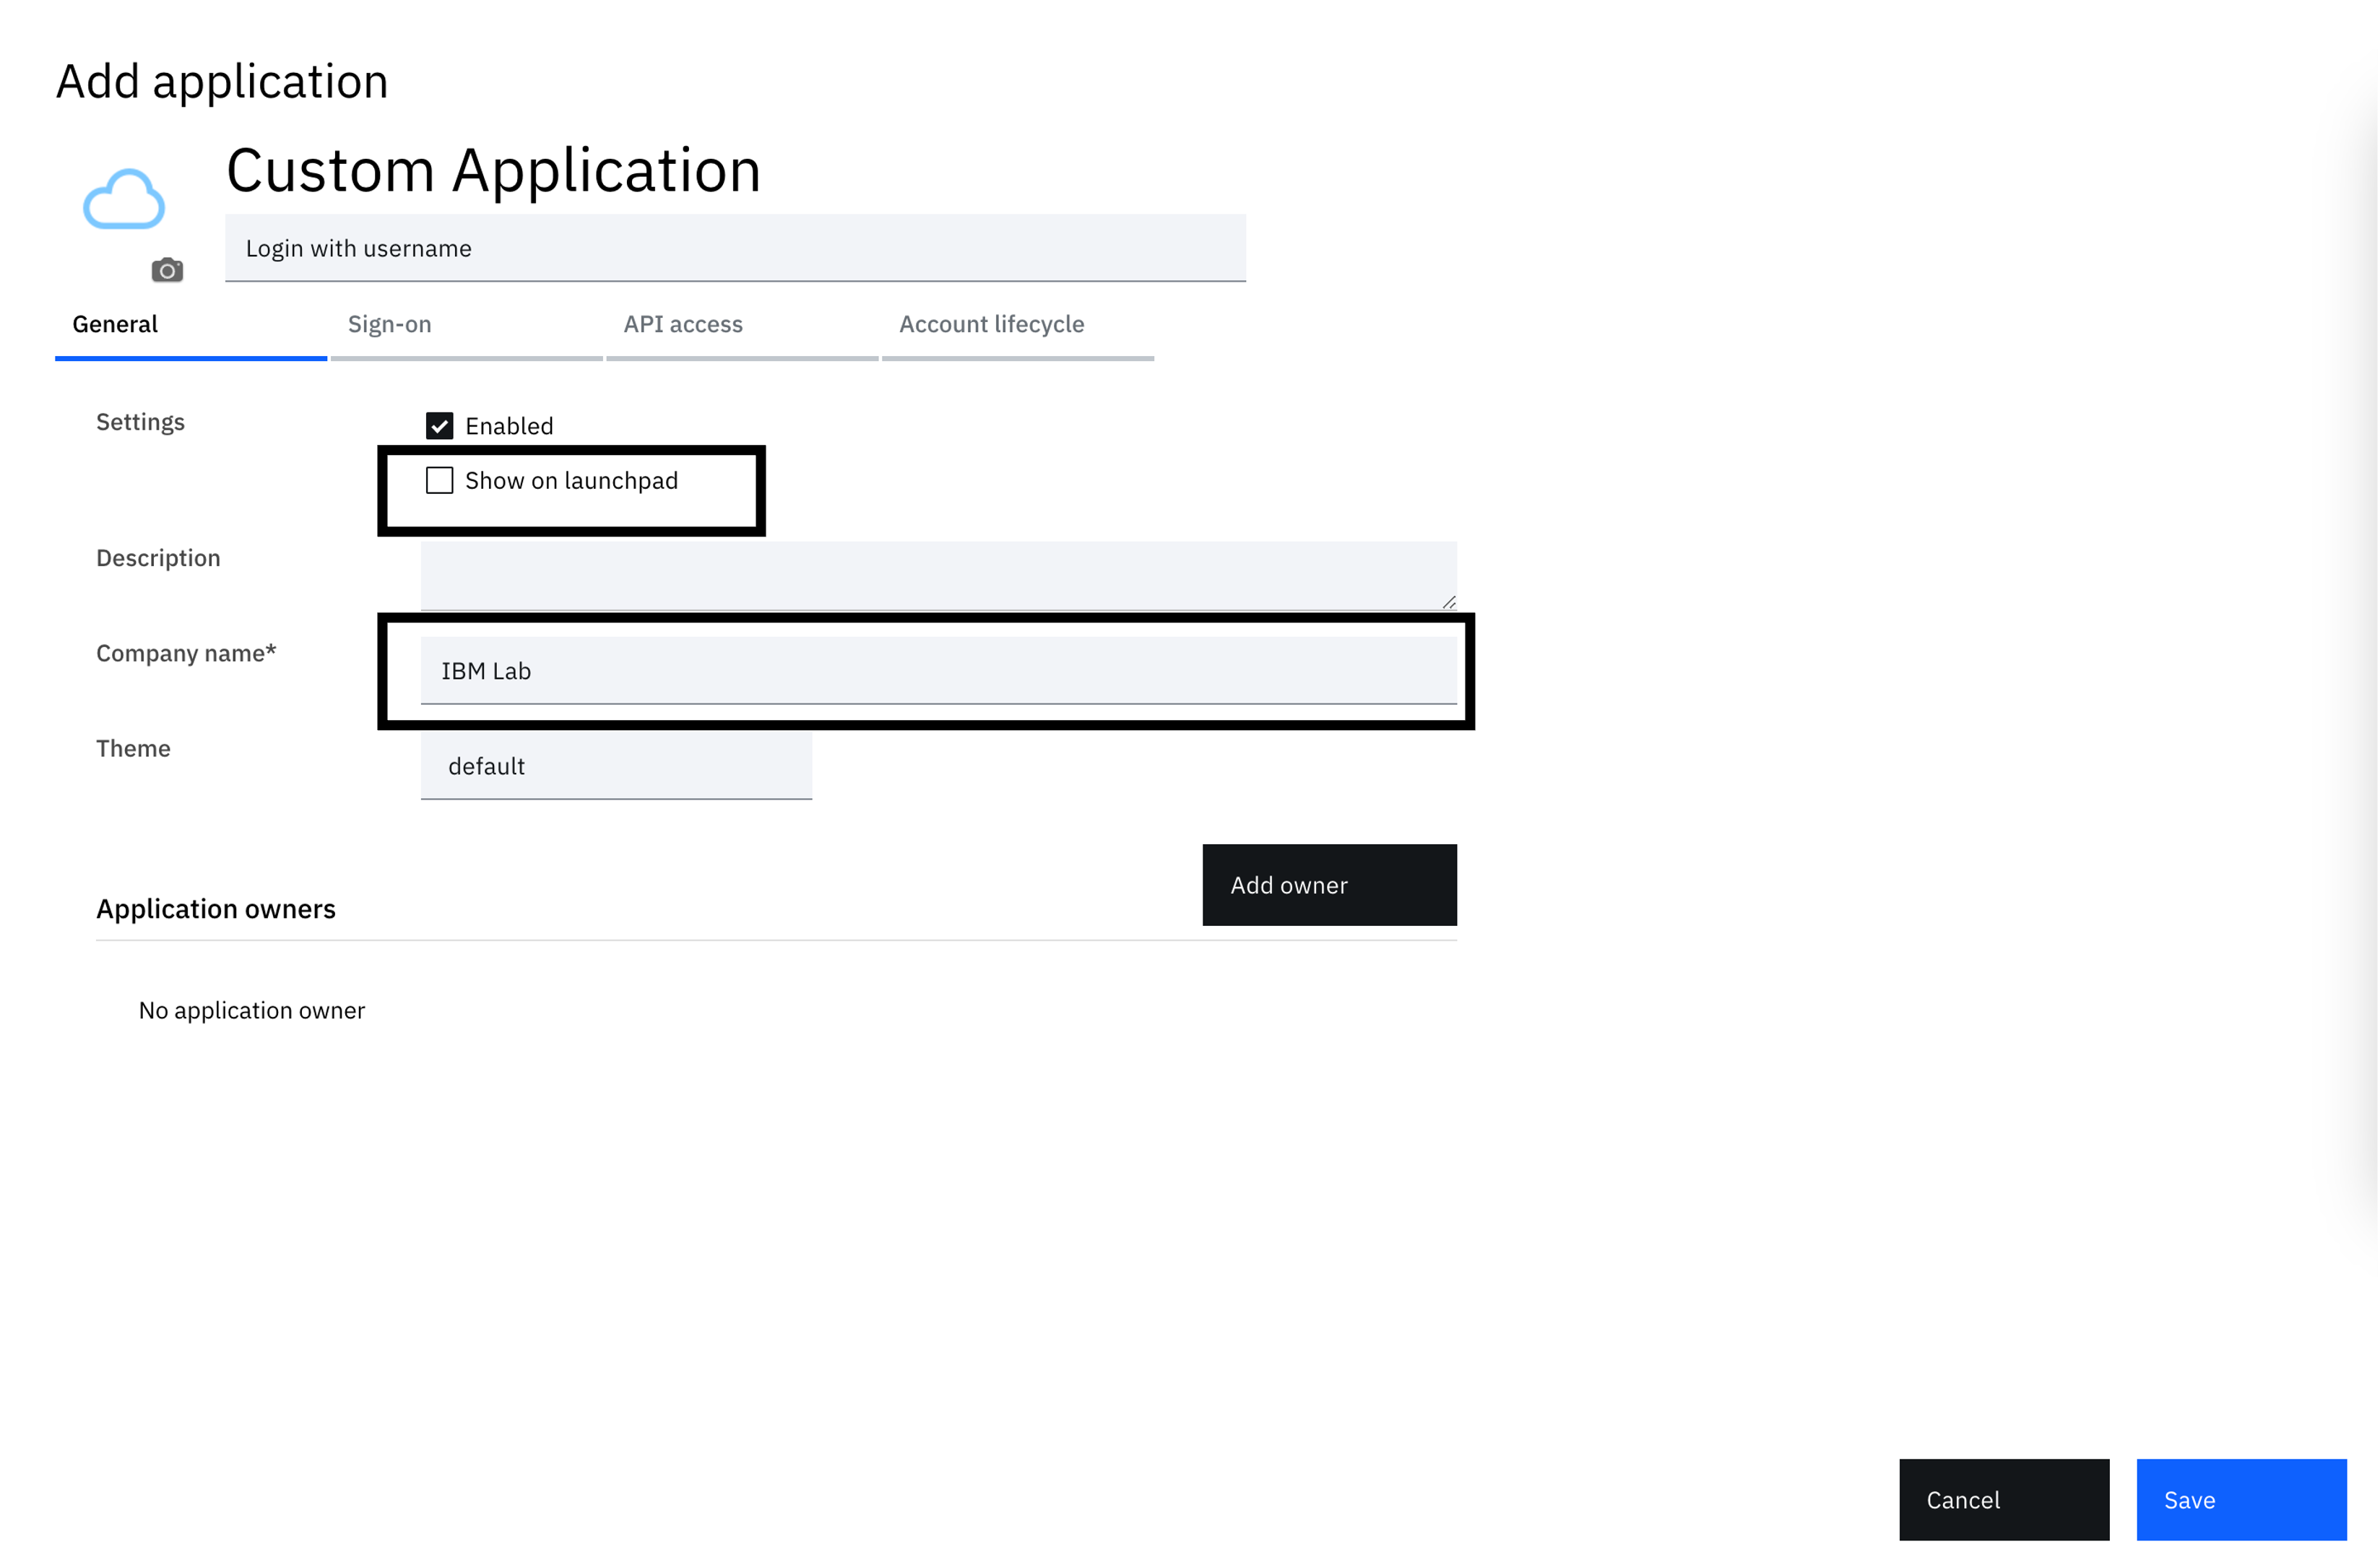
The next screen is the application definition wizard. The starting tab shows general settings where you can configure specific application metadata. Here, uncheck the "Show on launchpad" checkbox and provide a company name. You can put "IBM Lab" for the company value.
-
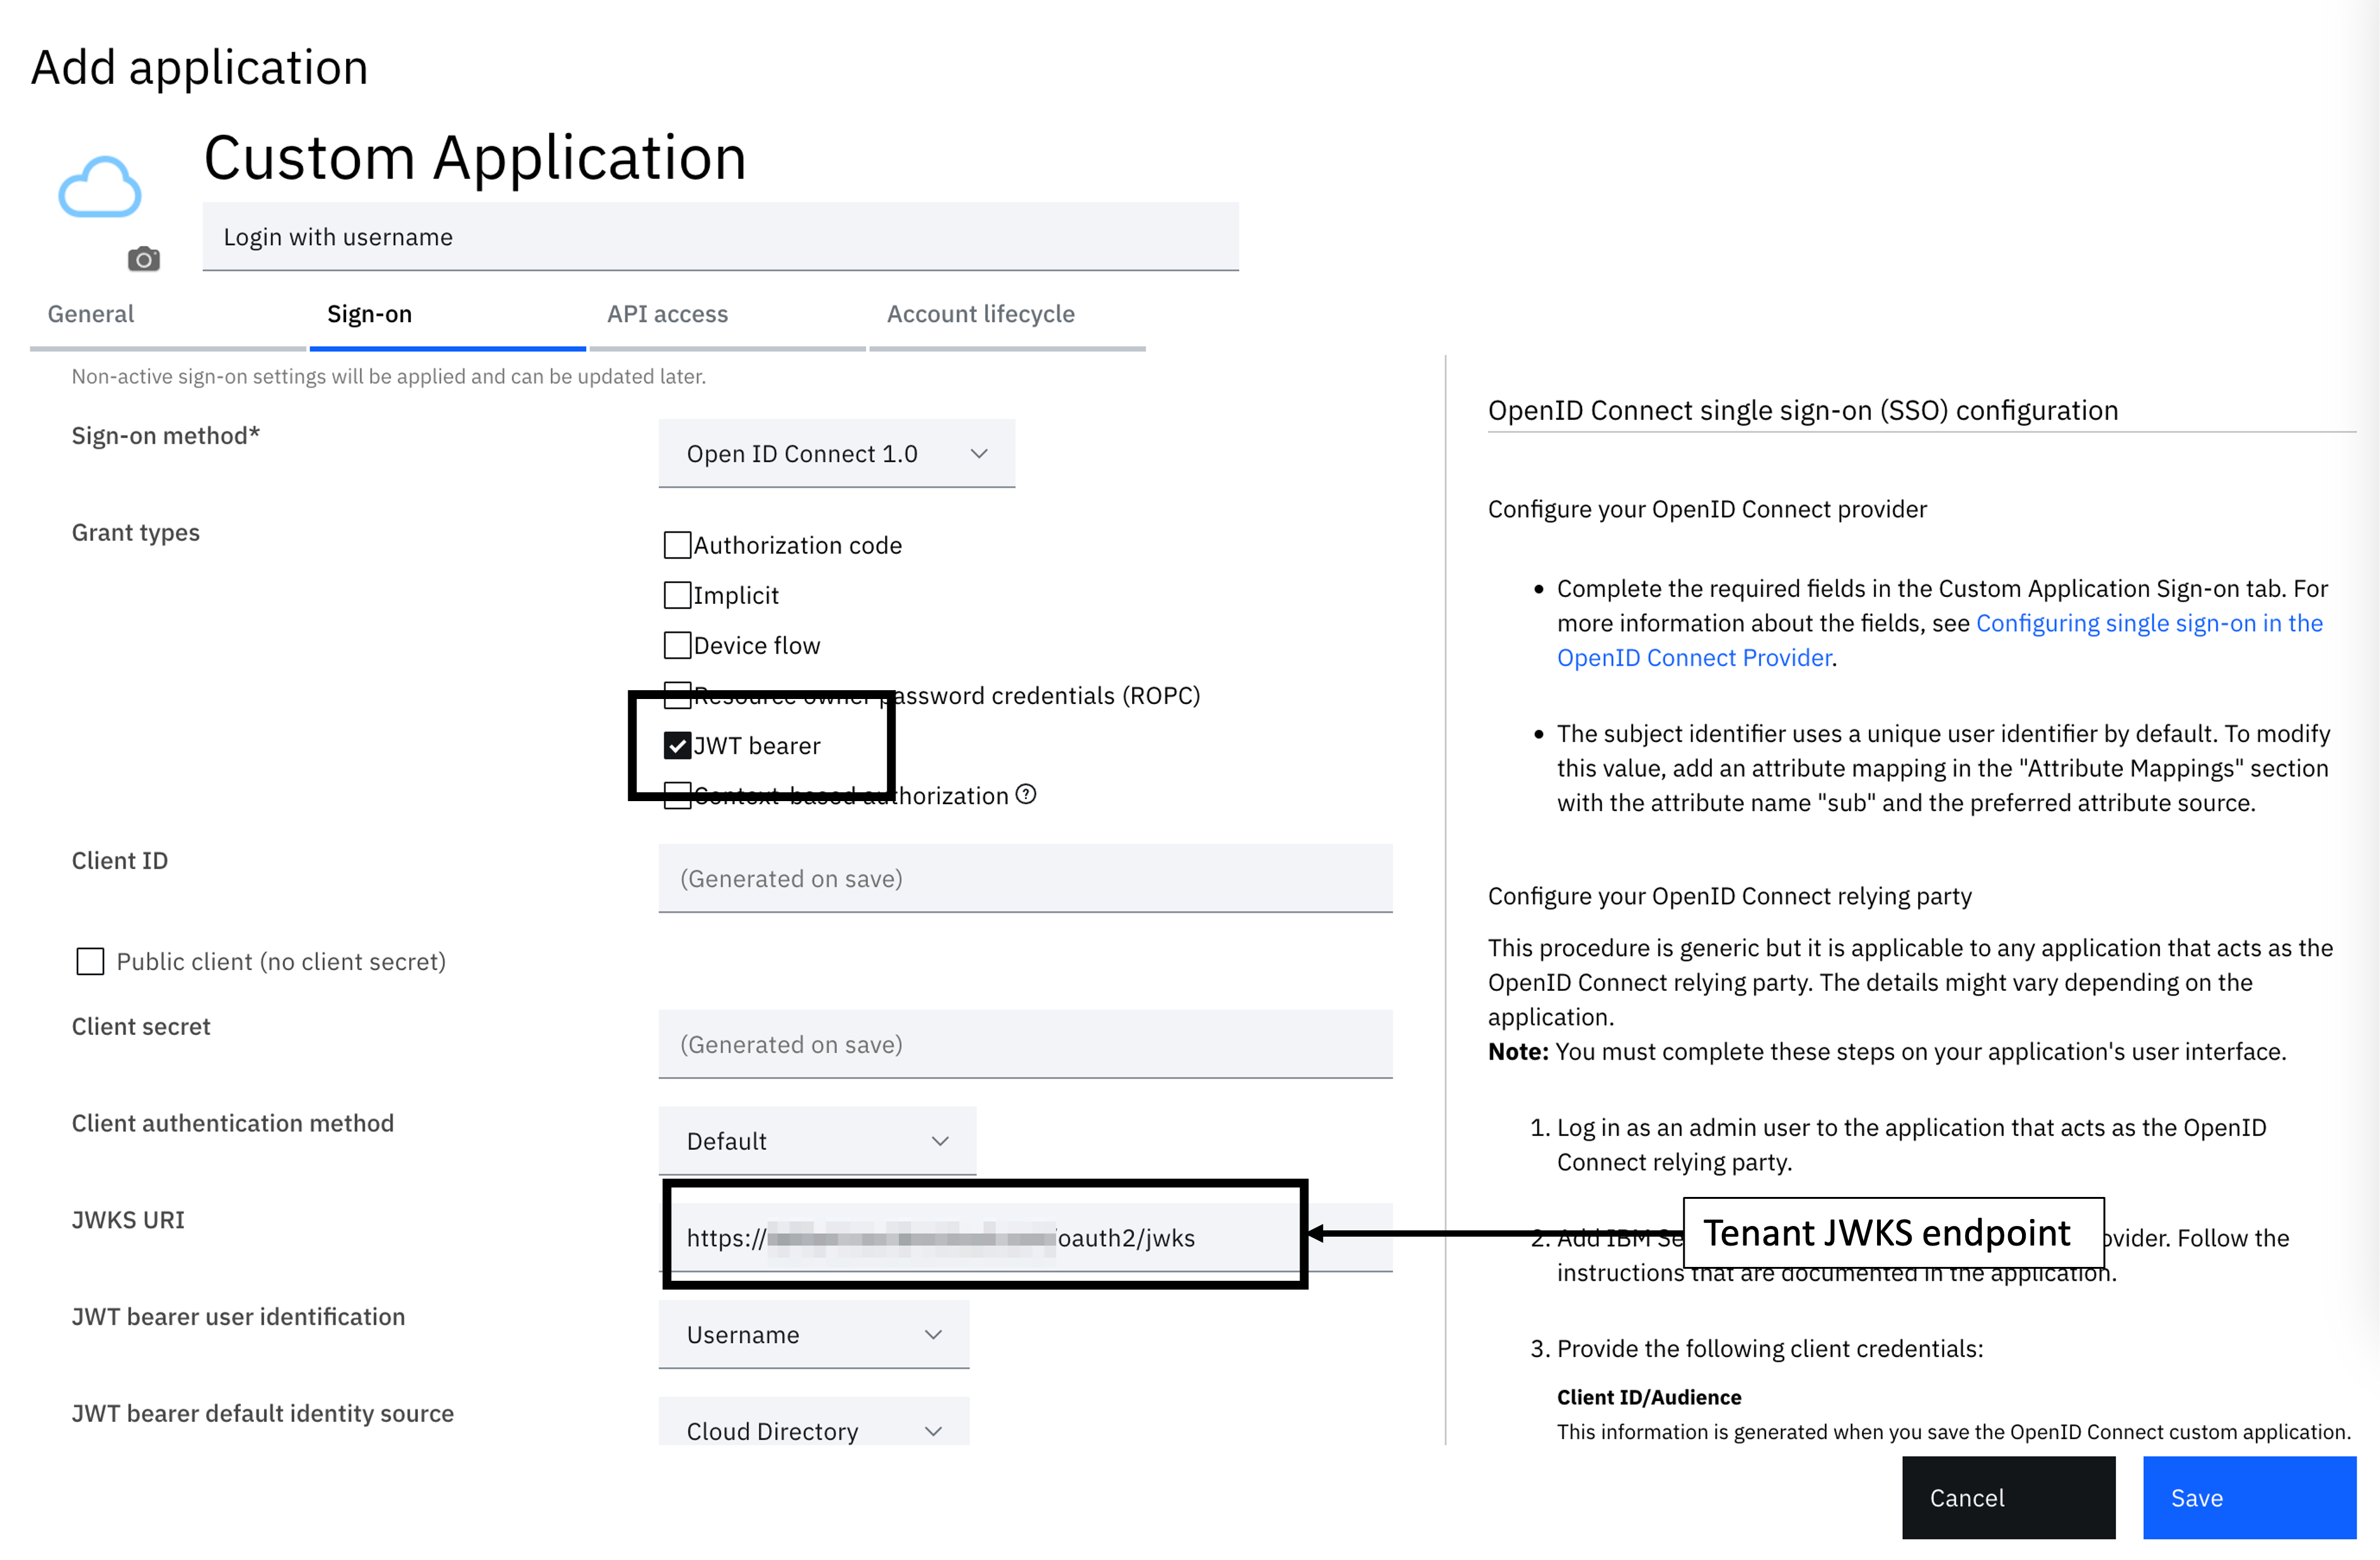
Select the Sign-On tab to configure the application definition. There are a few options here to configure. Follow the steps below to configure the application:
- Sign-on method - OpenID Connect 1.0
- Grant types - JWT bearer
- Public client (no client secret) - Enabled
- JWKS URI - https://yourtenant.verify.ibm.com/oauth2/jwks
- JWT bearer user identification - Username
- Under "Token settings", Access token expiry (secs) - 300
-
Save the configuration
-
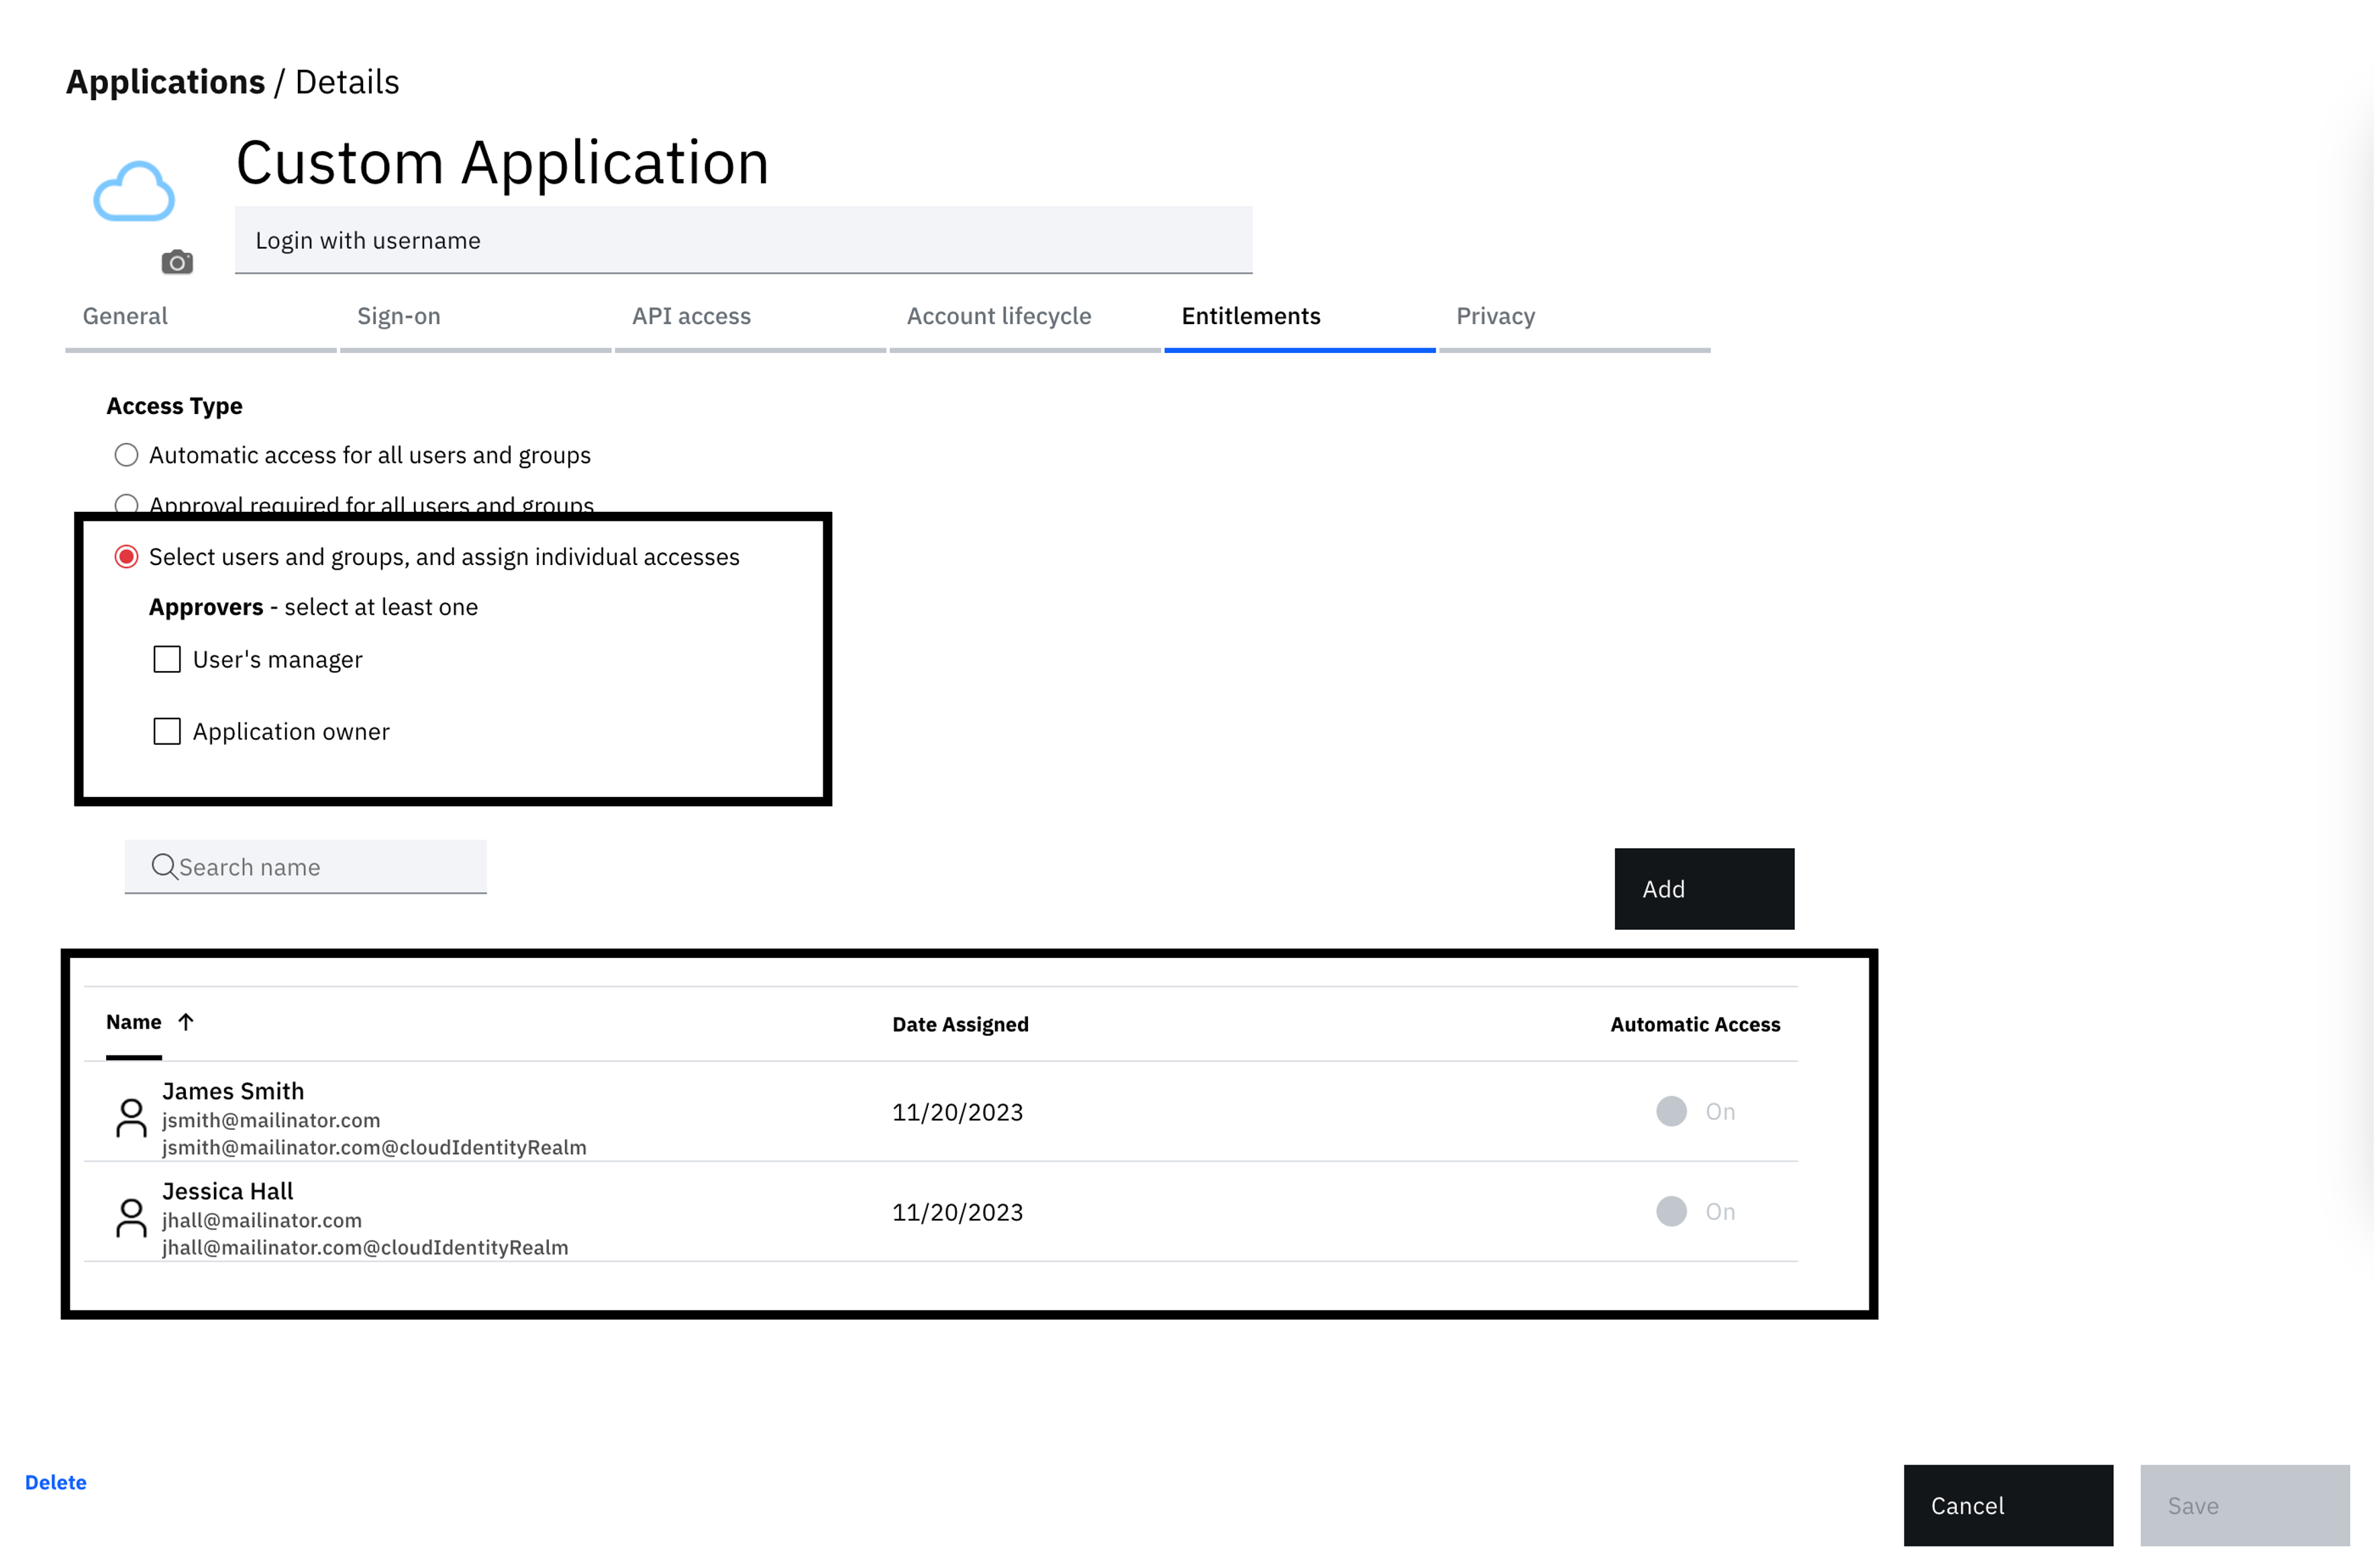
You will be redirected to the "Entitlements" screen. Given the nature of this flow where the user is simply authenticating to the tenant with a valid username, restrict access to specific users or groups to try out the flow, as illustrated below.
-
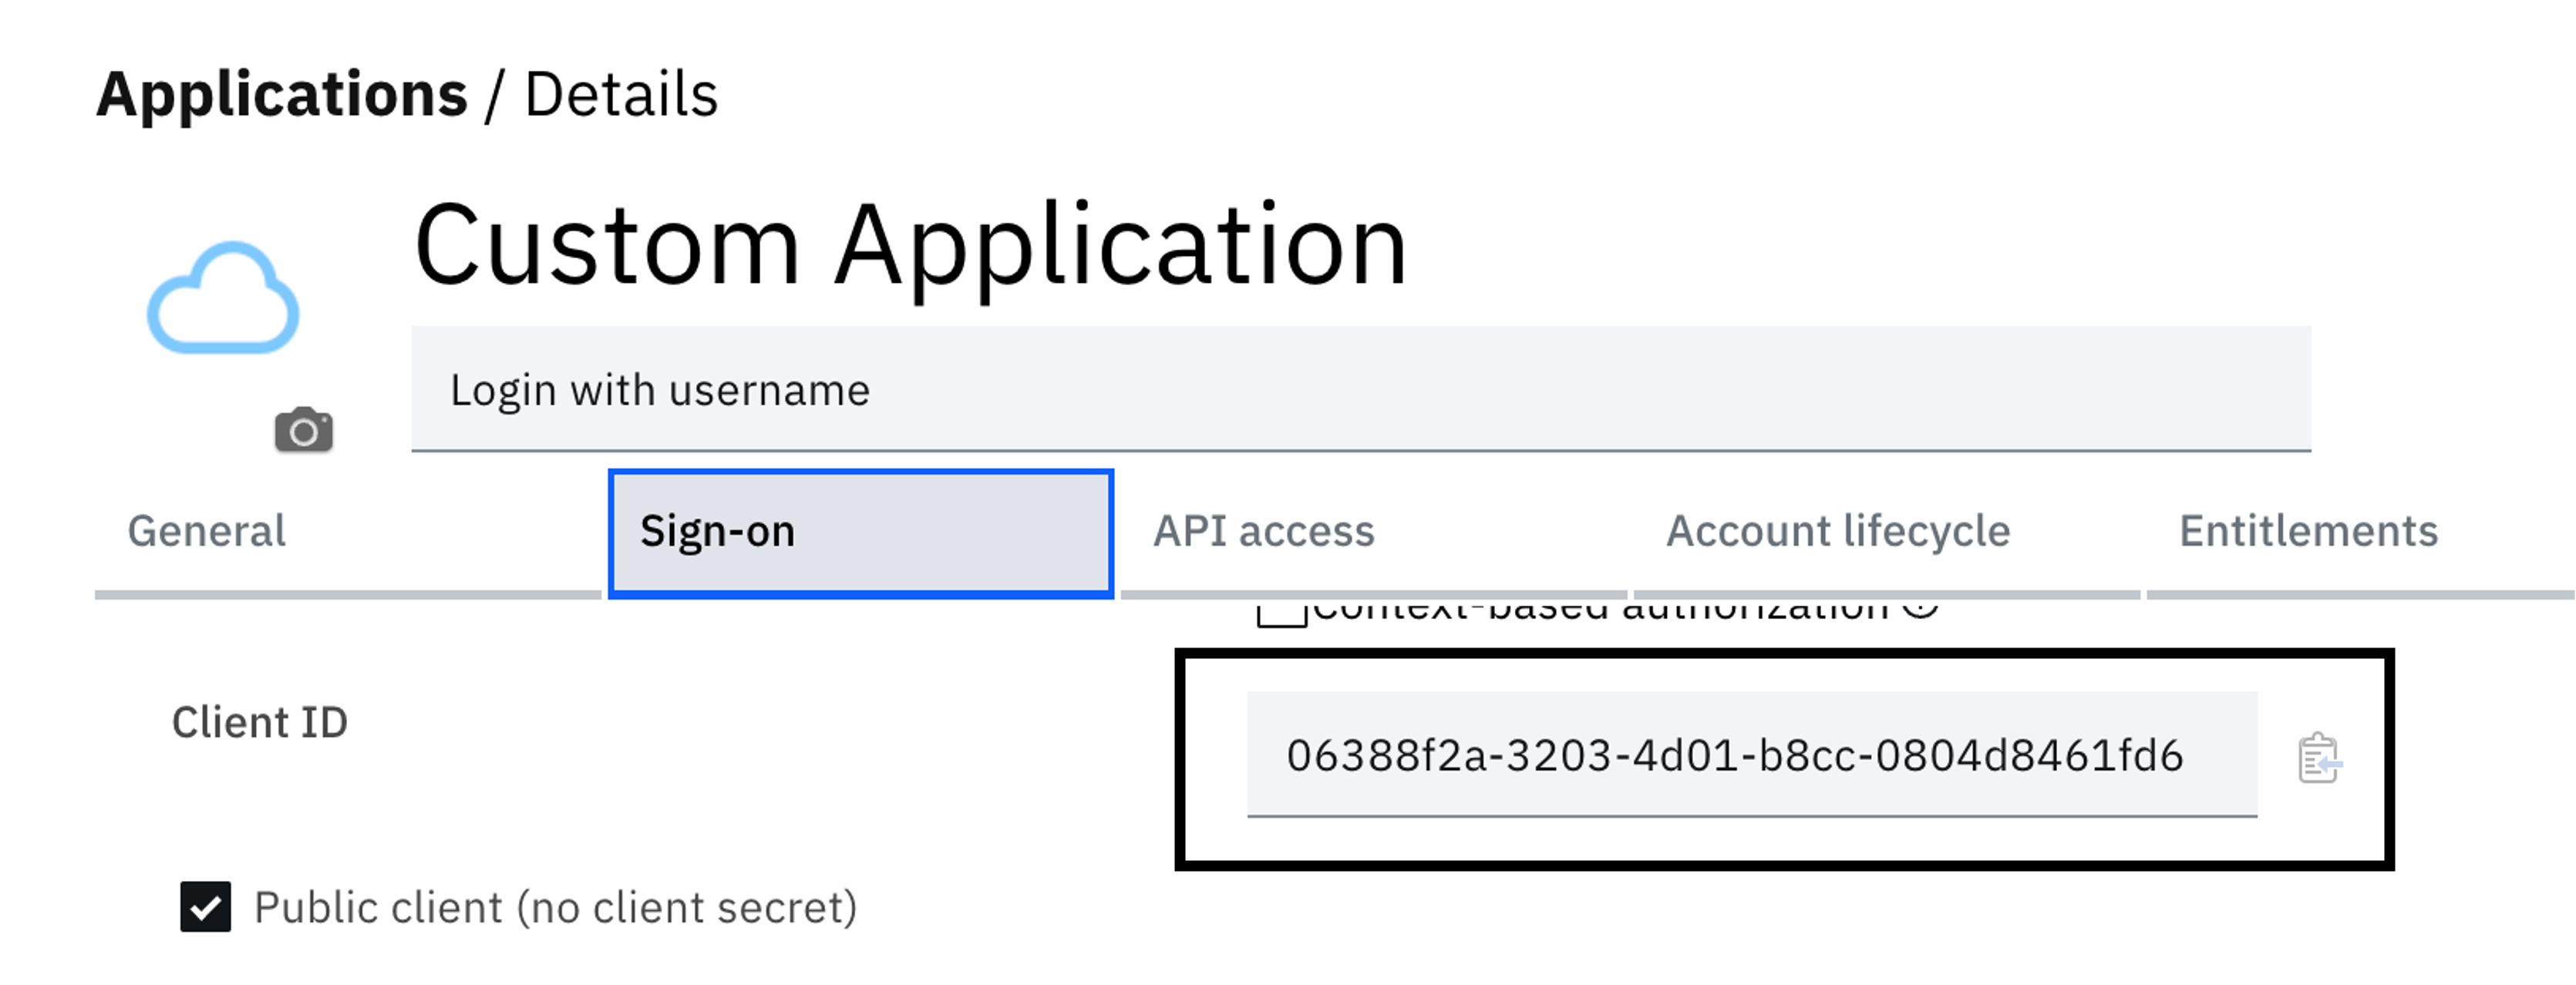
Navigate back to the "Sign-on tab and copy the OIDC Client ID. Copy this to a text file.
Caution!
Given the weak nature of authentication in this flow, ensure that you add a specific user or users in the "Entitlements" tab in the application. Also, the users must not be administrators or have roles that allow them expanded access to the administration console. This would inadvertently open your tenant up to attack.
Similarly, ensure that these users don't have access to any business critical applications through this login process.
Import the workflow
-
On the left-hand menu, select "User experience" and click on "Flow designer".
-
Click on the import icon next to the "Create flow" button.

-
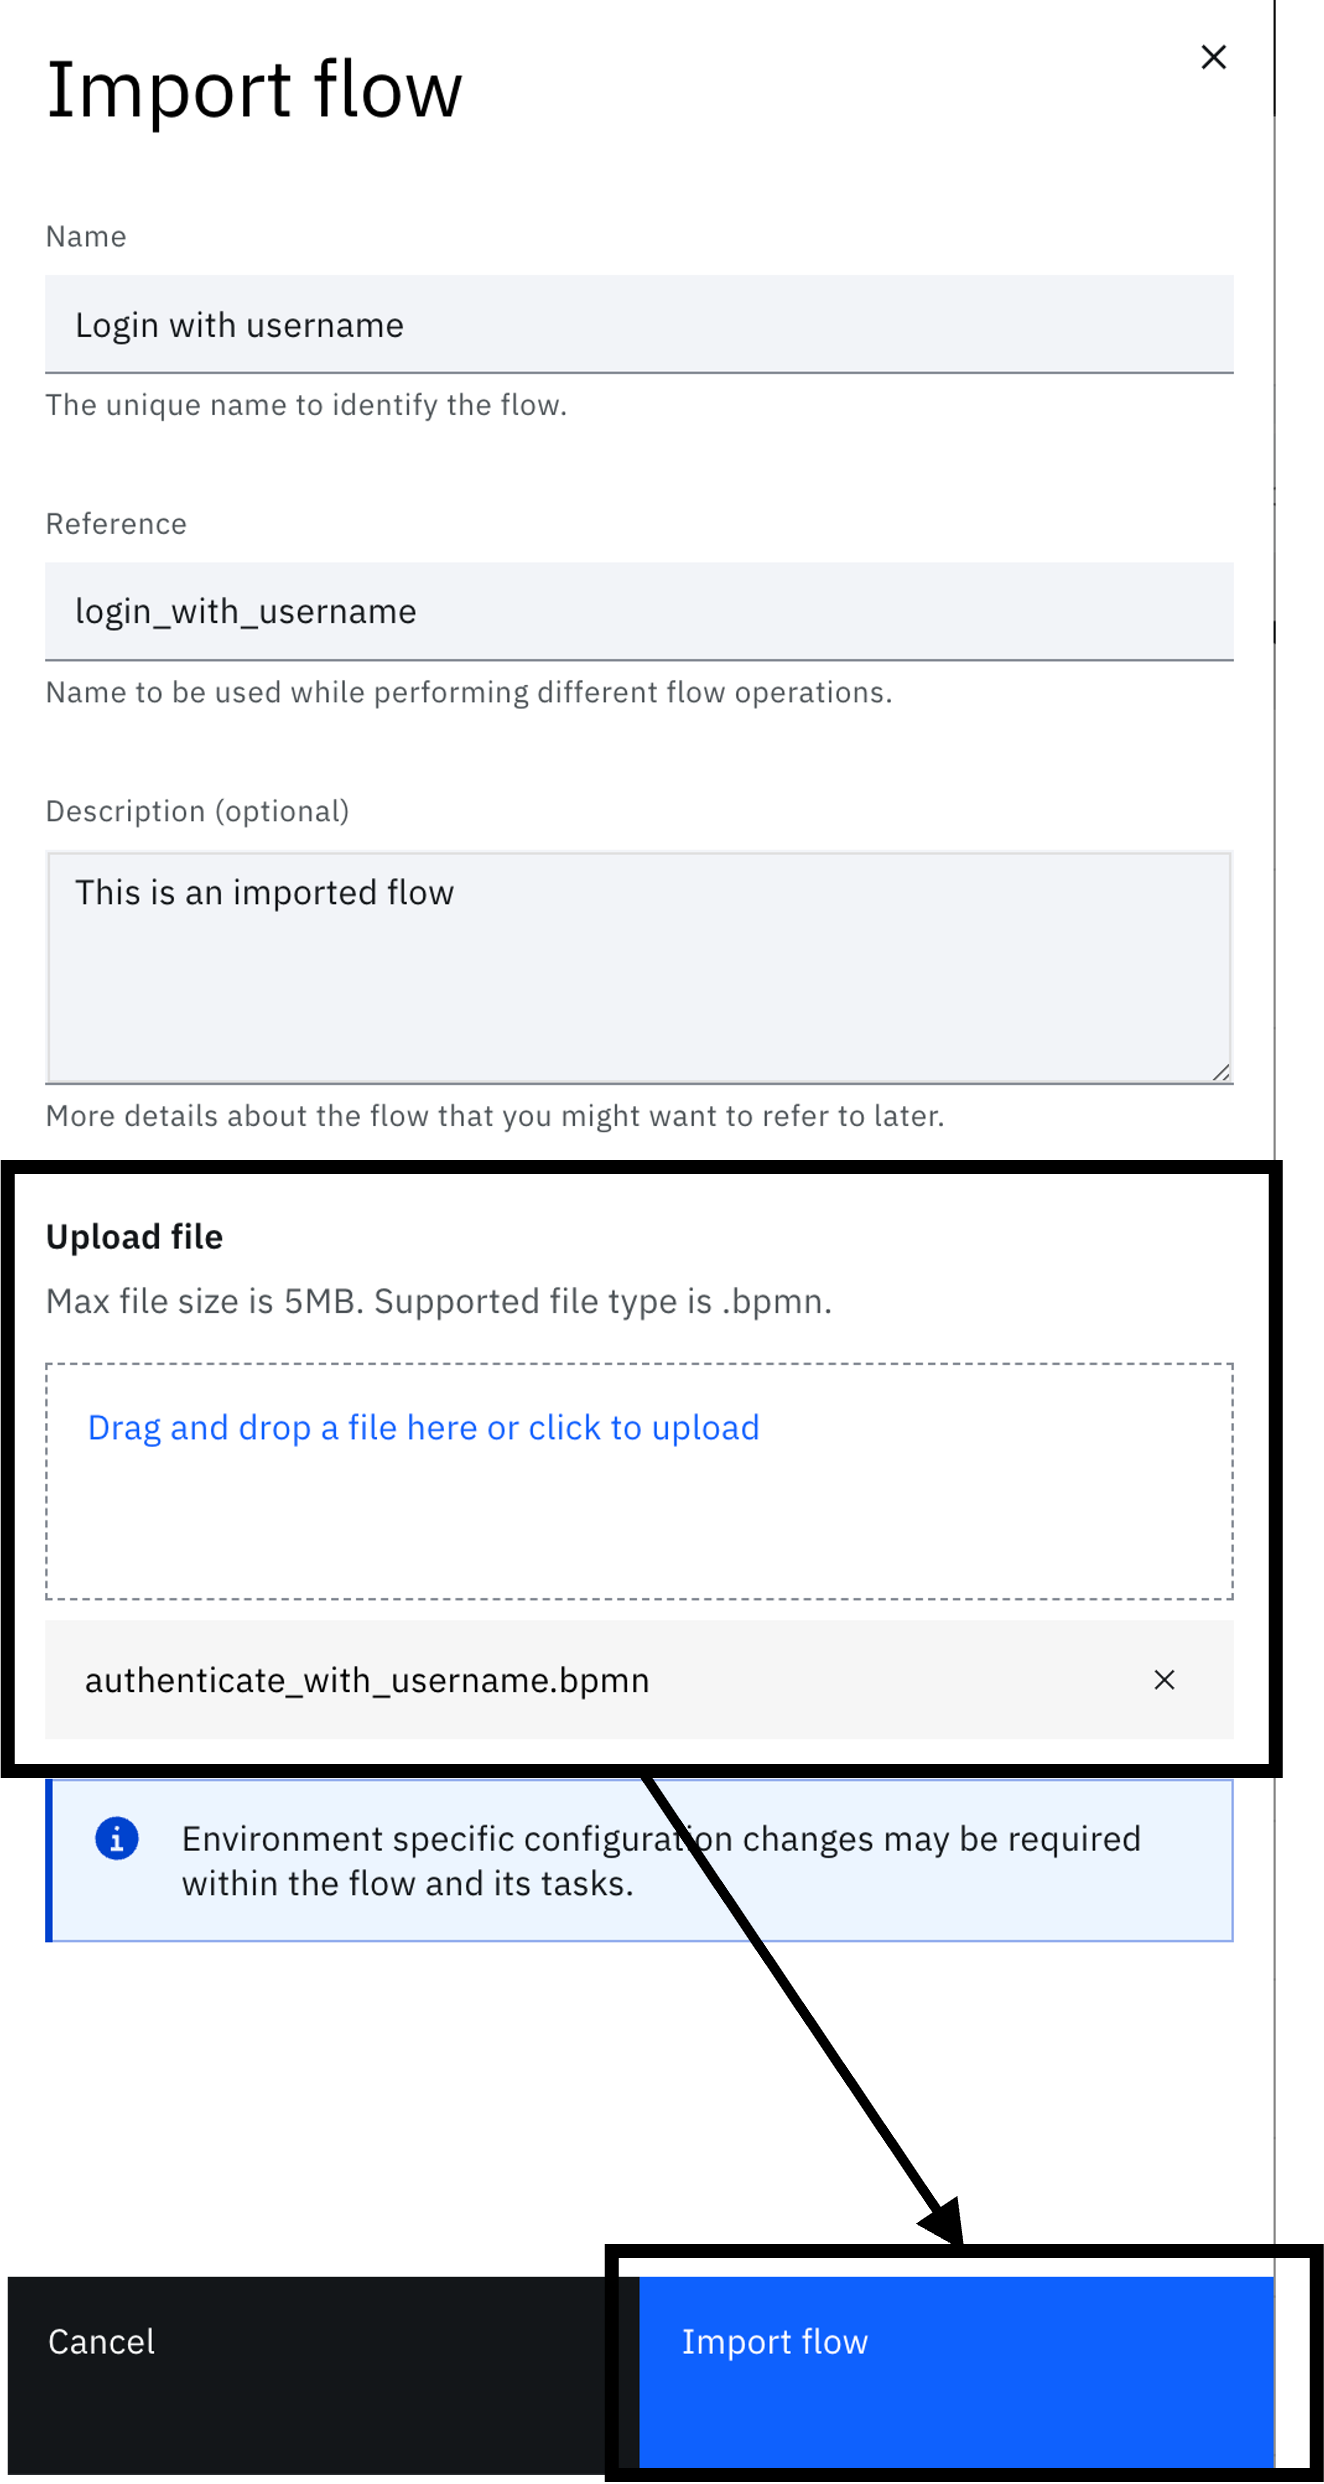
Fill in the details and upload the file located at "$GIT_REPO/flows/authenticate_with_username/authenticate_with_username.bpmn".
-
Click "Import flow". This will open the designer.
-
Select the "Set Vars" task and modify the "client_id" value with the one from the OIDC application.

-
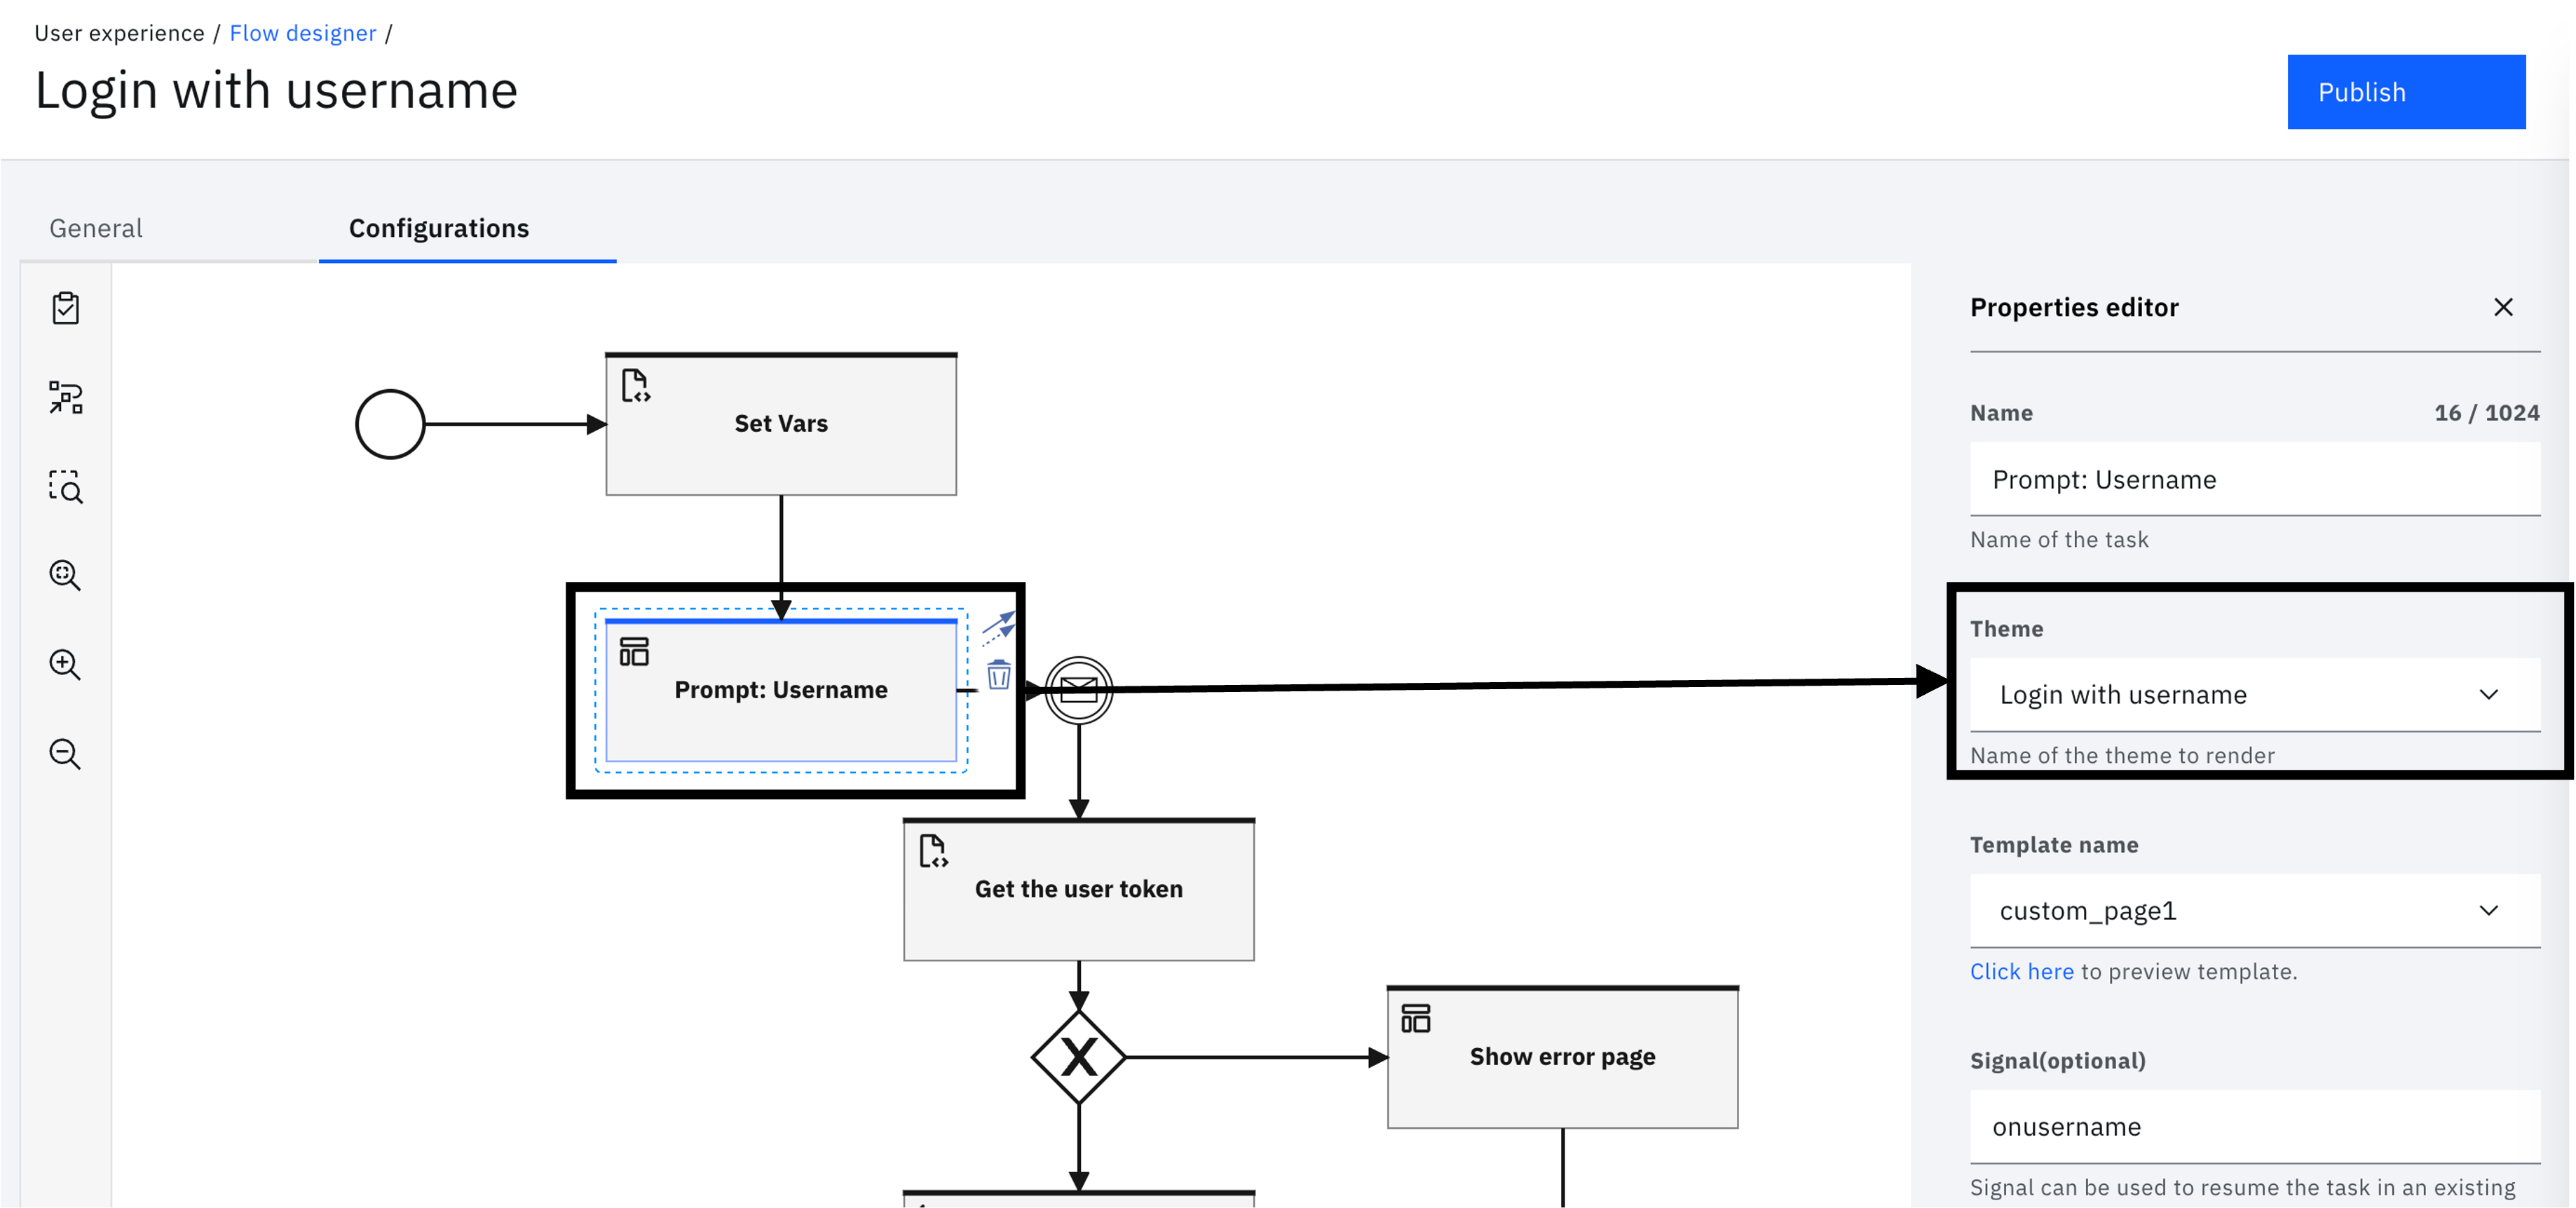
Select the "Prompt: Username" task and set the theme to the "Login with username" theme.
-
Click on "Save changes" and "Publish".
Running the flow
-
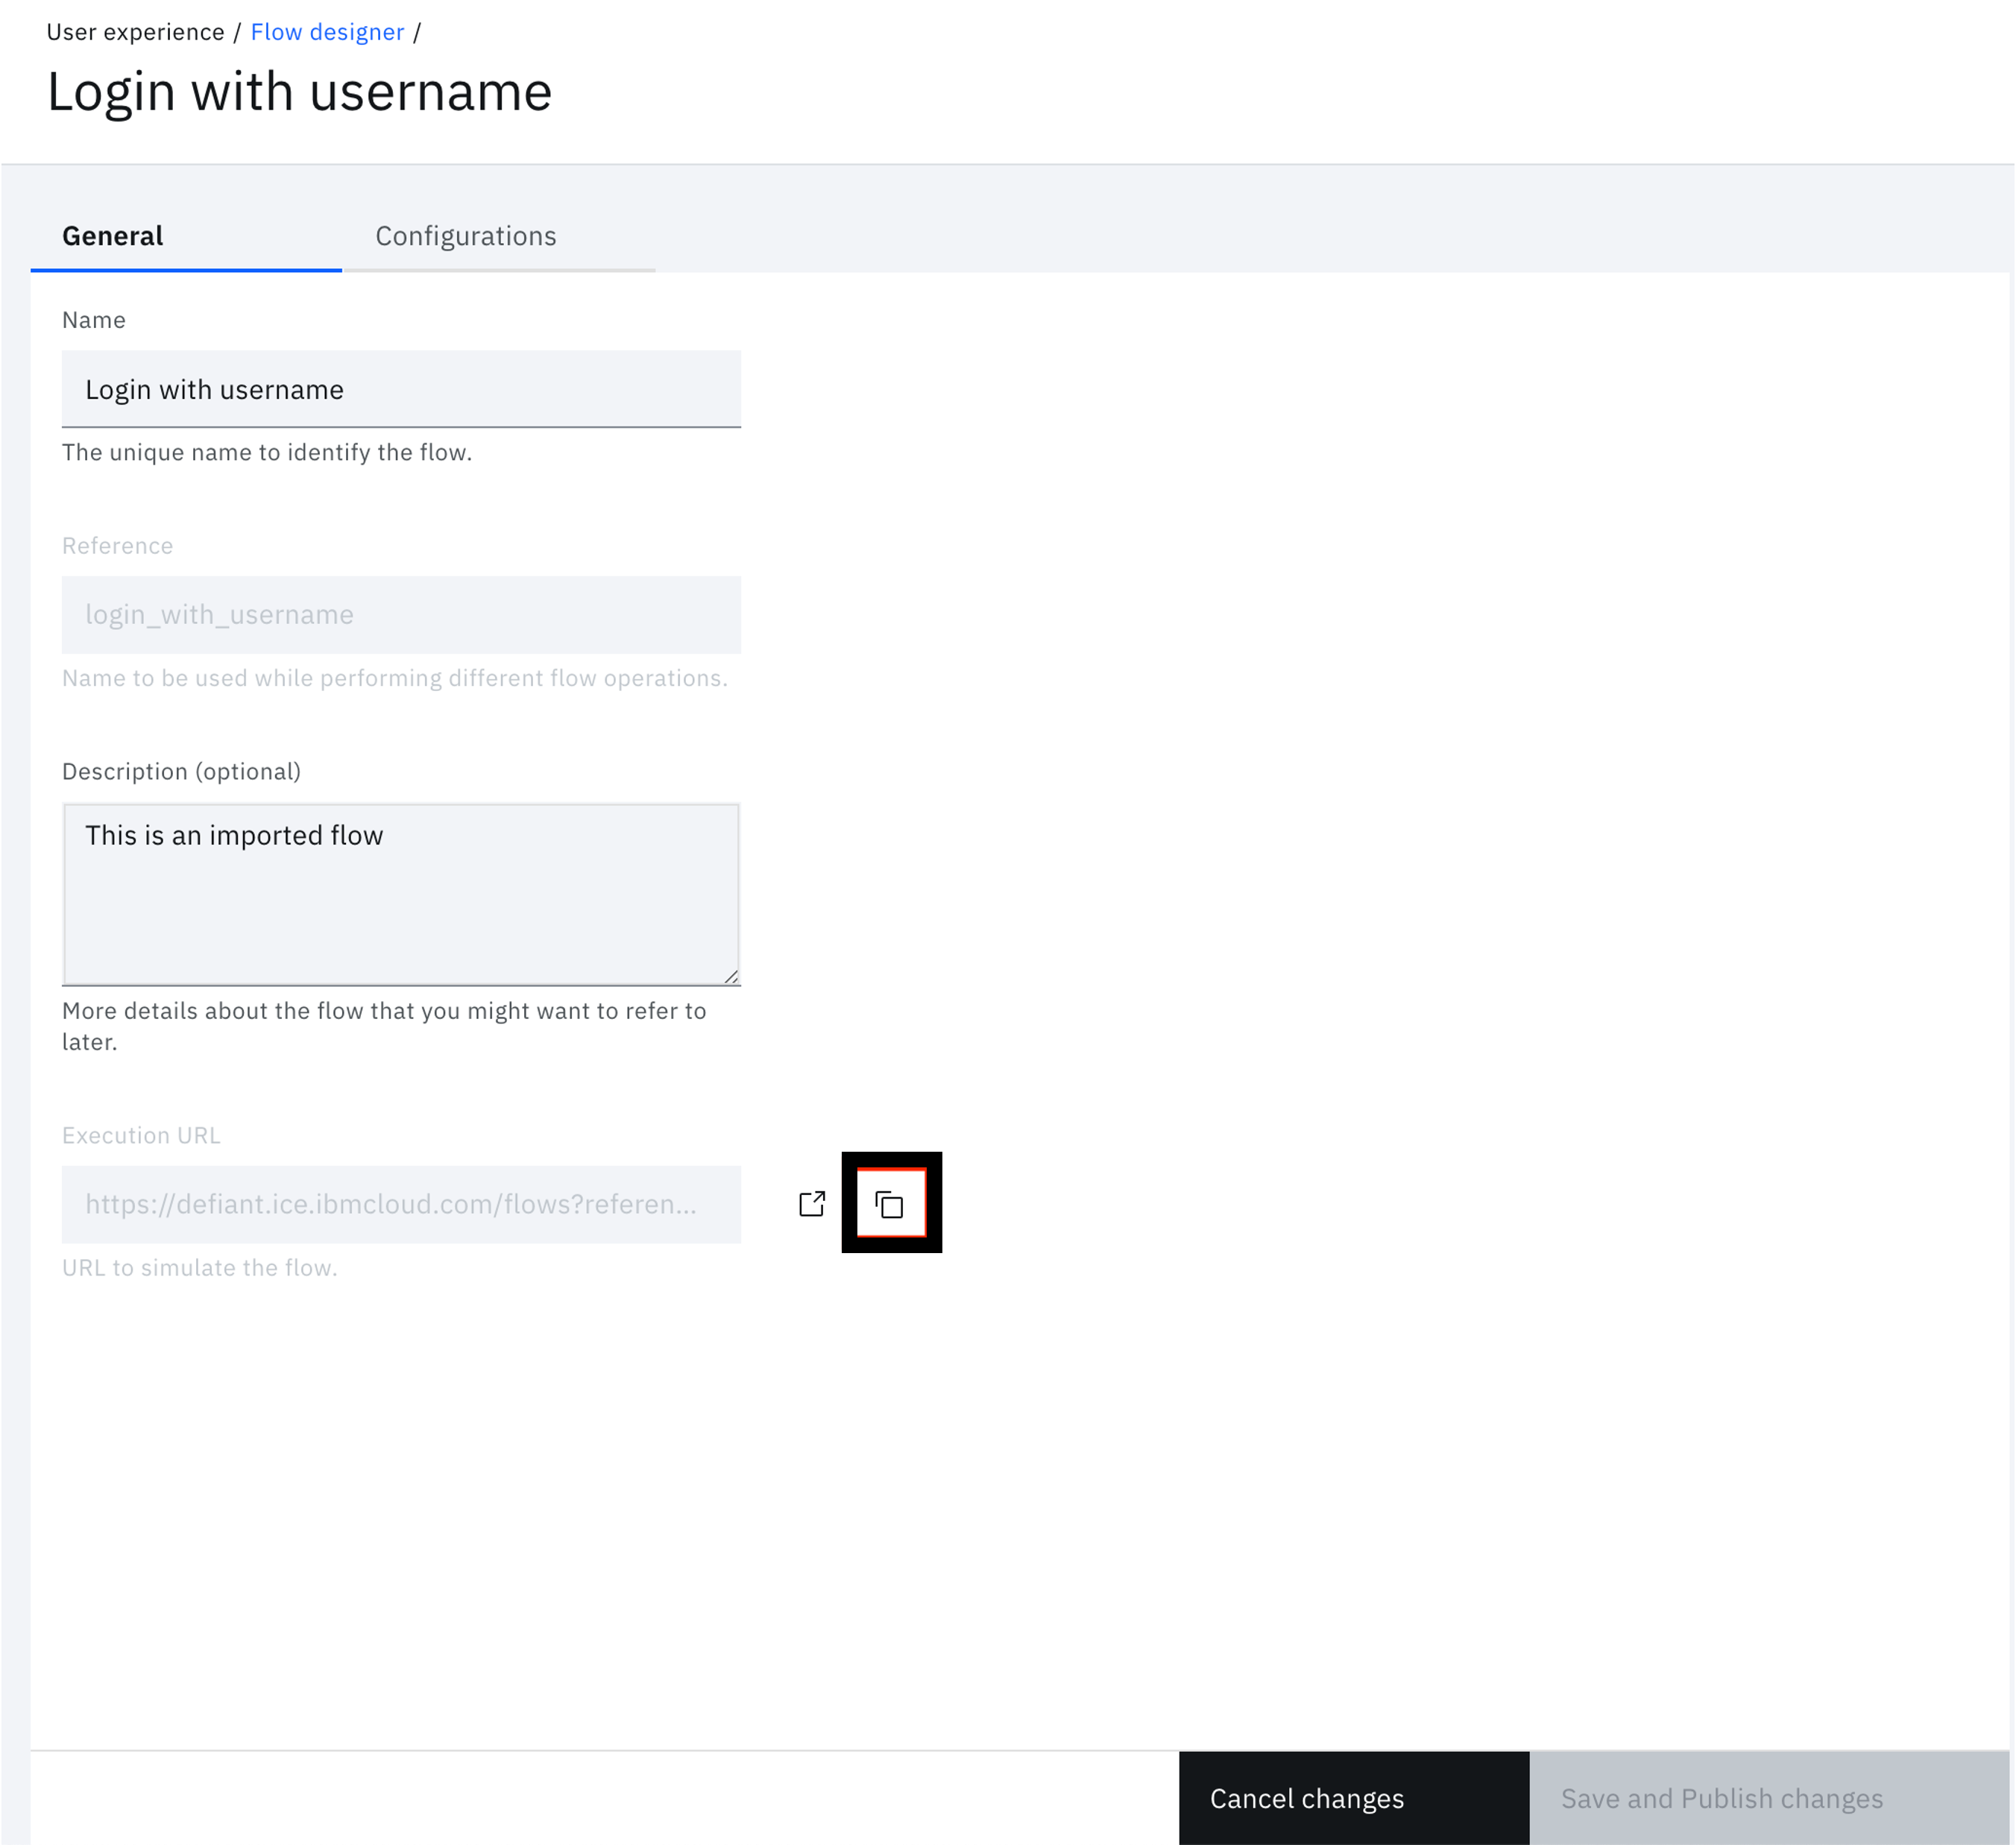
In the flow "General" tab, copy the "Execution URL".
-
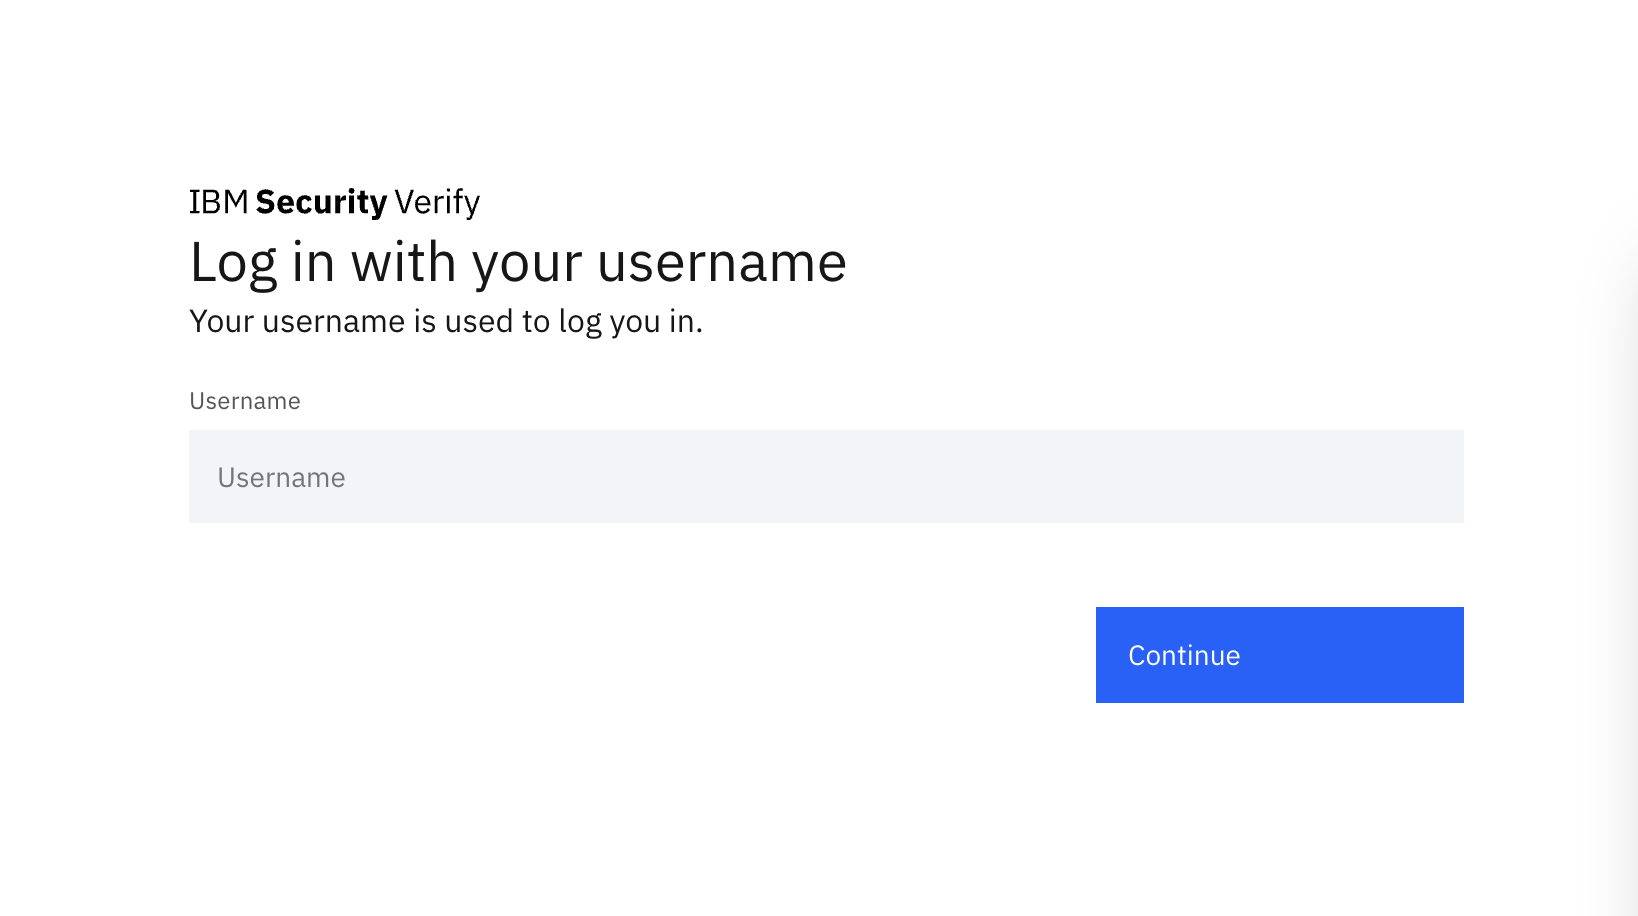
Open an incognito tab or a completely different browser and navigate to the URL.
-
Enter the username and click "Continue".
-
If the username is valid, the user will be logged in and see the application launchpad.
Note
This username must belong to a user account in the native Cloud Directory realm ("cloudIdentityRealm") and not be stored as a user belonging to an external identity source like IBMid. If you want to use an external identity source, append "@IDS_REALM". For example, for IBMid users, append "@www.ibm.com".
Unpacking the flow
This is an optional section and dives into the details of the workflow.
Prompt: Username task
This task presents the custom page that shows the username field. The HTML name attribute is set to "username". Any submitted parameters are stored in the flow context. Thus, when the HTML FORM is submitted, the flow context is updated with "username" as the property name and the value provided by the user.
The HTML FORM action URL leads back to the workflow referenced by the @WORKFLOW_CALLBACK_URL@ macro in the page template.
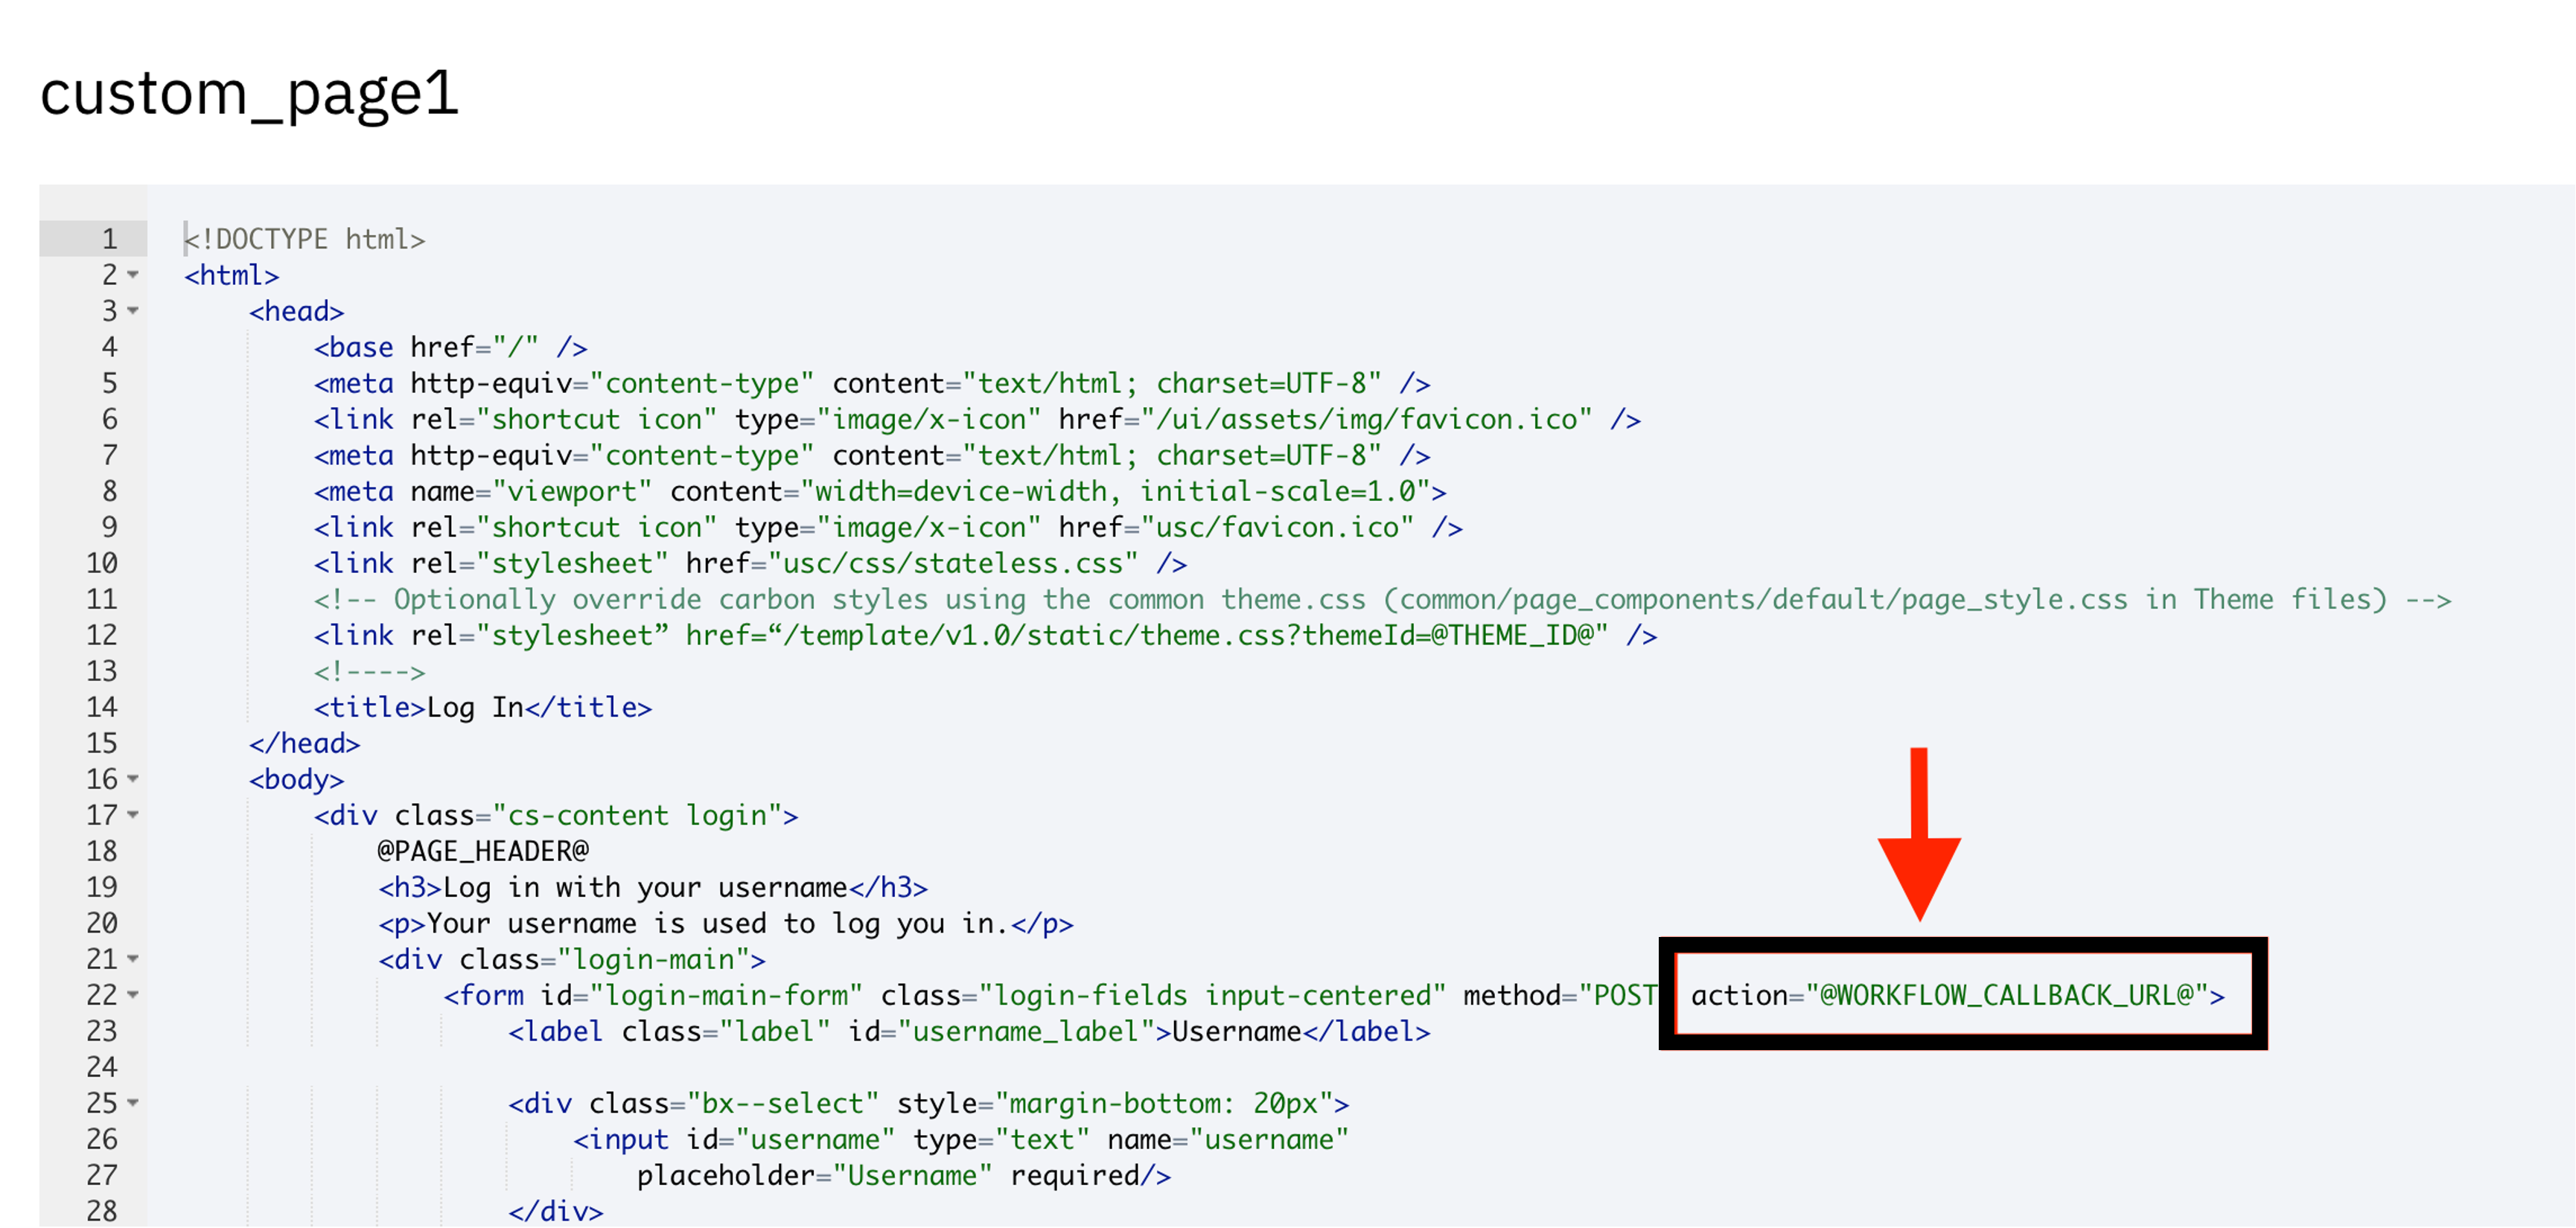
The "Signal" input parameter pairs with the "Message event" that follows in the flow. This value binds the event of FORM submission with the point where the workflow should resume.

Read more about the Page task here.
Get the user token
This task uses the common expression language used across Verify for scripting. It does the following:
-
Generates a signed JSON Web Token using the
jwt.signfunction. This JWT is signed by a personal certificate in the tenant's certificate management store.ctx.usernameis the username submitted by the user.- context: > userJWT := jwt.sign({ "sub": ctx.username, "iss": "https://" + ctx.__tenantid, "aud": "https://" + ctx.__tenantid + "/oidc/endpoint/default/token", "jti": genUUID() }, {}) -
Calls the tenant's token endpoint to request for an access token using the OAuth 2.0 JWT Bearer grant flow.
- context: > roauth := hc.Post("https://" + ctx.__tenantid + "/oidc/endpoint/default/token", {"content-type": "application/x-www-form-urlencoded"}, jsonToFormURLEncoded({ "client_id": ctx.client_id, "client_secret": has(ctx.client_secret) ? ctx.client_secret : "", "assertion": context.userJWT, "grant_type": "urn:ietf:params:oauth:grant-type:jwt-bearer" }, true)) -
Generates the URL to redirect the browser and create the login session.
- return: >
    {
        "result": "true",
        "loginURL": "https://" + ctx.__tenantid + "/v1.0/auth/session?access_token=" + context.roauth.responseBody.access_token
            + "&redirect_url=" + (has(ctx.Target) ? ctx.Target : "https://" + ctx.__tenantid + "/usc")
    }
Once this function task executes, the flow context has two additional properties:
- result: This indicates if the token was generated successfully
- loginURL: This is the session endpoint to which the browser needs to redirect to create a user authenticated single sign-on session.
The wrap
This flow allows a user to authenticate by just providing a valid username. It introduced the key concepts to build an authentication flow using APIs and/or non-native authentication mechanisms. This is not expected to be deployed in a real production environment, given the obvious possibility of exposure and the reader is expected to exercise adequate caution, as indicated throughout the guide.
Vivek Shankar, IBM Security
Updated 7 months ago
