Exchange external user token for access token
This article provides a step-by-step guide to exchange a custom JSON Web Token (JWT) for a Verify-issued access token. The goal is to obtain an OAuth token that can then be used to access protected resources or to authorize actions. It is an impersonation flow, where the subject of the JWT is mapped to a user in the Verify Cloud Directory. The user may be just-in-time provisioned as well.
The guide uses an online API that IBM provides to generate the signed JWT. You may use any other tool of your choice. Typically, however, this JWT would be issued by a third-party provider.
Overview
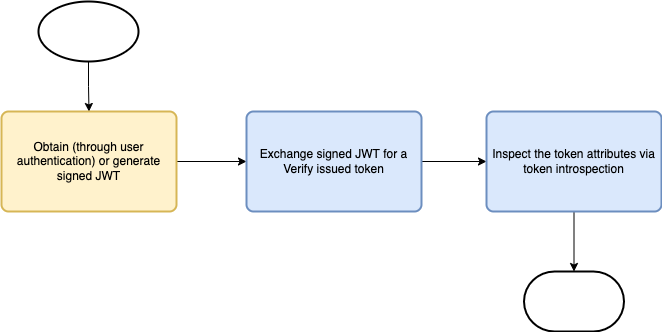
The process starts with obtaining or generating a user JWT. The JWT is then exchanged for a user token using OAuth 2.0 Token Exchange. The result is a token that contains sufficient permissions to access protected resources.
Prerequisites
Installation and configuration
Custom token type
Login to the IBM Verify admin console and follow the steps as follows.
-
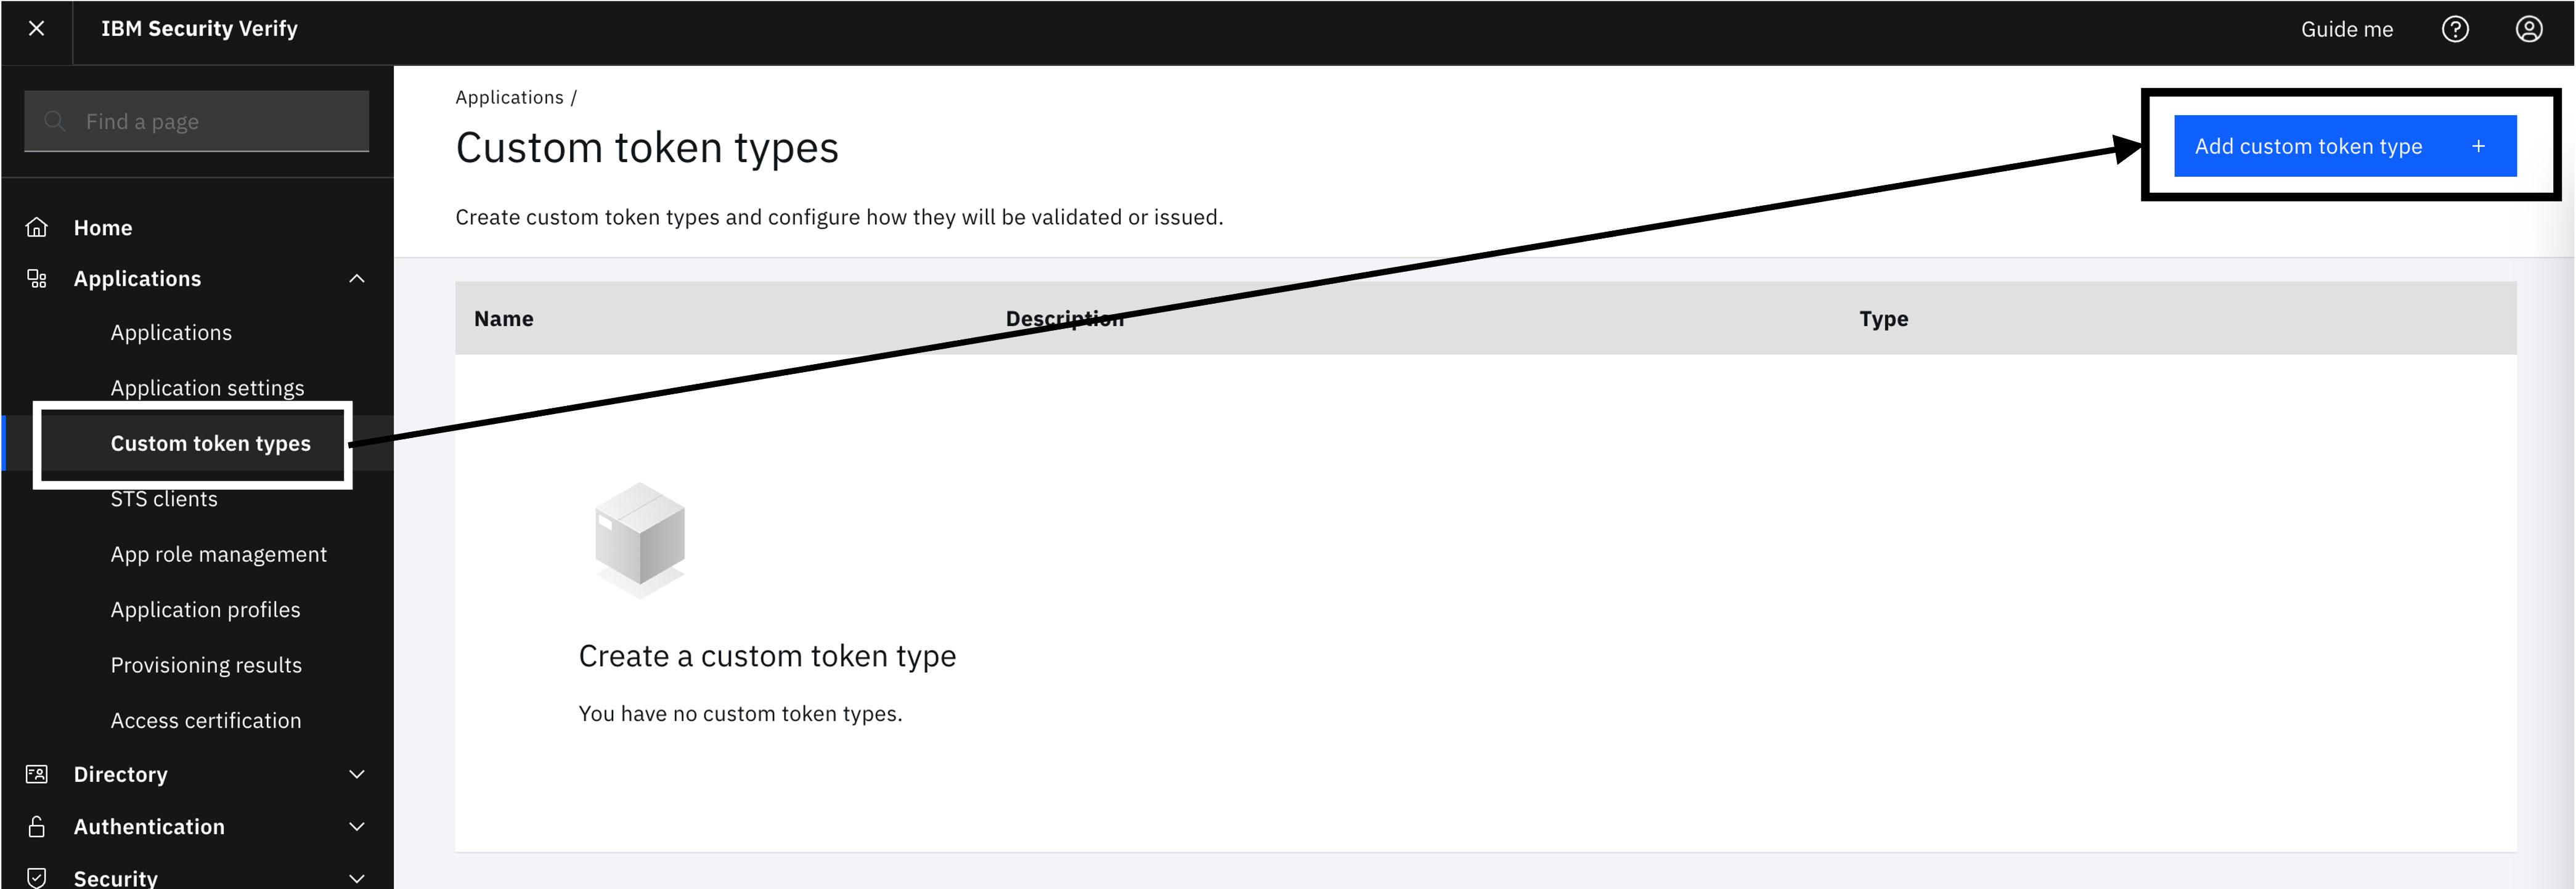
On the left-hand side menu, select "Applications" and click on "Custom token types".
-
Click on "Add custom token type".
-
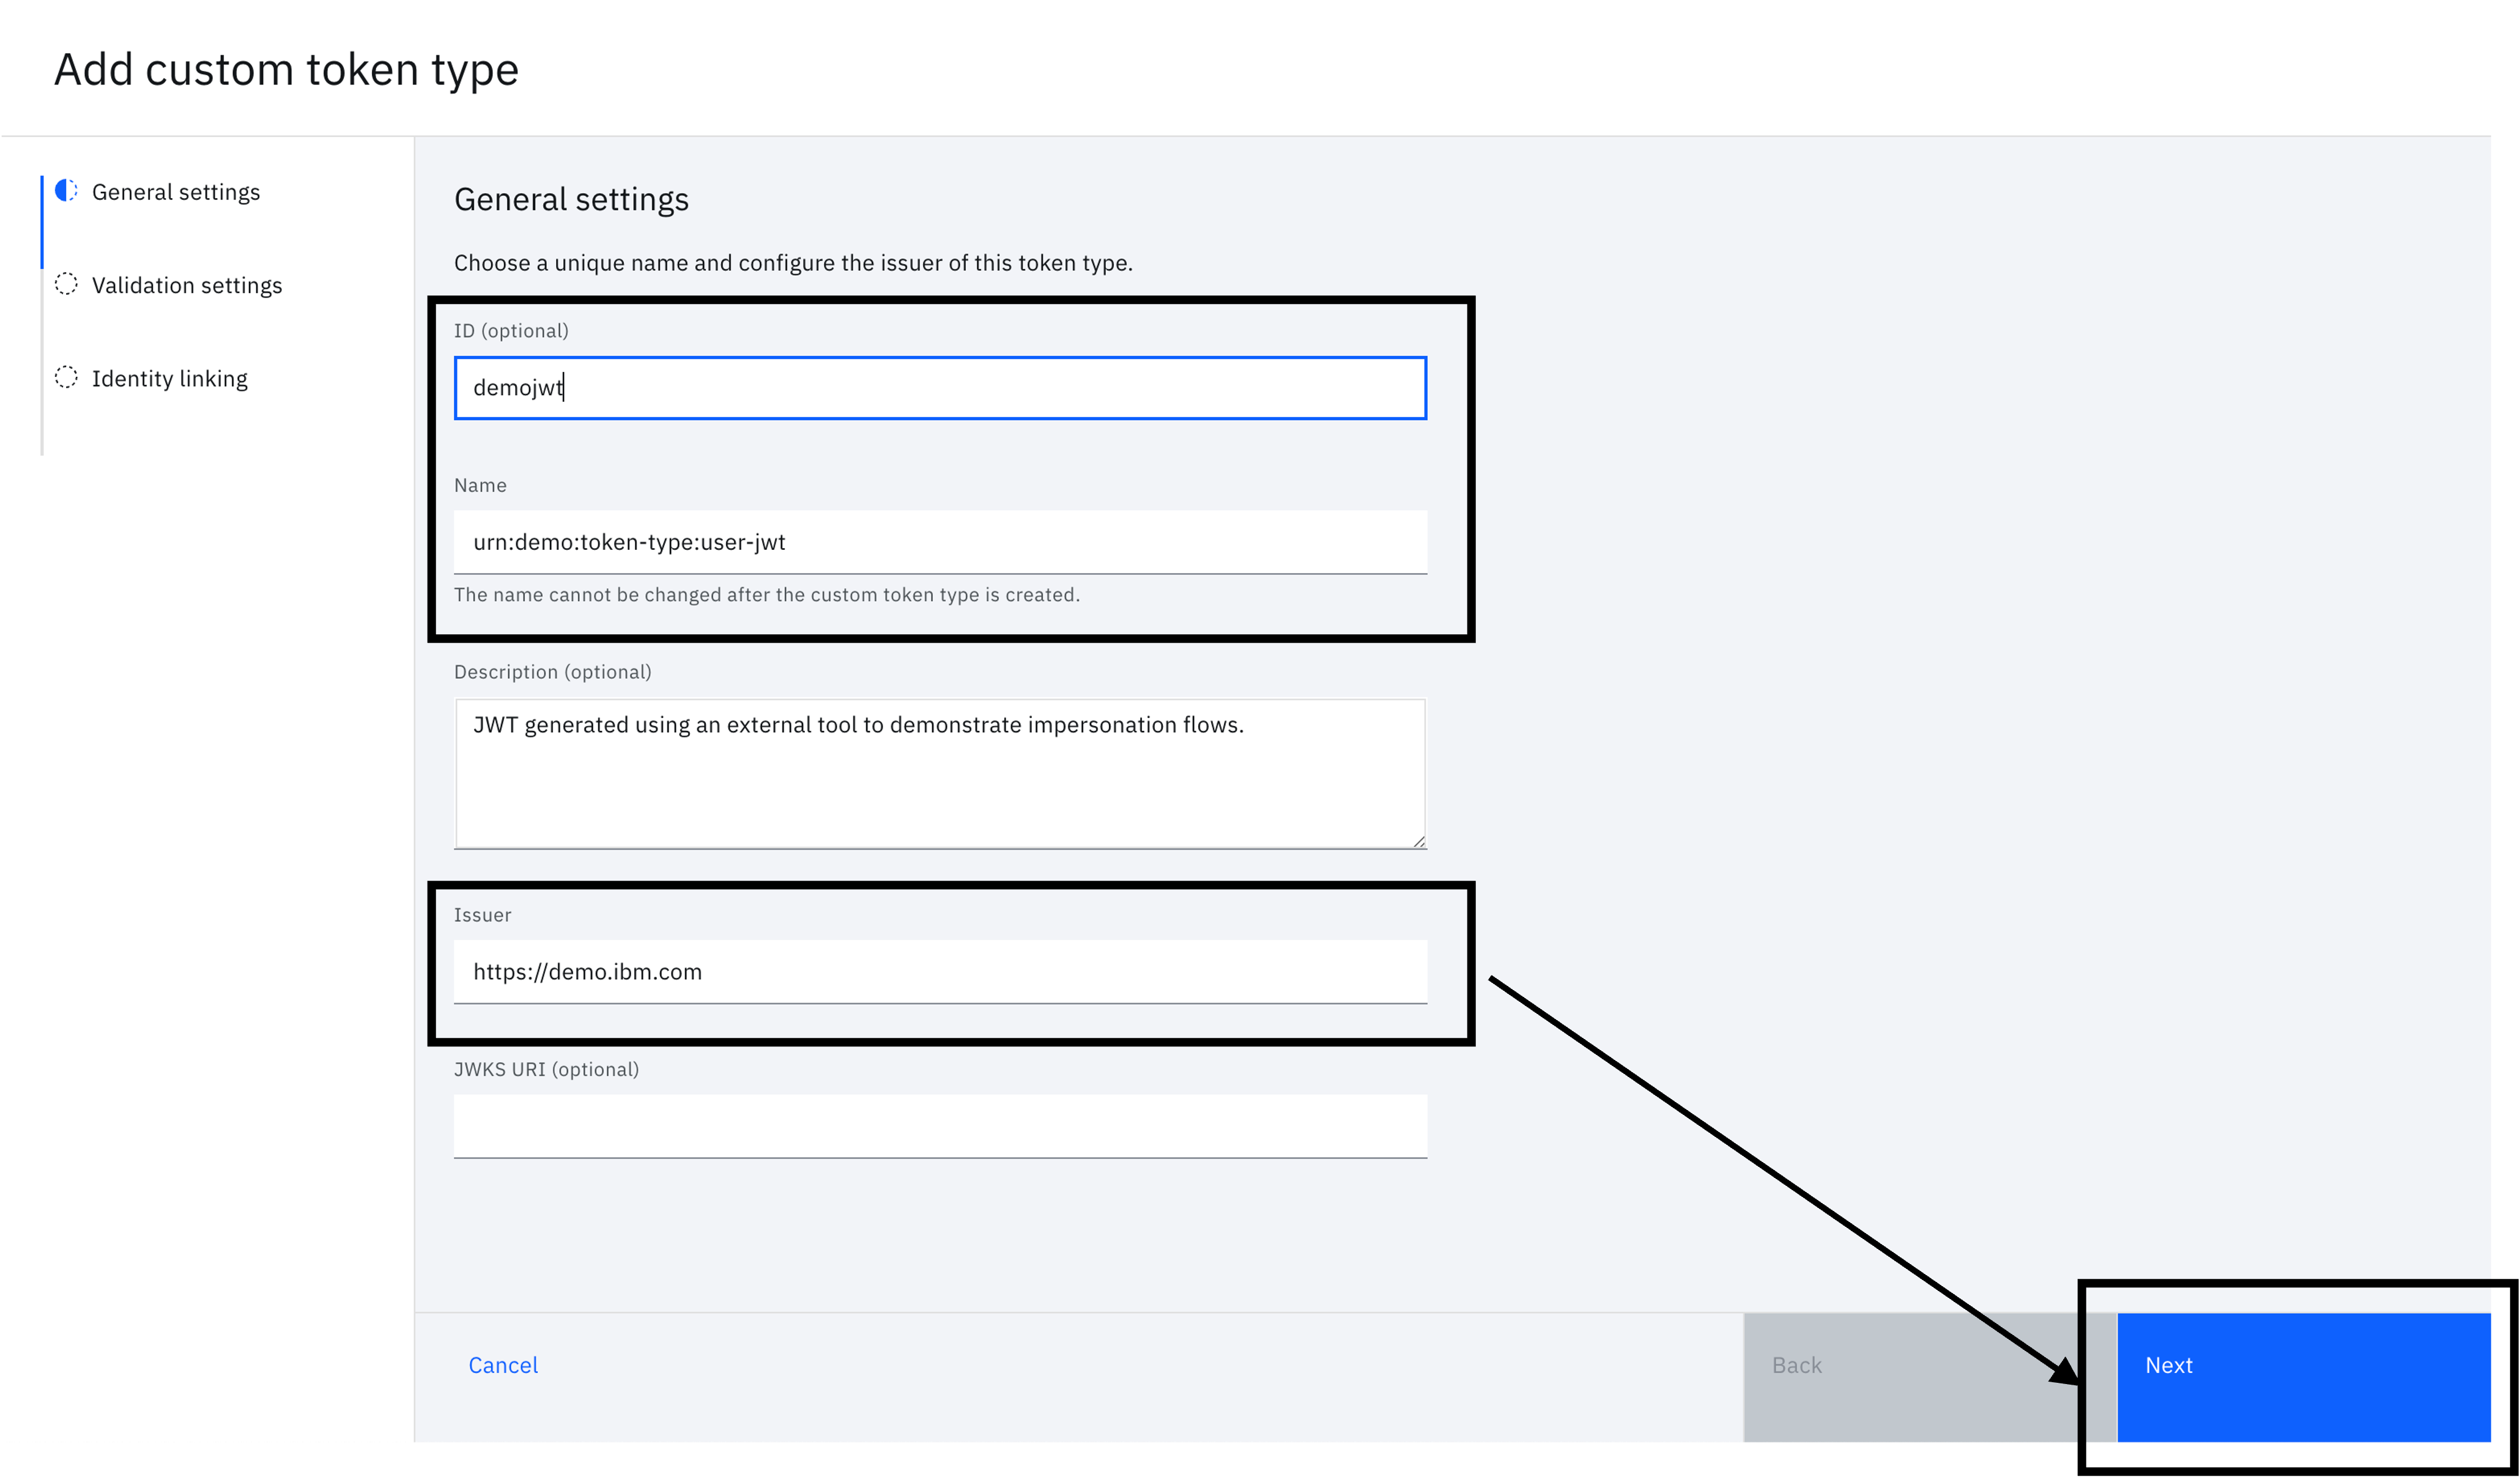
Enter the following details in the "General settings" and click "Next". The "name", in particular, is important because it is used to identify the token in the OAuth flow.
- ID - demojwt
- Name - urn:demo:token-type:user-jwt
- Issuer - https://demo.ibm.com
-
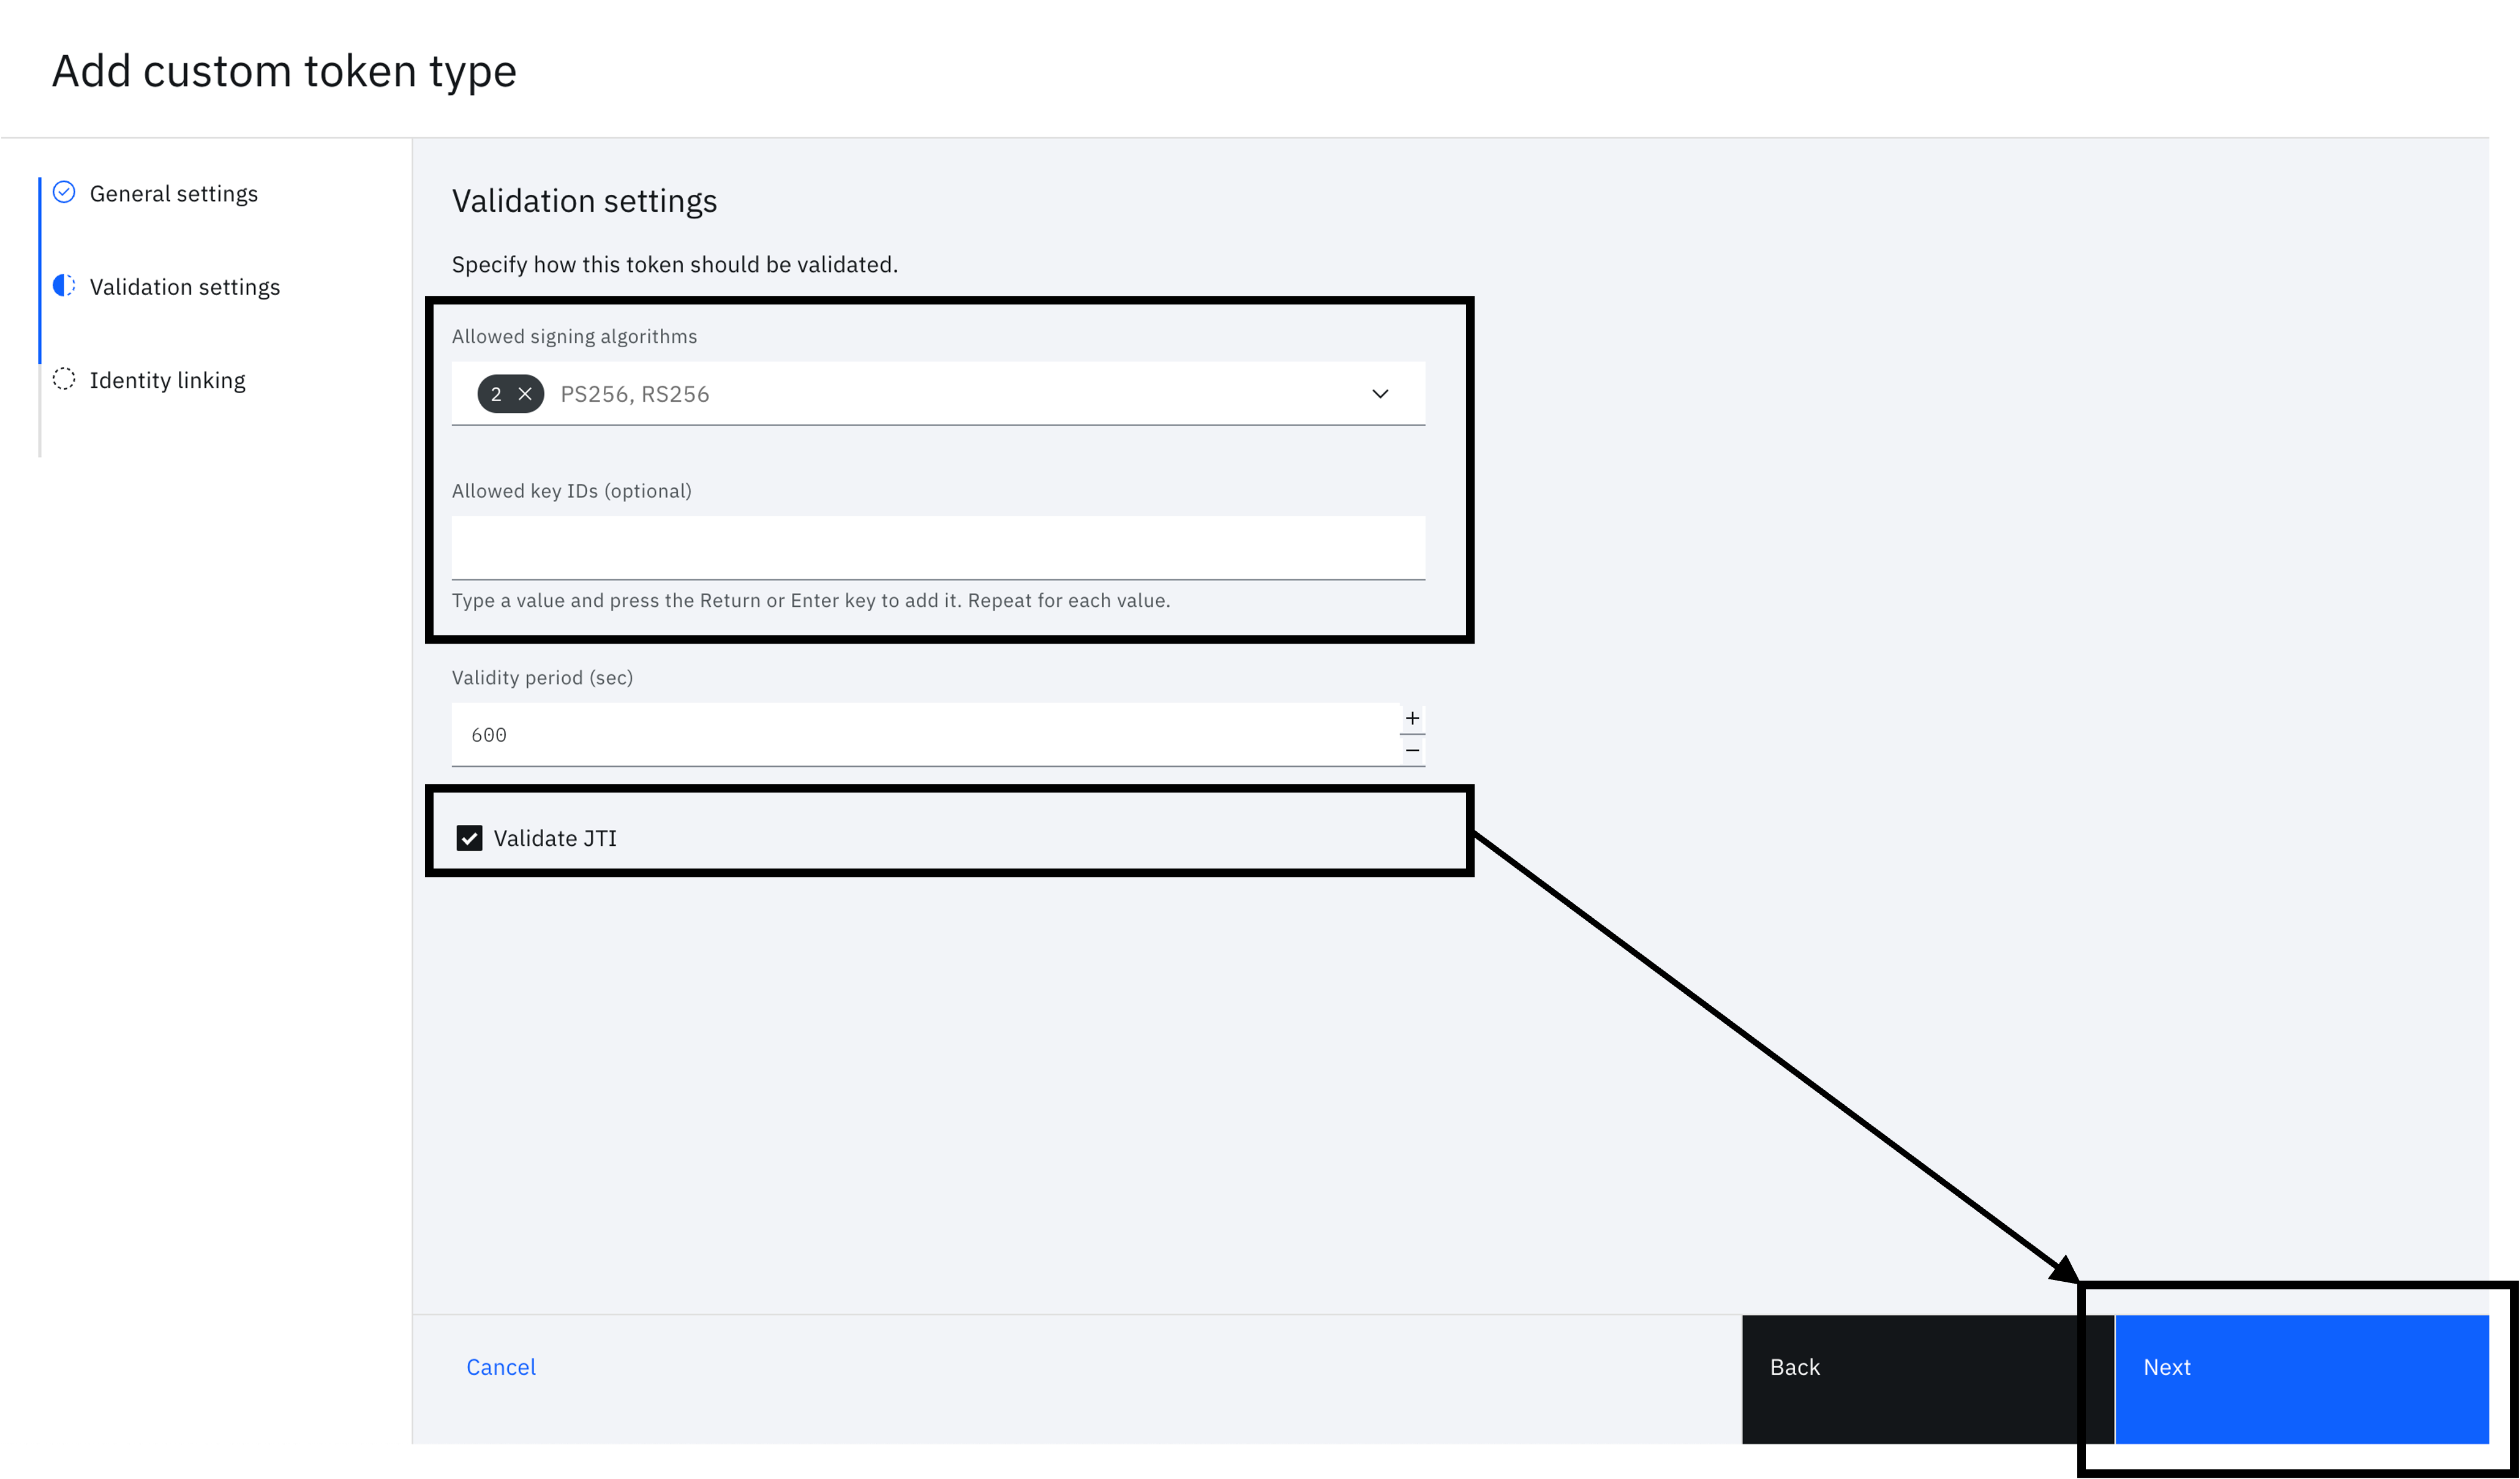
You will see the "Validation settings" form. Fill in the following and click "Next".
- Allowed signing algorithms - RS256
- Validity period (sec) - any value. You can leave this as the default value.
- Validate JTI - Enabled
-
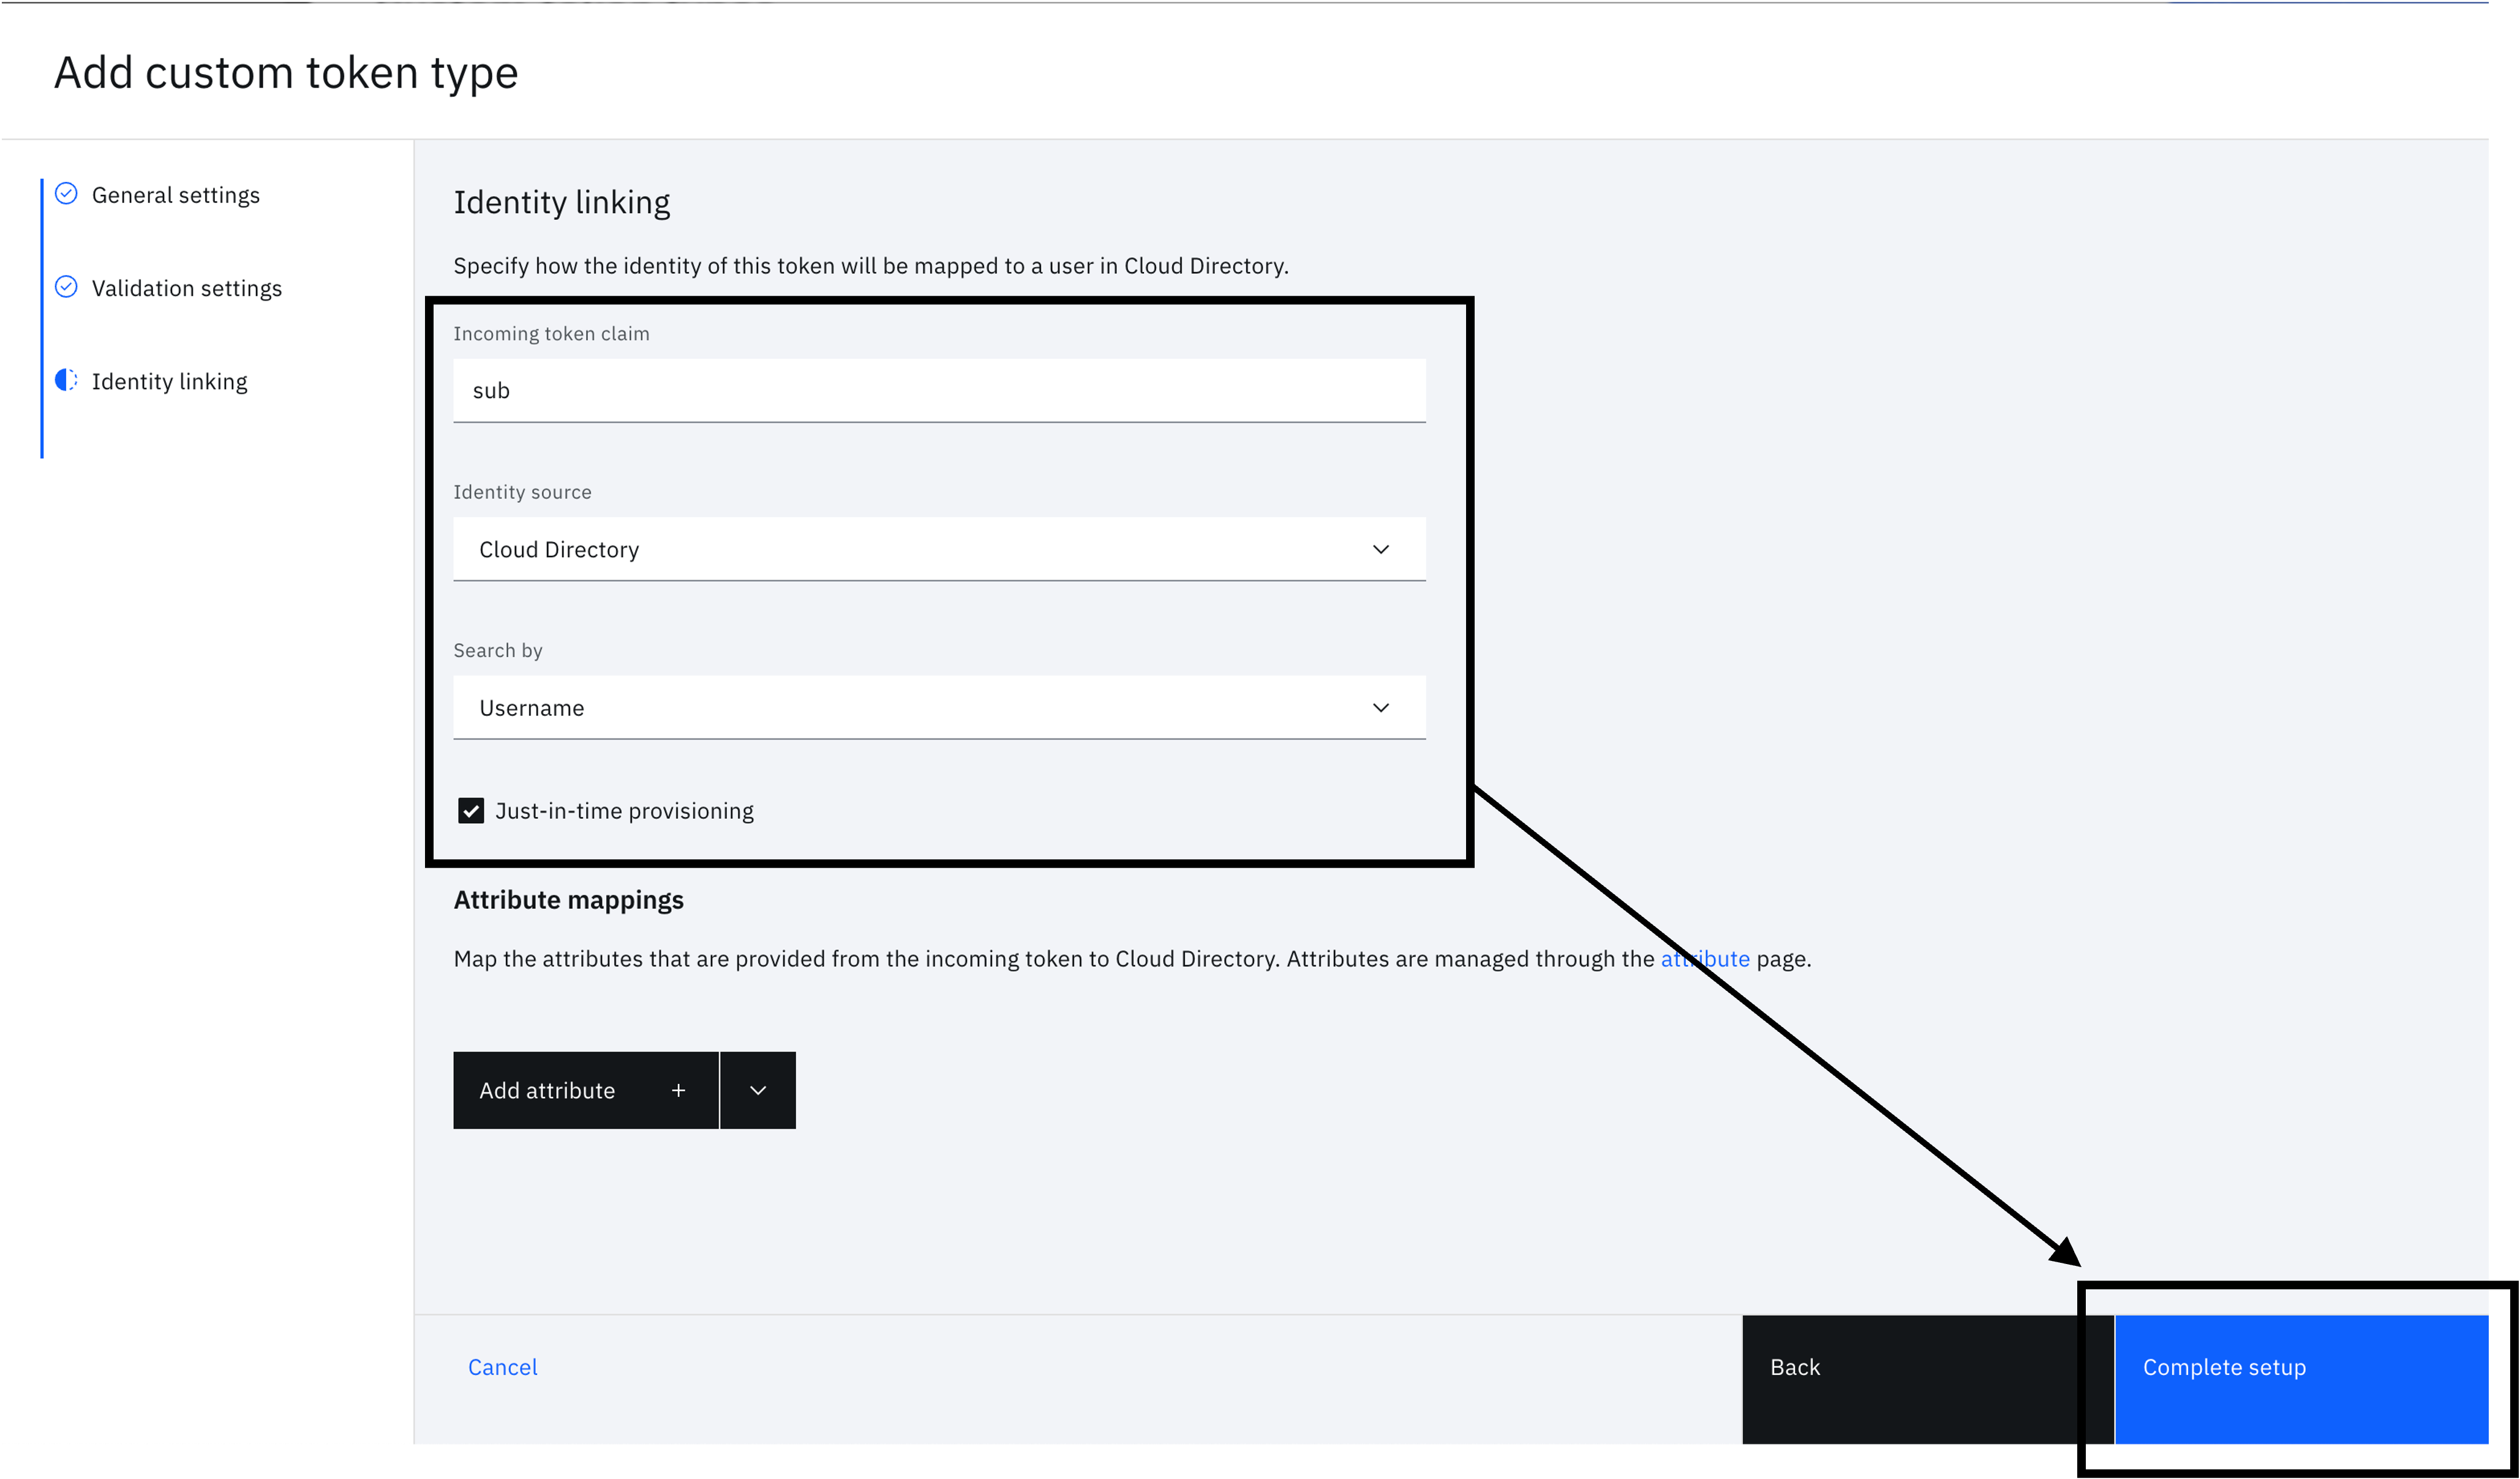
You will see the "Identity linking" form. Fill in the following and click "Complete setup".
- Incoming token claim - sub
- Identity source - Cloud Directory
- Search by - Username
- Just-in-time provisioning - Enabled
Note
In the identity linking configuration provided in this section, the Cloud Directory username is expected to match the value that is in the "sub" claim of the external JWT. You can customize this to use a different attribute in the JWT payload or even compute this value. "Search by" gives you flexibility on which attribute in the Cloud Directory account to use in the search filter.
STS client
A simple STS client is used to perform the token exchange. This would be appropriate for clients that aren't applications. For example, API gateways, resource servers, CLI programs, etc.
-
On the left-hand side menu, select "Applications" and click on "STS clients".
-
Click on "Add STS client".
-
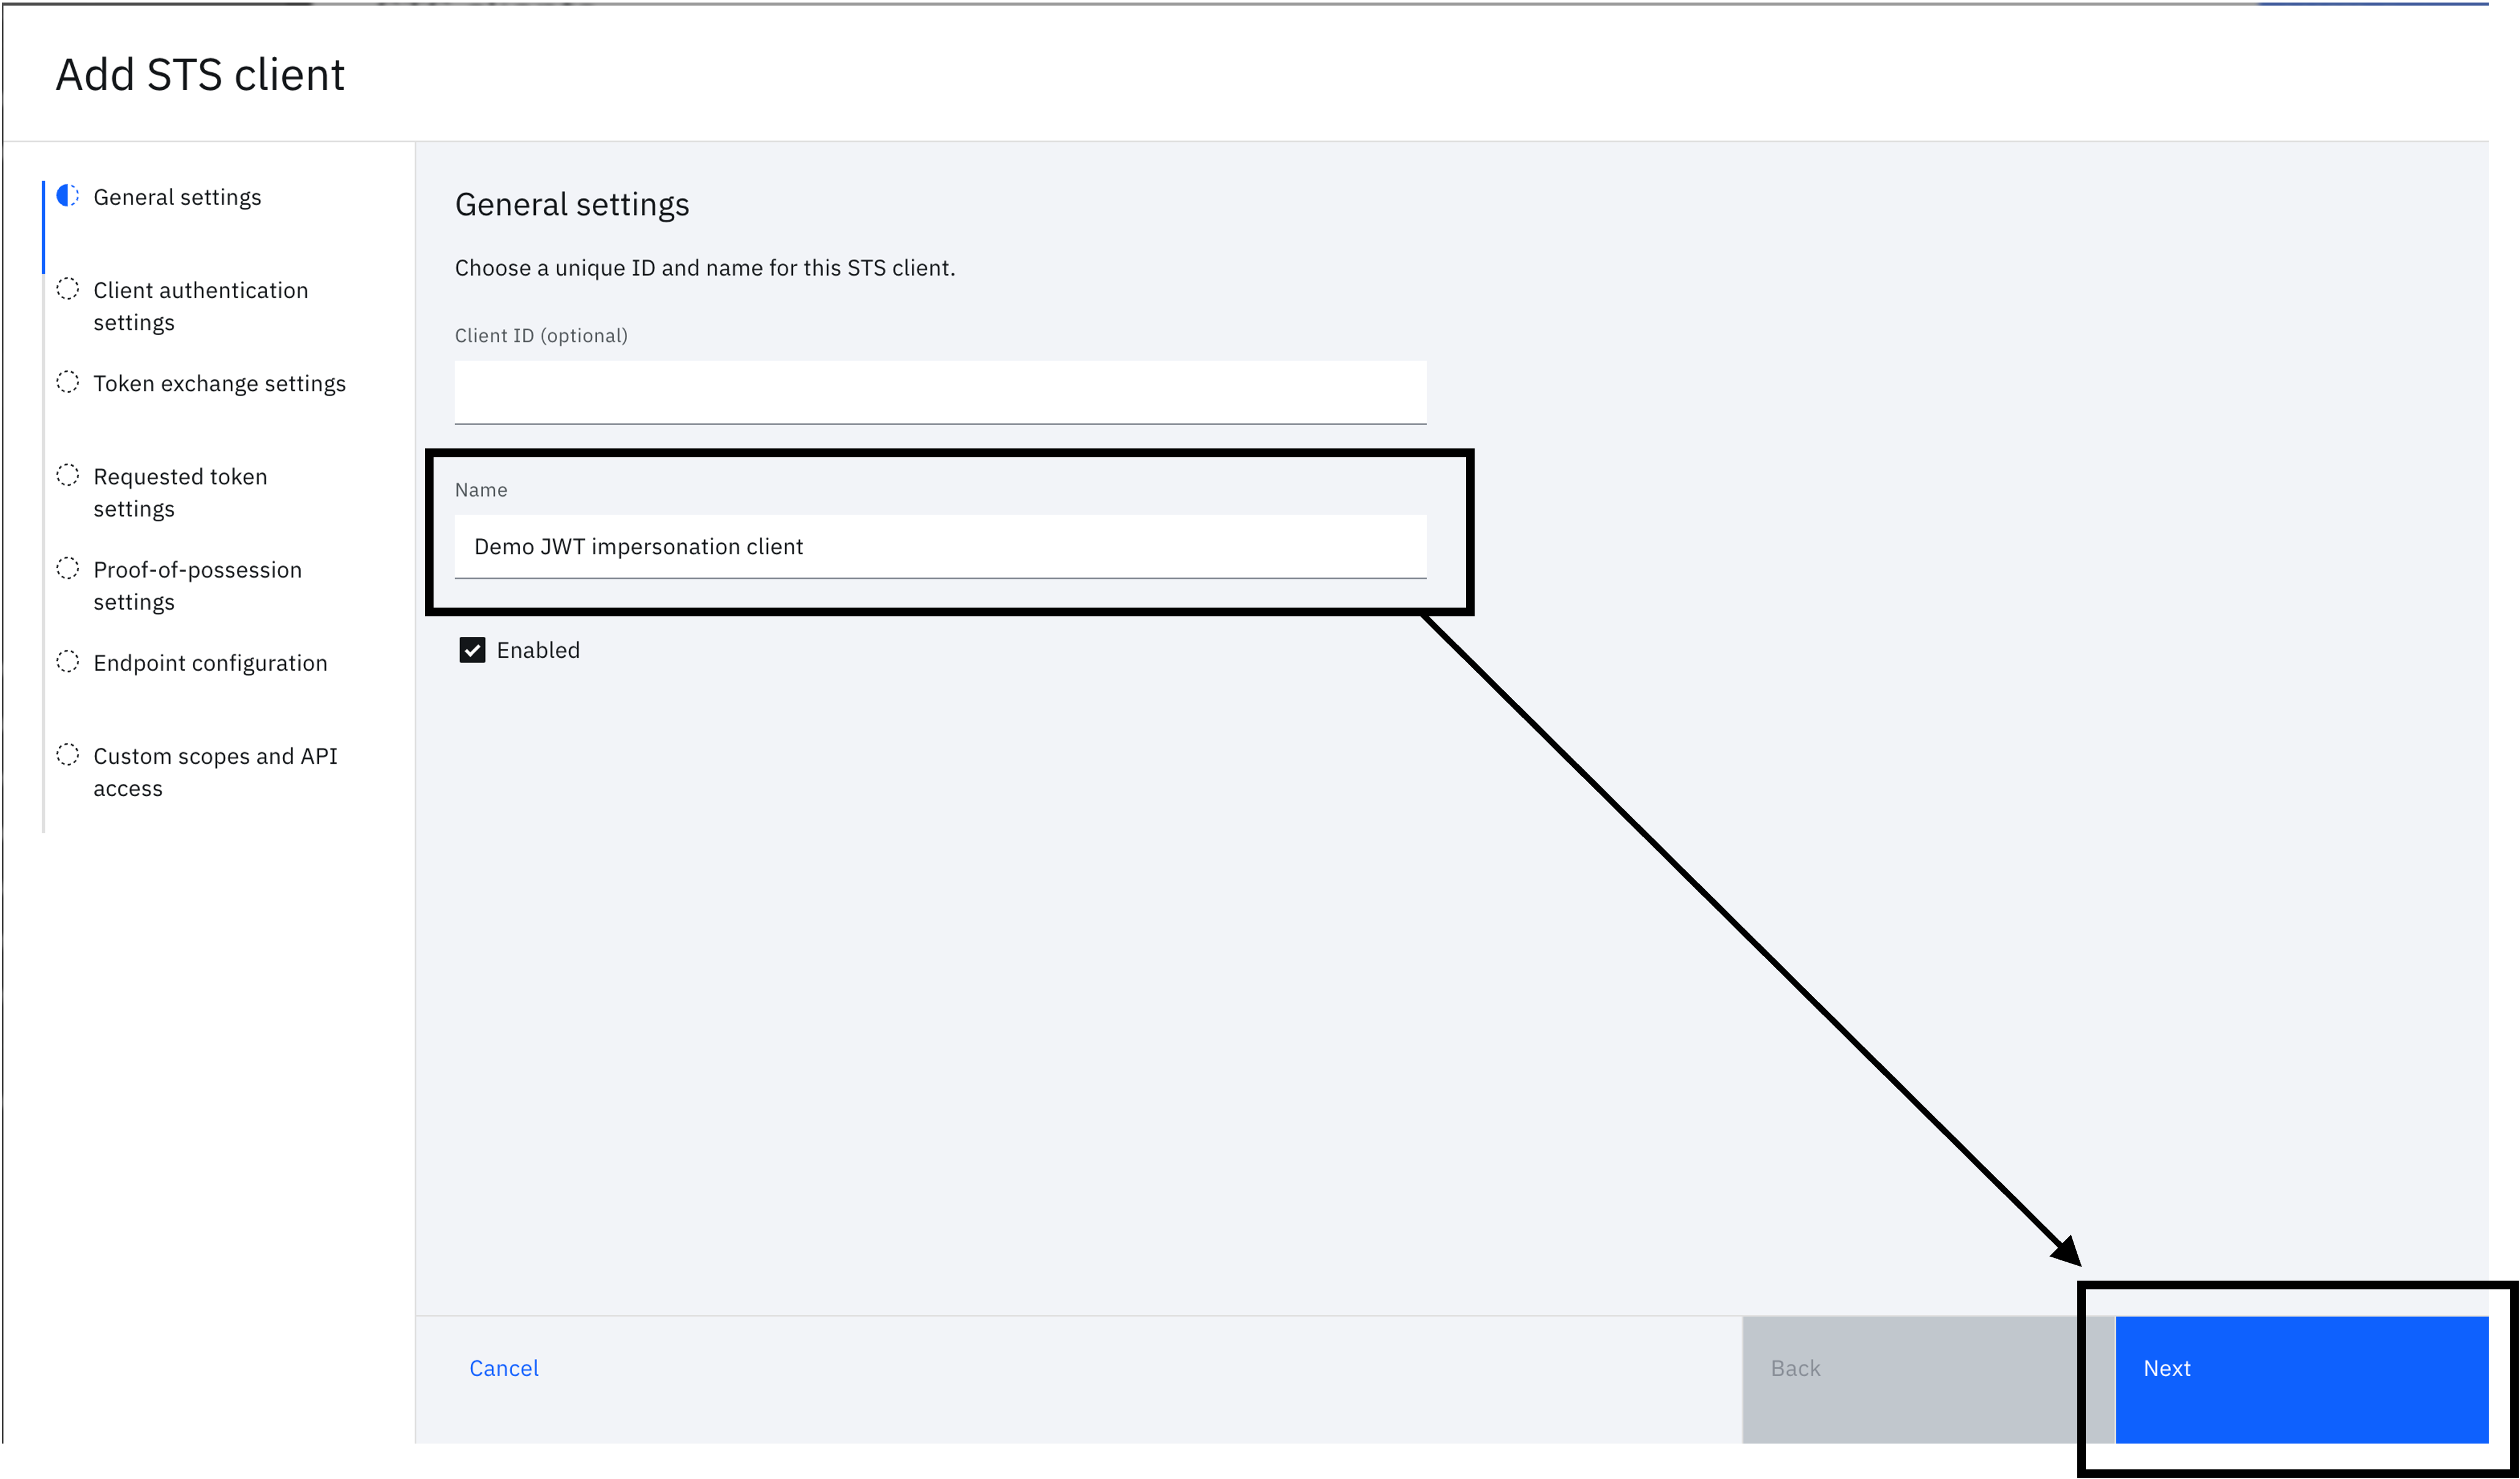
In "General settings", leave "Client ID" empty and provide an appropriate "Name". Click on "Next".
-
You will see "Client authentication settings". Click on "Next" without making any changes. This will generate a client secret for the STS client.
-
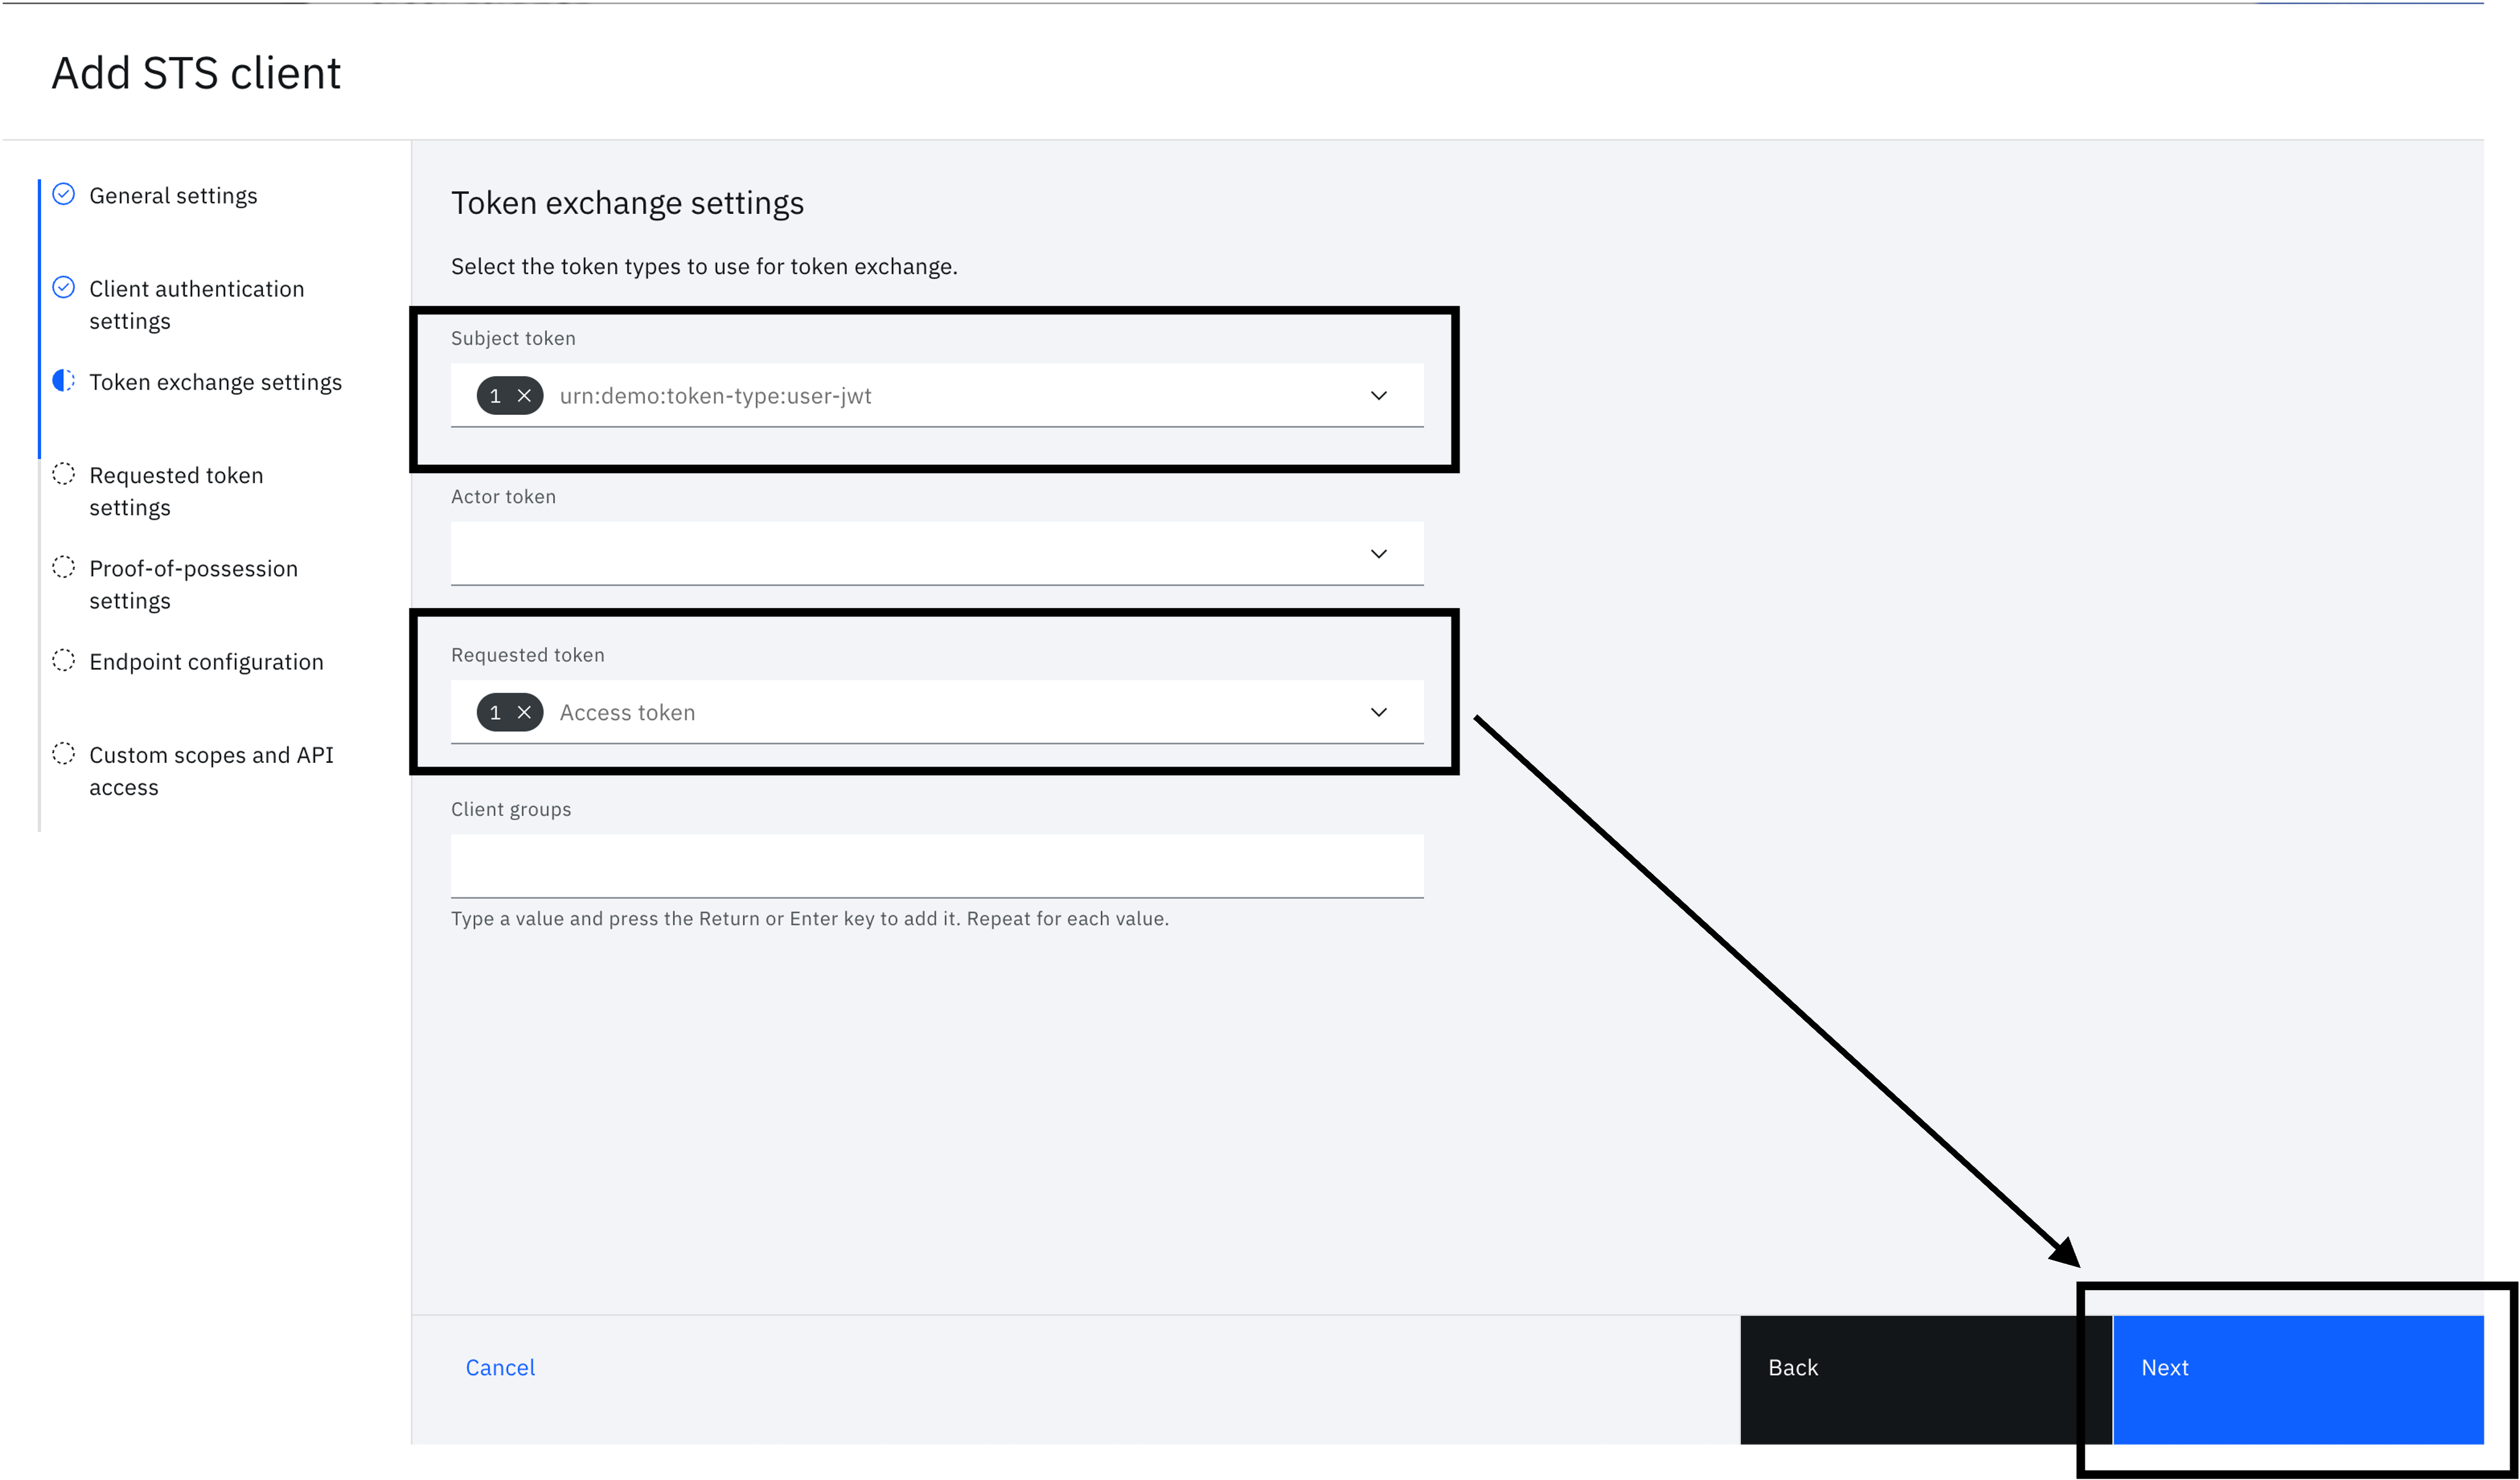
You will now see "Token exchange settings". Set the following values then click "Next".
- Subject token - urn:demo:token-type:user-jwt
- Requested token - Access token
-
You will see "Requested token settings". Click on "Next" without making any changes. The flow will generate an opaque access token.
-
Click on "Next" without making any changes in "Proof-of-possession settings".
-
Click on "Next" without making any changes in "Endpoint configuration". You can customize this to populate the token with any additional attributes at a later time.
-
Click on "Complete setup" without making any changes in "Custom scopes and API access". You can customize this to only grant specific scopes, for example, at a later time.
-
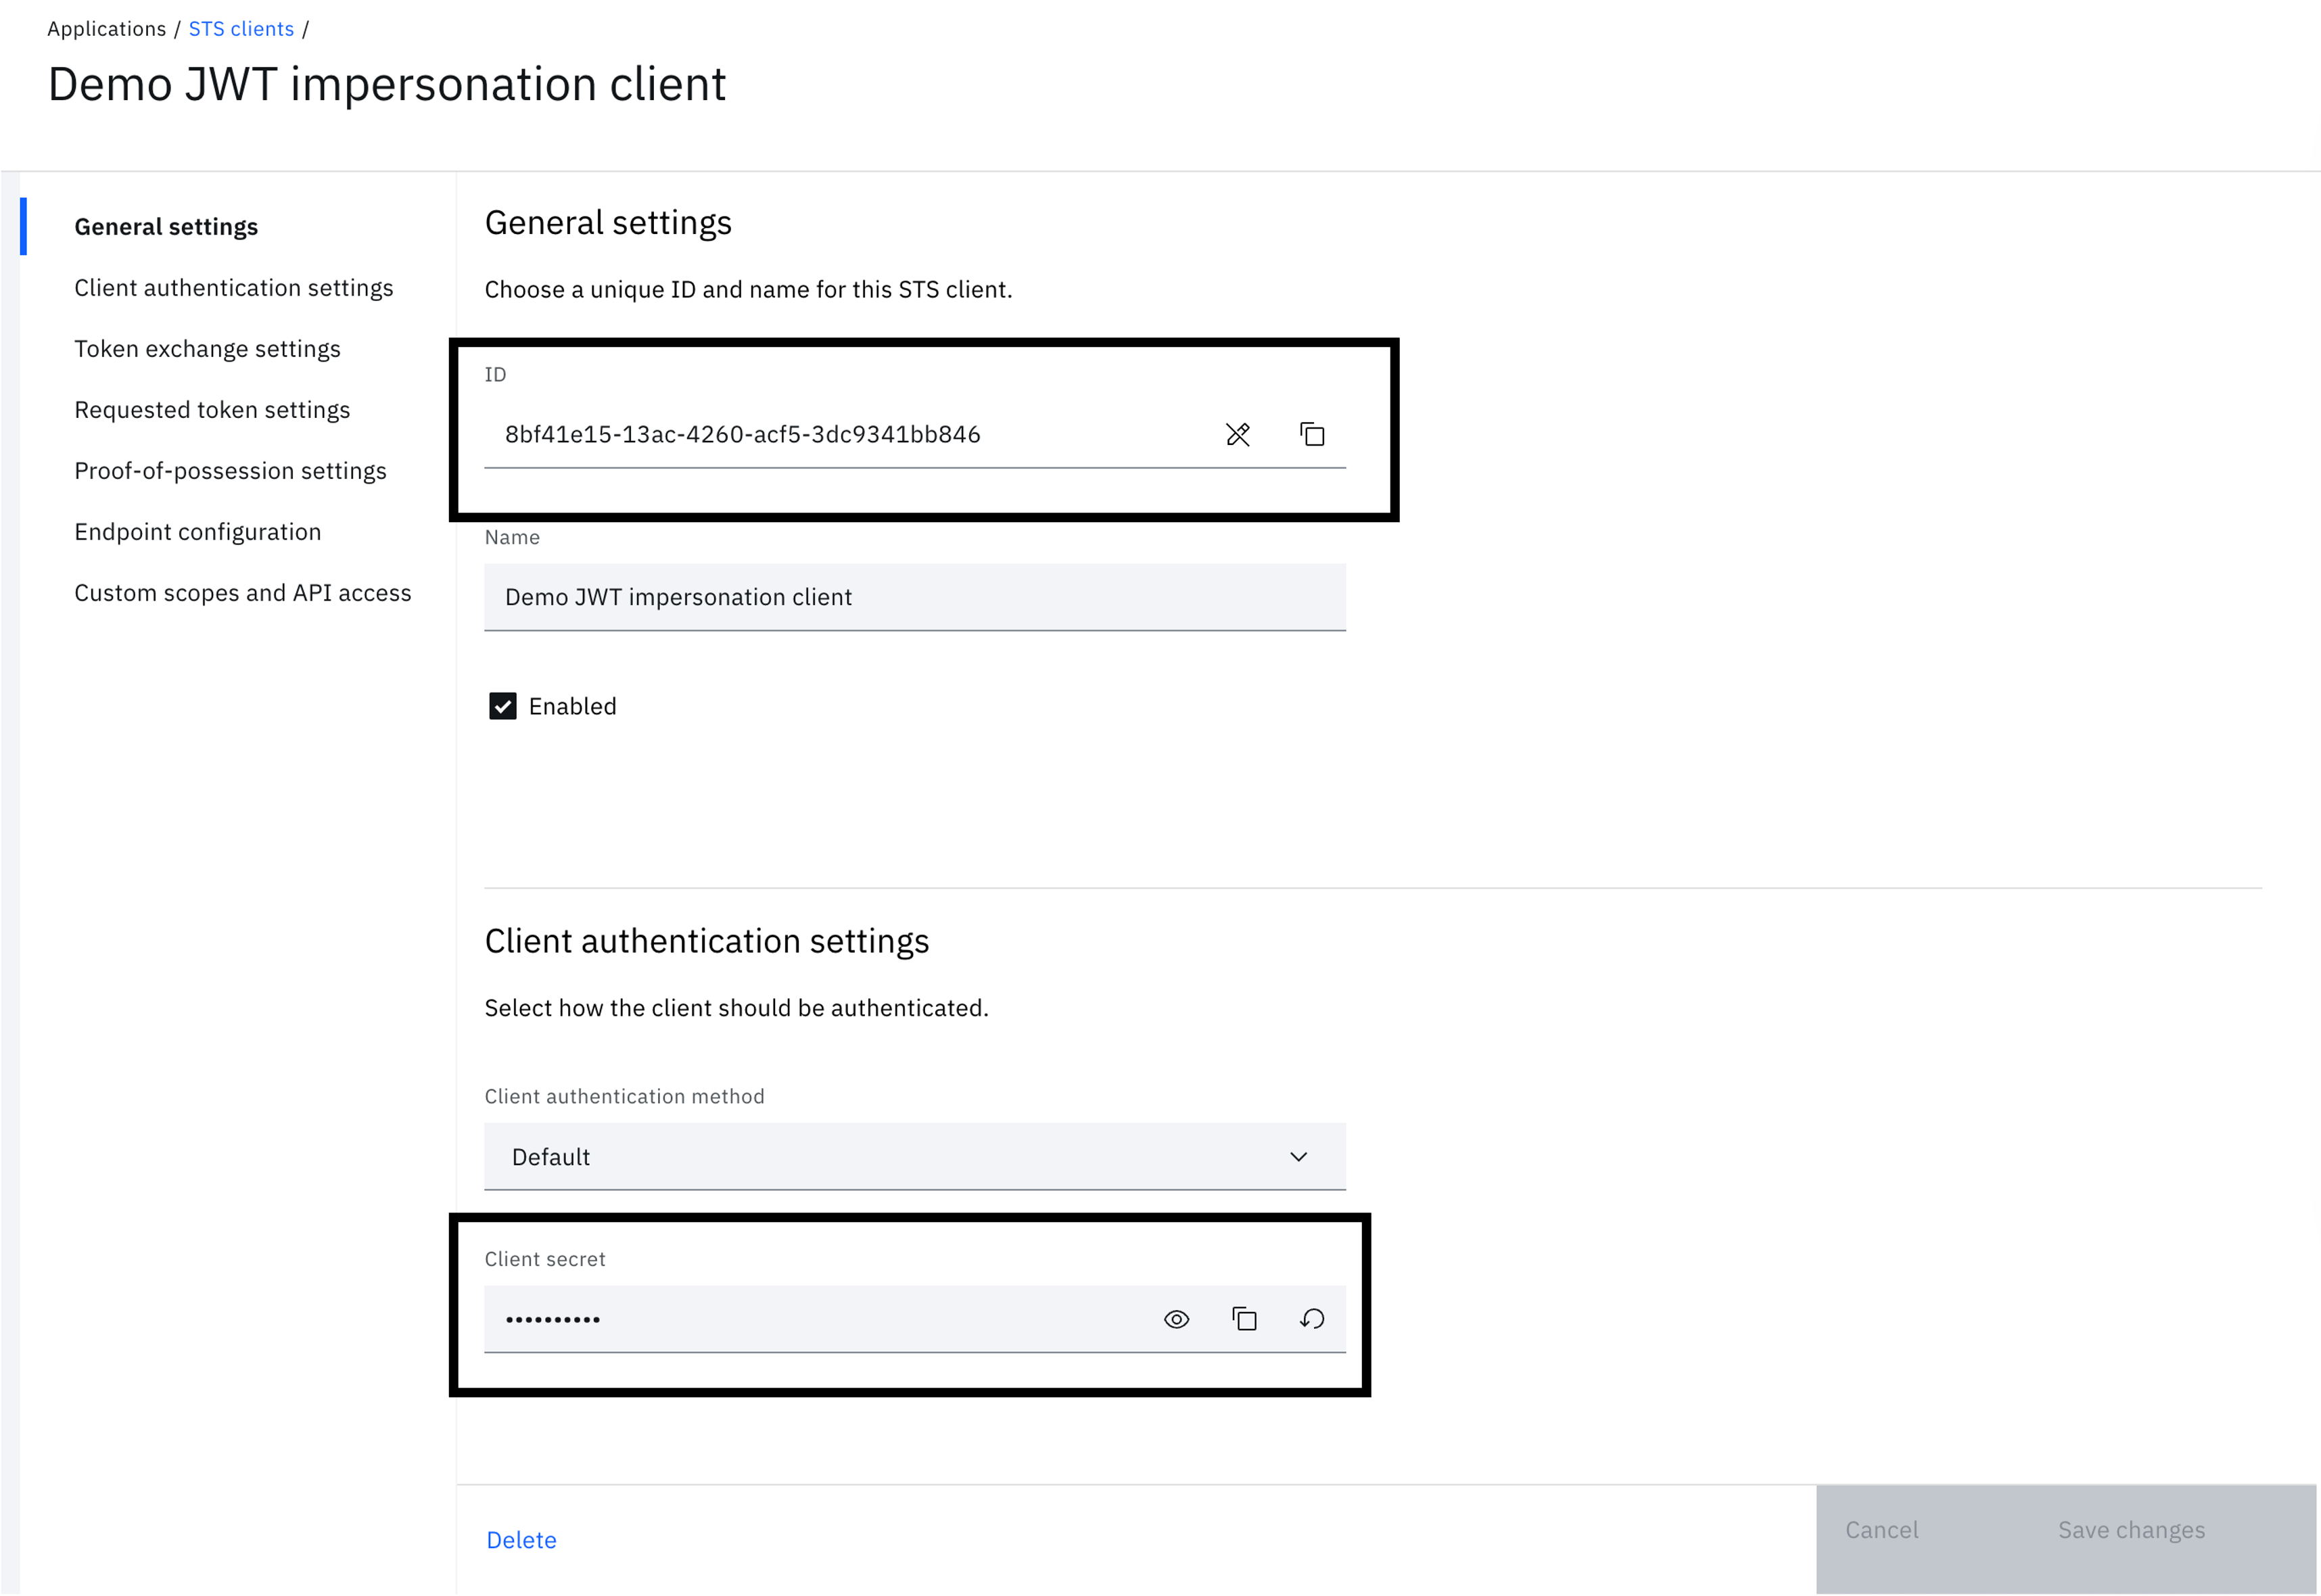
Take note of the "ID" and "Client secret". This will be used as the "client_id" and "client_secret" later for token exchange.
Generate and setup signer keys
Given you are going to sign a custom JWT, you will need a public and private key. The steps here use "openssl" but you can use any tool of your choice.
-
Open a terminal.
-
Generate a key-pair using "openssl". In the example here, "cert.pem" is the public key used to validate the signed JWT. The JWT is signed using "key.pem".
openssl req \ -x509 \ -newkey rsa:4096 \ -keyout key.pem \ -out cert.pem \ -sha256 \ -days 365 \ -nodes \ -subj "/CN=DemoTokenSigner" -
In the Verify admin console, on the left-hand side menu, select "Security" and click on "Certificates".
-
Click on "Add signer certificate".
-
Upload the "cert.pem" file and click "OK". Name the certificate
demotokensigner. This label will be used when generating the JWT as the "kid" in the header.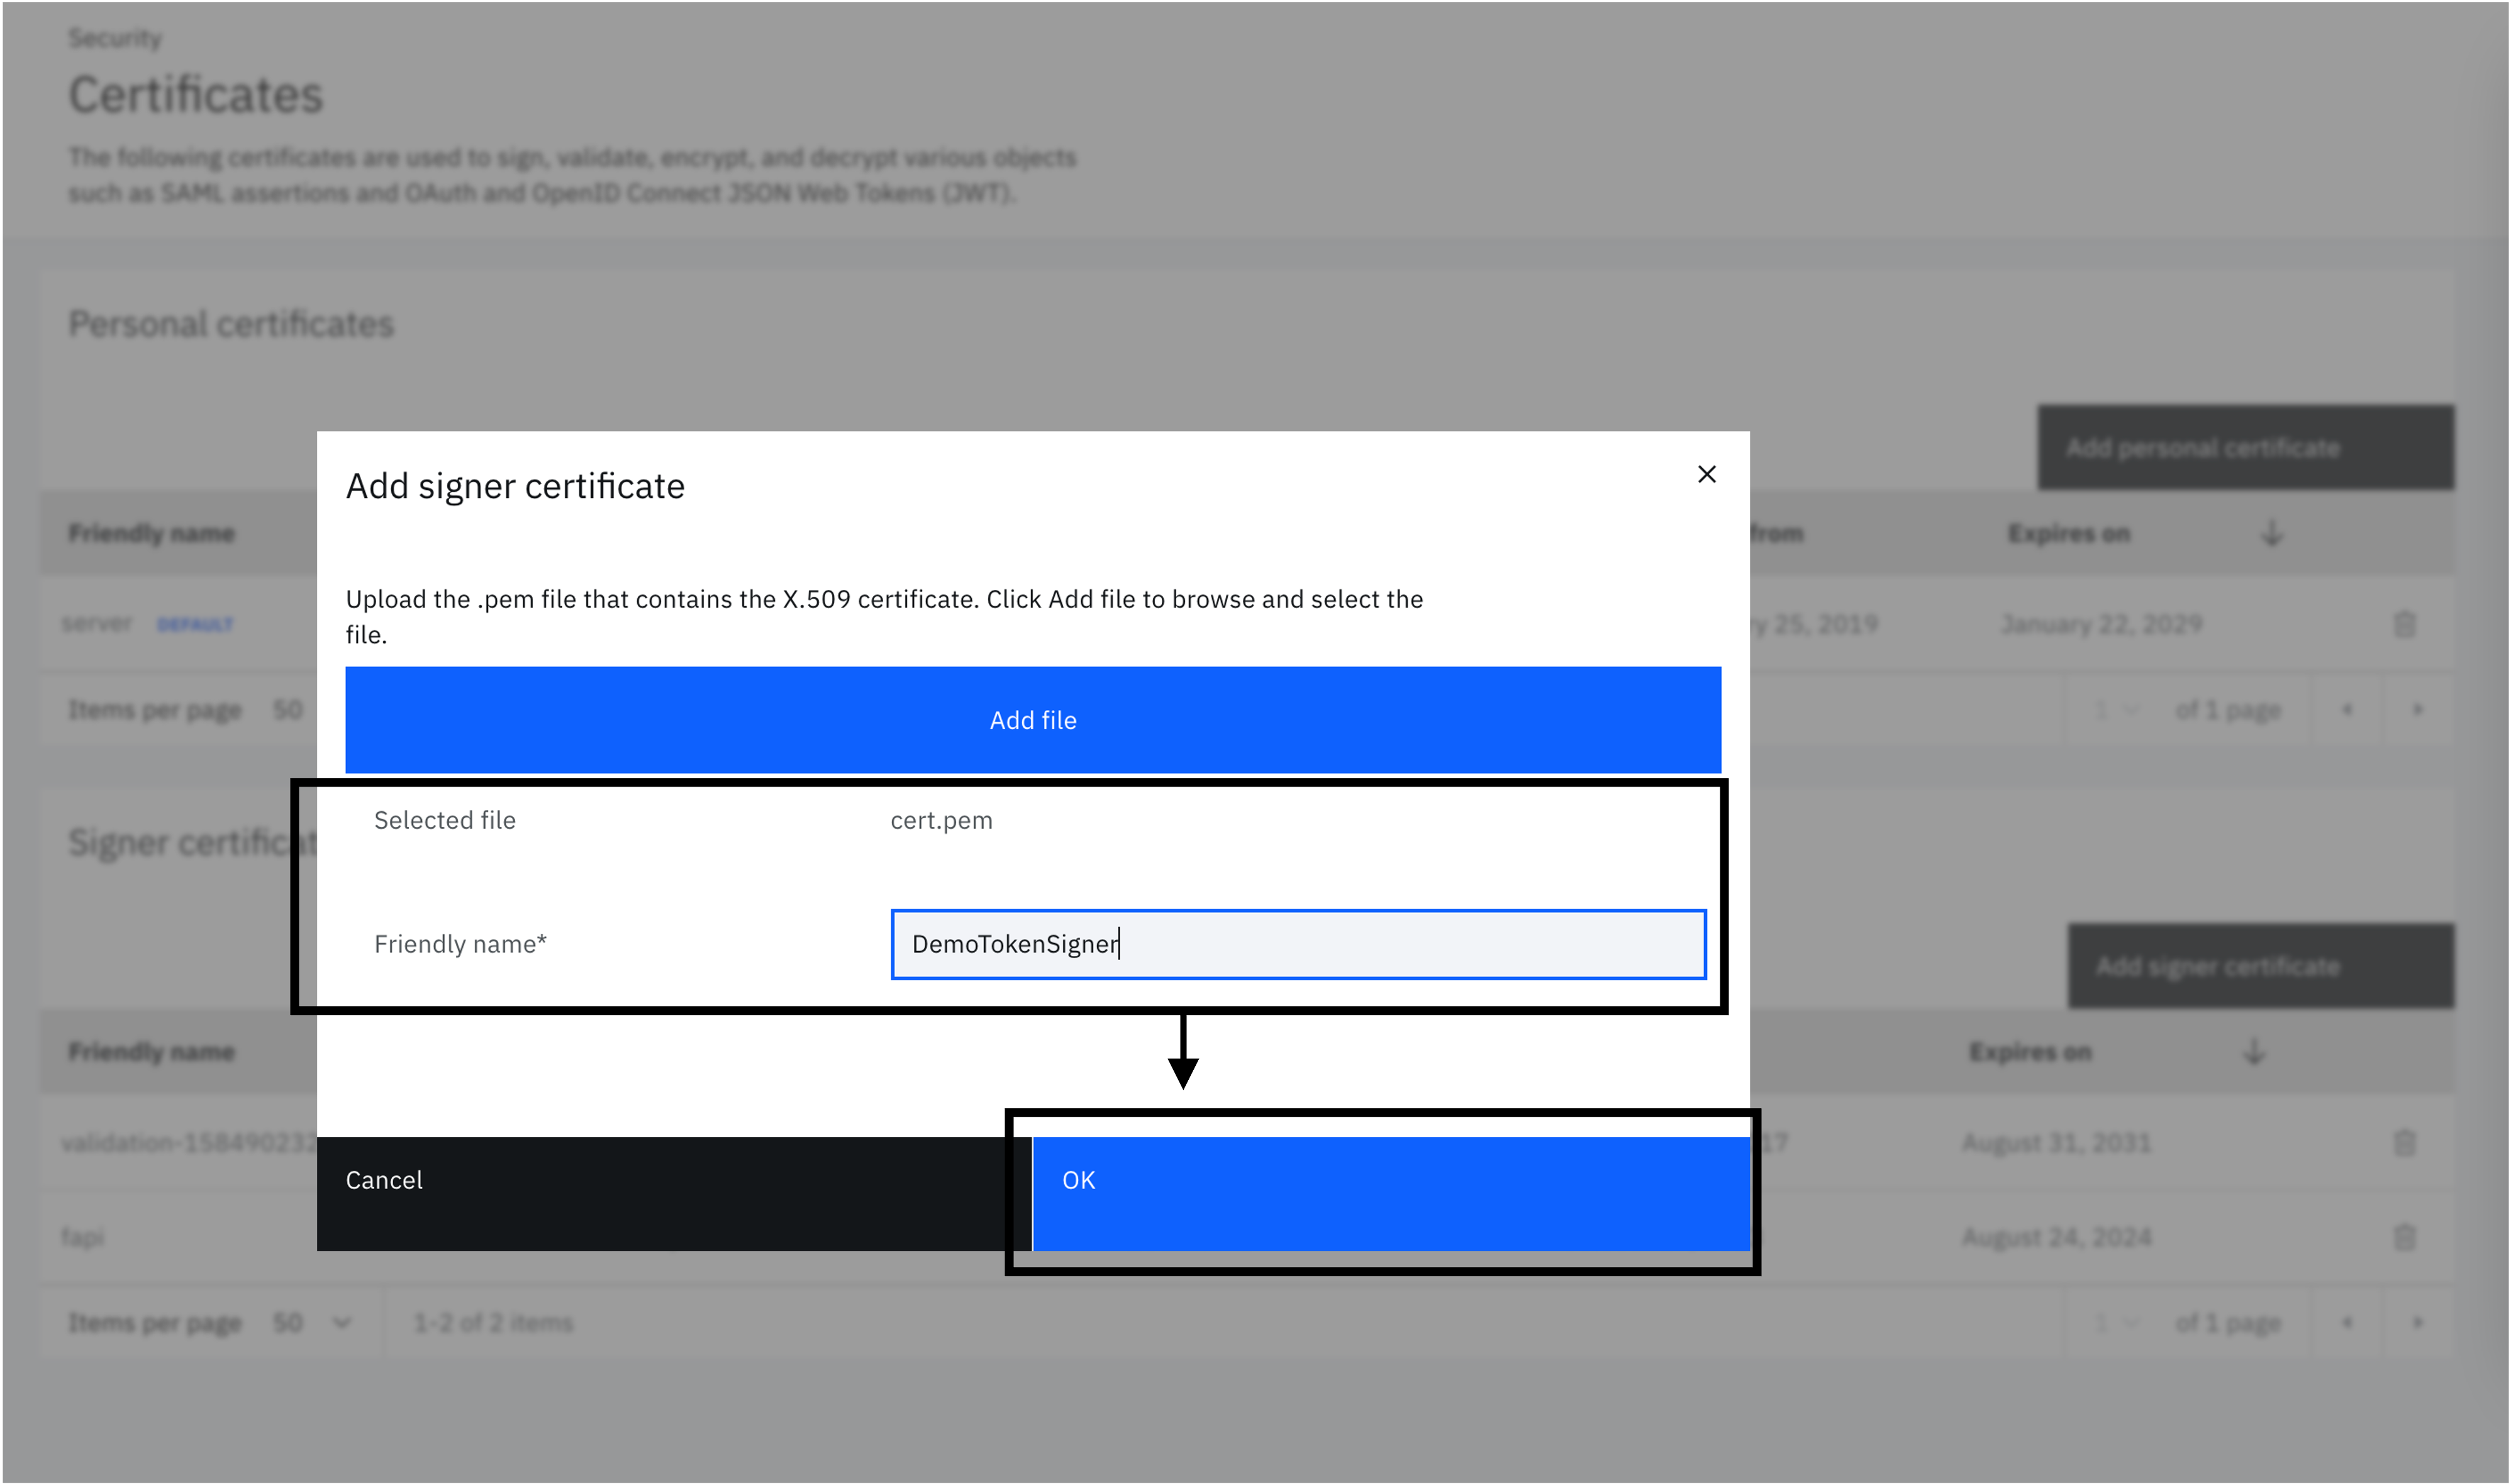
Run it
Generate custom JWT
A custom JWT is required to run the token exchange flow. You can use any JWT generator. The only requirements are the following:
- Subject (sub): This must be the username of an account in Cloud Directory. The configuration will just-in-time provision the account if it does not exist.
- Issuer (iss): This must be set to
https://demo.ibm.combased on the configuration described in the previous section. - Provide a unique JTI (JWT ID) in the payload.
- JWT header must contain "kid" set to match the certificate label, i.e.
demotokensigner. - The "key.pem" that corresponds with the signer certificate uploaded to Verify is used to sign the JWT.
Generate the JWT as described here. This uses an IBM provided API.
-
Convert all newlines in "key.pem" with "\n" to create a flattened string that can be included in a JSON request body.

-
Call the JWT sign API to generate the JWT as illustrated. While the API stores nothing, do not include any sensitive keys. This is provided for test purposes only.
curl 'https://tools-service.12murzlqn27z.us-east.codeengine.appdomain.cloud/jwt/sign' \ --header 'Content-Type: application/json' \ --data-raw '{ "payload": { "iss": "https://demo.ibm.com", "sub": "[email protected]", "iat": 1703048520, "exp": 1703049355, "jti": "af582a73-f19e-4f94-9107-111102c46128" }, "header": { "alg": "RS256", "kid": "demotokensigner" }, "key": "-----BEGIN PRIVATE KEY-----\nMIIJQgIBADANBgkqhkiG9w0BAQEFAASCCSwwggkoAgEAAoICAQCe5dhgBrfQgDQI\nmmpFU4gwTjpXJK62jqTqmMzHDnjoYplp6qG5ITZiezP+BOmta1Y+4GnG1isyQ9ND\n8xqD0mTVeYEEd4j75hXXrnQxJo9pkr5FUgZszD/BePT4zBg6KgypGNTuMW3PP0mV\nLEun0I/YpMjeGmge4zf84KRjfbXiVVcVLtFCBRIok87BvoWNzUERHSkox3zs/p3P\ntzCE9IXUjgPC59hrTElom320gTZt+GVb3ZtqtgiubGprgNrKtJeKEit31JJx7UAE\nekY8qwAaWSj+WfTKbYGN9cvXBA8ZvNb3w7p3dx/hd8uyO96X+TtRoyCER0csC3iX\n9kirnmFikdQpwPR+tma2Cdb91G6fYBqspEFsSSbLb+LYcJiNOZBkVWpdoektCPht\n9Har4q09WMp7p55RikvYpDmi8buDM2ckpBqvShjqr2WRmfzHBjApK+Dt33hOVZSs\nHJkQa3lNhy6/SQNNWBohxoCQXPQsC2rsS/bvHtz6kaKId143OuCErfDwzBWmItu0\nVbq8O2cPEEdqoiCe6QBxK9Z6nunMie6+t8Bpb1zBsabMiltZ6iY9hkzH+Yq02jmp\nYEyyoHl7HPJZvoh4Y10PWNoUdcCMSwEJ93NZkE9S+kUGBqCnY/0wfY4hLWmSU32X\n5QJUHg1Ud1ZUbbJ9f00RLMR0tC6qbQIDAQABAoICACQrYbOKE/FsHWwP6jzZpNiK\nFhGcEgEQO04Ddimhi7gqKY3IkQOZIc4NCWq7J44ILtulLa7LNY39jmubPN/g1n8Z\nZ1ri8tWULEiqN1yw0FhRxOn2n+vIGoMpy2mO27zxsWwUcPO/YKWaXF+Oc7JBcVz5\nNZgJHsZZJndzkzfqd6qLjoUN4ShMCzQdYSUM/02l+TeyEZpsvm0cEEQmCO9a0dPu\nd8C4EbVq6hLbwiOCfidOMZRVv3js8tDxcNADxsn5jb0qIabnRmaUgMwEIVTR//X/\ncatkQqqJfsIXv0y0adOL/srrTNjAzwr9v+pUYnjpjK0qms5Bg1vtSIge0a/vH296\nsTLBMmuwUdHKEkR7UX4l7SCGdOSRtlOgUfOBcDqFRDeNQ1g++Czpd8uJBazRkCXI\nYmdIZnhyMQpLYVKRTgfxF3t81v9r98KutjlqScn0V/xhw+znCa/ExDo9Sh+O+EhC\nRSheCy2ZjAjJOgeb88OcwVmIyd9SAcNlSpqAKoz5iuHf+8QRTAQHgwCVZJEEM8gm\nD1hCwD/mbA+YrTKfBKnxMyY85VF0AwhqfRw+U5Vkh6qOUxxWV/00LqvOrAHelMwQ\nNWwwGy7GpOT/kGzf94xwQP4IUZWvyeafOrj+V0jQPRTmA1AMHHaYc9QGjKYj/NMm\neN+4V43fECPNl/bPL0QBAoIBAQDQBAX7pBgZ3LlCssATbcq7szhOEfCxNkpqecW6\nvnF2xkpJxC3a3TBorjy374p8pBT+eGEXEl1JM71YR3MTzADzoj7FYkfXfKQyRApa\nCcXkZsHrecTLhSZeRI3bOdhJr561GFdzWuS62dcxGPXuKNOgmBHji9P0iEjJ0h5j\np9oolcRkDcCueAjCM18ecktHmt4v8g4QO5v34i29KA+ferMkU0gwSMnpUGZsCMWX\nyhssYyar+nc1Fd1c6Vow77e/dboA1BGEOGMwXRXplQPybd5fH3RcNs5bEom3NjTg\nPJQm2ZLN4NRCfH3u5v+jeetM3+Kf67QMFpEuCn9HC8xwXtPtAoIBAQDDjUH3ZwmW\nyBJ4ehpOtwPySnILV2ousjBAuWvi/RUK62EHuKAayGBnPHsmVfOGR+hVyYMXrCq+\nnV3WeNQ4HutAf+/rpqfZ/8uCOq7zSjW1m6zkn5tiboavItTirJk1C2u2tZwM7CFI\naoAaSAxGlLbBtTHjvma1NYqRYY+t943FcygpzbPArFDQzPxrvW8wU3pk/hy7NU+0\n0STW+BUxEwivWCKLhldBVFH6qyALukNw98mhfeRJyagW3ihyq3Z1aDNhoIX6sUyH\nDr0OZEE1KrkLd1srbObj1dD2+sUM/ResplMw5EgWm5+4ZIvtpA9vNX2XX4mbCl1B\n0L8r19BVAWCBAoIBACII9n2k7LiWj81k99518VzixwynDM3CB00CnaKfdGstqIwH\nSEVuOXR3RcIGtI8OPc0hHymqPI80ov9luWN81o8GdeTP3tdYMnly/oqa3MExOvtv\nUg7Gu29jIh7DiSsNTBdvYyehsJkN+ZKz9dFA5td46jxj7YsuHVLASW6e0Sgg0SBZ\ny7QAOdaklyShKMYPhdksbrajOjLF1BwGCQBcECGaas5Tqo29NPTqPoJGdEm/81zi\nP0z1ReHk4HfvUQ5HkeZ+zFro6vnH0UUFt76b0W2Y9O39nafzEYtjmCU0ZD0zDj0X\nU0OJoQVM0HkMAr7yRt9JroznyFtTJl4WhR3BtkUCggEBALPKiS8NNfzCoHDSWqOq\nkt9OYQJacY7TV5f6ot3EsHckqEZwEgvt1Oy158f8WHVKYauWJYg7S+WLS/5ngz7B\n9quLtSulQ0gkbZijmbynqy/5HIHq2PMsCXq2fKKX7BigEn2fBgW/iG5LNNJ1EYxH\nKKx6io8IvOe4fVljKLXbGCbE1NVygeUQyRDgluf7+GGnLq3yELpyroDhlYxr9Rf0\nlxSX5NMBRfITs3fTpBgEPgN8Xo6y75SD6p5zzR541OXnUu5cpzIxltnJzDqSJH3c\ndNu89j671qD9Mi4Rq+BgRkb/eRdHm5vlo3jmQNzR7TrjJEBrn1nDsrBTW6DUwH+X\nT4ECggEARElnUfiung1RqrruiT1GIpAA3HtXdbokEEVdRCp7fv6SG6pFsaflmI5f\nq3sbuYGr2uN00cl27lkkaBHKofcwv5nQQwQ9PA2ncFXEfn5x8n2WItwOpLeHU4a8\nM416gLte1VGvIdWNwAvI7WLQwTRFqGuwCvbWXIXNyJ3a28kgrpFFI+M3pajdSBQU\nO1p72PW7DJHAaXTCeuEKiDJaZIvWK8wrdKhaGUcXOD4c0iFuUUMmUWXz5xb2PXgv\nW3TXmuKZfaxYDEZYhRiUvLWiudFZcR/8mVk5fyTRG02I7bXbFJyzE694zoAjr/rc\nSQO7gs26y6wtDJO/SOxyvI7q9mPDCQ==\n-----END PRIVATE KEY-----\n" }'Caution!
The JWT API provided by IBM is meant for test usage only. While the API doesn't store any data server-side, do not include any private keys and sensitive data when making use of it.
-
Copy the JWT value in the response
jwtproperty. This JWT value is used as the subject token in the OAuth 2.0 Token Exchange flow.{ "jwt": "eyJhbGciOiJSUzI1NiIsImtpZCI6ImRlbW90b2tlbnNpZ25lciIsInR5cCI6IkpXVCJ9.eyJleHAiOjEuNzAzMDQ5MzU1ZSswOSwiaWF0IjoxLjcwMzA0ODUyZSswOSwiaXNzIjoiaHR0cHM6Ly9kZW1vLmlibS5jb20iLCJqdGkiOiJhZjU4MmE3My1mMTllLTRmOTQtOTEwNy0xMTExMDJjNDYxMjgiLCJzdWIiOiJqc21pdGhAbWFpbGluYXRvci5jb20ifQ.EHn_D2-e5d9r_0fnM7KIo3JG31Z26ATBw4AQibQhMQr1RRi3QO-o7ghFT45d5Fv6uNA566XeDNNzE29sHlaAQXad54_3pWsHYJigWEZRhqTuZKMuylXVJVZ2_c851V-8fAjVckjekvwjt2e8CNU5MBkX55tq6vDHypV65JSQN3_XEmzl9L0i1k2BnKfD7A--PWzI9_pgBDJY8sAWLCM8hpZwof80bOh4H_epAvsR5JOpSiolsgtatUwJ9Wz_6R7EZNoHMciZSuvTAyq7L34YBQrwAQv2PIvFZtrJJcVyGVRU0bSTwodZ5C5xtdGB2KNxQ9c3WaMxH36iaA84-0gWUVRMwZO5n4gEL6-7BBRVYDLa5UH1aSP01V0SBU4N3_NgPMMjX1uBmNDGgeepPO4oSr7rlgI-IaI4bl_vIGD51rtuwQXg2mNnx2Ep37-37y3LqgM_CdSfL7NKaePuERjeXdf0-L_62Ji4HqNXsNEFyHMZ8r1Rq58ROHgTxhloOrJj_blqkd-eEbfxtcMinvNA07nVt3_ysdKbS-p5uYYaQ_U-gQd-YDd3pkIMiR1ltO3WoqEtplm_w4weYRAWE_Gv_Rn4hAskiAc9_R8kKJaq2oMBR9uy6M5OD2reb61bd9oV9m2dLCxToD1JIyJ5_zjOZCMi6G7x0VXQYyHSdb6sCoY" }
Exchange token
Now that you have a signed JWT, this token can be exchanged for a Verify issued access token. You will use the client ID and secret generated for the STS client that you configured and the JWT generated in the previous step.
-
Run the OAuth 2.0 Token Exchange flow.
curl 'https://<tenant>.verify.ibm.com/oauth2/token' \ --header 'Content-Type: application/x-www-form-urlencoded' \ --data-urlencode 'client_id=<sts_client_id>' \ --data-urlencode 'client_secret=<sts_client_secret>' \ --data-urlencode 'grant_type=urn:ietf:params:oauth:grant-type:token-exchange' \ --data-urlencode 'subject_token=<jwt>' \ --data-urlencode 'subject_token_type=urn:demo:token-type:user-jwt' -
Verify responds with the access token.
{ "access_token": <access_token>, "expires_in": 3599, "grant_id": <grant_id>, "issued_token_type": "urn:ietf:params:oauth:token-type:access_token", "scope": "", "token_type": "bearer" } -
Introspect the token to inspect contents. This will show you the ID of the user in the "sub" claim. You can use this to look the user up in Verify admin console.
curl 'https://<tenant>.ice.ibmcloud.com/oauth2/introspect' \
    --header 'Content-Type: application/x-www-form-urlencoded' \
    --data-urlencode 'client_id=<sts_client_id>' \
    --data-urlencode 'client_secret=<sts_client_secret>' \
    --data-urlencode 'token=<access_token>'
The wrap
This guide demonstrated how an externally issued JWT can be exchanged for a user access token issued by Verify. While this guide provided steps to generate the JWT using an IBM provided tool, you may use any mechanism to generate a JWT, including by running an OIDC flow to get an id_token that can then be used as the external JWT. This is a very common form of impersonation that is used in a disparate ecosystem of identity providers within and outside an organization.
You are encouraged to configure different token types to gain a deeper understanding of what is possible.
Vivek Shankar, IBM Security
Updated 7 months ago
