Developing an External Agent Web Service
Developing an External Agent Web Service
This article will guide you through the development of an external agent web service with express.js using a sample application as a template.
High level architecture
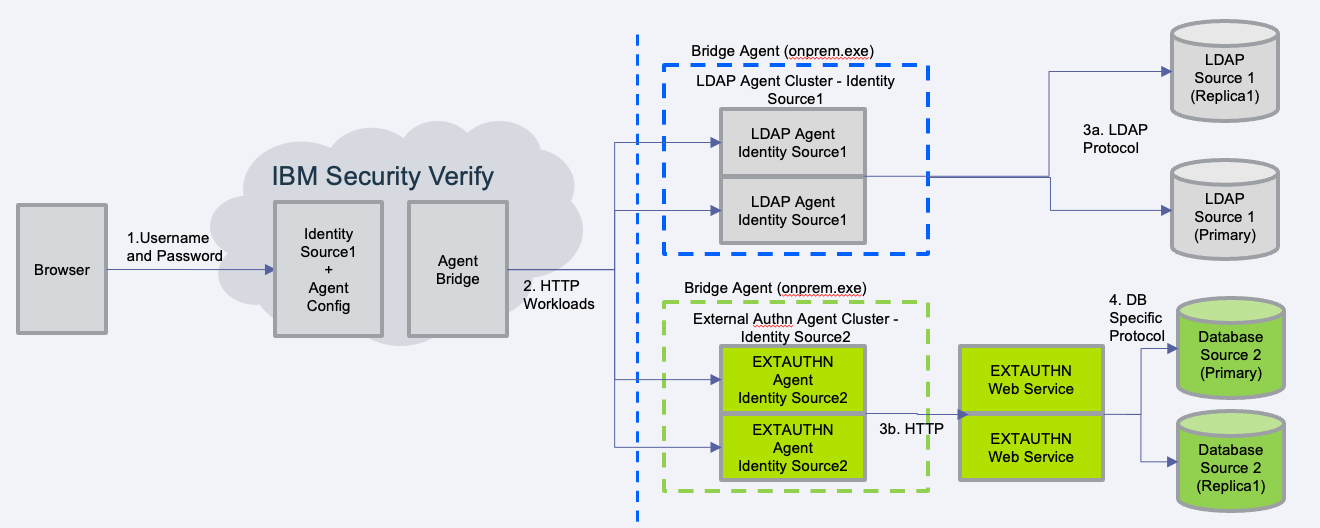
You will be developing the external agent web service (extauthn web service). Its function is to:
- Receive requests from the bridge agent
- Perform operations on your organization's identity source database via its own database specific protocol
- Respond to the bridge agent according to the API contracts
Read more about IBM Verify Bridge architecture.
The API contracts
Request Contract
Your external agent web service receives requests from the bridge agent. The following are details of the request contract:
| HTTP Attribute | Requirement | Description |
|---|---|---|
| METHOD | Mandatory | POST only |
| URL Path | Mandatory | /action |
| Content-Type | Mandatory | application/json |
| Accept | Mandatory | application/json |
| Authorization | See description | Required if On-Prem agent has been configured for Client Credentials granted Bearer token or Basic authentication |
| Request Payload Attribute | Requirement | Description |
|---|---|---|
| operation | Mandatory | One of password-verify, password-change |
| requestedAttributes | Optional for password-verify | Array of strings representing the preferred set of user attributes to be returned on successful verification responses. These attributes will be made available to IBM Verify for attribute mapping and JITP. |
| parameters | Mandatory | The parameters which are specific to the operation |
| parameters/username | Mandatory | The username or subject of the operation |
| parameters/password | Required for password-verify | The password to be validated |
| parameters/oldpassword | Optional for password-change | The users current password to be changed |
| parameters/newpassword | Required for password-change | The users new password |
| addressedTo | Mandatory for get-status | Label of the external auth service |
| id | Mandatory for get-status | Operation id |
HTTP REQUEST SAMPLE
POST  https://external.mod.com/action/
content-type: application/json
accept: application/json
authorization: Basic gobledeegoop
{
    "operation": "password-verify",
    "parameters": {
      "username": "scott",
      "password": "scott11111"
    },
    "requestedAttributes": ["cn", "mobile_number", "display_name"]
}
Response Contract
| Attribute | Requirement | Description |
|---|---|---|
| operation | Mandatory | The function or operation that was processed |
| status.result | Mandatory | The over job processing result status. Status codes are described below |
| status.message | Optional | Message about the status result |
| parameters | Optional | Optional but highly recommended object containing the parameters specific to the response operation. In the case of password-verify success response, this object should contain the users group membership and account attributes so that IBM Verify may perform JITP. |
| parameters/user | Optional | Object containing attributes of string arrays representing the users account attributes |
| parameters/user/ | Optional | Array of values associated with the users account attribute |
| parameters/groups | Optional | Array of strings representing the group names of which the user is a member |
| replyFrom | Mandatory for get-status | Label of external auth agent |
| id | Mandatory for get-status | Operation id of the get-status operation (echo'd back from request) |
| connection | Mandatory for get-status | Should be OK for good connection on get-status request |
Status codes include the following:
| Value | HTTP Status Code | Description |
|---|---|---|
| SUCCESS | 200 | Operation processing was successful |
| ERROR | 200 | Generic error or failure |
| USER_NOT_FOUND | 200 | User not found in target data store |
| USER_ACCOUNT_LOCKED | 200 | Users account is locked |
| INVALID_PARAMETERS | 200 | Parameter data was incorrect or missing |
| UNAVAILABLE | 200 | Something associated with the target system is unavailable |
| PASSWORD_EXPIRED | 200 | The user's password has expired and must be reset |
| PASSWORD_MUST_BE_CHANGED | 200 | The user's password must be changed (can occur after a password reset) |
| PASSWORD_CHANGE_FAILED | 200 | Unable to change the users password (generic failure) |
| PASSWORD_QUALITY | 200 | Unable to change the users password because it does not meet required quality (EG length) |
| ACCOUNT_RESTRICTION | 200 | Account is not usable at this time or place |
HTTP RESPONSE SAMPLE
HTTP/1.1 200 OK
content-type: application/json
{
    "operation": "password-verify",
    "status": {
        "result": "SUCCESS"
    },
    "parameters": {
        "groups": [
            {
                "name": "developer",
                "id": "608000GTNH"
            },
            {
                "name": "admin",
                "id": "608000GTNF"
            }
        ],
        "user": {
            "cn": [
                "Scott Admin"
            ],
            "mobile_number": [
                "111-222-3333"
            ],
            "displayName": [
                "Scott"
            ]
        }
    }
}
Some operations may not generate a HTTP RESPONSE BODY, and in that case a 204 is acceptable instead of a 200 (with content-length: 0).
get-status operation
The following are examples of the request/response for the get-status operation
Request
{
    "addressedTo": "extauthn",
    "id": "0",
    "operation": "get-status"
}
Response
{
    "replyFrom": "extauthn",
    "status": {
        "result": "SUCCESS"
    },
    "id": "0",
    "operation": "get-status",
    "connection": "OK"
}
Take a look at the provided sample application to see how the API contracts can be implemented.
Authentication
Before processing the above requests, your web service should confirm the identity of the bridge agent in order to protect your web service from unauthorized use. The bridge agent will identify itself to your web service via one of the following authentication flows:
| Method | Description |
|---|---|
| Basic Auth | Each request from the bridge agent sends a base64 encoded username:password in the request header to your web service. If the username:password is recognized by your web service the request can proceed. |
| MTLS | The bridge agent presents a client certificate to your web service. If that client certificate is recognized by your web service as being signed by a trusted CA your web service will allow the connection. MTLS can be used alone or in conjunction with Basic Auth or OAuth. |
| Symmetric Signed JWT | Both the bridge agent and your web service have a secret key. The bridge agent creates a JWT (JSON Web Token) and signs it with the secret key. The same secret key is then used by your web service to verify the JWT. |
| Asymmetric Signed JWT | The bridge agent signs a JWT (JSON Web Token) with a private key. Your web service can verify the validity of this JWT using a corresponding public key/certificate. |
| OAuth Client Credentials | The bridge agent completes a client credentials OAuth flow with some OAuth Authorization server. The OAuth server presents the bridge agent with an access token. The access token is then sent as a header to your web service. This token is then sent by your web service to the OAuth authorization server's introspect endpoint. If the token is valid then the request is authorized. |
The provided sample application demonstrates a working implementation of each of these authentication flows. By default the sample application uses Basic Auth. See the section on enabling authentication flows in the sample application to use the other flows.
Using the provided Sample Application
A sample, reference implementation of an external agent web service is supplied via GitHub repository. The Sample Application demonstrates how to:
- Implement the API contracts
- Authenticate with the sample application
Note: Although the the sample application is designed to handle requests from the bridge agent, you do not need to be running the bridge agent while developing/testing the sample application. Instead you can make use of the provided CURL scripts to simulate the requests from the bridge agent. See using the sample application as an IBM Verify identity source when you are ready to test against a live IBM Verify instance.
Download and run the sample application
To download and run the sample application, clone the repository:
git clone [email protected]:IBM-Security/Verify-Bridge-Authentication-Sample-App.git
This will create a directory called Verify-Bridge-Authentication-Sample-App/. The directory contains two subdirectories:
sample-application/- housing the sample applicationtests/- housing the CURL tests
Change directory into the sample-application/ directory and run npm install to install the requisite packages.
cd Verify-Bridge-Authentication-Sample-App/sample-application
npm install
Before you run your server you should set the environment variables and generate the required TLS certificates covered in the following sections.
Configuring the web service (environment variables)
The root of the sample-application directory contains a file called .env_example. Rename it to .env
# Web Server variables
PORT=8555
LOGGER_PREFIX='Extauthn Web Service'

# Authorization specific variables...
| Setting | Meaning |
|---|---|
| PORT | The port on which your https server will run |
| LOGGER_PREFIX | The prefix that appears before lines logged to the terminal |
You can leave the authentication specific variables on their defaults for now. See the section on authentication to learn more.
Generating the TLS certificates
The bridge agent will communicate with your external agent web service via https. You will need to generate the following certificates and their private keys:
| Certificate | Default name | Purpose |
|---|---|---|
| Root CA | extauthn.caroot.crt | This is the root CA certificate whose private key is used to sign the other certificates. It allows the bridge agent and your web service to know which certificates to trust. This certificate should be provided to the bridge agent during the IBM Verify identity agent setup and to your web service when using MTLS. |
| Server Certificate | extauthn.agent.crt | This certificate is signed by the root ca's private key (extauthn.caroot.key) and is presented BY your web service TO the bridge agent during the TLS handshake. |
| Client Certificate | extauthn.client.crt | This certificate is used during MTLS, is signed by the root CA's private key (extauthn.caroot.key) and is presented BY the bridge agent TO your web service during the TLS handshake as a means of authenticating the bridge agent. |
Before generating the certificates for the example application rename the certs/.env_example file to .env. Open the file, you should see something like the following:
# TLS generation variables
BRIDGE_AGENT_IP=
BRIDGE_AGENT_DNS=

WEB_SERVER_IP=
WEB_SERVER_DNS=

COUNTRY='AU'
STATE='Queensland'
LOCATION='Gold Coast'
ORGANIZATION='My Company'
By default running the certs.sh script will generate certificates that work only on the local machine (127.0.0.1). This is fine if you intend on running both the bridge agent and web service on the local machine. However if you plan on running the bridge agent (or the CURL tests simulating it) and web service on different machines you should set the values for the BRIDGE_AGENT_IP and WEB_SERVER_IP to the IP addresses of these machines. Or if you know their hostnames, set those accordingly.
BRIDGE_AGENT_IP='172.16.236.128'
BRIDGE_AGENT_DNS=bridge_agent.myhost

WEB_SERVER_IP='172.16.236.1'
WEB_SERVER_DNS=extauthn_webserver.myhost
Generate the required TLS certificates by running the cert.sh script in the certs/ directory.
Run
chmod +x certs.sh
./certs.sh
Your certs/ directory should now contain the following files:
drwxr-xr-x user group 768 B  Thu Oct 13 21:50:57 2022 .
drwxr-xr-x user group 416 B  Thu Oct 13 18:56:08 2022 ..
.rw-r--r-- user group 223 B  Thu Oct 13 21:41:51 2022 .env
.rw-r--r-- user group  41 B  Thu Oct 13 21:28:15 2022 .gitignore
.rw-r--r-- user group 180 B  Thu Oct 13 21:50:57 2022 cert.extauthn.agent.conf
.rw-r--r-- user group 261 B  Thu Oct 13 21:50:57 2022 cert.extauthn.client.conf
.rwxr-xr-x user group 3.8 KB Thu Oct 13 21:41:00 2022 certs.sh
.rwxr-xr-x user group 130 B  Thu Oct 13 19:33:59 2022 cleanup.sh
.rw-r--r-- user group 307 B  Thu Oct 13 21:50:56 2022 csr.extauthn.agent.conf
.rw-r--r-- user group 310 B  Thu Oct 13 21:50:57 2022 csr.extauthn.client.conf
.rw-r--r-- user group 1.3 KB Thu Oct 13 21:50:57 2022 extauthn.agent.crt
.rw-r--r-- user group 1.0 KB Thu Oct 13 21:50:56 2022 extauthn.agent.csr
.rw-r--r-- user group 1.6 KB Thu Oct 13 21:50:56 2022 extauthn.agent.key
.rw-r--r-- user group 2.5 KB Thu Oct 13 21:50:57 2022 extauthn.agent.p12
.rw-r--r-- user group 1.1 KB Thu Oct 13 21:50:56 2022 extauthn.caroot.crt
.rw-r--r-- user group 1.7 KB Thu Oct 13 21:50:56 2022 extauthn.caroot.key
.rw-r--r-- user group 1.3 KB Thu Oct 13 21:50:57 2022 extauthn.client.crt
.rw-r--r-- user group 1.0 KB Thu Oct 13 21:50:57 2022 extauthn.client.csr
.rw-r--r-- user group 1.6 KB Thu Oct 13 21:50:57 2022 extauthn.client.key
.rw-r--r-- user group 2.5 KB Thu Oct 13 21:50:57 2022 extauthn.client.p12
.rw-r--r-- user group  17 B  Thu Oct 13 21:50:57 2022 extauthn.srl
.rw-r--r-- user group 130 B  Thu Oct 13 21:50:56 2022 ssl.cfg
IMPORTANT NOTE
The certificates generated are for testing the sample application web service and shouldn't be used in your production environment. When you are ready to deploy, make sure you use your organization's own certificates or have them generated for use with the external agent web service accordingly.
Running the sample application
Ensure that you have configured the web service and created the TLS certificates then run the server by typing
npm start
If you see the following output your server is running correctly.
HTTPS Listening on port 8555
The application is running with nodemon which means any changes you make to the application will automatically restart the server.
You can test application using the provided CURL tests to ensure that the application conforms to the API contracts.
If you would like to use the sample application as an identity source for your live IBM Verify tenant and see it working in real time you will need to:
Testing your web service with CURL requests
Once you have your web service running, you can test that it conforms to the API contracts by using the CURL command to manually hit the /action endpoint. To assist with this we have provided various scripts for testing each of the operations.
Open the tests/curl/ directory, you should see the following subdirectories each corresponding to a different authentication method:
BasicAuth/BasicAuthOverMTLS/MTLS/
Inside of these directories are the following bash scripts:
| Script | Operation |
|---|---|
get-status.sh | Send the web service a get-status operation |
password-verify.sh | Sends the web service a password-verify operation |
password-change.sh | Sends the web service password-change operation |
invalid-operation | Send the web service an unknown operation.sh value |
unauthorized.sh | Sends the web service a valid password-verify operation by has without the correct authorization |
Before running these scripts open the tests/.env_example file and rename it to .env. Make sure you set the host and port of your web service as well as the certificate details. By default these details will work with the sample application, tweak them as appropriate.
# Path to certificates directory
CERT_PATH='../../../sample-application/certs/'
CA_CERT_NAME='extauthn.caroot.crt'

# Extauthn server info
EXTAUTHN_SERVER_HOST=localhost
EXTAUTHN_SERVER_PORT=8555

# Basic Auth info
BASIC_AUTH_USERNAME=admin
BASIC_AUTH_PASSWORD=passw0rd
INVALID_BASIC_AUTH_USERNAME=jerry
INVALID_BASIC_AUTH_PASSWORD=abcdef

# Client Cert and Key for mtls
CLIENT_CERT_NAME='extauthn.client.crt'
CLIENT_CERT_KEY='extauthn.client.key'
EXTAUTHN_SERVER_HOST and EXTAUTHN_SERVER_PORT refer to the hostname and port where your web service is running.
The CERT_PATH simply points to the location of the certs/ directory relative to the locations of the tests scripts.
Running the CURL scripts
Before running the tests make sure the appropriate authentication middleware is enabled. The default middleware is basic authentication so you would run the tests in the tests/curl/BasicAuth/ directory.
To run any of the bash tests simply run the corresponding script, for instance password-verify:
chmod +x password-verify.sh
./password-verify.sh
You'll see output that looks like the following
HTTP/1.1 200 OK
X-Powered-By: Express
Content-Type: application/json; charset=utf-8
Content-Length: 248
ETag: W/"f8-bDOG/ZHdodpQnYcCaI1Xhpf/Wgc"
Date: Mon, 10 Oct 2022 12:32:21 GMT
Connection: keep-alive
Keep-Alive: timeout=5

{"operation":"password-verify","status":{"result":"SUCCESS"},"parameters":{"groups":[{"name":"developer","id":"608000GTNH"},{"name":"admin","id":"608000GTNF"}],"user":{"cn":["Scott Admin"],"mobile_number":["111-222-3333"],"displayName":["Scott"]}}}%
As you develop your application, tweak the contents of the bash script to produce the desired results. For instance to see the result of a request for a user not in the data source modify the password-verify.sh request to ask for a user that doesn't exist, in this example we ask for frankie
--data-raw '{
    "operation": "password-verify",
    "parameters": {
      "username": "frankie",
      "password": "scott11111"
    },
    "requestedAttributes": ["cn", "mobile_number", "displayName"]
}'
You'll see the following response
HTTP/1.1 200 OK
X-Powered-By: Express
Content-Type: application/json; charset=utf-8
Content-Length: 110
ETag: W/"6e-AX+whB1hU5sA52YZ3uvRBOccdL4"
Date: Mon, 10 Oct 2022 12:34:57 GMT
Connection: keep-alive
Keep-Alive: timeout=5

{"operation":"password-verify","status":{"result":"USER_NOT_FOUND","message":"User not found in data source"}}%
Demonstrating correct handling of USER_NOT_FOUND as specified in the API contracts.
Using the sample application with IBM Verify
If you would like to use the sample application as an identity source for your IBM Verify tenant you will need to do the following:
1. Creating your Identity Agent on IBM Verify
To use the provided sample application as an identity source on IBM Verify you must create an identity source on IBM Verify. By default the sample application will use basic authentication. For other authentication types see the authentication section.
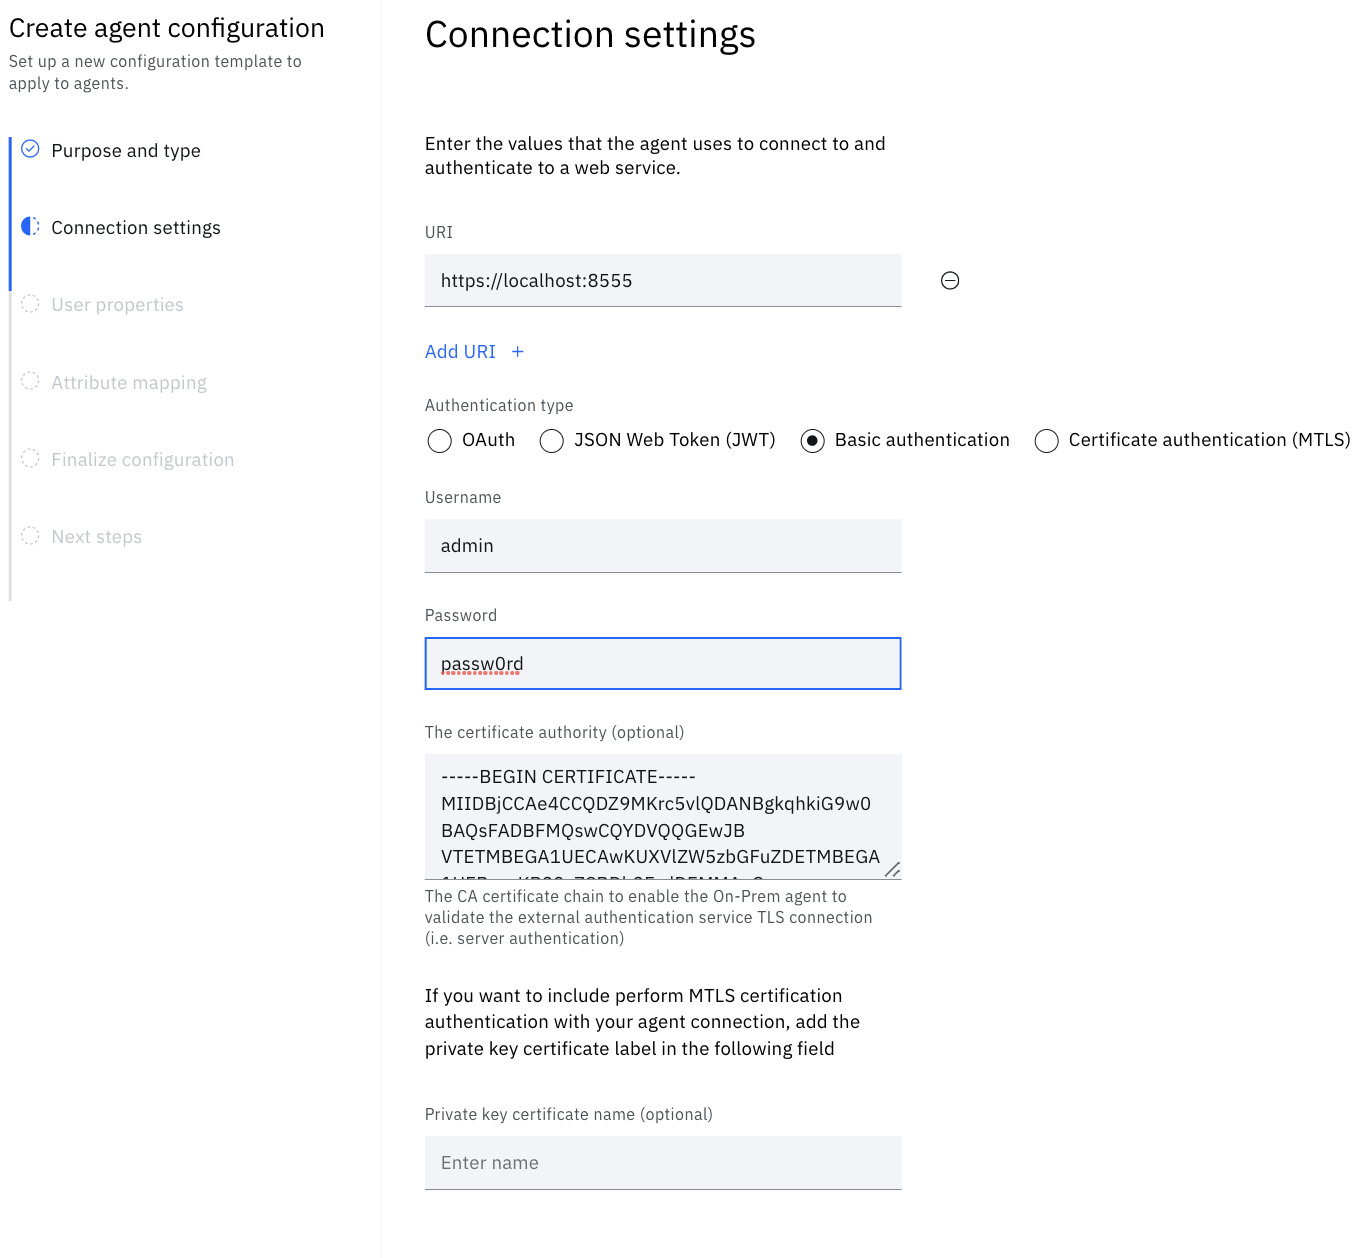
The sample application using basic authentication will require the following settings:
| Setting | Value | Explanation |
|---|---|---|
| URI | https://localhost:8555 | This is the location that the bridge agent will look for your running web service. If you are running the web service on the same machine use localhost otherwise set the hostname and port appropriately. |
| Authentication Type | Basic authentication | Tells the bridge agent to authenticate with the web service using Basic Auth |
| Username | admin | Basic auth username |
| Password | passw0rd | Basic auth Password |
| The certificate authority | Copy the text inside the extauthn.caroot.crt file you created when you created the tls certificates | The CA cert certificate whose private key was used sign the other certificates. This tells tells the bridge agent to trust TLS certificates presented to it by the web service. |
| Private key certificate name | Leave this blank. If you would like to use MTLS in addition to Basic Auth refer to the MTLS section for setting this value | |
| Attributes | displayName, givenName, mobile_number | The attributes that should be requested for JITP provisioning. Set this to displayName, givenName, mobile_number. |
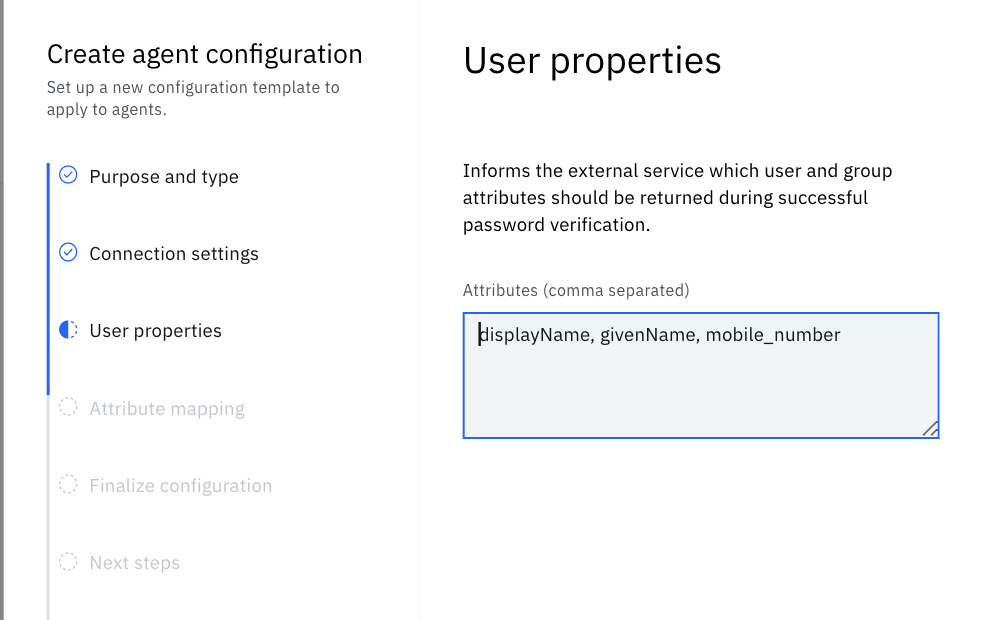
Attributes
For attributes, enter displayName, givenName, mobile_number. This is the list of attributes that we'd like the bridge agent to request from the web service and is returned upon a successful password-verify request. These attributes and values are then made available for attribute mapping to IBM Verify cloud directory account attributes during Just-In-Time Provisioning (JITP). See the example data source sample-application/data_source/data_source.js file to see what attributes can be requested from the sample application.
During development of an external agent web service the IBM Verify administrator who performs this Identity Agent configuration step will need to consult with the web service developer to find out what attributes the web service has access to and can return upon a successful password-verify request.
Set the attribute mappings
mobile_number->mobile_number
givenName->given_name

Name your agent and identity source and hit Save and continue to create your sample application identity agent.
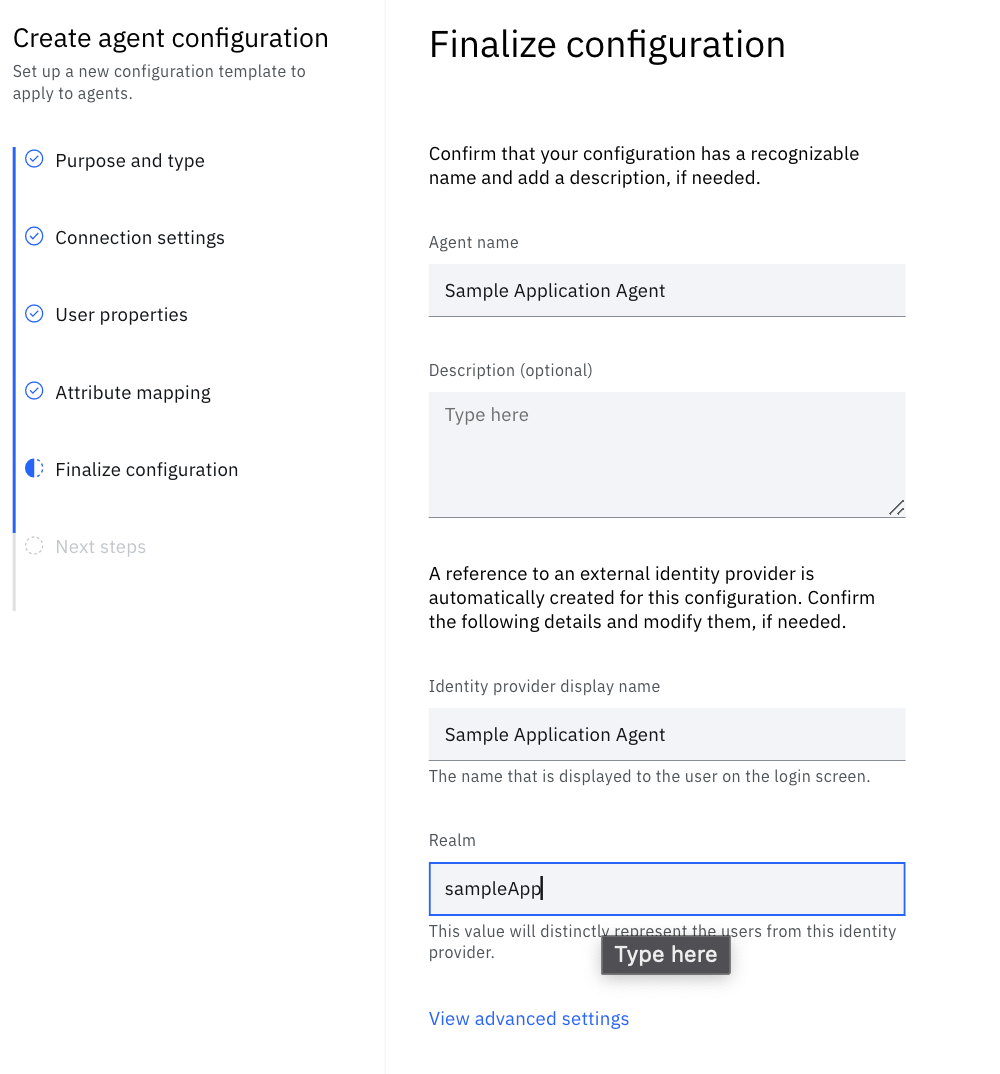
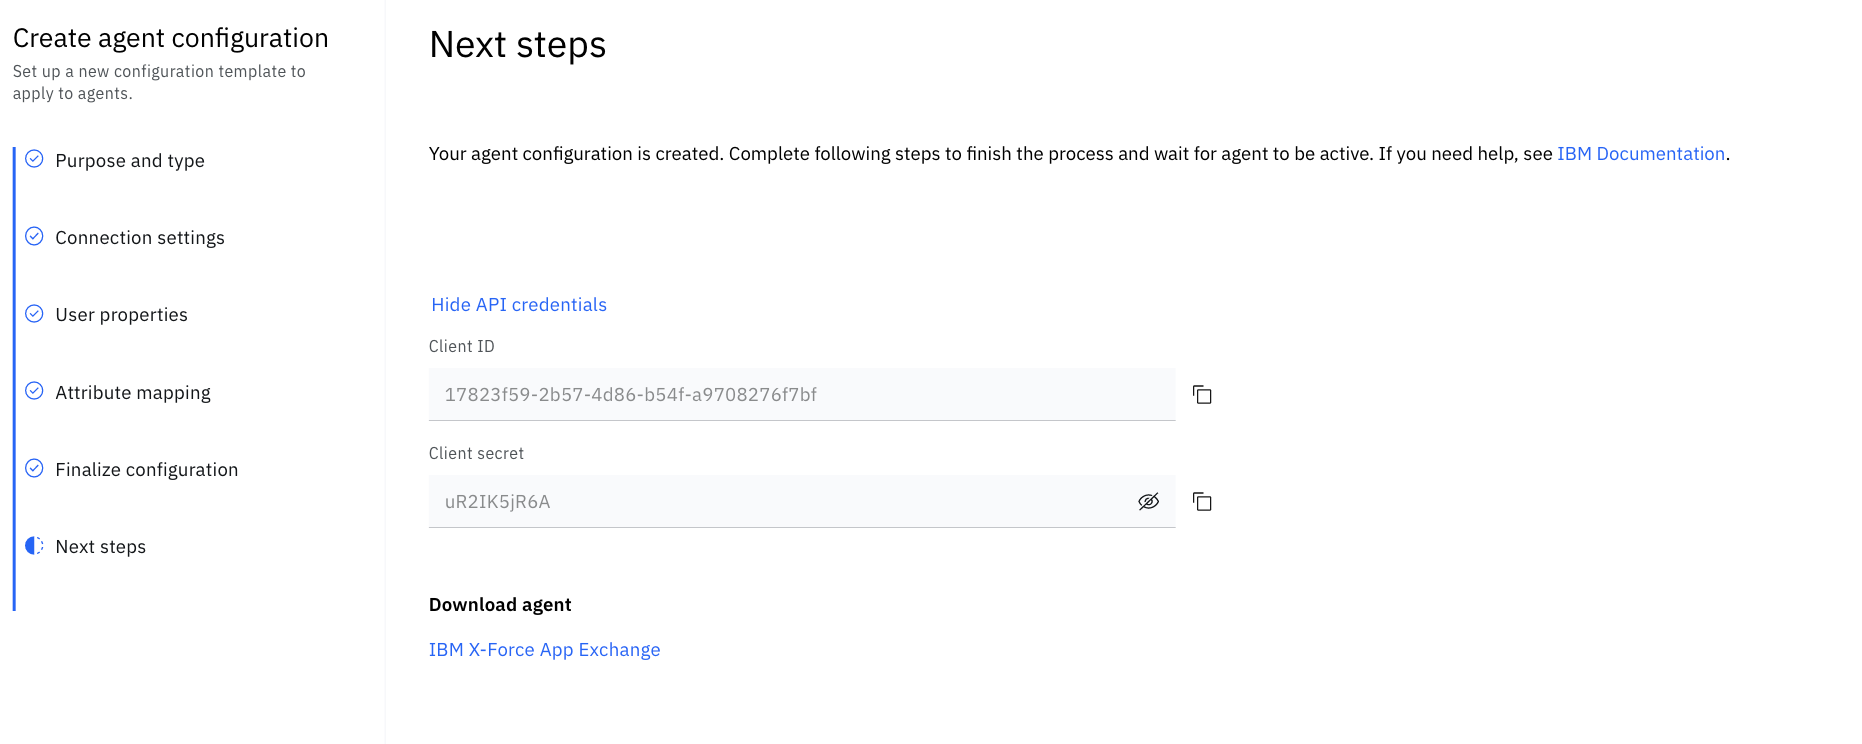
Finally you'll be presented with the API credentials that your bridge agent will require. Download the bridge agent from the X-Force App Exchange and use the credentials supplied to during this step when installing and running the bridge agent.
2. Installing and running the Bridge Agent on Windows
Download the bridge agent from the X-Force App Exchange and run the installer and following the prompts.
After installing you'll be presented with the Tenant Configuration screen pictured below
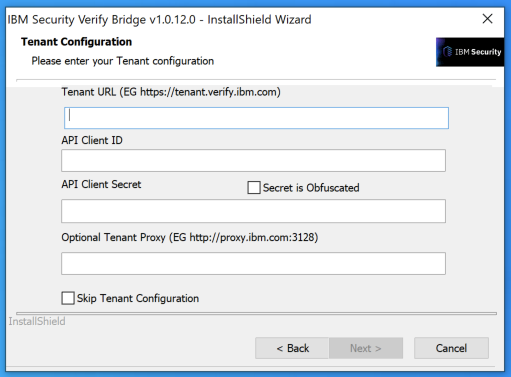
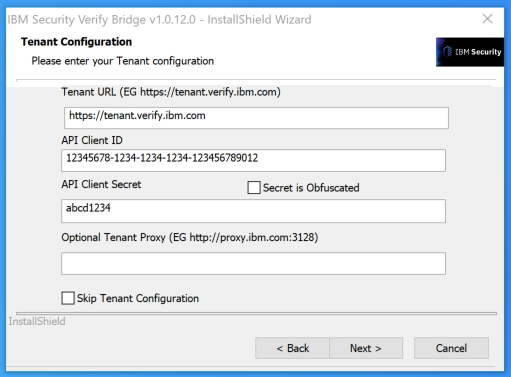
Enter the Client ID and Client Secret you received when creating the Identity Agent.
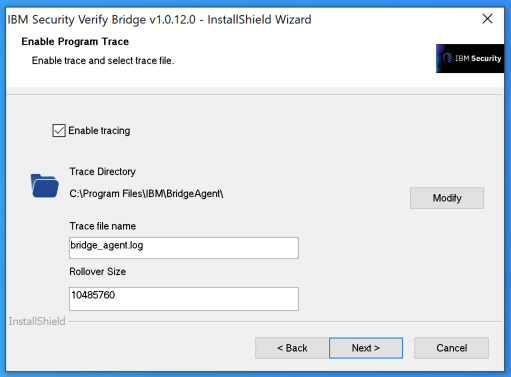
Check the box to enable tracing and take note of the Trace file name (default bridge_agent.log).
The bridge agent should now be running as service. If you would like to see the bridge agent's console output open powershell and type the following command, substituting in the filepath of the logfile you created while setting up the bridge agent:
Get-Content 'C:\Program Files\IBM\BridgeAgent\bridge_agent.log' -Tail 50 -Wait
The bridge agent log may be able to help you to troubleshoot and issues you have.
Restarting or Restarting the Bridge Agent
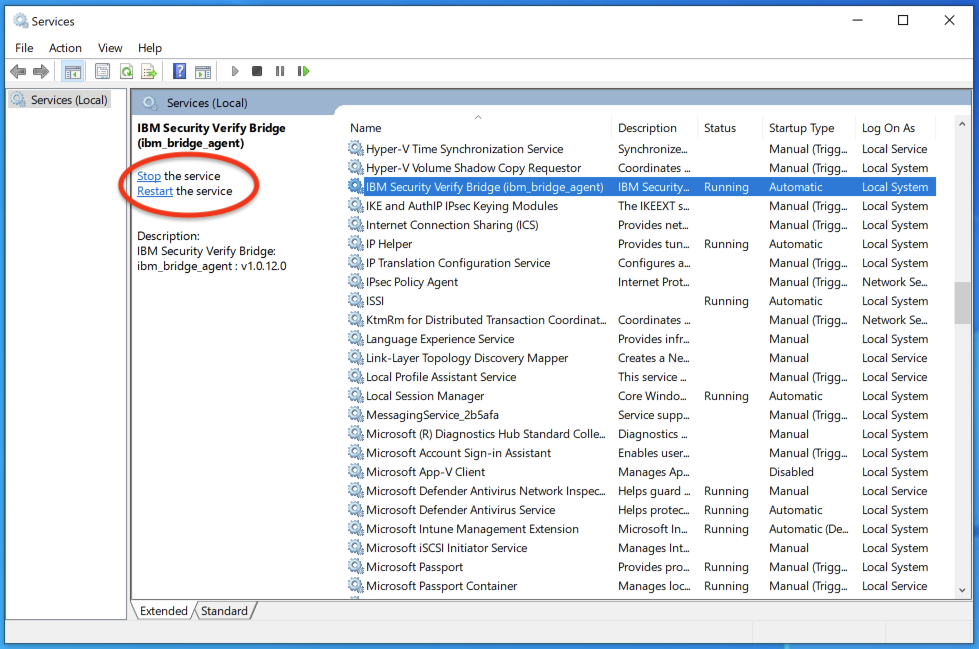
You may find that you want to stop or restart the bridge agent service. To do this on your windows machine press Win+R and type services.msc
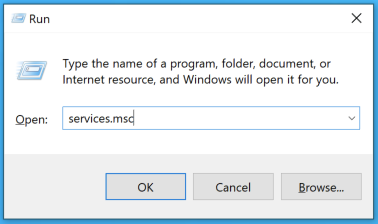
In the following screen select the service named IBM Verify Bridge (ibm_bridge_agent) and click stop or restart to stop or restart the bridge agent.
Successful Authentication
Once running, the bridge agent will connect to IBM Verify and retrieve the configuration you created while setting up the identity agent. The bridge agent will then attempt attempt to connect to one of the URIs specified for your web service in the Identity Agent configuration.
You should see the sample application log to its console something like the following:
Extauthn Web Service | HTTPS Listening on port   8555
Extauthn Web Service |
Request headers received:
Extauthn Web Service | {"host":"172.16.236.1:8555","user-agent":"Go-http-client/1.1","transfer-encoding":"chunked","accept":"application/json","authorization":"Basic YWRtaW46cGFzc3cwcmQ=","content-type":"application/json","accept-encoding":"gzip"}
Extauthn Web Service | Attempting Basic Authentication
Extauthn Web Service | Basic Auth: {"name":"admin","pass":"passw0rd"}
Extauthn Web Service | Basic auth successful
Extauthn Web Service | Request body:
Extauthn Web Service | {"addressedTo":"extauthn","id":"0","operation":"get-status"}
Extauthn Web Service | Replied:
Extauthn Web Service | {"replyFrom":"extauthn","status":{"result":"SUCCESS"},"id":"0","operation":"get-status","connection":"OK"}
Congratulations the bridge agent is successfully authenticating with your web service using basic authentication over TLS. You can now log into your IBM Verify tenant using the credentials in the data_source/data_source.json file.
Logging in to IBM Verify using the sample application as the identity source
With the bridge agent successfully authenticating with the web service you should now to able to login to IBM Verify using the credentials specified in the mock data source (data_source/data_source.json).
Select the identity source you created:
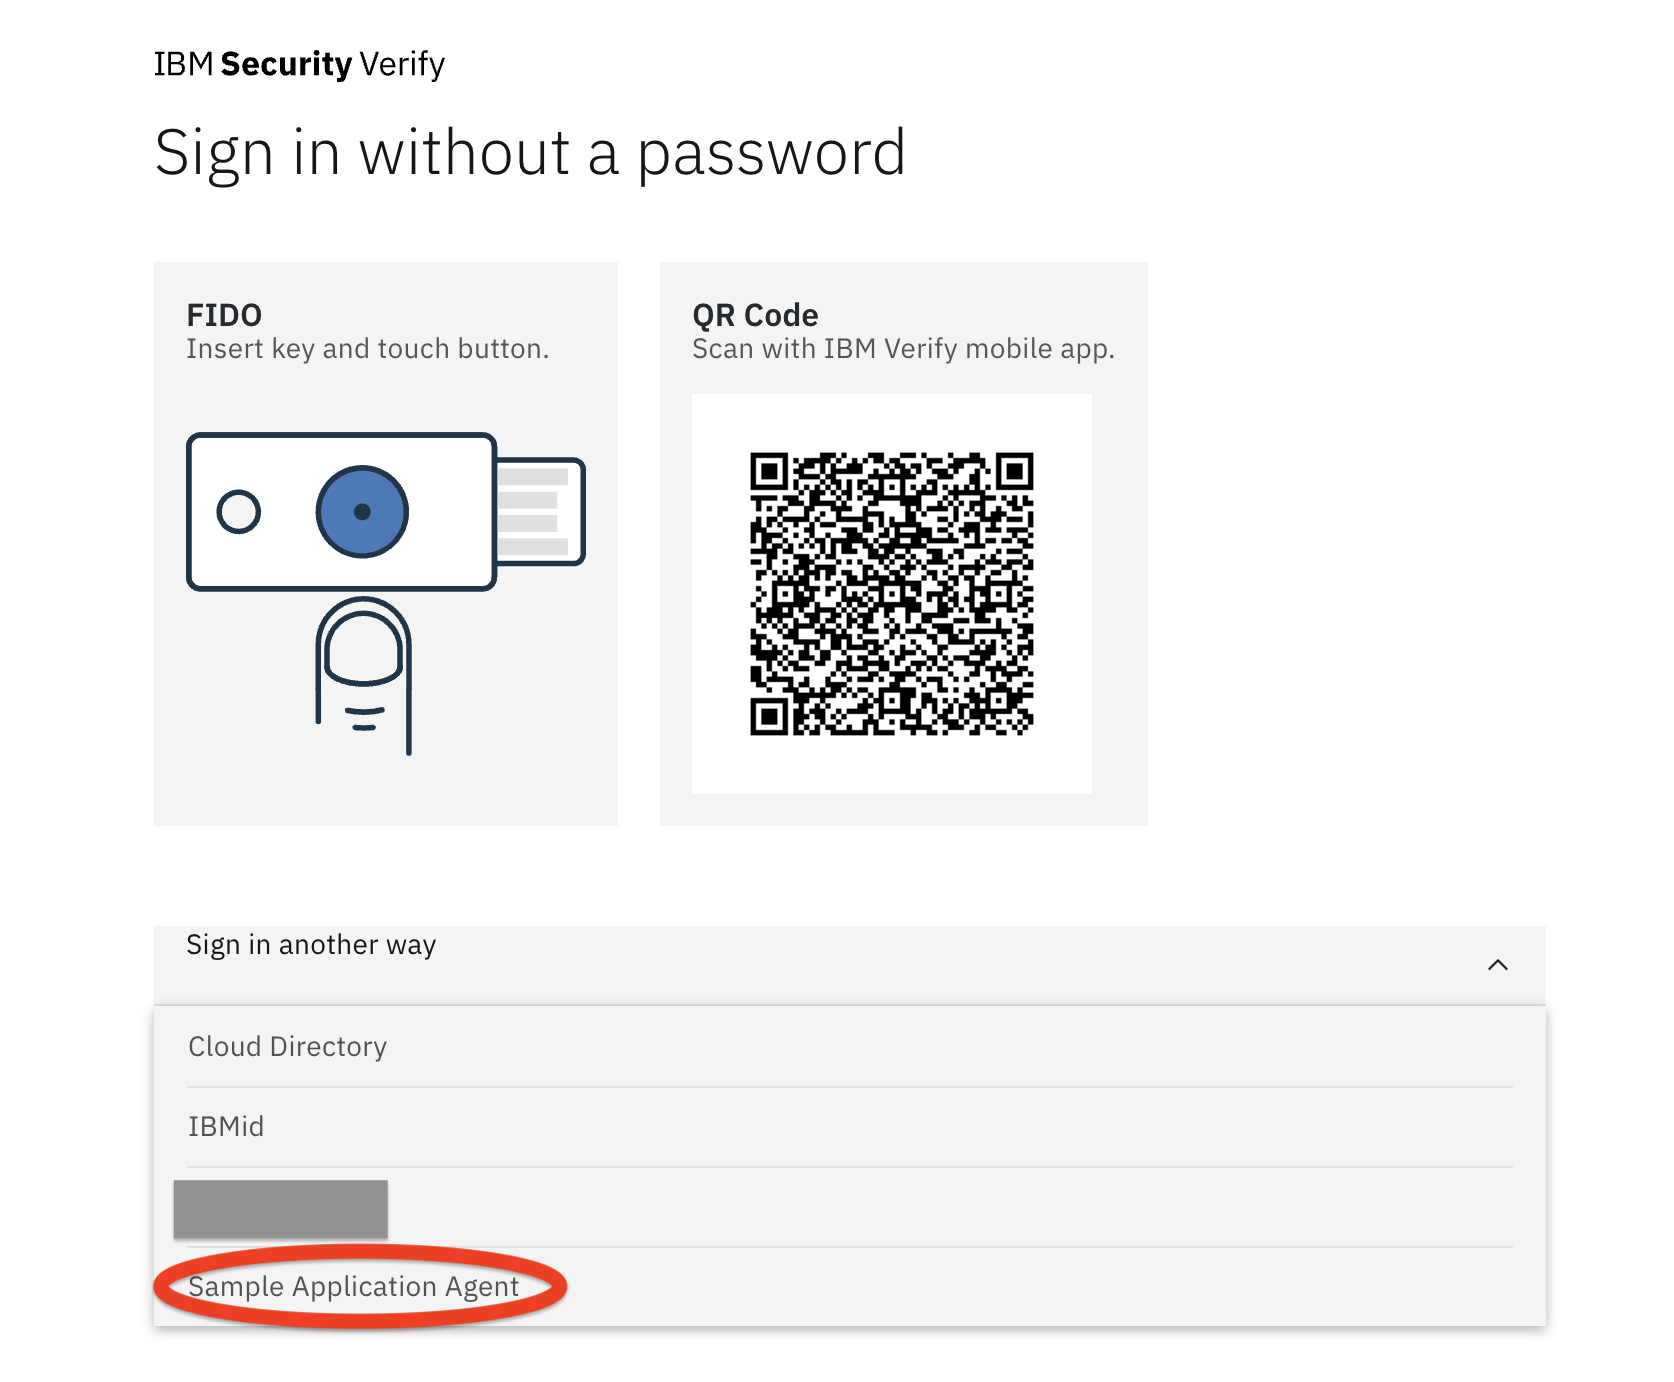
Type the credentials from the data_source/data_source.json file:
username: scott
password: scott11111
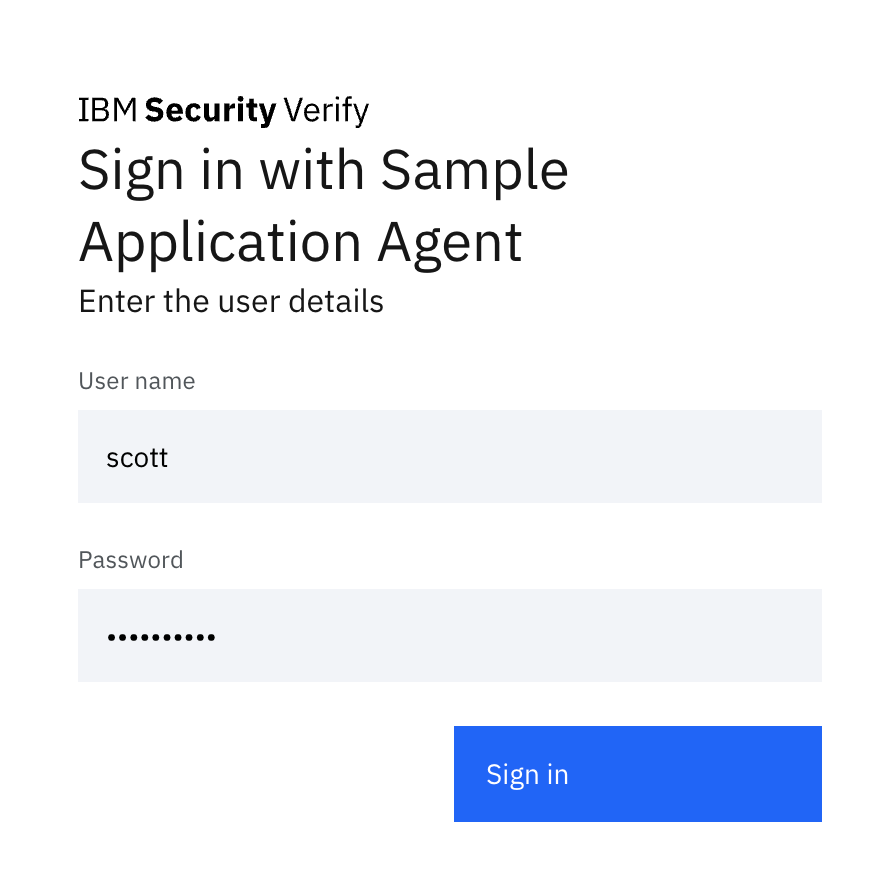
Your sample application should output the following to its console
Request headers received:
Extauthn Web Service | {"host":"172.16.236.1:8555","user-agent":"Go-http-client/1.1","transfer-encoding":"chunked","accept":"application/json","authorization":"Basic YWRtaW46cGFzc3cwcmQ=","content-type":"application/json","accept-encoding":"gzip"}
Extauthn Web Service | Attempting Basic Authentication
Extauthn Web Service | Basic Auth: {"name":"admin","pass":"passw0rd"}
Extauthn Web Service | Basic auth successful
Extauthn Web Service | Request body:
Extauthn Web Service | {"enqueuedTime":"2022-10-14 01:52:08.192","operation":"password-verify","parameters":{"password":"scott11111","username":"scott"},"requestedAttributes":["displayName","givenName","SN"]}
Extauthn Web Service | Replied
Extauthn Web Service | {"operation":"password-verify","status":{"result":"SUCCESS"},"parameters":{"groups":[{"name":"developer","id":"608000GTNH"},{"name":"admin","id":"608000GTNF"}],"user":{"displayName":["Scott"],"givenName":["Scott"],"SN":["Admin"]}}}
You should now be successfully logged into IBM Verify as scott.
Enabling authentication flows in the sample application
The sample application supports the following authentication methods:
MTLS can also be used in conjunction with Basic Auth and OAuth see enabling MTLS with these flows.
Basic Authentication
Basic Authentication expects an authorization header to be sent to the web service in the format Basic username:password where username:password is base64 encoded. For example a request header for the username:password credentials of admin:passw0rd would look like the following:
"authorization":"Basic YWRtaW46cGFzc3cwcmQ="
Enabling Basic Authentication in the Sample Application
To enable basic authentication in your sample application open server.js and make make sure that the basicAuthen middleware is uncommented
// Authentication (uncomment desired)
app.use(basicAuthen);                       // Basic Auth
// app.use(mtls);                              // MTLS
// app.use(symmetricJwt);                      // Symmetric signed JWT
// app.use(asymmetricJwt);                     // Asymmetric signed JWT
Setting the .env variables for Basic Authentication
Open .env at the root of your project directory and set the expected username and password. This is the username and password your server will expect to see in the authorization header. You can leave these values as is.
# Basic Auth Variables
BASIC_AUTH_USERNAME=admin
BASIC_AUTH_PASSWORD=passw0rd
IDENTITY AGENT CONFIG FOR BASIC AUTH
In the Identity Agent UI configure you basic auth
| Setting | Sample Application Value | Explanation |
|---|---|---|
| Username | admin | Basic auth username |
| Password | passw0rd | Basic auth Password |
| The certificate authority | Copy the text inside the extauthn.caroot.crt file you created when you created the tls certificates | The CA cert certificate whose private key was used sign the other certificates. This is how your web service knows to trust the certificate presented by your web service during the TLS hand shake |
| Private key certificate name | Leave this one blank for now. This can be set if you want to use MTLS in addition to Basic Auth. Refer to the MTLS section for more details |

MTLS Authentication
When using MTLS the bridge agent presents its client certificate to the web service. The web service checks to see if the certificate is trusted (signed by a trusted certificate authority). If the client certificate presented is trusted the web service will allow the request, otherwise the request will be denied.
Enabling MTLS in the Sample Application
To enable MTLS authentication in your sample application open server.js and make make sure that the mtls middleware is uncommented
// Authentication (uncomment desired)
// app.use(basicAuthen);                       // Basic Auth
app.use(mtls);                              // MTLS
// app.use(symmetricJwt);                      // Symmetric signed JWT
// app.use(asymmetricJwt);                     // Asymmetric signed JWT
To use MTLS make sure that your https server config includes
requestCert: true,
rejectUnauthorized: false,
For example
const httpsServerConfig = {
    key: fs.readFileSync(PATH_TO_KEY),
    cert: fs.readFileSync(PATH_TO_CRT),
    ca: fs.readFileSync(PATH_TO_CA),
    requestCert: true,
    rejectUnauthorized: false,
}
IDENTITY AGENT CONFIG FOR MTLS
Before configuring MTLS make sure that you import the client certificate and its associated private key onto the windows machine.
Importing the root certificate with Powershell
Start powershell as an administrator then type the following command substituting C:\extauthn.caroot.crt with the path of your extauthn.caroot.crt you created during your TLS certificate setup.
Import-Certificate -FilePath C:\extauthn.caroot.crt -CertStoreLocation Cert:\LocalMachine\root
Importing the client certificate and key with Powershell
Start powershell as an administrator then type the following command substituting C:\extauthn.client.p12 with the path of your extauthn.client.p12 you created during your TLS certificate setup.
Import-PfxCertificate -FilePath C:\extauthn.client.p12 -CertStoreLocation Cert:\LocalMachine\My
You should see see output like the following
   PSParentPath: Microsoft.PowerShell.Security\Certificate::LocalMachine\My

Thumbprint                                Subject
----------                                -------
8BEB4C0A77090F2BEDA49BCC0A57B03E8242540B  CN=extauthn.client, OU=MyUnit, O=MyOorg, S=QLD, C=AU
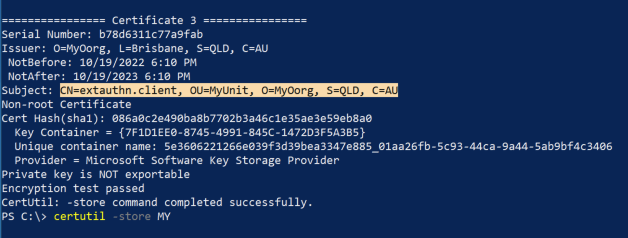
Copy the value under subject CN=extauthn.client, OU=MyUnit, O=MyOorg, S=QLD, C=AU, you will need this value when configuring your Identity Agent on IBM Verify.
IDENTITY AGENT SETTINGS FOR MTLS
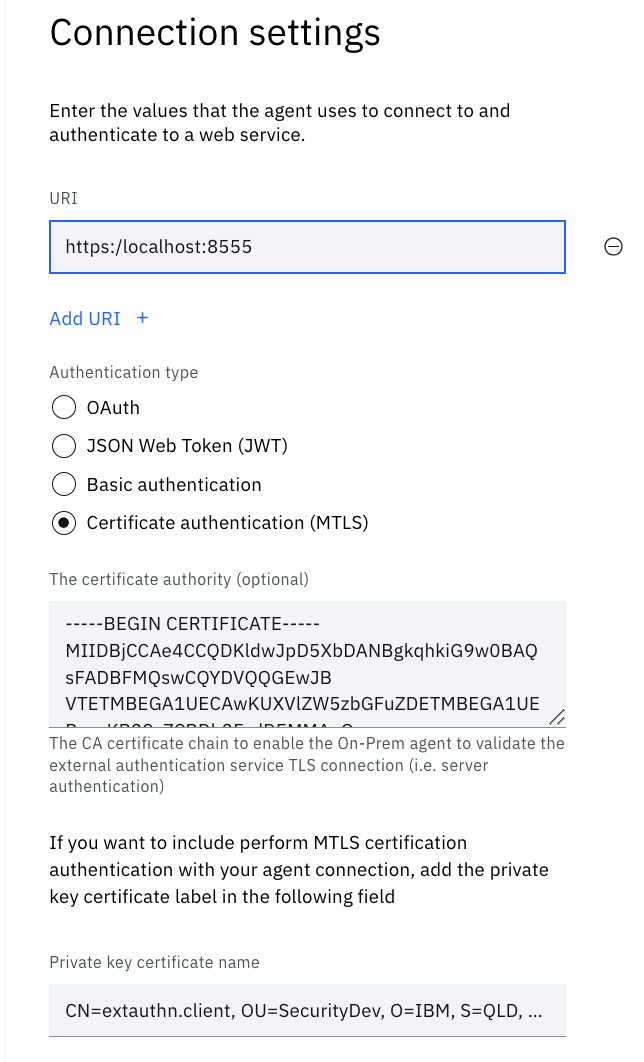
In the Identity Agent UI set the Authentication Type to MTLS and then set the following values:
| Setting | Value |
|---|---|
| The certificate authority | Copy the text inside the extauthn.caroot.crt file you created when you created the tls certificates |
| Private key certificate name | Enter the subject value that appeared after you imported your clicent certificate with powershell. Or type certutil -store MY to and copy the value for Subject. For example CN=extauthn.client, OU=MyUnit, O=MyOorg, S=QLD, C=AU |
Example of the Private Key Certificate Name
Using MTLS with Basic Auth or OAuth
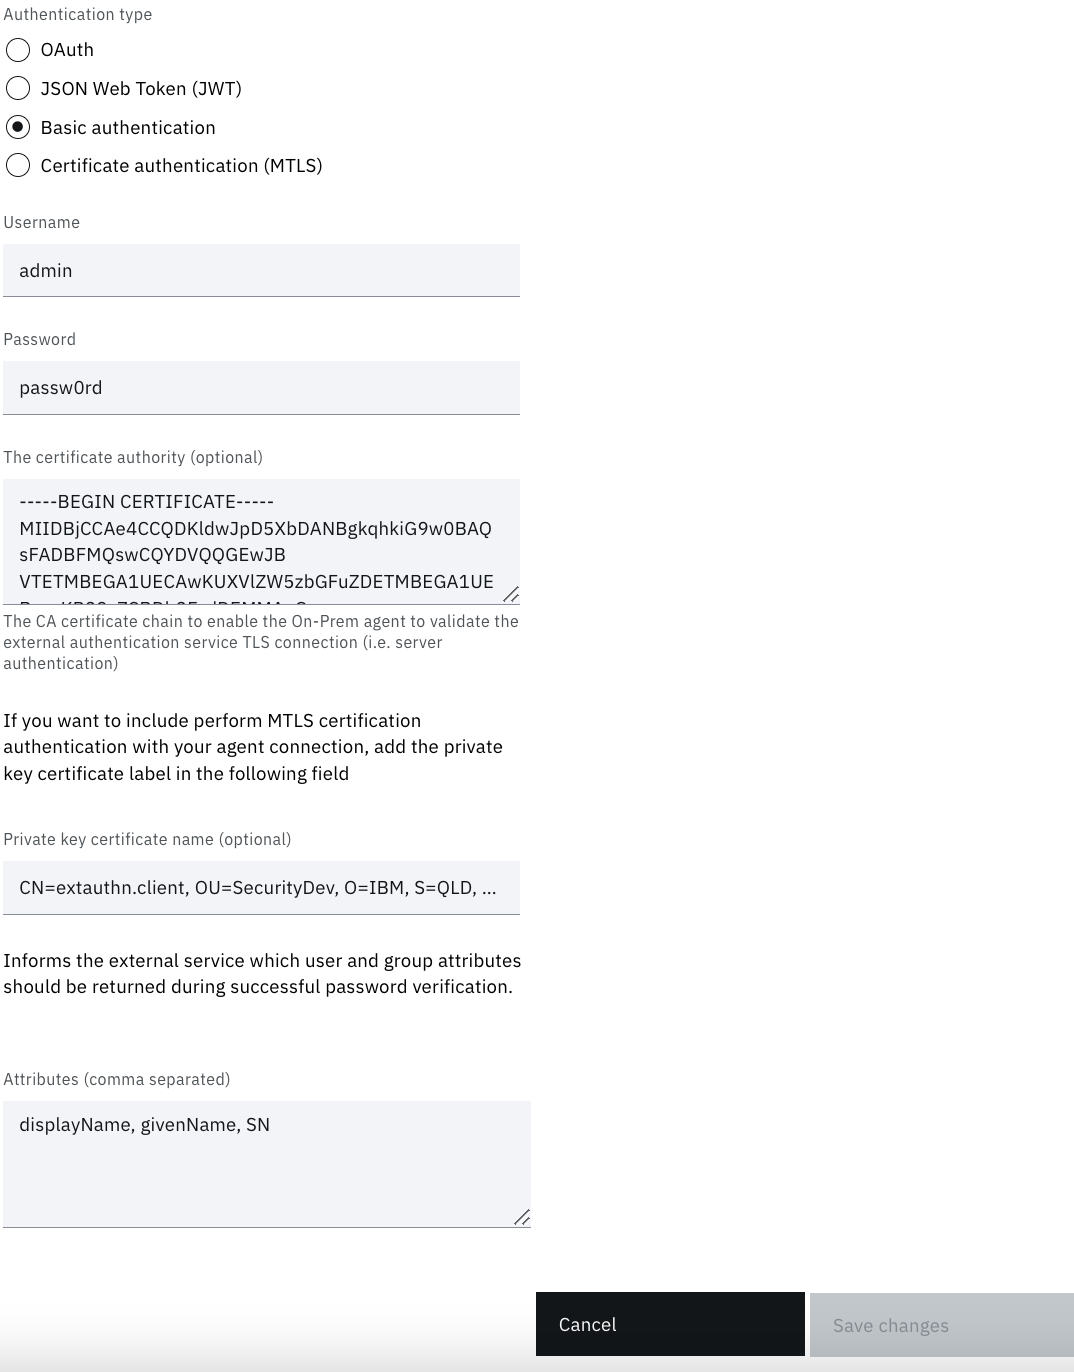
If you would like to use MTLS in addition to Basic Auth or OAuth, open the server.js file and uncomment both MTLS AND the other Auth type you'd like to use
// Authentication (uncomment desired)
app.use(basicAuthen);                       // Basic Auth
app.use(mtls);                              // MTLS
// app.use(symmetricJwt);                      // Symmetric signed JWT
// app.use(asymmetricJwt);                     // Asymmetric signed JWT
Then follow the steps above for importing the certificate on windows and setting the private key certificate name:
Signed JWT Authentication
Choosing JWT Authentication causes your the bridge agent to send a signed JSON Web Token (JWT) to your external agent web service.
Example header
{
  "host": "localhost:8555",
  "user-agent": "Go-http-client/1.1",
  "transfer-encoding": "chunked",
  "accept": "application/json",
  "authorization": "Bearer eyJhbGciOiJIUzI1NiIsInR5cCI6IkpXVCJ9.eyJleHAiOjE2NjUxMTAyMjcsImlzcyI6IkJyaWRnZUFnZW50Iiwic3ViIjoic3ViampqIn0.FYcDCwMdQA4Ibx17hPvrfrpnUAYe6sB_bTtfDI2PA2A",
  "content-type": "application/json",
  "accept-encoding": "gzip"
}
Enabling Symmetric Signed JWT Authentication in the Sample Application
Uncomment the symmetricJwt middleware
// Authentication (uncomment desired)
// app.use(basicAuthen);                       // Basic Auth
// app.use(mtls);                              // MTLS
app.use(symmetricJwt);                      // Symmetric signed JWT
// app.use(asymmetricJwt);                     // Asymmetric signed JWT
Setting the .env variables for Symmetric Signed JWT authentication
Open .env at the root of your project directory and set the expected secret key, subject and prefix of the signed JWT.
# Symmetric JWT variables
SYMMETRIC_JWT_SECRET_KEY=mySuperSecret
SYMMETRIC_JWT_SUBJECT=JwtAuth
SYMMETRIC_JWT_PREFIX='Bearer '
IDENTITY AGENT CONFIG FOR SYMMETRIC SIGNED JWT
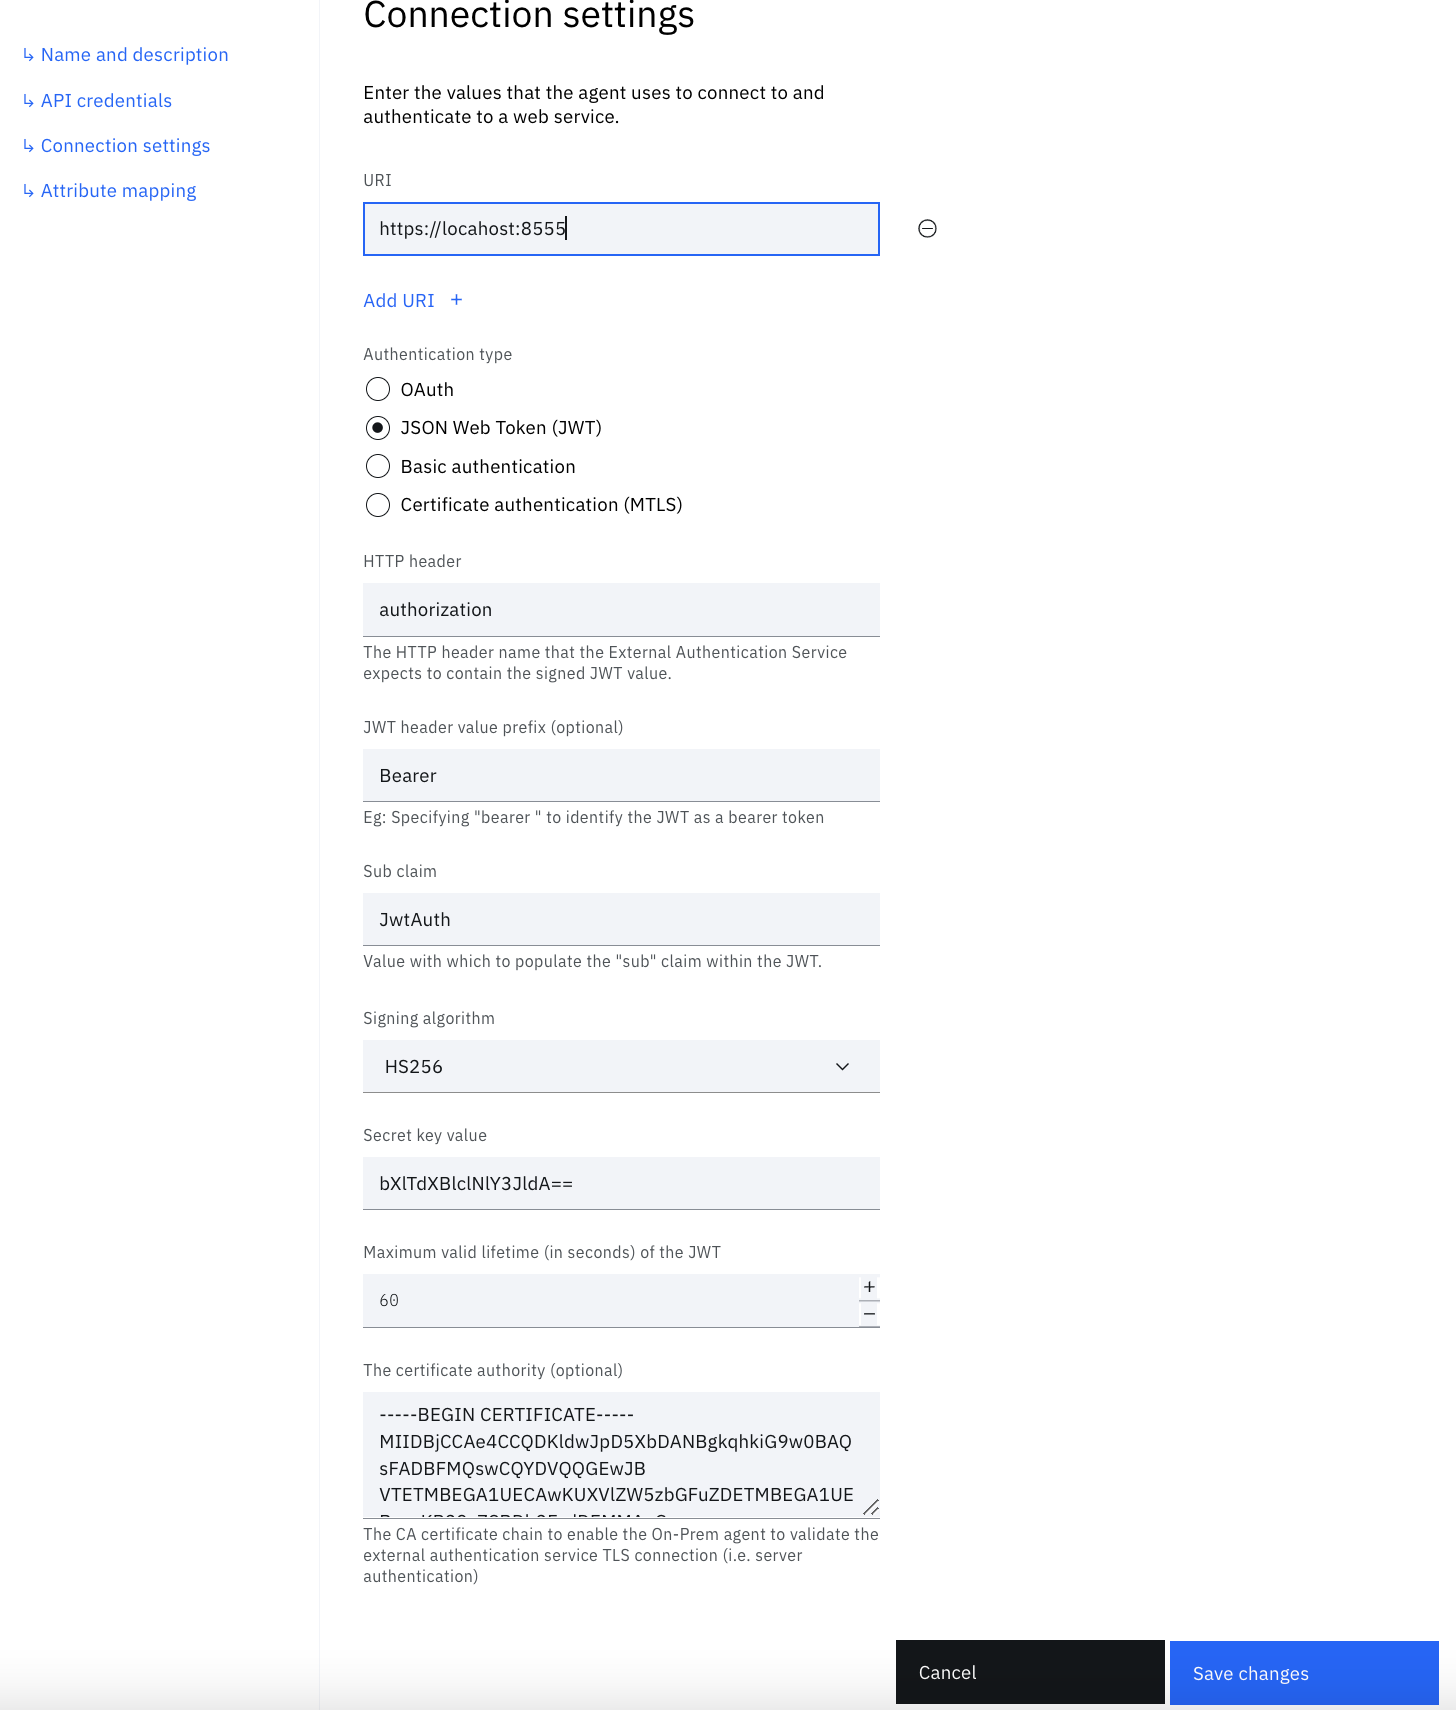
Open the Identity Agent UI and select JSON Web Token (JWT). Complete the following sections
| Setting | Sample Application Value | Explanation |
|---|---|---|
| HTTP header | authorization | The name of the header. The sample application uses authorization. |
| JWT header value prefix | Bearer | The prefix that appears before the JWT in the header. Set this to whatever you have set in the .env file. Remember to include the space after Bearer if that's the prefix you're using. |
| Sub claim | JwtAuth | The sub claim in the JWT. Must match what you have set in the .env file |
| Signing Algorithm | HS256 | Must be either HS256, HS384 or HS512 as these are the symmetric signing algorithms. |
| Secret Key Value | bXlTdXBlclNlY3JldA== | Must be the base64 encoded versions of whatever you specified in the .env file for SYMMETRIC_JWT_SECRET_KEY |
| Maximum valid lifetime | 60 | How long the JWT should be valid |
| The certificate authority | Copy and paste the value of the extauthn.caroot.crt that you created when setting up your TLS certificates | Root certificate that tells the bridge agent to trust TLS connections from the sample application. |
Enabling Asymmetric Signed JWT Authentication in the Sample Application
Uncomment the asymmetricJwt middleware
// Authentication (uncomment desired)
// app.use(basicAuthen);                       // Basic Auth
// app.use(mtls);                              // MTLS
// app.use(symmetricJwt);                      // Symmetric signed JWT
app.use(asymmetricJwt);                     // Asymmetric signed JWT
Setting the .env variables for Asymmetric Signed JWT authentication
Open .env at the root of your project directory and set the expected secret key, subject and prefix of the signed JWT.
# Asymmetric JWT variables
ASYMMETRIC_JWT_PUBLIC_CERTIFICATE_PATH='./certs/extauthn.client.crt'
ASYMMETRIC_JWT_SUBJECT=JwtAuth
ASYMMETRIC_JWT_ALGORITHM=RS256
ASYMMETRIC_JWT_PREFIX='Bearer '
Notice now that we are specifying the path of the public certificate. That is because we will be using this public key to verify the signed JWT.
Accordingly, this means the bridge agent will need to use the corresponding private key in order to sign the JWT.
Import the private key into the windows keystore by running powershell as an administrator and typing the following command replacing C:\extauthn.client.p12 with the path of your extauthn.client.p12 file.
Import-PfxCertificate -FilePath C:\extauthn.client.p12 -CertStoreLocation Cert:\LocalMachine\My
You will should see an output like the following:
   PSParentPath: Microsoft.PowerShell.Security\Certificate::LocalMachine\My

Thumbprint                                Subject
----------                                -------
8BEB4C0A77090F2BEDA49BCC0A57B03E8242540B  CN=extauthn.client, OU=SecurityDev, O=IBM, S=QLD, C=AU
Make a note of this Subject value (CN=extauthn.client, OU=SecurityDev, O=IBM, S=QLD, C=AU) as you will need to specify this value as the Private key certificate name when setting up up your Identity Agent on IBM Verify.
IDENTITY AGENT CONFIG FOR ASYMMETRIC SIGNED JWT
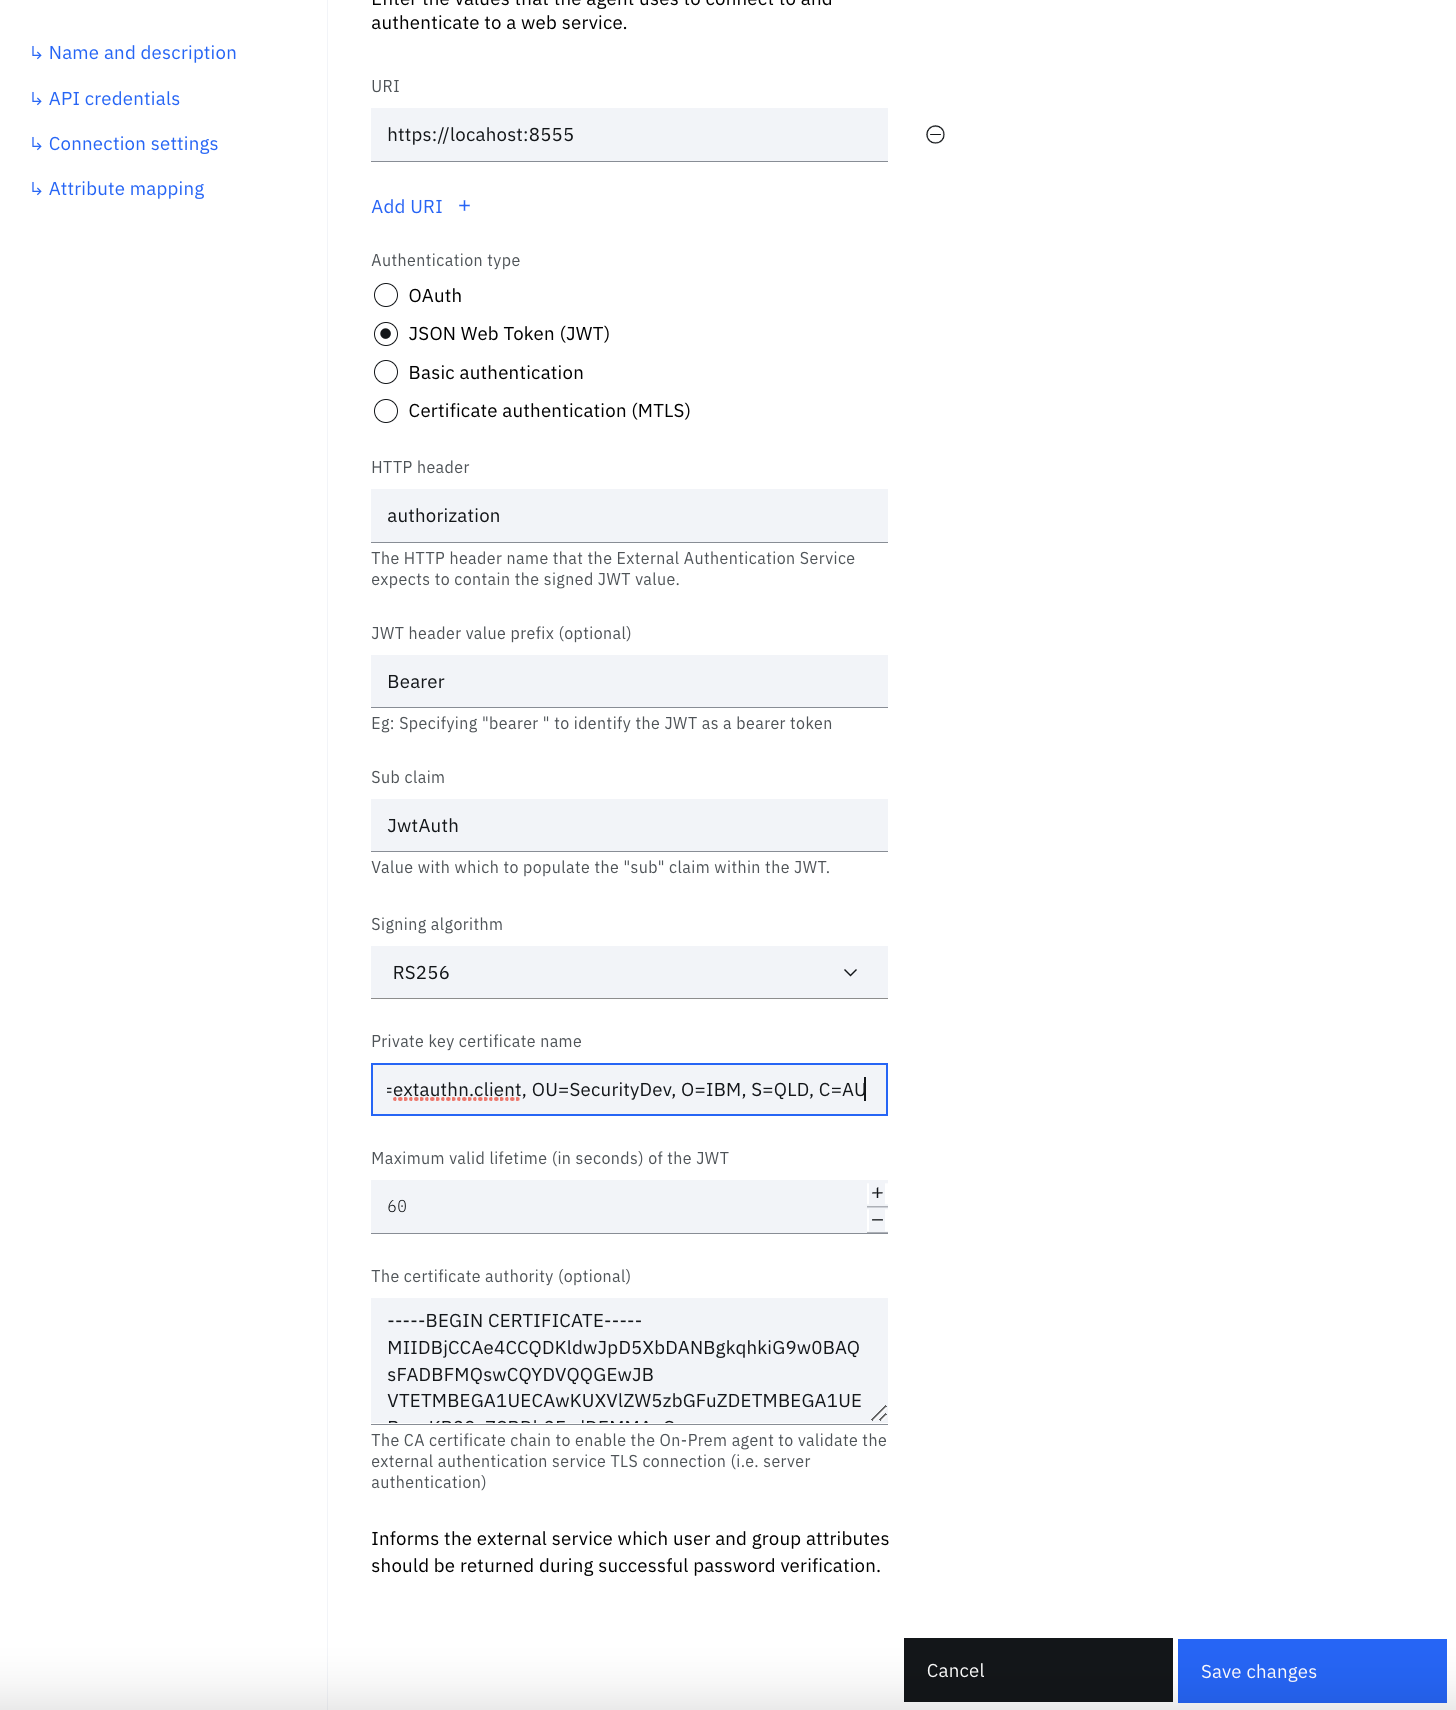
Open the Identity Agent UI and select JSON Web Token (JWT). Complete the following sections
| Setting | Sample Application Value | Explanation |
|---|---|---|
| HTTP header | authorization | The name of the header. The sample application uses authorization. |
| JWT header value prefix | Bearer | The prefix that appears before the JWT in the header. Set this to whatever you have set in the .env file. Remember to include the space after Bearer if that's the prefix you're using |
| Sub claim | JwtAuth | The sub claim in the JWT. Must match what you have set in the .env file |
| Signing Algorithm | RS256 | MUST be the same as the ASYMMETRIC_JWT_ALGORITHM set in the .env file. Other asymmetric signing algorithms include: RS256, RS384, RS512, ES256, ES384, ES512, PS256, PS384, PS512 |
| Private Key Certificate Name | CN=extauthn.client, OU=SecurityDev, O=IBM, S=QLD, C=AU | My be the subject name in the windows keystore. Retrieve it by typing certutil -store MY |
| Maximum valid lifetime | 60 | How long the JWT should be valid |
| The certificate authority | Copy and paste the value of the extauthn.caroot.crt that you created when setting up your TLS certificates | Root certificate that tells the bridge agent to trust TLS connections from the sample application |
OAuth Authentication
The OAuth flow works by having the bridge agent perform a client credentials OAuth flow against an OAuth authorization server (IBM Verify is used in this example). The flow works as follows:
- The bridge agent sends its client credentials to the authorization server for an access token.
- The access token is then sent as a Bearer token in an authorization header to your web service
- Your web service confirms the validity of this web token using the OAuth server's introspect endpoint.
Enabling OAuth Authentication in the Sample Application
Uncomment the OAuth middleware
// Authentication (uncomment desired)
// app.use(basicAuthen);                       // Basic Auth
// app.use(mtls);                              // MTLS
// app.use(symmetricJwt);                      // Symmetric signed JWT
// app.use(asymmetricJwt);                     // Asymmetric signed JWT
app.use(oauth);                             // Oauth
Create an API client in IBM Verify
To use this OAuth sample with IBM Verify you will need to create an API client.
Don't select any entitlements.
Use the client id and the client secret of this API Client in following steps.
Set the the OAuth .env variables
Open the .env file a the root of your project directory and set the following variables:
# OAuth Variables
OAUTH_CLIENT_ID=12345678-1234-1234-1234-123456789012
OAUTH_CLIENT_SECRET=abcd1234
OAUTH_INTROSPECT_URL=https://tenant.verify.ibm.com/v1.0/endpoint/default/introspect
| Setting | Value |
|---|---|
OAUTH_CLIENT_ID | The client_id of the API client you created |
OAUTH_CLIENT_SECRET | The client_secret of the API client you created |
OAUTH_INTROSPECT_URL | The url of the IBM Verify tenant you created your API client on followed by the introspection endpoint /v1.0/endpoint/default/introspect |
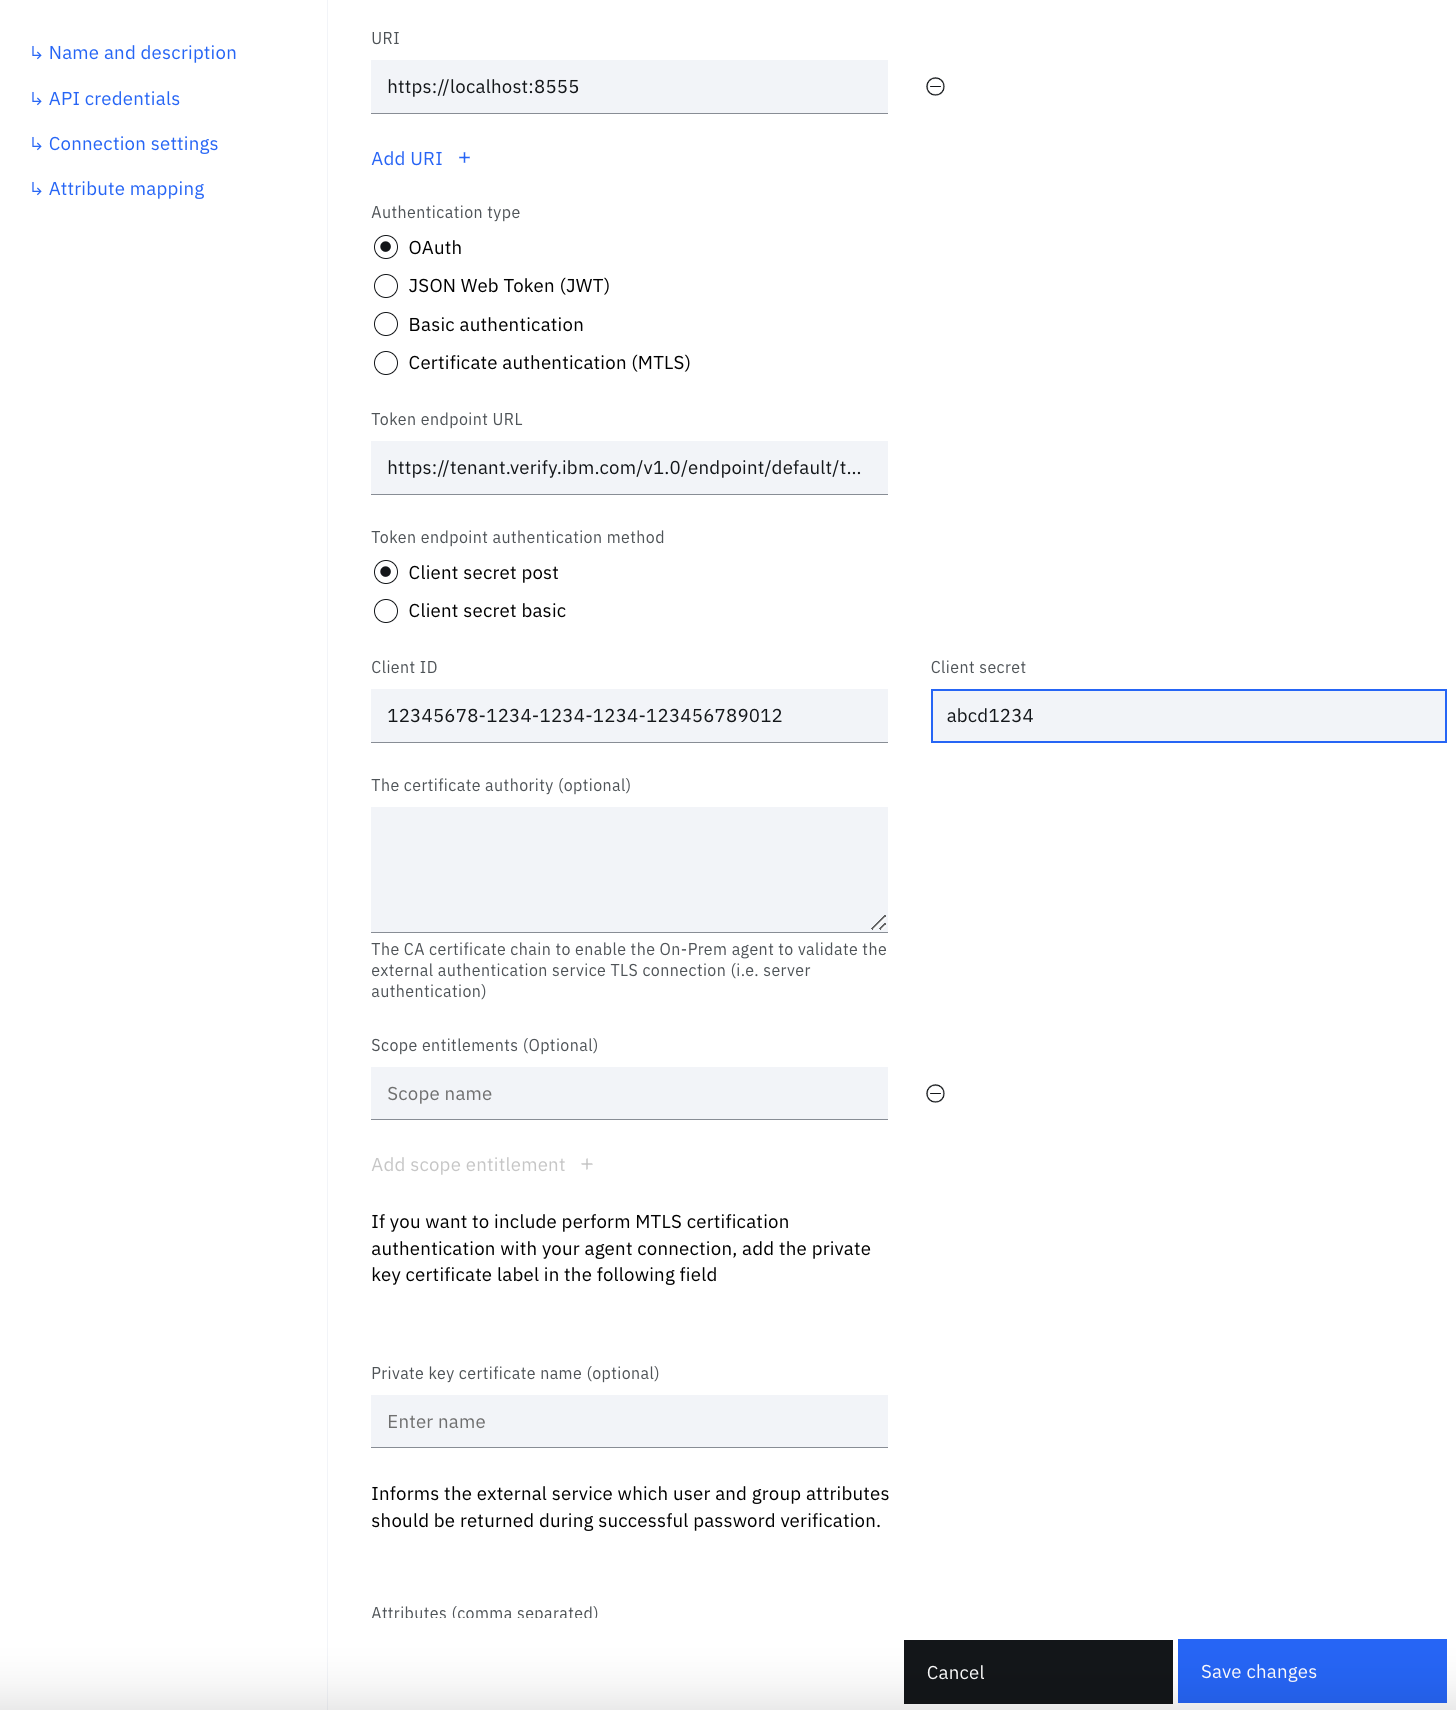
Configuring OAuth in Identity Agent Web UI
The Identity Agent settings are used by the bridge agent to talk to your web service. Enter the following settings
| Setting | Value |
|---|---|
| Token endpoint url | The url of your IBM Verify tenant followed by /v1.0/endpoint/default/token |
| Client ID | The client_id of the API client you created |
| Client Secret | The client_secret of the API client you created |
| The certificate authority | The CA certs whose private keys have been used to sign the TLS certificates of both your tenant (when talking talking to the introspect endpoint) and your web service. Leave this blank, we'll import the CA cert on the windows machine. |
| Private key certificate name | Leave blank for now. If you want to use MTLS alongside OAuth, see the MTLS section for setting this field. |
Installing the root certificate on the windows machine
In order for the bridge agent to know to trust the TLS certificate presented by your web service you'll need to import the extauthn.caroot.crt certificate into the root keystore on windows.
To do, run powershell as administrator and type the following command, replacing C:\extauthn.caroot.crt with the path your extauthn.caroot.crt file
Import-Certificate -FilePath C:\extauthn.caroot.crt -CertStoreLocation Cert:\LocalMachine\root
Updated 7 months ago
